Spicy Roasted Red Pepper Pasta Simple Flavor Boost

If you’re looking to add a kick to your dinner, this Spicy Roasted Red Pepper Pasta recipe is what you need. With simple ingredients like roasted red bell peppers and creamy sauce, you can whip up a tasty meal in no time. Whether you prefer penne or spaghetti, this easy dish will satisfy your cravings for bold flavors. Let’s dive into the details and elevate your pasta game!
Ingredients
Main Ingredients for Spicy Roasted Red Pepper Pasta
– 12 oz pasta (penne or spaghetti)
– 2 large red bell peppers, roasted and peeled
– 3 tablespoons olive oil
– 3 cloves garlic, minced
– 1 cup vegetable broth
– 1/2 cup heavy cream (or coconut cream for a dairy-free option)
I love using penne or spaghetti for this dish. Both types of pasta soak up the sauce well. Roasted red bell peppers give a sweet and smoky flavor. The olive oil adds a nice richness, while garlic brings a sharp zest. Heavy cream creates a creamy texture that makes the sauce feel luxurious.
Optional Ingredients
– 1/4 cup grated Parmesan cheese (optional)
– Fresh basil leaves, for garnish
Adding Parmesan cheese boosts the umami flavor. Fresh basil leaves provide a pop of color and freshness. They make the dish look pretty, too!
Seasoning and Substitutes
– 1 teaspoon red pepper flakes (adjust to taste)
– Salt and black pepper to taste
I like to add red pepper flakes for a kick. You can adjust the amount based on your spice level. If you want a lighter option, use vegetable broth as the base. If you’re dairy-free, coconut cream works well instead of heavy cream.
This combination of ingredients creates a rich and flavorful dish.Enjoy crafting your spicy roasted red pepper pasta!
Step-by-Step Instructions
Preparing the Roasted Red Peppers
To roast red peppers, you have two good choices: the broiler or the grill. If you use the broiler, set it to high and place the peppers on a baking sheet. Turn them often until the skin is blackened. For the grill, place the peppers directly on the grates. Keep turning until they get charred all over.
After roasting, put the peppers in a bowl and cover it with plastic wrap. This steaming process helps loosen the skin. Let them steam for about 10 minutes. Once cooled, peel off the skin, remove the seeds, and chop the peppers into small pieces.
Cooking the Pasta
Fill a large pot with water and add a generous amount of salt. Bring the water to a full boil. Add your choice of pasta, either penne or spaghetti. Cook according to the package instructions until the pasta is al dente. This usually takes about 8 to 10 minutes. Once cooked, drain the pasta but save a cup of the pasta water for later.
Making the Sauce
In a high-speed blender, combine the roasted red peppers, olive oil, minced garlic, red pepper flakes, vegetable broth, and heavy cream. Blend these ingredients until smooth and creamy. After blending, taste the sauce. Add salt and pepper to adjust the flavor to your liking.
Combining Pasta and Sauce
Pour the blended sauce into a large skillet over medium heat. Let it simmer for about 5 minutes, stirring occasionally. If the sauce is too thick, add a bit of the reserved pasta water until it reaches your desired consistency. Next, add the cooked pasta to the skillet. Toss gently to ensure that every piece of pasta gets a good coating of sauce. If you want, sprinkle in grated Parmesan cheese at this stage and mix well.
Serving Suggestions
Serve the pasta hot and garnish with fresh basil leaves. This adds a nice aroma and color to the dish. For plating, you can use a large bowl or individual plates. Twirl the pasta into a nest shape for a nice presentation. Enjoy your flavorful dish!
Tips & Tricks
Perfecting the Pasta Dish
To make the best Spicy Roasted Red Pepper Pasta, cook the pasta until it’s al dente. This means it should be firm but not hard. Usually, this takes about 8-10 minutes, but check the package for exact times. For spice lovers, add more red pepper flakes. If you want it milder, use less or skip them.
Time-Saving Tips
Prep your ingredients ahead of time. Chop garlic and roast red peppers in advance. You can roast peppers quickly on a grill or under a broiler. Just turn them until they are charred. This method takes about 10-15 minutes. After roasting, cover them to steam. This makes peeling easy.
Enhancing Flavor
To boost flavor, add herbs like thyme or oregano. You can also try spices like smoked paprika for a unique twist. When serving, pair the dish with a crisp white wine, like Sauvignon Blanc. This wine pairs perfectly with the creamy sauce. You can also serve it with a side salad to balance the meal.

Variations
Vegetarian and Vegan Options
You can easily make this dish vegetarian or vegan. To switch to vegan, replace the heavy cream with coconut cream. It gives a rich taste without dairy. You can also use plant-based cheese if you want. Adding more veggies boosts nutrition and flavor. Try tossing in spinach, zucchini, or mushrooms. They add color and taste to the dish.
Alternative Pasta Choices
For gluten-free options, use rice or chickpea pasta. These types cook well and taste great too. Whole grain pasta is a healthy choice. It adds more fiber and nutrients. You can find whole grain versions of penne or spaghetti. These options keep the dish wholesome and filling.
Different Flavor Profiles
To change the flavor, think about adding sun-dried tomatoes or olives. They bring a unique taste and depth to the sauce. You can also use nuts or seeds for a crunchy texture. Pine nuts or sunflower seeds work nicely. These additions make the dish exciting and different.
Storage Info
Storing Leftovers
To keep your spicy roasted red pepper pasta fresh, store it right. Let it cool down first. Then, place it in an airtight container. This helps to seal in the flavors. A glass container works best. It won’t stain and keeps the pasta safe. If you have extra sauce, store that in a separate container. This keeps the pasta from getting soggy.
Reheating Tips
When it’s time to enjoy your leftovers, reheat them carefully. The best way is to use a skillet. Add a bit of olive oil or water to the pan. Heat it over low to medium heat. Stir often to keep the pasta from sticking. If your sauce is thick, add a splash of reserved pasta water. This brings back that creamy texture.
Freezing the Dish
You can freeze this pasta for later meals. First, let it cool completely. Then, place it in a freezer-safe container. Make sure to leave some space at the top. The pasta will expand as it freezes. It’s best to use it within three months for the best taste. When ready to eat, thaw it overnight in the fridge. Reheat as mentioned above for a delicious meal.
FAQs
What pasta works best for Spicy Roasted Red Pepper Pasta?
I recommend using penne or spaghetti for this dish. Penne holds the sauce well in its tubes. Spaghetti gives you long, twirly bites that make each forkful fun. Both types cook quickly and pair nicely with the creamy sauce.
Can I make Spicy Roasted Red Pepper Pasta ahead of time?
Yes, you can! Prepare the sauce and cook the pasta in advance. Store the sauce in an airtight container in the fridge for up to three days. Keep the pasta separate to avoid sogginess. When you’re ready to eat, just reheat the sauce and toss it with the pasta.
How can I adjust the spice level?
To make it milder, use less red pepper flakes. You can also swap in sweet bell peppers for some of the red peppers. Adding more cream can tone down the heat as well. Taste as you go to get it just right for your liking.
What can I serve with this dish?
This pasta goes great with a simple green salad. A side of garlic bread also adds a nice touch. If you want a protein, grilled chicken or shrimp are excellent choices. They will enhance the meal and balance the flavors nicely.
In this blog post, we explored how to make Spicy Roasted Red Pepper Pasta. You learned about key ingredients like roasted red peppers and cream. I shared tips for cooking pasta and making a creamy sauce. We discussed variations, storage tips, and answered frequently asked questions.
Now, you have all the tools to create a tasty dish. Enjoy experimenting with flavors and making it your own. This pasta is easy, quick, and packed with flavor!

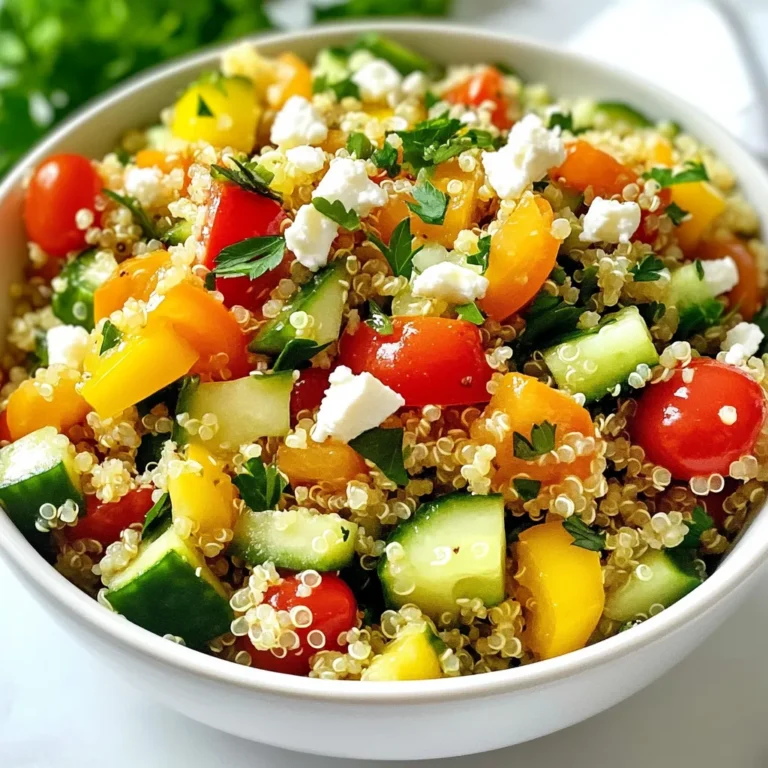
![To make a fresh Mediterranean quinoa salad, gather these key ingredients: - 1 cup quinoa, thoroughly rinsed - 2 cups vegetable broth (preferably low-sodium) - 1 bell pepper (either red or yellow), finely diced - 1 medium cucumber, diced into bite-sized pieces - 1 cup cherry tomatoes, halved - 1/4 of a medium red onion, finely chopped - 1/2 cup Kalamata olives, pitted and sliced - 1/2 cup feta cheese, crumbled - 1/4 cup fresh parsley, finely chopped - 1/4 cup extra virgin olive oil - 2 tablespoons freshly squeezed lemon juice - 1 teaspoon dried oregano - Sea salt and freshly cracked black pepper to taste These ingredients blend well together. Each one adds a unique flavor. The quinoa forms the base, while the vegetables add crunch and color. Kalamata olives give it a salty twist, and feta cheese adds creaminess. You can customize your salad with these optional add-ins: - Avocado for creaminess - Grilled chicken for protein - Chickpeas for extra fiber - Spinach or arugula for leafy greens - Sun-dried tomatoes for a tangy kick These add-ins can enhance the salad's taste and texture. Feel free to experiment with what you love! This salad is a healthy choice. It is packed with nutrients. Here’s a quick look at its benefits: - Quinoa: High in protein and fiber - Vegetables: Rich in vitamins and minerals - Olive oil: A source of healthy fats - Feta cheese: Adds calcium and flavor One serving provides a balanced mix of protein, healthy fats, and carbs. Eating this salad can support your health while satisfying your taste buds. For the full recipe, check out Mediterranean Quinoa Salad Delight! To start, rinse 1 cup of quinoa under cold water. This step removes the bitter coating. Next, combine the rinsed quinoa and 2 cups of vegetable broth in a medium saucepan. Bring this mixture to a rolling boil over medium-high heat. Once boiling, reduce the heat to a gentle simmer. Cover the saucepan and let it cook for about 15 minutes. The quinoa is ready when it absorbs all the liquid and becomes fluffy. After cooking, fluff it with a fork and transfer it to a large mixing bowl. Let it cool for a few minutes. While the quinoa cools, prepare the vegetables. Dice 1 bell pepper and 1 medium cucumber. Halve 1 cup of cherry tomatoes. Finely chop 1/4 of a medium red onion, and slice 1/2 cup of Kalamata olives. In the same large bowl with the quinoa, add all these diced vegetables along with 1/2 cup of crumbled feta cheese. Gently stir to mix everything together. For the dressing, take a separate small bowl. Whisk together 1/4 cup of extra virgin olive oil, 2 tablespoons of freshly squeezed lemon juice, and 1 teaspoon of dried oregano. Add sea salt and freshly cracked black pepper to taste. Whisk until the dressing is well combined and emulsified. Pour the dressing over the quinoa and vegetable mixture. Toss everything together until the quinoa and veggies are well coated with the dressing. Finally, fold in 1/4 cup of finely chopped fresh parsley. Be careful not to break the feta or overcrowd the grains. Cover the bowl and let the salad sit at room temperature for at least 30 minutes. This time helps the flavors blend beautifully. For the full recipe, check out the Mediterranean Quinoa Salad Delight. To cook quinoa, rinse it well in cold water. This removes bitterness. Use a ratio of 1 part quinoa to 2 parts vegetable broth. Boil the mixture, then reduce the heat to simmer. Cover and cook for about 15 minutes. When done, fluff it gently with a fork. Let it cool before mixing it with other ingredients. To boost flavors, add fresh herbs like basil or mint. You can also toss in some garlic or lemon zest for a zing. Experiment with different olives or cheese types. Each will give a unique twist. Don't forget to season with salt and pepper to taste. Serve the salad in a large bowl for sharing. For individual servings, use small plates. Garnish with lemon wedges and extra parsley for color. A drizzle of olive oil on top adds shine and flavor. You can also pair it with grilled chicken or fish for a complete meal. Find the full recipe in the article to enjoy a fresh and tasty meal. {{image_4}} You can easily boost the protein in your Mediterranean quinoa salad. Adding cooked chicken gives a hearty touch. Simply grill or roast chicken breasts, then slice them up and mix them in. If you prefer a meatless option, chickpeas work great. Use canned chickpeas for quick prep. Rinse and drain them before adding. While the olive oil and lemon dressing is tasty, you can try other dressings too. A balsamic vinaigrette adds a sweet tang. For a creamy twist, mix Greek yogurt with lemon juice and herbs. This will make the salad richer and even more satisfying. Swap in seasonal veggies for fresh flavor. In the spring, add sweet peas or asparagus. In summer, try zucchini or fresh corn. Autumn brings squash or roasted root vegetables. Winter is great for kale or Brussels sprouts. These swaps keep your salad exciting and varied all year round. Feel free to check the Full Recipe for more details! After enjoying your Mediterranean quinoa salad, store leftovers in the fridge. Place the salad in a bowl and cover it tightly with plastic wrap or a lid. This helps keep the salad fresh and tasty. If you want to save some for later, portion it out into meal prep containers. When storing your salad, use airtight containers. Glass containers work great because they don't stain or retain odors. If you prefer plastic, choose BPA-free containers. Ensure they are deep enough to hold the salad without squishing it. If you have a dressing, keep it separate until you are ready to eat to avoid sogginess. Your Mediterranean quinoa salad will last in the fridge for about 3 to 5 days. If you notice any change in smell or color, it’s best to toss it out. Reheating is not recommended for salads with fresh veggies. Instead, enjoy the salad cold or at room temperature. If you want to warm it up, heat the quinoa-only portion in a microwave for about 30 seconds, but avoid reheating the veggies and feta. For the full recipe, check [Full Recipe]. Quinoa is a tiny seed rich in protein, fiber, and vitamins. It is gluten-free and very nutritious. It helps in building muscles and keeps you full longer. Quinoa contains all nine essential amino acids, making it a complete protein. This is great for vegans and vegetarians. It also has antioxidants that help fight inflammation. Eating quinoa may support heart health and improve digestion. Yes, you can make this salad ahead of time. It tastes even better after sitting for a few hours. Just keep it in the fridge for up to three days. The flavors meld together nicely. If you add the dressing later, it stays fresh longer. Just remember to mix it before serving to spread the flavors. To make this salad vegan, skip the feta cheese. You can use avocado instead for creaminess. You can also add extra olives or nuts for texture. The dressing is already vegan with olive oil and lemon juice. This way, you keep it tasty without any animal products. This salad pairs well with many dishes. You can serve it with grilled chicken or fish for protein. It also goes nicely with roasted vegetables or hummus. For a lighter meal, enjoy it with pita bread. This salad is great as a side or a main dish. The Mediterranean quinoa salad is a tasty and healthy dish. We covered key ingredients, from quinoa and fresh veggies to possible add-ins. I shared easy steps for preparing the salad and tips for cooking quinoa just right. You learned about variations and how to store leftovers properly. Remember, this salad is very flexible; you can change the protein and dressing as you like. Enjoy this dish for its flavor and nutrition. It’s simple, refreshing, and great for any meal!](https://goldendishy.com/wp-content/uploads/2025/06/0bb42d2e-6f0a-4b63-945d-06b8684c6b2f-768x768.webp)
![- 2 lbs baby potatoes, halved - 1/4 cup extra virgin olive oil - 1/2 cup vegetable or chicken broth (low sodium recommended) - Juice of 2 large fresh lemons - Zest of 1 lemon - 4 cloves garlic, finely minced - 1 tablespoon dried oregano - Salt and freshly ground black pepper to taste - Fresh parsley, finely chopped (for garnish) To make Easy Greek Lemon Potatoes, you need fresh ingredients. Start with baby potatoes. They are the star of this dish. Their small size makes them cook evenly and taste great. Extra virgin olive oil adds richness and depth. The broth keeps the potatoes moist and adds flavor. Lemon juice and zest give a bright, tangy taste. Fresh garlic brings a bold kick. Dried oregano adds a lovely herb note. Finally, salt and pepper balance all the flavors. Garnish with parsley for a pop of color. This adds freshness and makes the dish look inviting. For the full recipe, check out [Full Recipe]. Enjoy the magic of these simple, yet flavorful Greek lemon potatoes! 1. Preheat the oven to 400°F (200°C). This step helps the potatoes cook evenly and get a nice crust. 2. Mix ingredients in a large bowl. Combine the halved baby potatoes, olive oil, broth, lemon juice, lemon zest, garlic, oregano, salt, and pepper. Stir until all potatoes are coated. 3. Transfer potatoes to baking dish. Spread the potatoes evenly in a single layer. Pour any leftover liquid from the bowl over them for extra flavor. 1. Cover with aluminum foil and bake for 30 minutes. This traps steam, helping the potatoes cook through. 2. Uncover and stir, bake uncovered for 25-30 minutes. This allows the potatoes to brown and become tender. Check for doneness by piercing with a fork. 1. Cool and garnish with parsley before serving. Let the potatoes sit for a few minutes, then sprinkle fresh parsley on top. 2. Presentation tips for serving. Use a rustic wooden bowl or a white platter. Add lemon wedges for a bright touch. Enjoy your Easy Greek Lemon Potatoes! Check the Full Recipe for more details. Using fresh lemon and quality olive oil is key. The lemon gives a bright taste, while good olive oil adds depth. I always choose extra virgin for its rich flavor. When seasoning, I recommend marinating the potatoes in the lemon juice and olive oil mix. This enhances the taste. Let them sit for at least 30 minutes if you can. The longer, the better the flavor. To ensure even cooking and browning, cut the potatoes into similar sizes. This helps them cook at the same rate. Arrange them in a single layer in the baking dish. Avoid crowding them, as this traps steam and keeps them from getting crispy. I often use broth instead of water. Broth adds a savory touch that elevates the dish. These Greek lemon potatoes pair wonderfully with grilled meats, like chicken or lamb. They also complement fresh salads, such as Greek salad or tabbouleh. For a perfect dining experience, serve them with a crisp white wine, like Sauvignon Blanc. The wine matches the lemony flavors well. You can find the full recipe for these tasty potatoes in my collection. {{image_4}} You can change herbs for fun flavors. Try fresh thyme or rosemary instead of oregano. If you want a kick, add some crushed red pepper flakes. For vegan or gluten-free options, swap chicken broth for vegetable broth. This keeps the dish tasty without animal products. Always read labels for gluten-free broth to be safe. Want to make these in an air fryer? Simply set it to 400°F (200°C). Cook for about 20-25 minutes. Shake the basket halfway to get even browning. You can also use a slow cooker. Add all ingredients and cook on low for 6-8 hours. This method makes the potatoes very tender and flavorful. To boost flavor, add crumbled feta cheese or olives on top. This brings a lovely salty touch. You can also mix in seasonal veggies like cherry tomatoes or bell peppers. They roast well and add color. These little tweaks make your dish burst with extra zest and excitement! To keep your Greek lemon potatoes fresh, use an airtight container. Place the cooled potatoes inside. You can store them in the fridge for up to three days. This helps keep the flavor and texture intact. If you see any signs of spoilage, it’s best to toss them out. When reheating, the oven is your friend. Preheat it to 350°F (175°C). Spread the potatoes on a baking sheet. Bake for about 15-20 minutes. This method keeps them crispy. If you use a microwave, place them in a microwave-safe bowl. Heat in 30-second intervals. Stir between intervals. This helps warm them evenly. To freeze your cooked potatoes, let them cool completely. Then, spread them on a baking sheet in a single layer. Freeze for about an hour. This prevents them from sticking together. Once frozen, transfer them to a freezer bag. Be sure to remove as much air as possible. When you want to eat them, just thaw in the fridge overnight. Reheat them in the oven at 350°F (175°C). Bake for 20-25 minutes until heated through. This keeps their flavor and texture nice. Enjoy your tasty Greek lemon potatoes anytime! For the full recipe, check out the [Full Recipe]. You bake Greek lemon potatoes for about 55 to 60 minutes. Start by covering them with foil for the first 30 minutes. This helps them cook well. After that, remove the foil and stir the potatoes. Bake them uncovered for another 25 to 30 minutes. Check if they are soft by poking them with a fork. If the fork goes in easily, they are done! You can use regular potatoes, but cooking times will change. Regular potatoes take longer to cook. Cut them into smaller pieces to match the cooking time of baby potatoes. This helps them cook evenly. The texture may also be different. Baby potatoes have a creamy texture, while regular potatoes can be a bit fluffier. Greek lemon potatoes pair well with many dishes. You can serve them with grilled chicken or lamb for a tasty meal. They also go great with a fresh Greek salad. The bright lemon flavor complements the rich dishes well. For a fun twist, add some tzatziki on the side. It adds a cool, creamy touch to the meal. For the full recipe, check out the Full Recipe section. In this blog post, we covered how to make Greek Lemon Potatoes. We explored the key ingredients, preparation steps, and the baking process. I shared tips for flavor and cooking techniques, plus variations to customize your dish. Proper storage and reheating tips help keep leftovers fresh. Remember, using fresh ingredients greatly enhances the taste. Enjoy these potatoes with your favorite Mediterranean meals. They are tasty and easy to make. Your cooking will impress friends and family alike. Dig in and savor every bite!](https://goldendishy.com/wp-content/uploads/2025/06/8502e506-5824-4799-8038-5c3f7491fce4-768x768.webp)