
Crispy Air Fryer Potato Wedges Easy and Tasty Snack
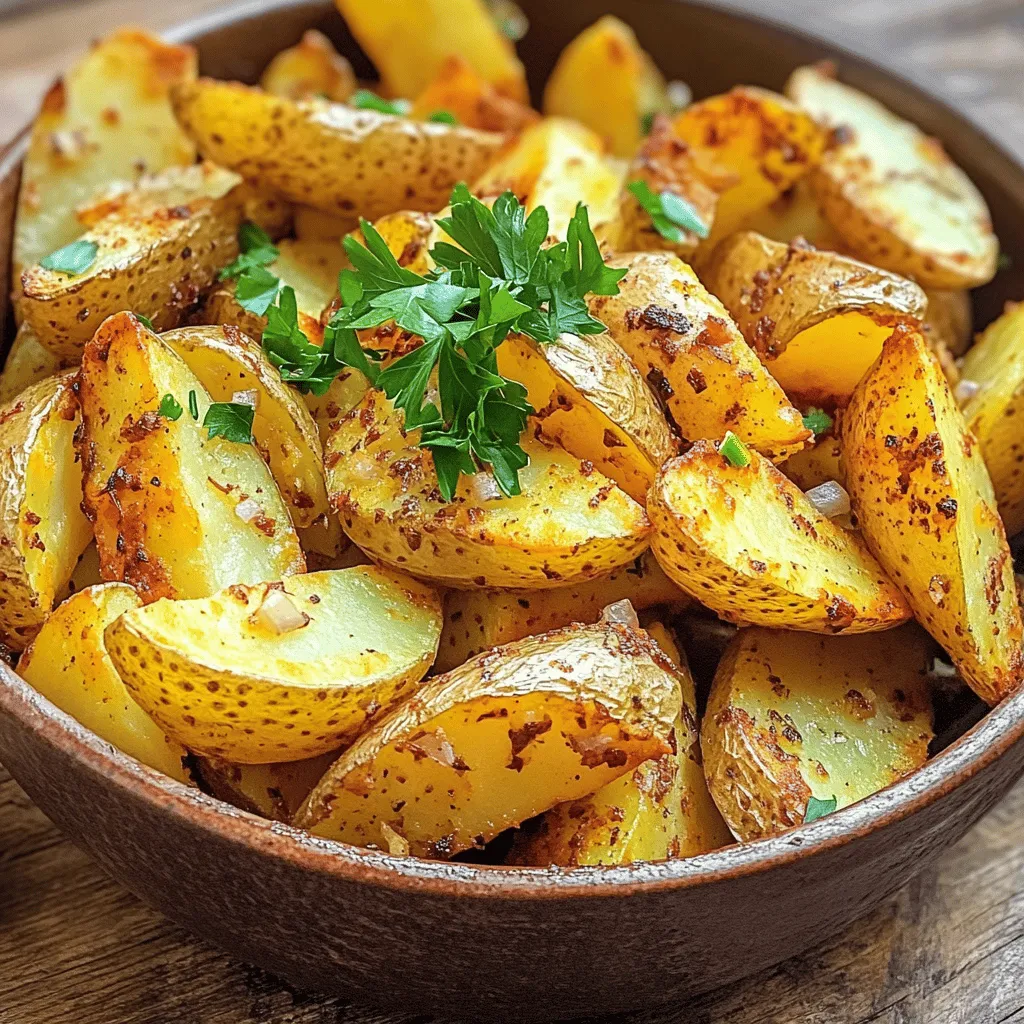
Want crispy, golden potato wedges in a snap? I’ve got you covered! My easy recipe for air fryer potato wedges not only delivers crunch but packs in flavor. With just a handful of simple ingredients and a straightforward process, you’ll enjoy a snack that’s light yet satisfying. Let’s dive in and learn how to make these tasty wedges your new go-to treat!
Ingredients
To make crispy air fryer potato wedges, gather these simple ingredients:
– 4 large russet potatoes
– 3 tablespoons olive oil
– 1 teaspoon garlic powder
– 1 teaspoon onion powder
– 1 teaspoon smoked paprika
– 1 teaspoon dried oregano
– Salt and black pepper to taste
– Fresh parsley, chopped (for garnish, optional)
These ingredients work together to create the perfect flavor and crunch. The russet potatoes give a nice texture. The olive oil helps them crisp up. The spices add a punch of flavor that makes these wedges stand out.
When choosing your potatoes, look for ones that are firm and free of blemishes. This ensures that your wedges will be tasty and hold their shape. You can adjust the spices to suit your taste. If you love garlic, add more garlic powder. If you want heat, toss in some cayenne pepper.
Remember, these ingredients are just a base. Feel free to get creative! You can mix in other herbs or spices you enjoy. The goal is to make a snack that you and your loved ones will crave.
Step-by-Step Instructions
Preparation Steps
– Scrub and cut potatoes into wedges
First, wash the russet potatoes under running water. This removes dirt and grit. After cleaning, slice each potato into wedges. Aim for about eight wedges per potato. Keeping the skin adds flavor and texture.
– Mix seasoning ingredients in a bowl
In a large bowl, pour the olive oil. Add garlic powder, onion powder, smoked paprika, dried oregano, salt, and black pepper. Whisk these ingredients together. This mix creates a tasty seasoning blend.
– Coat potato wedges with seasoning
Gently add the potato wedges to the seasoning bowl. Toss the wedges using your hands or a spatula. Make sure each wedge is fully coated with the seasoning mix. This step is key for flavor.
Cooking Instructions
– Preheat air fryer to 400°F (200°C)
Set your air fryer to 400°F (200°C) and let it preheat for about five minutes. This ensures the air fryer is hot for even cooking.
– Arrange wedges in air fryer basket
Carefully place the seasoned potato wedges in the air fryer basket. Arrange them in a single layer for best results. If your air fryer is small, cook in batches to avoid overcrowding.
– Air fry for 15-20 minutes, shaking halfway
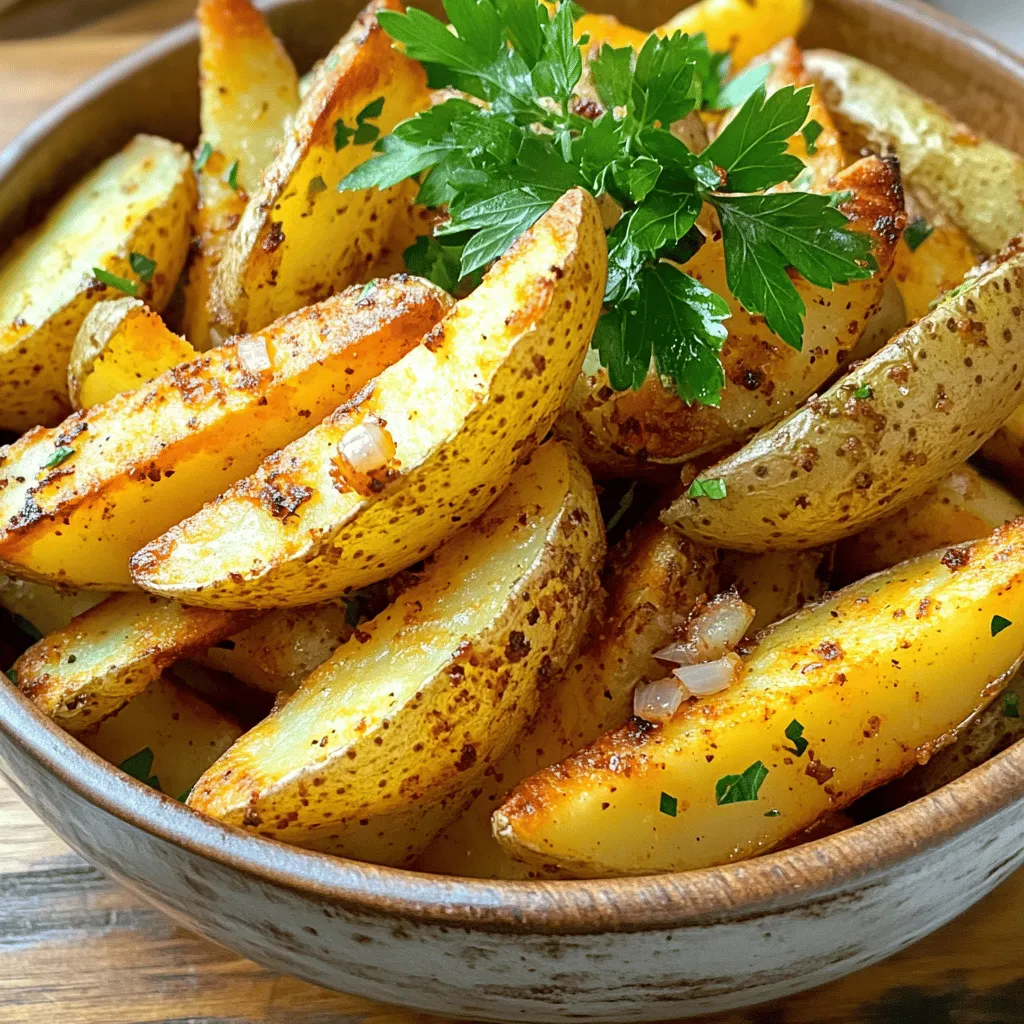
Cook the wedges for 15 to 20 minutes. Shake the basket halfway through cooking. This helps the wedges crisp up evenly. When they turn golden brown, they are ready to enjoy.
Tips & Tricks
Achieving Crispy Texture
To get those crispy potato wedges, you need to coat them well. Use olive oil and seasonings. This mix helps the wedges brown nicely. I like to use 3 tablespoons of olive oil for 4 large russet potatoes. This amount works great!
Make sure your air fryer is set to 400°F (200°C). This high heat is key for crispiness! Preheat your air fryer for five minutes before cooking. This step helps the wedges cook evenly.
When you place the wedges in the air fryer, arrange them in a single layer. This way, hot air can flow freely around them. If your air fryer is small, cook in batches. Don’t overcrowd the basket; it will lead to soggy wedges.
Adjusting Seasonings
Want to change up the flavors? Try adding spices! You can use chili powder for heat or Parmesan cheese for a cheesy twist. Feel free to mix and match spices based on your taste.
You can also customize your flavors. If you love herbs, add fresh rosemary or thyme to the mix. Taste the seasoning blend before coating the wedges. Adjust it until you find the perfect balance! This way, your snack will be just how you like it.Enjoy your crispy air fryer potato wedges!
Variations
Flavor Variations
You can easily change the taste of your crispy air fryer potato wedges. Here are some fun ideas:
– Cheesy potato wedges: Add grated cheese on top of the wedges before air frying. Cheddar or parmesan works great. It melts and gives a rich flavor.
– Spicy buffalo-style wedges: Toss the cooked wedges in buffalo sauce after frying. This adds heat and tang. Serve with ranch dressing for a cool contrast.
– Herb-infused options: Mix fresh herbs like rosemary or thyme with the seasoning. This gives a lovely earthy taste. You can also use dried herbs if fresh ones are not available.
Alternative Cooking Methods
While air frying gives great results, you can try other methods too.
– Oven-baked potato wedges: Preheat your oven to 425°F (220°C). Arrange the seasoned wedges on a baking sheet. Bake for 25-30 minutes, flipping halfway. They will be crispy and delicious.
– Deep-fried potato wedges: Heat oil in a deep pot to 350°F (175°C). Fry the wedges in batches for about 5-7 minutes. This method gives a classic crunchy texture. Just be mindful of the extra oil used.
Storage Info
Storing Cooked Potato Wedges
To keep your crispy air fryer potato wedges fresh, let them cool down. This helps avoid moisture buildup. Once cooled, place them in a clean, dry container. I recommend using an airtight container. It keeps the wedges from drying out. You can also use a zip-top bag, squeezing out as much air as possible before sealing.
Reheating Instructions
To reheat your potato wedges, use an air fryer or oven. Preheat your air fryer to 350°F (175°C). Then, place the wedges in a single layer. Heat for about 5 to 7 minutes. This ensures they stay crispy. If using an oven, preheat to 375°F (190°C) and bake for 10 to 15 minutes.
To avoid sogginess, do not cover the wedges while reheating. If you have leftover wedges, you can also toss them in the air fryer for a quick crisp.
FAQs
How do I make potato wedges crispy in the air fryer?
To make potato wedges crispy, follow these key steps:
– Use oil: Coat the wedges in olive oil. This helps them crisp up.
– Season well: Use salt and spices for flavor. The seasoning adds to the crunch.
– Preheat the air fryer: Heating it to 400°F (200°C) is important. It helps to create a crispy outer layer.
– Do not overcrowd: Place the wedges in a single layer. This allows hot air to reach all sides and makes them crispier.
– Shake halfway: Give the basket a shake at about 10 minutes. This helps them cook evenly.
By following these steps, you will get perfectly crispy potato wedges every time.
Can I use sweet potatoes instead of russet potatoes?
Yes, you can use sweet potatoes! Here are some tips for cooking them:
– Cooking time: Sweet potatoes may need a little less time. Aim for 12-18 minutes.
– Cut size: Cut them into similar sizes as russet wedges. This helps them cook evenly.
– Flavor: Sweet potatoes have a sweeter taste. You might want to adjust spices to match their flavor.
Sweet potato wedges are a tasty alternative to russet potatoes.
What dipping sauces pair well with potato wedges?
Dipping sauces can elevate your potato wedges. Here are some great options:
– Ketchup: A classic choice that many love.
– Ranch dressing: Creamy and flavorful, a favorite for dipping.
– Honey mustard: Adds a sweet and tangy kick.
– Spicy mayo: For those who like a bit of heat, this is a perfect match.
– Barbecue sauce: Smoky and sweet, it pairs well with the crispy texture.
Try these sauces to make your crispy air fryer potato wedges even more enjoyable!
To sum up, we explored how to make delicious potato wedges. You learned about the ingredients needed, from russet potatoes to tasty spices. The step-by-step guide showed you how to prepare and cook them in an air fryer. We also shared tips for achieving that perfect crispiness and offered flavor variations. Finally, we covered storage and reheating methods. With these easy steps, you can enjoy tasty wedges any time. Get creative and make them your own!

![- Ripe mango, diced - Ripe avocados, diced - Small red onion, finely chopped - Medium red bell pepper, finely diced - Jalapeño peppers, deseeded and minced Fresh produce is key for a bright flavor. I love the sweet, juicy mango and creamy avocado. Choose ripe mangoes for the best taste. They should feel soft, but not mushy. Avocados should also yield slightly when pressed. This gives the salsa a smooth texture. - Fresh cilantro leaves, chopped - Juice of fresh limes - Salt and freshly cracked black pepper - Optional: Honey for sweetness Cilantro adds a fresh kick. Lime juice brightens the mix. Salt and pepper bring out all the flavors. Honey is a fun twist. It balances the heat from the jalapeños. Adjust the salt and pepper to match your taste. - Suggested amounts for a balanced flavor - Importance of using ripe ingredients Use equal amounts of mango and avocado for balance. A small onion and bell pepper add crunch. Adjust jalapeños based on your spice level. Ripe ingredients really make a difference. They enhance the taste and texture of the salsa. Remember, fresh is always best! For the full recipe, check out the complete guide. Gather your ingredients first. You will need: - 1 ripe mango, diced into small cubes - 2 ripe avocados, diced into small cubes - 1 small red onion, finely chopped - 1 medium red bell pepper, finely diced - 1-2 jalapeño peppers, deseeded and minced - 1/4 cup fresh cilantro leaves, chopped - Juice of 2 limes - Salt and freshly cracked black pepper, to taste - Optional: 1 teaspoon honey You’ll want a sharp knife for dicing and a cutting board. A large mixing bowl is also essential for combining everything. Start by placing the diced mango and avocado into the bowl. Next, add the chopped red onion and diced red bell pepper. Use a large spoon to mix gently. Be careful not to mash the avocado. When you add the minced jalapeño, adjust the amount for your spice level. Add the cilantro leaves, then squeeze fresh lime juice over the mix. Season with salt and pepper, and if you like, stir in honey for a touch of sweetness. Gently toss the ingredients together until well combined. This keeps the avocado pieces intact and makes for a prettier salsa. Letting the salsa sit is key. This helps the flavors blend together nicely. I recommend letting it sit for at least 10 minutes at room temperature. During this time, the lime juice and salt work their magic, enhancing the overall taste. Enjoy this fresh delight with your favorite chips or as a topping on grilled dishes. For the full recipe, check out the details above. How do you choose ripe mangoes and avocados? Look for soft spots. A ripe mango gives slightly when pressed. The skin should be a mix of green and yellow. For avocados, check the skin color. It should be dark green or black. Gently squeeze; it should feel soft but not mushy. Fresh herbs and vegetables make your salsa shine. Look for bright colors and firm textures. Cilantro should smell fresh and green. Bell peppers should be smooth and shiny. Avoid any with brown spots or wrinkles. How can you keep avocados intact? Use a sharp knife for cutting. Dice them gently. Avoid stirring too hard when mixing. Use a large spoon to gently fold the salsa. For tossing the salsa, you want to be careful. Start by mixing the firmer ingredients first. Then, add the avocados and mango last. This way, you avoid mashing them. How can you adjust spice levels with jalapeños? Start with one jalapeño. Taste before adding more. If you want it spicier, add more minced peppers. Remember, you can always add spice, but you can't take it away! To balance sweetness, you can add honey or other sweeteners. A teaspoon of honey works wonders. It brings out the fruit flavors without being too sweet. You can also try agave syrup or maple syrup for a twist. For the full recipe, check out the details above. Enjoy your Mango Avocado Salsa! {{image_4}} You can make mango avocado salsa even more exciting. Adding fruits like pineapple or peach gives it a sweet twist. The juicy sweetness of pineapple pairs well with mango. Try diced peaches for a softer sweetness. These fruits bring unique flavors that brighten up the dish. Herbs can also change the taste. Instead of cilantro, try mint or parsley. Mint adds a fresh and cool taste. Parsley gives a mild flavor that still pops. Experimenting with herbs can transform your salsa. Making this salsa vegan or gluten-free is easy. The recipe is already plant-based, so you’re set. You can also adjust the ingredients based on what you have. If you don't have lime, use lemon juice instead. Missing jalapeños? Just leave them out or use a milder pepper. If you want to make it creamier, try adding black beans. They add protein and texture without changing the flavor much. This way, you can enjoy a nutritious dish that fits your needs. Mango avocado salsa pairs great with tacos or grilled dishes. Spoon it over fish or chicken for a fresh burst of flavor. You can also serve it with crispy tortilla chips for dipping. Get creative! Use the salsa in salads for an extra kick. It can work as a topping for baked potatoes too. The fresh flavors make any meal feel special. For the full recipe, check out the [Full Recipe]. To keep your Mango Avocado Salsa fresh, use an airtight container. Glass or plastic containers work well. Make sure to fill the container to the top. This minimizes air and keeps it fresher longer. To prevent browning of the avocado, squeeze extra lime juice over the salsa. The acidity helps slow down oxidation. Mango Avocado Salsa lasts about 2-3 days in the fridge. Always check for signs of spoilage. If you see browning, it's still okay. But if it smells sour or looks mushy, it's time to toss it. Fresh salsa is best enjoyed right away! You can freeze Mango Avocado Salsa, but the texture may change. Freezing can make the avocado mushy when thawed. If you decide to freeze it, use a freezer-safe container. Leave some space at the top for expansion. When ready to use, thaw it in the fridge overnight. Stir well before serving to mix the flavors. Store your Mango Avocado Salsa in an airtight container. This keeps it fresh. Place it in the fridge right after making it. Use it within two days for the best taste. To slow browning, add lime juice on top before sealing. Yes, you can make it ahead, but it is best fresh. If you want to prepare it early, chop the mango and avocado just before serving. This keeps the salsa vibrant and tasty. If you can't find mango, try peach or pineapple for sweetness. For avocado, use mashed banana or even silken tofu for creaminess. The flavors change, but the salsa stays delicious. To change the spice level, use fewer jalapeños. You can also remove the seeds and ribs of the peppers. For more heat, add more jalapeños or a pinch of cayenne. Taste as you go to get it just right. Yes, it is great for meal prep! You can add it to salads, tacos, or grilled meats. Just remember to store it properly. Enjoying this salsa adds flavor and fun to your meals! For the full recipe, check out the previous section. Mango Avocado Salsa is a fresh and vibrant dish. We discussed the best ingredients, like ripe mangoes and avocados, and how to combine them. I shared tips for mixing, storing, and serving, plus fun variations to try. In the end, enjoy creating your salsa! Fresh flavors and fun twists await you. Dive in and savor every bite.](https://goldendishy.com/wp-content/uploads/2025/06/5eda548a-8636-40c4-8fce-ece2351eafc8-768x768.webp)
![- 2 cups shredded cooked chicken - 1 (8 oz) package of cream cheese - 1/2 cup buffalo sauce - 1/2 cup ranch dressing For buffalo chicken dip, the main ingredients create a creamy and rich base. Shredded cooked chicken gives it that hearty texture. You can use rotisserie chicken to save time. Cream cheese adds smoothness, while buffalo sauce brings the heat. Ranch dressing balances the flavors and adds a nice creaminess. - 1/2 cup crumbled blue cheese - 1 green onion for garnish - Tortilla chips or celery sticks for serving Optional ingredients enhance the dip. Crumbled blue cheese adds a bold taste that many love. It pairs well with the spicy buffalo flavor. A sprinkle of green onion on top looks great and adds freshness. For serving, I recommend crunchy tortilla chips or crisp celery sticks. They both complement the dip's rich and creamy texture. Always remember to adjust the buffalo sauce to match your spice preference. You can find the full recipe in the section above for more detailed steps! 1. First, preheat your oven to 350°F (175°C). This helps the dip cook evenly. 2. In a large bowl, combine the shredded chicken, cream cheese, buffalo sauce, and ranch dressing. Mix until smooth. 1. Now, gently fold in the shredded cheddar cheese and blue cheese, if you use it. This adds great flavor and creaminess. 2. Next, transfer the chicken mixture to a baking dish. Spread it evenly with a spatula. 3. Bake the dip for 20-25 minutes. Look for bubbling edges and a slightly golden top. 1. When your dip is done, take it out and garnish with sliced green onions. This adds freshness. 2. Serve it warm with tortilla chips or celery sticks. Enjoy this creamy and flavorful delight! For the full recipe, check out the details above. Adjusting buffalo sauce is key for your dip. If you love heat, add more buffalo sauce. If you prefer mild dishes, use less. Start small and taste as you go. You can always add more but can’t take it out. If you want a cream cheese alternative, try Greek yogurt. It gives a nice tang and cuts some fat. You can also use vegan cream cheese for a plant-based option. This keeps the dip creamy without dairy. To get the perfect crust, bake your dip until it’s bubbly and golden. This usually takes about 20-25 minutes at 350°F. You want the edges to have a light brown color. This shows the dip is ready and adds flavor. For a crispy top, use a broiler after baking. Set your oven to broil and watch closely. Just a few minutes under the broiler can give your dip a nice crunch. Be careful not to burn it! When serving at parties, focus on presentation. Put the dip in the center of a colorful platter. Surround it with chips and celery sticks. This makes it look inviting and fun. For drinks, consider pairing it with light beers or sparkling water. The lightness balances the richness of the dip. You can also serve it with a side of fresh veggies for a nice crunch. {{image_4}} You can make buffalo chicken dip healthier with just a few swaps. - Low-fat cream cheese options: Use low-fat cream cheese. It cuts fat and calories but keeps the creaminess. - Using Greek yogurt instead of ranch dressing: Greek yogurt adds a tangy taste and protein. It's a great way to lower calories while keeping it creamy. You might want to kick up the flavor in your dip. - Additions like diced jalapeños or hot peppers: These add heat and a fresh taste. Adjust to your spice level. - Incorporating other cheeses for unique flavors: Try mixing in mozzarella or gouda. Each cheese adds its own twist to the dip's flavor. Change how you serve your buffalo chicken dip for fun. - Buffalo chicken dip stuffed in peppers: Hollow out mini bell peppers and fill them with the dip. Bake until warm for a tasty bite. - Spinach and buffalo chicken dip combo: Mix in fresh spinach. It adds color and nutrition, making the dip even better. For the complete recipe, check out the [Full Recipe]. To keep buffalo chicken dip fresh, place it in an airtight container. This helps prevent it from drying out. Store the dip in the fridge for up to five days. You may notice the flavors deepen as it sits. Just be sure to cover it well to avoid any fridge odors. You can freeze buffalo chicken dip for longer storage. First, let the dip cool completely. Then, transfer it to a freezer-safe container. Press plastic wrap directly on the dip before sealing. It can last for up to three months in the freezer. When you're ready to enjoy it, thaw it in the fridge overnight. You have two great options to reheat buffalo chicken dip: the oven or microwave. If using the oven, preheat it to 350°F (175°C). Place the dip in an oven-safe dish and heat for about 20 minutes. Stir halfway through for even warming. If you choose the microwave, heat in 30-second intervals. This prevents hot spots and keeps the dip creamy. To maintain texture, avoid overheating. Let the dip sit for a minute after reheating. This helps the flavors come back together. Enjoy your dip warm with chips or celery sticks! Yes, you can make buffalo chicken dip ahead of time. To prepare in advance, follow these steps: - Mix the ingredients: Combine the shredded chicken, cream cheese, buffalo sauce, and ranch dressing. - Store it: Place the mixture in a baking dish, cover it with plastic wrap, and put it in the fridge. - Bake when ready: When you are ready to serve, take it out and bake it at 350°F for 20-25 minutes. This way, you save time and enjoy a warm dip at your gathering. If you want to swap ranch dressing, here are some great options: - Blue cheese dressing: This adds a tangy flavor that works well. - Greek yogurt: Use plain Greek yogurt for a healthier twist. - Caesar dressing: This offers a different but tasty flavor profile. Feel free to experiment with your favorite dressings! To kick up the spice level, try these ideas: - Extra buffalo sauce: Add more buffalo sauce to your mix. - Diced jalapeños: Mix in fresh or pickled jalapeños for heat. - Hot sauce: Drizzle hot sauce on top before serving for an extra kick. Adjust the spice to match your taste, and enjoy the heat! Buffalo chicken dip can be gluten-free, but check your ingredients. Here’s what to know: - Buffalo sauce: Most brands are gluten-free, but confirm by reading the label. - Ranch dressing: Look for gluten-free options if using store-bought. - Dipping options: Use gluten-free tortilla chips or fresh veggies for dipping. With careful choices, everyone can enjoy this dip! You now know how to make buffalo chicken dip from scratch. We covered key ingredients like chicken, cream cheese, and buffalo sauce. I shared step-by-step instructions to get delicious results. You learned tips for adjustments and variations to suit your taste. Remember, this dip is versatile; you can customize it for any gathering. Enjoy experimenting with flavors and serving styles. Your next snack night will be a hit!](https://goldendishy.com/wp-content/uploads/2025/07/99cdad4a-7337-4a60-a9b0-2f79e024797e-768x768.webp)
![- 1 can refrigerated pizza dough - 4 tablespoons unsalted butter, melted - 4 cloves garlic, finely minced - 1 teaspoon dried oregano - 1 teaspoon dried parsley - 1/2 teaspoon sea salt - 1/4 teaspoon freshly cracked black pepper - Optional toppings: Grated Parmesan cheese To make these breadsticks, you need simple ingredients. The key is the pizza dough. It makes the process quick and easy. The butter and garlic blend perfectly to give a rich flavor. Oregano and parsley add freshness. Sea salt and black pepper enhance all the tastes. - Baking sheet - Parchment paper - Mixing bowl - Knife or pizza cutter - Measuring spoons You will need a few basic kitchen tools. A baking sheet and parchment paper help with easy cleanup. A mixing bowl mixes your garlic butter. A knife or pizza cutter cuts the dough into strips. Measuring spoons ensure you use the right amounts. Using the right ingredients and tools will make your garlic breadsticks tasty and fun to make. You can find the full recipe in the earlier section. Start by preheating your oven to 400°F (200°C). This ensures the oven is hot when you bake. Next, take your can of refrigerated pizza dough. On a clean, lightly floured surface, roll out the dough into a rectangle. Aim for a thickness of about 1/2 inch. A uniform thickness helps the breadsticks bake evenly. Now it’s time to cut the dough into strips. Use a sharp knife or pizza cutter for best results. Cut the dough into strips that are around 1-inch wide. This size is perfect for dipping. Make sure your cuts are even, as this will give you uniform breadsticks. In a small bowl, mix the melted butter with minced garlic, dried oregano, dried parsley, sea salt, and black pepper. Stir well until all the ingredients blend together. This garlic butter mixture adds tons of flavor. Make sure you coat each strip of dough evenly for the best taste. Line a baking sheet with parchment paper. Arrange the breadstick strips on the sheet, leaving about an inch of space between each one. This space allows them to bake evenly. Place the baking sheet in your preheated oven. Bake for 12-15 minutes, until the breadsticks turn golden brown. Keep an eye on them to avoid overbaking. When done, let them cool for a few minutes before serving. Enjoy your garlic breadsticks! For the complete recipe, check the Full Recipe section. To get that perfect breadstick texture, start with a hot oven. A preheated oven at 400°F (200°C) helps brown the breadsticks well. Place your baking sheet in the middle of the oven for even heat. Check them often as they bake. You want them golden brown, not burnt. Keep an eye on them during the last few minutes. If they look golden, they are ready. Overbaking can make them hard. So, watch closely! Adding herbs can boost the flavor of your breadsticks. Try mixing in fresh basil or thyme for a twist. If you like a spicy kick, add red pepper flakes to the garlic butter. You can also try mixing in some Italian seasoning or rosemary. Experimenting lets you find your favorite flavor. Use what you enjoy most! For a fun and creative way to serve your breadsticks, stand them upright in a tall glass. It looks nice and keeps them warm. You can also place them in a basket lined with a cloth. This adds a rustic touch. Pair your breadsticks with marinara sauce or garlic-infused olive oil for dipping. It makes each bite even better. Enjoy the flavors! {{image_4}} For a cheesy twist, you can stuff your breadsticks. First, roll out the pizza dough. Cut it into strips, about 1-inch wide. Place a small piece of cheese in the middle of each strip. Then, fold the dough over the cheese and pinch it to seal. Great cheese options include: - Mozzarella - Cheddar - Cream cheese These cheeses melt well and add a rich flavor. You can make garlic breadsticks even better by using fresh herbs. Try adding chopped basil or thyme to the garlic butter mix. This adds a bright flavor. You can also mix in a little lemon zest. It brightens up the taste even more. Combining flavors is easy. Use sun-dried tomatoes or olives in the dough. These give a unique twist to your breadsticks. If you want a vegan version, swap out the butter. You can use olive oil or vegan butter. Both give great flavor without dairy. Also, check your pizza dough. Some brands have dairy, so look for vegan options. Adjust your garlic butter mix to include your chosen fat. Enjoy the same delicious taste without any animal products. For the full recipe, check out the [Full Recipe]. To keep your leftover breadsticks fresh, follow these tips: - Refrigeration: Place the breadsticks in an airtight container. This helps keep them soft and tasty. They will last for up to three days in the fridge. - Freezing: For longer storage, freeze the breadsticks. Wrap them tightly in plastic wrap and then in foil. This prevents freezer burn. They can be frozen for up to three months. When you want to enjoy your breadsticks again, reheating is key. Here are two popular methods: - Oven Method: Preheat your oven to 350°F (175°C). Place the breadsticks on a baking sheet. Heat them for about 10 minutes. This will make them warm and crisp. - Microwave Method: If you need a quick fix, use the microwave. Place the breadsticks on a microwave-safe plate. Cover them with a damp paper towel. Heat for about 20-30 seconds. This keeps them soft but may not give the same crispness as the oven. Yes, you can use homemade pizza dough for these breadsticks. Just make sure your dough is soft and easy to roll out. If you choose to use a thicker dough, you may need to bake it a bit longer. Roll the dough to about 1/2 inch thick. This thickness helps the breadsticks cook evenly. Remember to season your garlic butter mixture well, as homemade dough can absorb flavors differently. To make gluten-free garlic breadsticks, use a gluten-free pizza dough mix. Many brands offer ready-made options. You can also make it from scratch with gluten-free flour. Make sure to follow the instructions on the package for best results. Add the same garlic butter mixture for great flavor. This way, everyone can enjoy tasty garlic breadsticks! Garlic breadsticks are great with many meals. They go well with pasta dishes, like spaghetti or fettuccine alfredo. You can also serve them with soups, like minestrone or tomato basil. For drinks, pair them with a light salad or a refreshing sparkling water. You can even enjoy them with a glass of red wine if you prefer. The flavors of garlic and herbs complement many dishes, making them a versatile side! You now know how to make easy garlic breadsticks from simple ingredients. With just a few steps, you can prepare delicious breadsticks that add flavor to any meal. Remember to experiment with toppings and herbs to create your own unique twist. Store any leftovers properly, or even freeze them for later. Enjoy baking these treats and sharing them with others. Your homemade garlic breadsticks will surely impress everyone!](https://goldendishy.com/wp-content/uploads/2025/07/3052f1a4-9d5f-43ae-ba15-9488150fef43-768x768.webp)