
Crispy Air Fryer Chickpeas Packed with Flavorful Spice
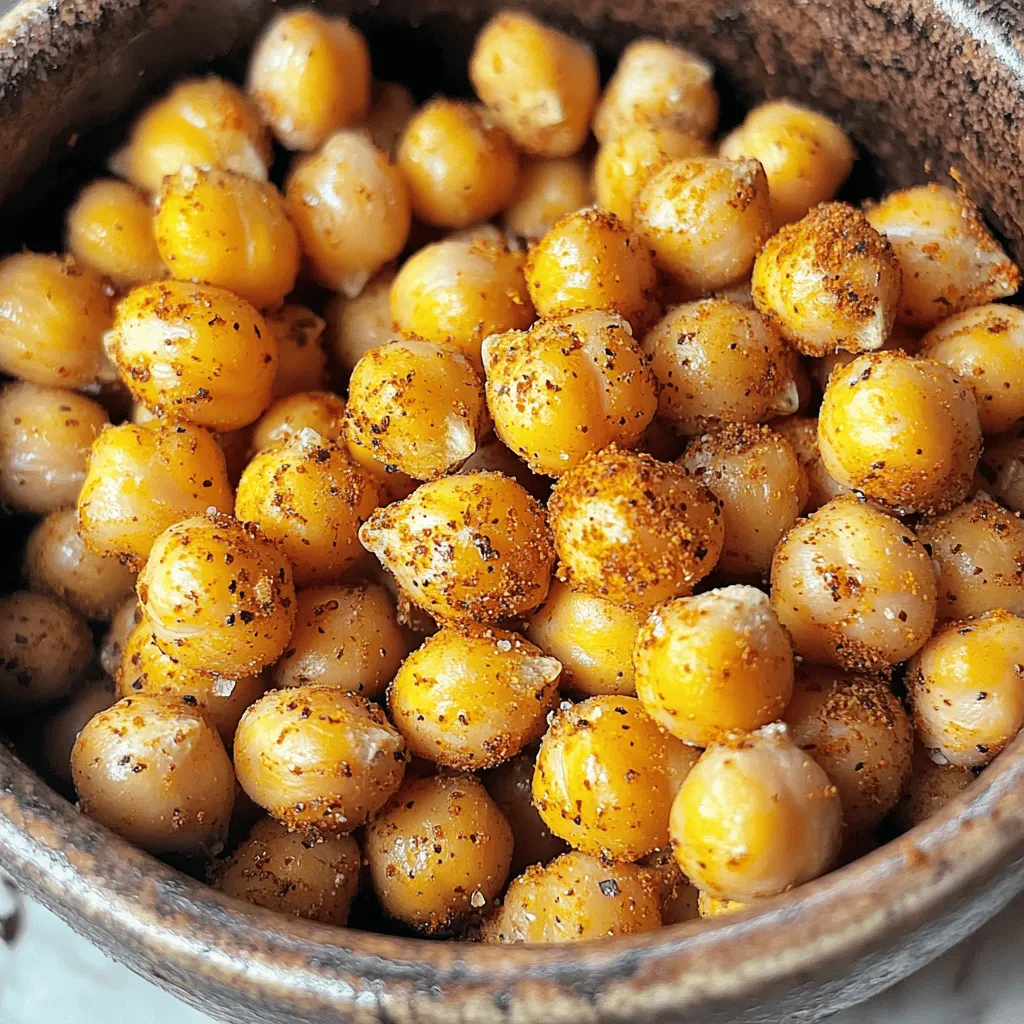
Are you ready to elevate your snacking game? Crispy Air Fryer Chickpeas are not just delicious; they’re a healthy option packed with flavor. In this article, I’ll show you how to turn simple chickpeas into a crunchy, spice-filled treat. With just a few ingredients and easy steps, you can whip up a snack that will impress your friends and family. Let’s dive in and get cooking!
Ingredients
To make crispy air fryer chickpeas packed with flavorful spice, you need these simple ingredients:
– 1 can (15 oz) chickpeas, drained and rinsed
– 1 tablespoon olive oil
– 1 teaspoon garlic powder
– 1 teaspoon smoked paprika
– ½ teaspoon ground cumin
– ½ teaspoon chili powder
– Salt to taste
– Freshly cracked black pepper to taste
These ingredients come together to create a snack that’s not only tasty but also healthy. The chickpeas provide protein and fiber, while the spices bring in a burst of flavor.
When you pick your ingredients, try to choose high-quality spices. Fresh spices can make a big difference in taste. Using good olive oil will also enhance the flavor.
If you want to switch things up, feel free to experiment with other spices. You can add herbs or even a pinch of cayenne for heat.
Step-by-Step Instructions
Preheat the Air Fryer
First, set your air fryer to 400°F (200°C). Preheating helps cook your chickpeas evenly. This step is key for that perfect crunch.
Drying the Chickpeas
After draining and rinsing the chickpeas, dry them well. Use a clean towel or paper towels. The drier they are, the crispier they get. This is an important step that impacts texture.
Seasoning the Chickpeas
In a mixing bowl, add the dried chickpeas. Drizzle with olive oil and toss until they are coated. Next, sprinkle in the garlic powder, smoked paprika, ground cumin, chili powder, salt, and pepper. Mix until every chickpea is well-seasoned. This step adds lots of flavor.
Cooking the Chickpeas
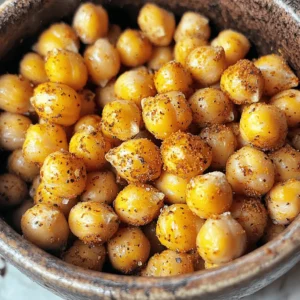
Place the seasoned chickpeas in the air fryer basket. Spread them in a single layer. This allows them to cook evenly. Cook for 15-20 minutes, shaking the basket halfway through. Watch for them to turn golden brown and crispy.
Cooling and Adjusting Seasoning
After cooking, take out the chickpeas and let them cool for a few minutes. They will crisp up even more as they cool. Taste a few and adjust the seasoning if needed. You can add more salt or spices to suit your taste. Enjoy your crispy air fryer chickpeas as a tasty snack or salad topping.
Tips & Tricks
Achieving Maximum Crispiness
To make crispy air fryer chickpeas, you need to dry them well. After draining and rinsing, pat them dry with a towel. The drier your chickpeas, the crispier they will turn out. If they are wet, they will steam instead of crisp.
Spread the chickpeas out in the air fryer. This ensures even cooking and maximum crunch. If they are too close, they won’t get that golden finish.
Flavor Enhancements
Experimenting with spices can take your chickpeas to the next level. Try adding different spices to suit your taste. You can mix in herbs like oregano or thyme for a fresh twist.
For a zesty kick, squeeze some lemon juice on the chickpeas before serving. This adds brightness and enhances the flavors.
Cooking Times and Temperatures
Different air fryers may have slight variations in cooking time. I recommend cooking your chickpeas for about 15-20 minutes at 400°F (200°C). Check them halfway through and shake the basket for even cooking.
You’ll know your chickpeas are perfect when they are golden brown and crunchy. If they look pale, give them a few more minutes.

Variations
Flavorful Spice Mixes
You can change the flavor of your crispy air fryer chickpeas with different spice mixes. Here are a couple of my favorite ideas:
– Mediterranean Herb Blend: Use dried oregano, thyme, and rosemary. This mix adds a refreshing taste. It pairs well with salads or as a snack.
– Spicy Sriracha Chickpeas: Mix in some sriracha sauce. You can also add cayenne pepper for more heat. This option is perfect for those who love bold flavors.
Additional Ingredients
You can also add other ingredients for fun twists:
– Nuts & Seeds for a Mixed Snack: Toss in almonds, sunflower seeds, or pumpkin seeds. This adds crunch and healthy fats. You can roast them together with the chickpeas.
– Adding Cheese for a Savory Twist: Try adding grated Parmesan or feta cheese. Sprinkle it on right before serving for a delicious flavor boost.
Dietary Alternatives
If you have dietary needs, there are easy swaps:
– Gluten-Free Options: All the ingredients are naturally gluten-free. Just check your spice labels to ensure they are safe.
– Vegan & Vegetarian Substitutions: This recipe is already vegan! You can enjoy it without any changes. If you want a creamier dip, blend the chickpeas into a hummus-style dip.
These variations make crispy air fryer chickpeas fun and exciting. Get creative and find your favorite mix!
Storage Info
Best Practices for Storing Leftovers
To keep your crispy air fryer chickpeas fresh, store them in an airtight container. This helps maintain their crunch. Avoid using plastic bags, as they can trap moisture. Let the chickpeas cool down completely before sealing them. This ensures they stay crispy longer.
How to Reheat Crispy Chickpeas
If your chickpeas lose their crunch, you can easily revive them. Spread them on a baking sheet and reheat in the oven at 350°F (175°C) for about 5-10 minutes. You can also put them back in the air fryer for a few minutes. This method brings back the crunch without drying them out.
Shelf Life Tips
– Duration for Store in Air-Tight Containers: When stored properly, crispy chickpeas can last up to one week. Check for any signs of moisture or sogginess before eating.
– Tips for Long-Term Storage: For longer storage, freeze the chickpeas in a single layer on a baking sheet. Once frozen, transfer them to a freezer bag. They can last up to three months in the freezer. Just remember to reheat them straight from the freezer for best results.
Enjoy your flavorful crispy air fryer chickpeas even days later!
FAQs
How Long Does It Take to Make Crispy Air Fryer Chickpeas?
It takes about 30 minutes to make crispy air fryer chickpeas. You spend 10 minutes preparing the ingredients and 15-20 minutes cooking them. Preheating the air fryer takes just a few minutes, too. This quick process gives you a tasty snack or topping in no time!
Can I Use Dried Chickpeas Instead?
Yes, you can use dried chickpeas. However, you need to soak and cook them first. Soaking helps them soften, which makes them easier to cook. After soaking, cook them until they are tender. Then, follow the recipe just as you would with canned chickpeas.
What Other Dishes Can I Use Crispy Chickpeas In?
Crispy chickpeas are very versatile. You can add them to salads for crunch. They also work well on soups, giving a nice texture. Use them in grain bowls or as a snack. Try mixing them with nuts for a tasty trail mix!
Are Crispy Air Fryer Chickpeas Healthy?
Yes, crispy air fryer chickpeas are healthy! They are high in protein and fiber. Using olive oil adds healthy fats without too many calories. They are a great snack option compared to chips or cookies. You get flavor and crunch while staying healthy.
You’ve learned how to make crispy air fryer chickpeas. We covered each step, from drying to seasoning. You also discovered tips for maximizing crispiness and flavor. Remember to explore different spices and variations for more fun. Store leftovers in an air-tight container for freshness. These chickpeas make a healthy snack or topping. Enjoy experimenting in the kitchen with this easy recipe. Happy cooking!
![- 1 can (15 oz) chickpeas, thoroughly drained and rinsed - 1 large cucumber, diced into bite-sized pieces - 1 cup cherry tomatoes, halved for a burst of flavor - 1 red bell pepper, diced for sweetness and crunch - 1 small red onion, finely chopped for subtle sharpness - 1/4 cup fresh parsley, roughly chopped for a fresh aroma - 1/4 cup feta cheese, crumbled (optional; adds creaminess) - Juice of 2 fresh lemons, providing that zesty kick - 3 tablespoons extra-virgin olive oil for richness - 1 teaspoon Dijon mustard for a hint of tang - 1 teaspoon honey (or maple syrup for a vegan option) to balance flavors - Salt and freshly ground black pepper to taste This salad is packed with nutrients. It has about 200 calories per serving. You get protein from chickpeas, fiber from veggies, and healthy fats from olive oil. Plus, it provides vitamins A and C. This makes it not just tasty, but also good for you. Start by gathering a large mixing bowl. Add the chickpeas, diced cucumber, halved cherry tomatoes, red bell pepper, red onion, and parsley. Mix these fresh ingredients well. You want each piece to shine in your salad. If you enjoy cheese, sprinkle in the crumbled feta for a creamy touch. This adds a nice contrast to the crunch of the veggies. For the dressing, take a smaller bowl. Whisk together the lemon juice and olive oil. This forms the base of your zesty dressing. Next, add the Dijon mustard and honey. These ingredients give a perfect balance of flavor. Season with salt and black pepper. Whisk until the mixture looks smooth and well combined. Now it’s time to bring everything together. Drizzle the dressing over your salad mix. Use a spatula or wooden spoon to toss gently. You want all the ingredients to be evenly coated without mashing them. If you added feta, do a light toss to keep the cheese intact. Taste your salad and adjust the seasoning if needed. Cover it and let it chill in the fridge for at least 30 minutes. This helps the flavors meld beautifully. For the full recipe, you can refer back to the recipe card. To make your Zesty Lemon Chickpea Salad shine, focus on seasoning. Start with salt and pepper. Taste as you go. You may want more lemon juice for tang. If you like a sweeter flavor, drizzle more honey. For different dressings, try balsamic vinegar or apple cider vinegar. You can also mix in tahini for creaminess. Each option gives a new twist to the salad. Serving your salad well makes it more enticing. Use a large, colorful bowl for a rustic look. Add fresh parsley on top for a pop of green. You can even place lemon wedges around the bowl for a bright touch. If you want individual servings, use clear cups. This way, the layers show off the bright colors. A light drizzle of olive oil on each cup adds elegance. Prepping this salad in advance is easy. Make it a few hours before serving. The flavors develop more when they sit. For best results, chill the salad for at least 30 minutes. This helps the flavors mix well. You can store leftovers in the fridge for up to three days. Just keep the dressing separate if you want it fresh. For the full experience, check out the Full Recipe. {{image_4}} You can make this salad even better by adding veggies. Try adding avocados. They bring creaminess and healthy fats. Carrots can add a nice crunch. You can also toss in diced mango or apple. These fruits add sweetness and a fun twist. Want to make this salad heartier? Add some protein! Grilled chicken works great for meat lovers. Shrimp is a tasty option too. For a plant-based choice, use tofu. It soaks up flavors well and adds nutrition. Switch up the dressing for a new taste! Try using different vinegars, like balsamic or apple cider. You can also squeeze in more citrus juice for extra zing. For a creamier touch, mix in yogurt or tahini. Both add richness and make the salad more filling. Check out the [Full Recipe] to see how these variations can fit into your meal! Store your Zesty Lemon Chickpea Salad in a sealed container. This keeps it fresh and tasty. It lasts about 3 to 5 days in the fridge. Make sure to check for any signs of spoilage before eating. Freezing this salad is not ideal. The vegetables may lose their crunch. If you want to freeze it, consider freezing just the chickpeas. Place them in an airtight bag. When you want to use them, thaw overnight in the fridge. Leftover salad is great for new meals! You can add it to wraps for a quick lunch. Toss it in grain bowls for added flavor. Or, layer it in sandwiches for a fresh twist. You can even mix it into soups for a hearty touch. Enjoy creating new dishes with your leftover salad! For the full recipe, refer to the [Full Recipe]. Yes, you can make this salad ahead of time. In fact, it often tastes better after chilling. The flavors mix well when you let it sit. I suggest making it a few hours before serving. Just cover it with plastic wrap and place it in the fridge. This way, the lemon juice and olive oil soak into the chickpeas and veggies. You will enjoy a zesty and bright flavor profile! Yes, this salad is gluten-free. Chickpeas, fresh veggies, and the dressing contain no gluten. If you want to check other ingredients, always read the labels. Most items are safe, but it’s best to confirm. This makes the salad a great option for those with gluten sensitivities. You can serve it to everyone without worry! If you can’t eat chickpeas, no problem! You can use other beans like black beans or kidney beans. These will add protein and texture. Another option is to use cooked quinoa or lentils. These alternatives keep the salad hearty and filling. Each will bring a unique taste, so feel free to explore. Get creative based on what you have! This blog post provided a clear guide to making a Zesty Lemon Chickpea Salad. We covered the key ingredients, from fresh veggies to the zesty dressing. You learned how to prepare, dress, and assemble the salad for the best flavor. I shared tips for meal prep, variations to try, and how to store leftovers. Remember, this salad is not just easy to make; it’s also packed with nutrients. Enjoy your creation, explore the variations, and make it your own!](https://goldendishy.com/wp-content/uploads/2025/07/e89bc11c-d040-4055-8bd2-d62839faab5f-768x768.webp)

![- Ripe mango, diced - Ripe avocados, diced - Small red onion, finely chopped - Medium red bell pepper, finely diced - Jalapeño peppers, deseeded and minced Fresh produce is key for a bright flavor. I love the sweet, juicy mango and creamy avocado. Choose ripe mangoes for the best taste. They should feel soft, but not mushy. Avocados should also yield slightly when pressed. This gives the salsa a smooth texture. - Fresh cilantro leaves, chopped - Juice of fresh limes - Salt and freshly cracked black pepper - Optional: Honey for sweetness Cilantro adds a fresh kick. Lime juice brightens the mix. Salt and pepper bring out all the flavors. Honey is a fun twist. It balances the heat from the jalapeños. Adjust the salt and pepper to match your taste. - Suggested amounts for a balanced flavor - Importance of using ripe ingredients Use equal amounts of mango and avocado for balance. A small onion and bell pepper add crunch. Adjust jalapeños based on your spice level. Ripe ingredients really make a difference. They enhance the taste and texture of the salsa. Remember, fresh is always best! For the full recipe, check out the complete guide. Gather your ingredients first. You will need: - 1 ripe mango, diced into small cubes - 2 ripe avocados, diced into small cubes - 1 small red onion, finely chopped - 1 medium red bell pepper, finely diced - 1-2 jalapeño peppers, deseeded and minced - 1/4 cup fresh cilantro leaves, chopped - Juice of 2 limes - Salt and freshly cracked black pepper, to taste - Optional: 1 teaspoon honey You’ll want a sharp knife for dicing and a cutting board. A large mixing bowl is also essential for combining everything. Start by placing the diced mango and avocado into the bowl. Next, add the chopped red onion and diced red bell pepper. Use a large spoon to mix gently. Be careful not to mash the avocado. When you add the minced jalapeño, adjust the amount for your spice level. Add the cilantro leaves, then squeeze fresh lime juice over the mix. Season with salt and pepper, and if you like, stir in honey for a touch of sweetness. Gently toss the ingredients together until well combined. This keeps the avocado pieces intact and makes for a prettier salsa. Letting the salsa sit is key. This helps the flavors blend together nicely. I recommend letting it sit for at least 10 minutes at room temperature. During this time, the lime juice and salt work their magic, enhancing the overall taste. Enjoy this fresh delight with your favorite chips or as a topping on grilled dishes. For the full recipe, check out the details above. How do you choose ripe mangoes and avocados? Look for soft spots. A ripe mango gives slightly when pressed. The skin should be a mix of green and yellow. For avocados, check the skin color. It should be dark green or black. Gently squeeze; it should feel soft but not mushy. Fresh herbs and vegetables make your salsa shine. Look for bright colors and firm textures. Cilantro should smell fresh and green. Bell peppers should be smooth and shiny. Avoid any with brown spots or wrinkles. How can you keep avocados intact? Use a sharp knife for cutting. Dice them gently. Avoid stirring too hard when mixing. Use a large spoon to gently fold the salsa. For tossing the salsa, you want to be careful. Start by mixing the firmer ingredients first. Then, add the avocados and mango last. This way, you avoid mashing them. How can you adjust spice levels with jalapeños? Start with one jalapeño. Taste before adding more. If you want it spicier, add more minced peppers. Remember, you can always add spice, but you can't take it away! To balance sweetness, you can add honey or other sweeteners. A teaspoon of honey works wonders. It brings out the fruit flavors without being too sweet. You can also try agave syrup or maple syrup for a twist. For the full recipe, check out the details above. Enjoy your Mango Avocado Salsa! {{image_4}} You can make mango avocado salsa even more exciting. Adding fruits like pineapple or peach gives it a sweet twist. The juicy sweetness of pineapple pairs well with mango. Try diced peaches for a softer sweetness. These fruits bring unique flavors that brighten up the dish. Herbs can also change the taste. Instead of cilantro, try mint or parsley. Mint adds a fresh and cool taste. Parsley gives a mild flavor that still pops. Experimenting with herbs can transform your salsa. Making this salsa vegan or gluten-free is easy. The recipe is already plant-based, so you’re set. You can also adjust the ingredients based on what you have. If you don't have lime, use lemon juice instead. Missing jalapeños? Just leave them out or use a milder pepper. If you want to make it creamier, try adding black beans. They add protein and texture without changing the flavor much. This way, you can enjoy a nutritious dish that fits your needs. Mango avocado salsa pairs great with tacos or grilled dishes. Spoon it over fish or chicken for a fresh burst of flavor. You can also serve it with crispy tortilla chips for dipping. Get creative! Use the salsa in salads for an extra kick. It can work as a topping for baked potatoes too. The fresh flavors make any meal feel special. For the full recipe, check out the [Full Recipe]. To keep your Mango Avocado Salsa fresh, use an airtight container. Glass or plastic containers work well. Make sure to fill the container to the top. This minimizes air and keeps it fresher longer. To prevent browning of the avocado, squeeze extra lime juice over the salsa. The acidity helps slow down oxidation. Mango Avocado Salsa lasts about 2-3 days in the fridge. Always check for signs of spoilage. If you see browning, it's still okay. But if it smells sour or looks mushy, it's time to toss it. Fresh salsa is best enjoyed right away! You can freeze Mango Avocado Salsa, but the texture may change. Freezing can make the avocado mushy when thawed. If you decide to freeze it, use a freezer-safe container. Leave some space at the top for expansion. When ready to use, thaw it in the fridge overnight. Stir well before serving to mix the flavors. Store your Mango Avocado Salsa in an airtight container. This keeps it fresh. Place it in the fridge right after making it. Use it within two days for the best taste. To slow browning, add lime juice on top before sealing. Yes, you can make it ahead, but it is best fresh. If you want to prepare it early, chop the mango and avocado just before serving. This keeps the salsa vibrant and tasty. If you can't find mango, try peach or pineapple for sweetness. For avocado, use mashed banana or even silken tofu for creaminess. The flavors change, but the salsa stays delicious. To change the spice level, use fewer jalapeños. You can also remove the seeds and ribs of the peppers. For more heat, add more jalapeños or a pinch of cayenne. Taste as you go to get it just right. Yes, it is great for meal prep! You can add it to salads, tacos, or grilled meats. Just remember to store it properly. Enjoying this salsa adds flavor and fun to your meals! For the full recipe, check out the previous section. Mango Avocado Salsa is a fresh and vibrant dish. We discussed the best ingredients, like ripe mangoes and avocados, and how to combine them. I shared tips for mixing, storing, and serving, plus fun variations to try. In the end, enjoy creating your salsa! Fresh flavors and fun twists await you. Dive in and savor every bite.](https://goldendishy.com/wp-content/uploads/2025/06/5eda548a-8636-40c4-8fce-ece2351eafc8-768x768.webp)