Avocado Egg Salad Creamy and Flavorful Dish
![- 4 large eggs - 1 ripe avocado, mashed - 2 tablespoons Greek yogurt - 1 tablespoon Dijon mustard - 1 small red onion, finely chopped - 1 celery stalk, finely chopped - 1 tablespoon fresh lemon juice - 1 tablespoon fresh dill, chopped (or 1 teaspoon dried dill) - Salt and pepper to taste Gather these simple ingredients for a creamy and flavorful dish. The eggs provide protein, while the avocado brings richness. Greek yogurt adds a tangy creaminess that makes this salad stand out. Don't forget the Dijon mustard for a zesty kick. The red onion and celery add crunch and flavor. The fresh lemon juice brightens the dish and keeps it fresh. Dill offers a wonderful herbal note that complements the other flavors. For the full recipe, you can check out my detailed guide on making Avocado Egg Salad. This dish is not just easy but also very satisfying. Enjoy the blend of textures and tastes in every bite! - Place eggs in a saucepan with cold water. - Bring to a boil, then simmer for 9-12 minutes. Boiling eggs is simple. The cold water helps cook them evenly. If you like your yolks soft, aim for 9 minutes. For firmer yolks, 12 minutes works best. - Transfer to a bowl of ice water. - Peel under running water. After boiling, cool the eggs fast. The ice water stops the cooking. Let them sit for about 5-7 minutes. When peeling, run the eggs under water. This helps the shell come off easily. - Combine mashed avocado, Greek yogurt, Dijon mustard, and lemon juice. In a mixing bowl, mash the ripe avocado. Add Greek yogurt for creaminess, Dijon mustard for kick, and lemon juice for zest. Mix until smooth and creamy. - Add chopped eggs, onion, celery, and dill. - Fold gently to combine. Now, add the chopped eggs, onion, celery, and dill to the avocado mix. Use a spatula to fold everything together. Be gentle so the eggs stay in chunks. That’s how you get the perfect texture. For the full recipe, check out the details above! To make the best Avocado Egg Salad, start with the eggs. For a soft yolk, boil for 9 minutes. For a firm yolk, go for 12 minutes. Timing is key! After boiling, cool the eggs quickly. An ice bath is great for this. It stops the eggs from cooking further and makes peeling easy. For that rich and creamy texture, I use Greek yogurt instead of mayo. Greek yogurt adds protein and a tangy taste. If you want even more creaminess, check your avocado. A perfectly ripe avocado will give a smooth texture. If it's too firm, let it ripen a bit. Spice it up! A pinch of paprika or a dash of cayenne can add a kick. Fresh herbs can also change the game. Try adding dill, parsley, or chives for a flavor boost. Each herb brings a unique taste and aroma that makes this dish shine. These tips will help you create a delicious Avocado Egg Salad. For the complete recipe, check the [Full Recipe]. Enjoy your cooking! {{image_4}} You can easily swap ingredients to fit your diet. To make it vegan, use chickpeas instead of eggs. Just mash them up and mix well. They provide a nice texture and protein. For a lighter option, substitute Greek yogurt with low-fat yogurt. This keeps the salad creamy while cutting down on calories. Want to spice things up? Try adding diced bell peppers. They add crunch and a pop of color. You can also sprinkle in spices like paprika or garlic powder. These enhance the flavor and give your salad a unique twist. Experimenting with different herbs can also elevate your dish. How you serve this salad makes a big difference. You can spread it on toast or crackers for a quick snack. It also works great as a filling for sandwiches or wraps. This makes it perfect for lunch or picnics. You can even serve it in lettuce leaves for a light meal. Each option offers a new way to enjoy your creamy, flavorful dish. For the full recipe, check out Avocado Egg Salad with a Zesty Twist. To keep your avocado egg salad fresh, store it in the fridge. Use an airtight container to prevent air from spoiling the ingredients. This salad stays good for about 2-3 days. After that, the avocado may brown, and the flavor might fade. Always check for any off smells or changes in texture before eating leftovers. Freezing avocado egg salad is not recommended. The texture of avocado changes when frozen. If you freeze it, it may become mushy once thawed. Instead, prepare only what you need. If you have to freeze it, use an airtight container. This will help protect it from freezer burn. This salad is best served cold. If you must reheat it, do so gently. Use a microwave on low power for a short time. Stir it frequently to help maintain its texture. However, I suggest enjoying it cold for the best flavor and creaminess. If you want to mix things up, serve it on toasted bread or in a wrap. Enjoy the zesty taste! Yes, you can make Avocado Egg Salad ahead of time. It tastes even better after chilling. To prepare in advance, follow these tips: - Cook and cool the eggs, then chop them. - Mix the avocado, yogurt, mustard, and lemon juice. - Combine right before serving to keep the eggs fresh. - Store in an airtight container in the fridge for up to 24 hours. If you want creaminess, here are some substitutes: - Sour cream for a tangy flavor. - Silken tofu if you prefer a vegan option. - Cream cheese for a rich texture. Each option will change the taste a bit, so choose what you like best. To check if your avocado is ripe, look for these signs: - The skin should be dark green or black. - Gently press the avocado; it should yield slightly. - If it feels hard, it’s not ripe yet. Choose avocados that feel soft but not too mushy for the best results. Yes, store-bought mayonnaise works well in this recipe. Use it if you prefer a classic taste. Here’s how: - Replace Greek yogurt with an equal amount of mayo. - Mix it with the avocado and mustard for a creamy blend. This will give your egg salad a rich flavor. To make Avocado Egg Salad fit dietary needs, try these suggestions: - For nut-free, just stick to the original recipe. - For lactose-free, use a dairy-free yogurt or mayo. - For vegan, swap eggs with mashed chickpeas for protein. These options keep your dish tasty and inclusive. In this blog post, I shared a simple recipe for Avocado Egg Salad. We reviewed key ingredients, including eggs, avocado, and Greek yogurt. You learned steps to boil and mix the ingredients perfectly. I also offered tips for adding flavor and making dietary swaps. This dish is fun, healthy, and easy to make. Try it your way and enjoy the flavors! Whether you eat it in a wrap or on toast, it will be a hit. Prepare it fresh or store leftovers; you won't regret it.](https://goldendishy.com/wp-content/uploads/2025/06/e93c3c70-9342-49f9-9c4a-33a1a85bd889.webp)
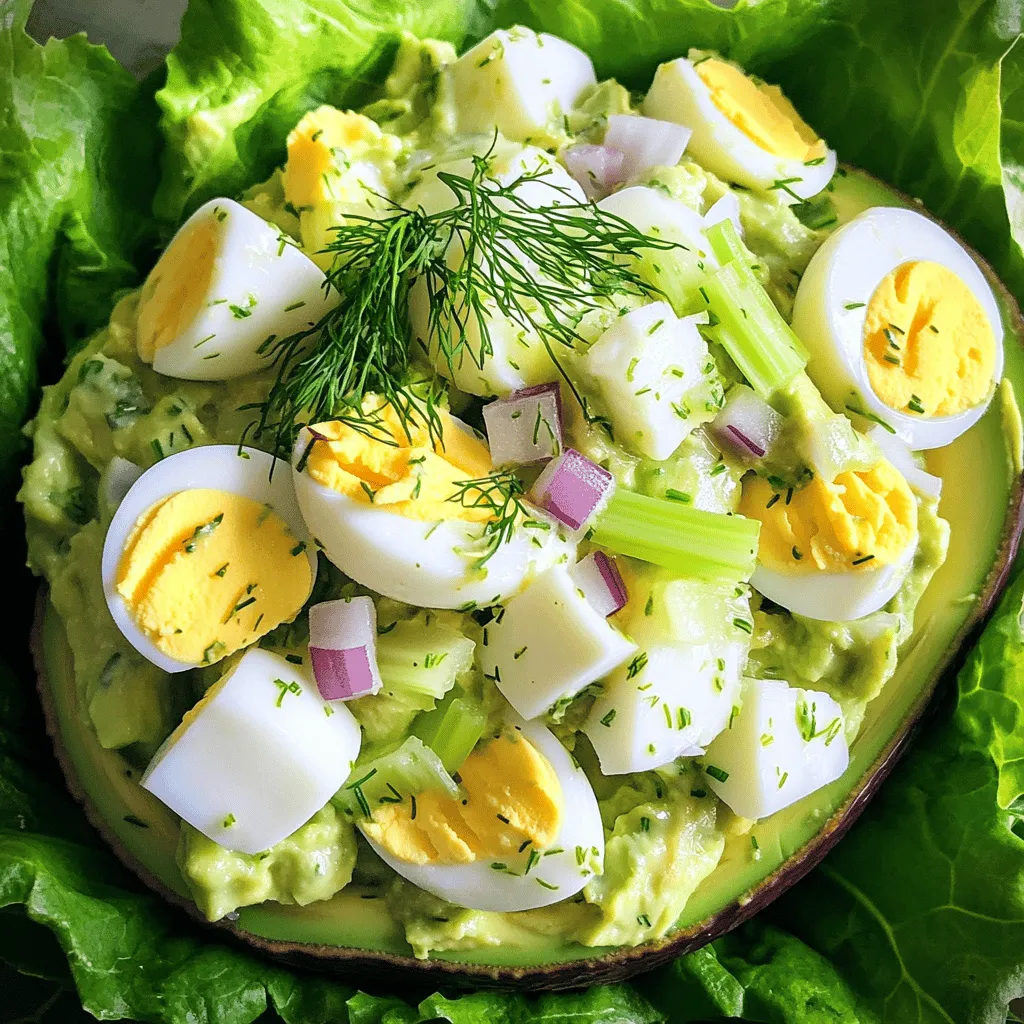
Looking for a fresh, creamy dish that packs a punch of flavor? Look no further! My Avocado Egg Salad combines rich avocado with hard-boiled eggs and a zesty kick from Dijon mustard. This simple, healthy recipe is perfect for lunches, snacks, or even quick dinners. Plus, it’s easy to customize based on what you have at home. Let’s jump into the steps to make this delicious salad today!
Ingredients
Main Ingredients
– 4 large eggs
– 1 ripe avocado, mashed
– 2 tablespoons Greek yogurt
Additional Ingredients
– 1 tablespoon Dijon mustard
– 1 small red onion, finely chopped
– 1 celery stalk, finely chopped
Flavor Enhancers
– 1 tablespoon fresh lemon juice
– 1 tablespoon fresh dill, chopped (or 1 teaspoon dried dill)
– Salt and pepper to taste
Gather these simple ingredients for a creamy and flavorful dish. The eggs provide protein, while the avocado brings richness. Greek yogurt adds a tangy creaminess that makes this salad stand out. Don’t forget the Dijon mustard for a zesty kick.
The red onion and celery add crunch and flavor. The fresh lemon juice brightens the dish and keeps it fresh. Dill offers a wonderful herbal note that complements the other flavors.This dish is not just easy but also very satisfying. Enjoy the blend of textures and tastes in every bite!
Step-by-Step Instructions
Boil the Eggs
– Place eggs in a saucepan with cold water.
– Bring to a boil, then simmer for 9-12 minutes.
Boiling eggs is simple. The cold water helps cook them evenly. If you like your yolks soft, aim for 9 minutes. For firmer yolks, 12 minutes works best.
Cool the Eggs
– Transfer to a bowl of ice water.
– Peel under running water.
After boiling, cool the eggs fast. The ice water stops the cooking. Let them sit for about 5-7 minutes. When peeling, run the eggs under water. This helps the shell come off easily.
Prepare the Avocado Mixture
– Combine mashed avocado, Greek yogurt, Dijon mustard, and lemon juice.
In a mixing bowl, mash the ripe avocado. Add Greek yogurt for creaminess, Dijon mustard for kick, and lemon juice for zest. Mix until smooth and creamy.
Incorporate the Ingredients
– Add chopped eggs, onion, celery, and dill.
– Fold gently to combine.
Now, add the chopped eggs, onion, celery, and dill to the avocado mix. Use a spatula to fold everything together. Be gentle so the eggs stay in chunks. That’s how you get the perfect texture.
Tips & Tricks
Perfecting the Boil
To make the best Avocado Egg Salad, start with the eggs. For a soft yolk, boil for 9 minutes. For a firm yolk, go for 12 minutes. Timing is key! After boiling, cool the eggs quickly. An ice bath is great for this. It stops the eggs from cooking further and makes peeling easy.
Creaminess Factor
For that rich and creamy texture, I use Greek yogurt instead of mayo. Greek yogurt adds protein and a tangy taste. If you want even more creaminess, check your avocado. A perfectly ripe avocado will give a smooth texture. If it’s too firm, let it ripen a bit.
Flavor Variations
Spice it up! A pinch of paprika or a dash of cayenne can add a kick. Fresh herbs can also change the game. Try adding dill, parsley, or chives for a flavor boost. Each herb brings a unique taste and aroma that makes this dish shine.
These tips will help you create a delicious Avocado Egg Salad.Enjoy your cooking!
Variations
Dietary Substitutions
You can easily swap ingredients to fit your diet. To make it vegan, use chickpeas instead of eggs. Just mash them up and mix well. They provide a nice texture and protein. For a lighter option, substitute Greek yogurt with low-fat yogurt. This keeps the salad creamy while cutting down on calories.
Additional Ingredients to Consider
Want to spice things up? Try adding diced bell peppers. They add crunch and a pop of color. You can also sprinkle in spices like paprika or garlic powder. These enhance the flavor and give your salad a unique twist. Experimenting with different herbs can also elevate your dish.
Serving Style Options
How you serve this salad makes a big difference. You can spread it on toast or crackers for a quick snack. It also works great as a filling for sandwiches or wraps. This makes it perfect for lunch or picnics. You can even serve it in lettuce leaves for a light meal. Each option offers a new way to enjoy your creamy, flavorful dish.
Storage Info
Storing Leftovers
To keep your avocado egg salad fresh, store it in the fridge. Use an airtight container to prevent air from spoiling the ingredients. This salad stays good for about 2-3 days. After that, the avocado may brown, and the flavor might fade. Always check for any off smells or changes in texture before eating leftovers.
Freezing Considerations
Freezing avocado egg salad is not recommended. The texture of avocado changes when frozen. If you freeze it, it may become mushy once thawed. Instead, prepare only what you need. If you have to freeze it, use an airtight container. This will help protect it from freezer burn.
Reheating Tips
This salad is best served cold. If you must reheat it, do so gently. Use a microwave on low power for a short time. Stir it frequently to help maintain its texture. However, I suggest enjoying it cold for the best flavor and creaminess. If you want to mix things up, serve it on toasted bread or in a wrap. Enjoy the zesty taste!
FAQs
Can I make Avocado Egg Salad ahead of time?
Yes, you can make Avocado Egg Salad ahead of time. It tastes even better after chilling. To prepare in advance, follow these tips:
– Cook and cool the eggs, then chop them.
– Mix the avocado, yogurt, mustard, and lemon juice.
– Combine right before serving to keep the eggs fresh.
– Store in an airtight container in the fridge for up to 24 hours.
What can I substitute for Greek yogurt?
If you want creaminess, here are some substitutes:
– Sour cream for a tangy flavor.
– Silken tofu if you prefer a vegan option.
– Cream cheese for a rich texture.
Each option will change the taste a bit, so choose what you like best.
How do I know if my avocado is ripe?
To check if your avocado is ripe, look for these signs:
– The skin should be dark green or black.
– Gently press the avocado; it should yield slightly.
– If it feels hard, it’s not ripe yet.
Choose avocados that feel soft but not too mushy for the best results.
Can I use store-bought mayonnaise instead?
Yes, store-bought mayonnaise works well in this recipe. Use it if you prefer a classic taste. Here’s how:
– Replace Greek yogurt with an equal amount of mayo.
– Mix it with the avocado and mustard for a creamy blend.
This will give your egg salad a rich flavor.
How to adjust for dietary restrictions?
To make Avocado Egg Salad fit dietary needs, try these suggestions:
– For nut-free, just stick to the original recipe.
– For lactose-free, use a dairy-free yogurt or mayo.
– For vegan, swap eggs with mashed chickpeas for protein.
These options keep your dish tasty and inclusive.
In this blog post, I shared a simple recipe for Avocado Egg Salad. We reviewed key ingredients, including eggs, avocado, and Greek yogurt. You learned steps to boil and mix the ingredients perfectly. I also offered tips for adding flavor and making dietary swaps.
This dish is fun, healthy, and easy to make. Try it your way and enjoy the flavors! Whether you eat it in a wrap or on toast, it will be a hit. Prepare it fresh or store leftovers; you won’t regret it.
![- 4 large eggs - 1 ripe avocado, mashed - 2 tablespoons Greek yogurt - 1 tablespoon Dijon mustard - 1 small red onion, finely chopped - 1 celery stalk, finely chopped - 1 tablespoon fresh lemon juice - 1 tablespoon fresh dill, chopped (or 1 teaspoon dried dill) - Salt and pepper to taste Gather these simple ingredients for a creamy and flavorful dish. The eggs provide protein, while the avocado brings richness. Greek yogurt adds a tangy creaminess that makes this salad stand out. Don't forget the Dijon mustard for a zesty kick. The red onion and celery add crunch and flavor. The fresh lemon juice brightens the dish and keeps it fresh. Dill offers a wonderful herbal note that complements the other flavors. For the full recipe, you can check out my detailed guide on making Avocado Egg Salad. This dish is not just easy but also very satisfying. Enjoy the blend of textures and tastes in every bite! - Place eggs in a saucepan with cold water. - Bring to a boil, then simmer for 9-12 minutes. Boiling eggs is simple. The cold water helps cook them evenly. If you like your yolks soft, aim for 9 minutes. For firmer yolks, 12 minutes works best. - Transfer to a bowl of ice water. - Peel under running water. After boiling, cool the eggs fast. The ice water stops the cooking. Let them sit for about 5-7 minutes. When peeling, run the eggs under water. This helps the shell come off easily. - Combine mashed avocado, Greek yogurt, Dijon mustard, and lemon juice. In a mixing bowl, mash the ripe avocado. Add Greek yogurt for creaminess, Dijon mustard for kick, and lemon juice for zest. Mix until smooth and creamy. - Add chopped eggs, onion, celery, and dill. - Fold gently to combine. Now, add the chopped eggs, onion, celery, and dill to the avocado mix. Use a spatula to fold everything together. Be gentle so the eggs stay in chunks. That’s how you get the perfect texture. For the full recipe, check out the details above! To make the best Avocado Egg Salad, start with the eggs. For a soft yolk, boil for 9 minutes. For a firm yolk, go for 12 minutes. Timing is key! After boiling, cool the eggs quickly. An ice bath is great for this. It stops the eggs from cooking further and makes peeling easy. For that rich and creamy texture, I use Greek yogurt instead of mayo. Greek yogurt adds protein and a tangy taste. If you want even more creaminess, check your avocado. A perfectly ripe avocado will give a smooth texture. If it's too firm, let it ripen a bit. Spice it up! A pinch of paprika or a dash of cayenne can add a kick. Fresh herbs can also change the game. Try adding dill, parsley, or chives for a flavor boost. Each herb brings a unique taste and aroma that makes this dish shine. These tips will help you create a delicious Avocado Egg Salad. For the complete recipe, check the [Full Recipe]. Enjoy your cooking! {{image_4}} You can easily swap ingredients to fit your diet. To make it vegan, use chickpeas instead of eggs. Just mash them up and mix well. They provide a nice texture and protein. For a lighter option, substitute Greek yogurt with low-fat yogurt. This keeps the salad creamy while cutting down on calories. Want to spice things up? Try adding diced bell peppers. They add crunch and a pop of color. You can also sprinkle in spices like paprika or garlic powder. These enhance the flavor and give your salad a unique twist. Experimenting with different herbs can also elevate your dish. How you serve this salad makes a big difference. You can spread it on toast or crackers for a quick snack. It also works great as a filling for sandwiches or wraps. This makes it perfect for lunch or picnics. You can even serve it in lettuce leaves for a light meal. Each option offers a new way to enjoy your creamy, flavorful dish. For the full recipe, check out Avocado Egg Salad with a Zesty Twist. To keep your avocado egg salad fresh, store it in the fridge. Use an airtight container to prevent air from spoiling the ingredients. This salad stays good for about 2-3 days. After that, the avocado may brown, and the flavor might fade. Always check for any off smells or changes in texture before eating leftovers. Freezing avocado egg salad is not recommended. The texture of avocado changes when frozen. If you freeze it, it may become mushy once thawed. Instead, prepare only what you need. If you have to freeze it, use an airtight container. This will help protect it from freezer burn. This salad is best served cold. If you must reheat it, do so gently. Use a microwave on low power for a short time. Stir it frequently to help maintain its texture. However, I suggest enjoying it cold for the best flavor and creaminess. If you want to mix things up, serve it on toasted bread or in a wrap. Enjoy the zesty taste! Yes, you can make Avocado Egg Salad ahead of time. It tastes even better after chilling. To prepare in advance, follow these tips: - Cook and cool the eggs, then chop them. - Mix the avocado, yogurt, mustard, and lemon juice. - Combine right before serving to keep the eggs fresh. - Store in an airtight container in the fridge for up to 24 hours. If you want creaminess, here are some substitutes: - Sour cream for a tangy flavor. - Silken tofu if you prefer a vegan option. - Cream cheese for a rich texture. Each option will change the taste a bit, so choose what you like best. To check if your avocado is ripe, look for these signs: - The skin should be dark green or black. - Gently press the avocado; it should yield slightly. - If it feels hard, it’s not ripe yet. Choose avocados that feel soft but not too mushy for the best results. Yes, store-bought mayonnaise works well in this recipe. Use it if you prefer a classic taste. Here’s how: - Replace Greek yogurt with an equal amount of mayo. - Mix it with the avocado and mustard for a creamy blend. This will give your egg salad a rich flavor. To make Avocado Egg Salad fit dietary needs, try these suggestions: - For nut-free, just stick to the original recipe. - For lactose-free, use a dairy-free yogurt or mayo. - For vegan, swap eggs with mashed chickpeas for protein. These options keep your dish tasty and inclusive. In this blog post, I shared a simple recipe for Avocado Egg Salad. We reviewed key ingredients, including eggs, avocado, and Greek yogurt. You learned steps to boil and mix the ingredients perfectly. I also offered tips for adding flavor and making dietary swaps. This dish is fun, healthy, and easy to make. Try it your way and enjoy the flavors! Whether you eat it in a wrap or on toast, it will be a hit. Prepare it fresh or store leftovers; you won't regret it.](https://goldendishy.com/wp-content/uploads/2025/06/e93c3c70-9342-49f9-9c4a-33a1a85bd889-300x300.webp)
![- 1 can refrigerated pizza dough - 4 tablespoons unsalted butter, melted - 4 cloves garlic, finely minced - 1 teaspoon dried oregano - 1 teaspoon dried parsley - 1/2 teaspoon sea salt - 1/4 teaspoon freshly cracked black pepper - Optional toppings: Grated Parmesan cheese To make these breadsticks, you need simple ingredients. The key is the pizza dough. It makes the process quick and easy. The butter and garlic blend perfectly to give a rich flavor. Oregano and parsley add freshness. Sea salt and black pepper enhance all the tastes. - Baking sheet - Parchment paper - Mixing bowl - Knife or pizza cutter - Measuring spoons You will need a few basic kitchen tools. A baking sheet and parchment paper help with easy cleanup. A mixing bowl mixes your garlic butter. A knife or pizza cutter cuts the dough into strips. Measuring spoons ensure you use the right amounts. Using the right ingredients and tools will make your garlic breadsticks tasty and fun to make. You can find the full recipe in the earlier section. Start by preheating your oven to 400°F (200°C). This ensures the oven is hot when you bake. Next, take your can of refrigerated pizza dough. On a clean, lightly floured surface, roll out the dough into a rectangle. Aim for a thickness of about 1/2 inch. A uniform thickness helps the breadsticks bake evenly. Now it’s time to cut the dough into strips. Use a sharp knife or pizza cutter for best results. Cut the dough into strips that are around 1-inch wide. This size is perfect for dipping. Make sure your cuts are even, as this will give you uniform breadsticks. In a small bowl, mix the melted butter with minced garlic, dried oregano, dried parsley, sea salt, and black pepper. Stir well until all the ingredients blend together. This garlic butter mixture adds tons of flavor. Make sure you coat each strip of dough evenly for the best taste. Line a baking sheet with parchment paper. Arrange the breadstick strips on the sheet, leaving about an inch of space between each one. This space allows them to bake evenly. Place the baking sheet in your preheated oven. Bake for 12-15 minutes, until the breadsticks turn golden brown. Keep an eye on them to avoid overbaking. When done, let them cool for a few minutes before serving. Enjoy your garlic breadsticks! For the complete recipe, check the Full Recipe section. To get that perfect breadstick texture, start with a hot oven. A preheated oven at 400°F (200°C) helps brown the breadsticks well. Place your baking sheet in the middle of the oven for even heat. Check them often as they bake. You want them golden brown, not burnt. Keep an eye on them during the last few minutes. If they look golden, they are ready. Overbaking can make them hard. So, watch closely! Adding herbs can boost the flavor of your breadsticks. Try mixing in fresh basil or thyme for a twist. If you like a spicy kick, add red pepper flakes to the garlic butter. You can also try mixing in some Italian seasoning or rosemary. Experimenting lets you find your favorite flavor. Use what you enjoy most! For a fun and creative way to serve your breadsticks, stand them upright in a tall glass. It looks nice and keeps them warm. You can also place them in a basket lined with a cloth. This adds a rustic touch. Pair your breadsticks with marinara sauce or garlic-infused olive oil for dipping. It makes each bite even better. Enjoy the flavors! {{image_4}} For a cheesy twist, you can stuff your breadsticks. First, roll out the pizza dough. Cut it into strips, about 1-inch wide. Place a small piece of cheese in the middle of each strip. Then, fold the dough over the cheese and pinch it to seal. Great cheese options include: - Mozzarella - Cheddar - Cream cheese These cheeses melt well and add a rich flavor. You can make garlic breadsticks even better by using fresh herbs. Try adding chopped basil or thyme to the garlic butter mix. This adds a bright flavor. You can also mix in a little lemon zest. It brightens up the taste even more. Combining flavors is easy. Use sun-dried tomatoes or olives in the dough. These give a unique twist to your breadsticks. If you want a vegan version, swap out the butter. You can use olive oil or vegan butter. Both give great flavor without dairy. Also, check your pizza dough. Some brands have dairy, so look for vegan options. Adjust your garlic butter mix to include your chosen fat. Enjoy the same delicious taste without any animal products. For the full recipe, check out the [Full Recipe]. To keep your leftover breadsticks fresh, follow these tips: - Refrigeration: Place the breadsticks in an airtight container. This helps keep them soft and tasty. They will last for up to three days in the fridge. - Freezing: For longer storage, freeze the breadsticks. Wrap them tightly in plastic wrap and then in foil. This prevents freezer burn. They can be frozen for up to three months. When you want to enjoy your breadsticks again, reheating is key. Here are two popular methods: - Oven Method: Preheat your oven to 350°F (175°C). Place the breadsticks on a baking sheet. Heat them for about 10 minutes. This will make them warm and crisp. - Microwave Method: If you need a quick fix, use the microwave. Place the breadsticks on a microwave-safe plate. Cover them with a damp paper towel. Heat for about 20-30 seconds. This keeps them soft but may not give the same crispness as the oven. Yes, you can use homemade pizza dough for these breadsticks. Just make sure your dough is soft and easy to roll out. If you choose to use a thicker dough, you may need to bake it a bit longer. Roll the dough to about 1/2 inch thick. This thickness helps the breadsticks cook evenly. Remember to season your garlic butter mixture well, as homemade dough can absorb flavors differently. To make gluten-free garlic breadsticks, use a gluten-free pizza dough mix. Many brands offer ready-made options. You can also make it from scratch with gluten-free flour. Make sure to follow the instructions on the package for best results. Add the same garlic butter mixture for great flavor. This way, everyone can enjoy tasty garlic breadsticks! Garlic breadsticks are great with many meals. They go well with pasta dishes, like spaghetti or fettuccine alfredo. You can also serve them with soups, like minestrone or tomato basil. For drinks, pair them with a light salad or a refreshing sparkling water. You can even enjoy them with a glass of red wine if you prefer. The flavors of garlic and herbs complement many dishes, making them a versatile side! You now know how to make easy garlic breadsticks from simple ingredients. With just a few steps, you can prepare delicious breadsticks that add flavor to any meal. Remember to experiment with toppings and herbs to create your own unique twist. Store any leftovers properly, or even freeze them for later. Enjoy baking these treats and sharing them with others. Your homemade garlic breadsticks will surely impress everyone!](https://goldendishy.com/wp-content/uploads/2025/07/3052f1a4-9d5f-43ae-ba15-9488150fef43-768x768.webp)
![- 1 can (15 oz) chickpeas, drained and rinsed - 1 can (5 oz) tuna in water, drained - 1/4 cup Greek yogurt or vegan mayonnaise (optional) - 1 tablespoon Dijon mustard - 1/2 red bell pepper, finely chopped - 1/4 red onion, finely chopped - 1/4 cup fresh parsley, chopped - 1 tablespoon fresh lemon juice - Seasoning: Salt and pepper to taste - Optional: 1 ripe avocado, diced To make this salad, gather all the ingredients listed above. The chickpeas and tuna serve as the base. Chickpeas give a nice texture, while tuna adds protein. The Greek yogurt or vegan mayo brings creaminess. Dijon mustard gives it a tangy kick. Chop the red bell pepper and red onion finely for a nice crunch. Fresh parsley adds color and flavor. A squeeze of lemon juice brightens up the dish. You can also add diced avocado for extra creaminess. This Easy Chickpea Tuna Salad is perfect for lunch or a light dinner. You can follow the [Full Recipe] for step-by-step guidance. - Lightly mash the chickpeas in a large mixing bowl. - Combine the drained tuna with the chickpeas. - Whisk together Greek yogurt, Dijon mustard, and lemon juice in a small bowl. - Pour the yogurt mixture over the chickpeas and tuna. - Fold in the chopped red bell pepper, red onion, parsley, and optional avocado. - Season with salt and pepper to taste. - Serve immediately or chill before serving. This Easy Chickpea Tuna Salad is simple and quick. You can find the Full Recipe for more details. Enjoy it as a meal or snack! - Use freshly squeezed lemon juice for a brighter flavor. This adds freshness. - Adjust seasoning to taste. Start with a little and add more if needed. - Pair the salad with whole grain crackers. This adds crunch and fullness. - Serve as a filling for lettuce wraps. It makes a great low-carb meal. - Garnish with extra parsley and lemon wedges. This makes your dish look bright and inviting. - Use a colorful bowl to showcase the vibrant ingredients. This enhances the overall experience. For the full recipe, check the detailed steps to create this delicious dish! {{image_4}} You can easily change up the recipe to suit your taste. If you want a plant-based option, swap Greek yogurt for vegan mayonnaise. This keeps the salad creamy and tasty. You can also switch the chickpeas for different beans. Black beans or white beans both work well. These swaps give you a fun twist on the classic recipe. Want to add some crunch? Diced celery is a great choice. It brings a nice texture to the salad. If you like salty flavors, try adding olives. They give a briny kick that pairs well with the other ingredients. Feel free to get creative with your flavor choices! If you need to make it gluten-free, check the ingredients you use. Most of the items in the salad should be gluten-free. Just make sure that any sauces or extras are also gluten-free. This way, you can enjoy the salad without worry. For the Full Recipe, check out the complete guide for making this delicious dish! Store your chickpea tuna salad in an airtight container. This keeps it fresh. Make sure the lid is on tight. For the best taste, eat it within 3-4 days. After this time, it may lose flavor. This salad is best served cold or at room temperature. Avoid reheating to keep the texture and taste just right. Enjoy it straight from the fridge for a quick meal! Yes, you can make it a few hours in advance. This gives the flavors time to meld together. I often make this salad in the morning for lunch later. It’s easy and saves time! Absolutely! This salad holds up well for meal prep. You can store it in the fridge for a few days. It remains tasty and fresh, making it a great option for busy weeks. This salad is high in protein, fiber, and healthy fats. Chickpeas provide protein and fiber, while tuna adds more protein. Greek yogurt gives creaminess and healthy fats. Overall, it's a nutritious choice for any meal. In this article, we explored how to make a tasty and simple Chickpea Tuna Salad. You learned the key ingredients and followed easy steps to prepare it. We discussed tips for adding flavor and how to store any leftovers. Finally, the salad’s health benefits make it a smart choice for meals. This salad is quick, nutritious, and great for any occasion. Enjoy making it in your own kitchen!](https://goldendishy.com/wp-content/uploads/2025/07/30687038-eca4-4cc3-b428-c7157439eb59-768x768.webp)
![- Bell pepper (red, yellow, or green) - Zucchini and yellow squash - Red onion and cherry tomatoes - Mushrooms When I make grilled veggie skewers, I choose a mix of colorful vegetables. They not only look great but also taste fantastic. Bell peppers are a must. You can pick red, yellow, or green. Each type adds a sweet taste. Zucchini and yellow squash are next. Their soft texture and mild flavor work well on the grill. I like to cut them into thick rounds. This helps them hold their shape while cooking. Red onions add a nice bite. I cut them into wedges so they cook evenly. Cherry tomatoes are fun and juicy. I use them whole, so they burst with flavor when grilled. Finally, I love mushrooms. They soak up the marinade and get smoky when grilled. - Olive oil, garlic powder, smoked paprika - Salt and black pepper To bring out the flavors, I use a simple marinade. I drizzle extra virgin olive oil over the veggies. It helps the spices stick and adds richness. I sprinkle garlic powder for a savory kick and smoked paprika for a hint of smoke. Don’t forget to add salt and black pepper. They enhance all the natural flavors. I mix everything well, so each piece is coated. This step is crucial for a tasty outcome. - Fresh basil leaves After grilling, I like to add fresh basil leaves. They give a burst of color and flavor. Just tear them up and sprinkle on top of the skewers. This final touch makes the dish even more inviting. For the full recipe, check out the [Full Recipe]. First, we need to get our grill ready. Preheating is key to good grilling. It helps to cook the veggies evenly and gives them nice grill marks. Set your grill to medium-high heat. This temperature is perfect for cooking our colorful skewers. Let’s prep our vegetables. Start by cutting them into pieces. Cut the bell pepper into 1-inch chunks. Slice the zucchini and yellow squash into thick rounds. Cut the red onion into wedges. Keep the cherry tomatoes whole and use whole mushrooms or half them if they are large. Next, we’ll mix the veggies. Place all the cut veggies in a big bowl. Drizzle them with olive oil and sprinkle in garlic powder, smoked paprika, salt, and black pepper. Now, toss everything gently with your hands or a spatula. Make sure each piece is well-coated with the seasoning. This step adds a lot of flavor! Now comes the fun part: assembling the skewers. Take a skewer and start threading the veggies. Alternate the types of veggies to create a colorful mix. This not only looks great but also adds different flavors in every bite. Be careful when handling the skewers. The ends can be sharp, so keep your hands clear when you thread the veggies. Once you finish, your skewers are ready for the grill. For the full recipe, check out the details above. Grilling veggie skewers is simple and fun. Aim for a medium-high heat. This ensures your veggies cook well. Grill them for about 10-12 minutes. Turn them often to get nice grill marks. You want them tender but not mushy. To boost flavor, try adding spices like cumin or dill. A splash of lemon juice also brightens the taste. For a smoky flavor, use smoked paprika or a dash of liquid smoke. Marinades can add depth, too. A blend of olive oil, vinegar, and herbs works great. For a beautiful presentation, stand skewers upright in a holder. You can also lay them on a platter. Drizzle with olive oil and sprinkle fresh herbs. Pair the skewers with dips like hummus or tzatziki. These add flavor and make serving easier. Check out the Full Recipe for more ideas! {{image_4}} You can mix and match veggies for your skewers. Seasonal vegetables make great choices. In summer, try zucchini and corn. In fall, use butternut squash and Brussels sprouts. You can also add eggplant for a nice smoky taste. Asparagus gives a nice crunch and fresh flavor. If you can’t grill, you can bake or roast your skewers. For oven-baking, preheat your oven to 400°F (200°C). Place the skewers on a baking sheet. Bake for about 20 minutes. Keep an eye on them to ensure they don’t burn. Roasting gives a rich taste and helps the flavors blend well. This recipe is easy to adapt for different diets. For a vegan version, stick to the veggies and oil. If you need gluten-free options, all ingredients in this recipe work well. Just make sure to check labels on sauces or seasonings. You can enjoy tasty skewers that fit your needs by making small swaps. For the full recipe, check the details above. To keep your grilled veggie skewers fresh, use airtight containers. Store them in the fridge right after they cool down. Make sure to eat them within three days for the best taste and quality. If you notice any moisture, add a paper towel inside the container to soak it up. You can reheat skewers in the microwave or on the grill. For the microwave, place them on a plate and cover them with a damp paper towel. Heat in short bursts to avoid overcooking. To reheat on the grill, warm it up and place the skewers back on for a few minutes. This keeps the texture nice and doesn't make them soggy. To freeze skewers, wrap them tightly in plastic wrap and place them in a freezer bag. Make sure to remove as much air as possible. They can last for up to three months in the freezer. When you’re ready to eat them, thaw them in the fridge overnight. Reheat on the grill or in the oven to restore their flavor and texture. For the full recipe, check out the details above. I prefer metal skewers for grilling. They heat up quickly and help cook the veggies evenly. They are also reusable, making them eco-friendly. Wooden skewers are lighter but can burn easily. If you use wooden skewers, you need to soak them in water first. This helps prevent them from catching fire. Both types work well, so choose what you like best. Yes, you can use frozen vegetables. They are convenient and save time. However, frozen veggies may not have the same texture as fresh ones. They can become mushy when cooked. If you choose to use them, thaw them first. Pat them dry to remove extra moisture before grilling. This helps keep them from steaming and allows for better grilling. To prevent sticking, coat your vegetables with olive oil. This adds flavor and creates a barrier. Preheat your grill well before adding the skewers. A hot grill helps to sear the veggies quickly. Turn them gently with tongs. Avoid using a fork, as this can pierce the vegetables and let juices escape. Keep an eye on them, so they don't burn. Soaking wooden skewers is a good idea. It prevents them from burning on the grill. Soak them for at least 30 minutes before using. This helps them stay intact while grilling. If you skip soaking, watch them closely as they cook. You might need to turn down the heat to avoid burning. Soaking is a simple step that makes grilling easier. This blog post guides you on making vibrant vegetable skewers. We covered key ingredients, including bell peppers, zucchini, and cherry tomatoes. I shared tips for preparing the grill and veggies, along with assembling skewers safely. Remember optimal grilling time and temperature for the best results. You can try different vegetables or cooking methods for variety. Don’t forget about storing leftovers properly for later enjoyment. With the right techniques, you’ll create tasty skewers that impress. Your grilling skills can elevate any meal!](https://goldendishy.com/wp-content/uploads/2025/06/899b9bee-2fb2-475c-b5a5-3b543ce01d01-768x768.webp)