Roasted Garlic Cauliflower Bites Savory Snack Idea
![- 1 medium head of cauliflower, cut into bite-sized florets - 4 cloves fresh garlic, finely minced - 3 tablespoons extra virgin olive oil - 1 teaspoon smoked paprika - 1 teaspoon fine sea salt - ½ teaspoon freshly ground black pepper The main ingredients create a base of flavor. Cauliflower gives a nice texture and absorbs the garlic well. Garlic adds a strong taste that enhances the dish. Olive oil helps with roasting and adds richness. Smoked paprika brings depth, while salt and pepper balance the flavors. - 2 tablespoons grated Parmesan cheese - Fresh parsley, finely chopped You can add Parmesan cheese for a cheesy twist. It melts nicely and adds a savory note. Fresh parsley adds color and freshness on top. These add-ins make the bites even more delightful. - Baking sheet - Mixing bowl - Parchment paper A baking sheet is essential for roasting. Use a mixing bowl to combine all the ingredients. Parchment paper helps with easy cleanup and prevents sticking. These tools make the cooking process smooth and simple. You can find the Full Recipe above for more details. 1. Preheat the Oven: Start by preheating your oven to 425°F (220°C). This heat helps make the bites crispy and golden. 2. Prepare the Cauliflower: Cut one medium head of cauliflower into bite-sized florets. Make sure they are all similar in size. This helps them cook evenly. 1. Combine Cauliflower and Seasonings: In a large mixing bowl, add the cauliflower florets. Then, add 4 minced garlic cloves, 3 tablespoons of olive oil, 1 teaspoon of smoked paprika, 1 teaspoon of sea salt, and ½ teaspoon of black pepper. 2. Ensure Even Coating: Toss everything together well. You want the florets to be fully coated with the olive oil and seasonings. This gives them great flavor. 1. Arrange on Baking Sheet: Line a baking sheet with parchment paper for easy cleanup. Spread the cauliflower in a single layer. Make sure the florets have space. This helps them roast well. 2. Roast Duration and Tips: Place the sheet in the oven. Roast for 25-30 minutes. Keep an eye on them. Toss the florets halfway through. This helps them cook evenly. If you like cheese, sprinkle 2 tablespoons of grated Parmesan cheese on top in the last 5 minutes. This adds a nice touch. Enjoy the full recipe for all the details and tips for these delicious bites! Ensuring Tender Florets To get tender florets, cut them into uniform pieces. This helps them cook at the same rate. Toss them well with oil and seasonings. The olive oil locks in moisture and adds a nice flavor. Roasting at 425°F (220°C) gives the perfect balance of crispiness and tenderness. Avoiding Soggy Cauliflower Space the florets on the baking sheet. If they are too close, steam will build up and make them soggy. Use parchment paper to keep them from sticking. This also helps with cleanup. Remember to toss them halfway through roasting for even cooking. Adding Spices Spices can elevate the taste of your cauliflower bites. I love using smoked paprika for depth. You can also try garlic powder, cayenne, or cumin for a twist. Start with small amounts and adjust to your taste. Using Different Oils While olive oil is great, try other oils for different flavors. Avocado oil works well for high heat. You can also use sesame oil for a nutty taste. Just ensure the oil has a high smoke point to avoid burning. Serving Suggestions Serve the roasted garlic cauliflower bites on a rustic wooden platter. This adds warmth to your meal. You can also arrange them in a circle with a bowl of dipping sauce in the center. This invites guests to dig in. Garnishing Techniques Garnish with fresh parsley for a pop of color. You can also sprinkle some lemon zest on top for a refreshing zing. If you used Parmesan, let some shavings fall over the bites to enhance the look and flavor. For the complete recipe, check the [Full Recipe]. {{image_4}} Vegan Alternatives You can easily make these bites vegan. Just skip the Parmesan cheese. The garlic and spices keep the taste rich and satisfying. You can also add nutritional yeast for a cheesy flavor without dairy. Gluten-Free Options This recipe is naturally gluten-free! You can enjoy it without any worry. Always check labels on packaged spices or sauces to ensure they are gluten-free. Spice Variations Want a kick? Add cayenne pepper or chili powder. For a milder flavor, use paprika or turmeric. You can also try curry powder for an exotic twist. Herb Infusions Fresh herbs make a big difference. Add rosemary or thyme for earthy notes. Basil or cilantro can brighten the dish. Mix and match to find your favorite combination. Air Fryer Instructions Using an air fryer makes these bites super crispy. Set your air fryer to 400°F (200°C). Cook them for about 15-20 minutes, shaking the basket halfway through. Grilling Method Grilling adds a smoky flavor. Toss the cauliflower in a grill basket. Grill over medium heat for about 10-15 minutes. Turn occasionally for even cooking. Enjoy the charred bits! Store any leftovers in an airtight container. This helps keep them fresh. You can place them in the fridge. They stay good for about 3 to 5 days. If you see any signs of spoilage, throw them away. You have two options for reheating: oven or microwave. The oven keeps the bites crispy. Preheat it to 350°F (175°C) and heat for about 10 minutes. The microwave is faster, but it can make them soggy. If using a microwave, heat in 30-second intervals. You can freeze roasted cauliflower bites if you want to save some. Let them cool completely first. Place them in a freezer-safe bag. They can last up to 3 months in the freezer. When ready to eat, thaw them in the fridge overnight. Reheat in the oven for the best texture. To make your roasted garlic cauliflower bites crispy, follow these tips: - Cut the cauliflower into small, even pieces. - Make sure to coat every floret with olive oil. - Spread the florets out on the baking sheet, leaving space between them. - Roast at a high temperature, around 425°F (220°C). - Toss the cauliflower halfway through cooking to ensure even roasting. - If you want extra crunch, broil for the last few minutes. Yes, you can use frozen cauliflower. However, it’s best to thaw it first. Pat it dry with a towel. This helps remove excess moisture, which can make your bites soggy. The cooking time may be shorter, so check for doneness a few minutes early. A great dipping sauce pairs well with roasted garlic cauliflower bites. Here are some tasty options: - Ranch dressing for a classic taste. - Garlic aioli for a creamy twist. - Spicy sriracha for a kick of heat. - Hummus for a healthy choice. Feel free to try different sauces to find your favorite! To adjust the recipe for more servings, simply multiply the ingredients. For example: - Use two heads of cauliflower for eight servings. - Keep the same ratio for olive oil and seasonings. - Roast in batches if your baking sheet is too small. This way, you’ll still get delicious, crispy bites! For the complete instructions, check the Full Recipe. Roasted garlic cauliflower is easy to make and very tasty. We covered the main ingredients, like cauliflower and garlic, and shared tips for perfect texture and flavors. You learned about storage and reheating methods to keep your dish fresh. Try different variations to suit your tastes or dietary needs. Enjoy this dish as a side or snack. It’s healthy, fun, and simple. You'll love making it again and again!](https://goldendishy.com/wp-content/uploads/2025/06/58dc371e-82c7-47cc-93f2-9c36524126f6.webp)
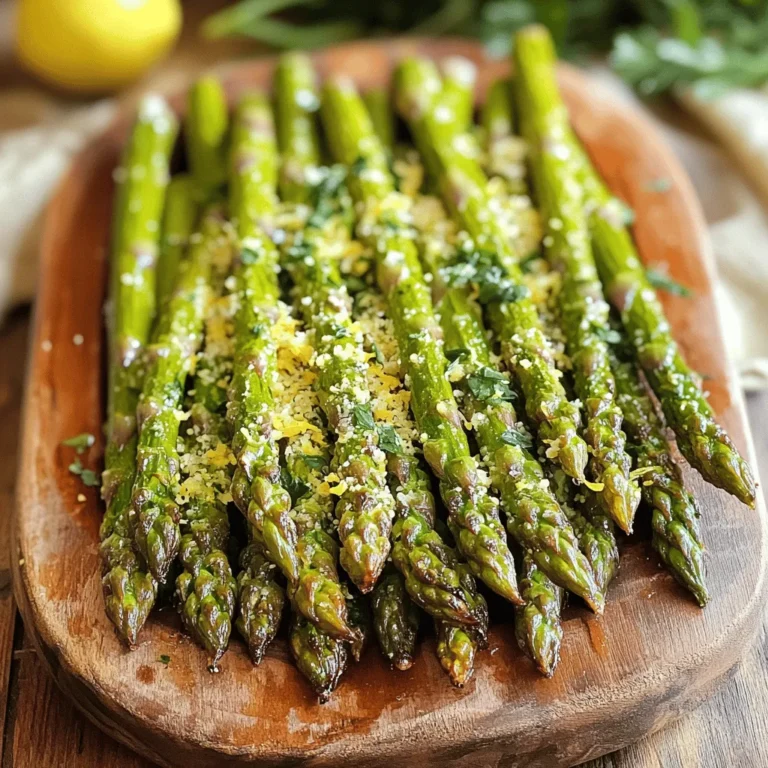
Are you looking for a tasty snack that’s easy to make and good for you? Roasted Garlic Cauliflower Bites are the answer! This savory treat is packed with flavor and comes together quickly with simple ingredients. In this guide, I’ll walk you through each step, from prepping the cauliflower to achieving that perfect crispiness. Get ready to impress your taste buds with a snack that’s not just delicious but healthy too!
Ingredients
Main Ingredients
– 1 medium head of cauliflower, cut into bite-sized florets
– 4 cloves fresh garlic, finely minced
– 3 tablespoons extra virgin olive oil
– 1 teaspoon smoked paprika
– 1 teaspoon fine sea salt
– ½ teaspoon freshly ground black pepper
The main ingredients create a base of flavor. Cauliflower gives a nice texture and absorbs the garlic well. Garlic adds a strong taste that enhances the dish. Olive oil helps with roasting and adds richness. Smoked paprika brings depth, while salt and pepper balance the flavors.
Optional Add-ins
– 2 tablespoons grated Parmesan cheese
– Fresh parsley, finely chopped
You can add Parmesan cheese for a cheesy twist. It melts nicely and adds a savory note. Fresh parsley adds color and freshness on top. These add-ins make the bites even more delightful.
Equipment Needed
– Baking sheet
– Mixing bowl
– Parchment paper
A baking sheet is essential for roasting. Use a mixing bowl to combine all the ingredients. Parchment paper helps with easy cleanup and prevents sticking. These tools make the cooking process smooth and simple.
Step-by-Step Instructions
Preparation Steps
1. Preheat the Oven: Start by preheating your oven to 425°F (220°C). This heat helps make the bites crispy and golden.
2. Prepare the Cauliflower: Cut one medium head of cauliflower into bite-sized florets. Make sure they are all similar in size. This helps them cook evenly.
Mixing Ingredients
1. Combine Cauliflower and Seasonings: In a large mixing bowl, add the cauliflower florets. Then, add 4 minced garlic cloves, 3 tablespoons of olive oil, 1 teaspoon of smoked paprika, 1 teaspoon of sea salt, and ½ teaspoon of black pepper.
2. Ensure Even Coating: Toss everything together well. You want the florets to be fully coated with the olive oil and seasonings. This gives them great flavor.
Roasting the Cauliflower
1. Arrange on Baking Sheet: Line a baking sheet with parchment paper for easy cleanup. Spread the cauliflower in a single layer. Make sure the florets have space. This helps them roast well.
2. Roast Duration and Tips: Place the sheet in the oven. Roast for 25-30 minutes. Keep an eye on them. Toss the florets halfway through. This helps them cook evenly. If you like cheese, sprinkle 2 tablespoons of grated Parmesan cheese on top in the last 5 minutes. This adds a nice touch.
Tips & Tricks
Achieving Perfect Texture
Ensuring Tender Florets
To get tender florets, cut them into uniform pieces. This helps them cook at the same rate. Toss them well with oil and seasonings. The olive oil locks in moisture and adds a nice flavor. Roasting at 425°F (220°C) gives the perfect balance of crispiness and tenderness.
Avoiding Soggy Cauliflower
Space the florets on the baking sheet. If they are too close, steam will build up and make them soggy. Use parchment paper to keep them from sticking. This also helps with cleanup. Remember to toss them halfway through roasting for even cooking.
Flavor Enhancements
Adding Spices
Spices can elevate the taste of your cauliflower bites. I love using smoked paprika for depth. You can also try garlic powder, cayenne, or cumin for a twist. Start with small amounts and adjust to your taste.
Using Different Oils
While olive oil is great, try other oils for different flavors. Avocado oil works well for high heat. You can also use sesame oil for a nutty taste. Just ensure the oil has a high smoke point to avoid burning.
Presentation Ideas
Serving Suggestions
Serve the roasted garlic cauliflower bites on a rustic wooden platter. This adds warmth to your meal. You can also arrange them in a circle with a bowl of dipping sauce in the center. This invites guests to dig in.
Garnishing Techniques
Garnish with fresh parsley for a pop of color. You can also sprinkle some lemon zest on top for a refreshing zing. If you used Parmesan, let some shavings fall over the bites to enhance the look and flavor.

Variations
Dietary Adjustments
Vegan Alternatives
You can easily make these bites vegan. Just skip the Parmesan cheese. The garlic and spices keep the taste rich and satisfying. You can also add nutritional yeast for a cheesy flavor without dairy.
Gluten-Free Options
This recipe is naturally gluten-free! You can enjoy it without any worry. Always check labels on packaged spices or sauces to ensure they are gluten-free.
Flavor Profile Changes
Spice Variations
Want a kick? Add cayenne pepper or chili powder. For a milder flavor, use paprika or turmeric. You can also try curry powder for an exotic twist.
Herb Infusions
Fresh herbs make a big difference. Add rosemary or thyme for earthy notes. Basil or cilantro can brighten the dish. Mix and match to find your favorite combination.
Cooking Methods
Air Fryer Instructions
Using an air fryer makes these bites super crispy. Set your air fryer to 400°F (200°C). Cook them for about 15-20 minutes, shaking the basket halfway through.
Grilling Method
Grilling adds a smoky flavor. Toss the cauliflower in a grill basket. Grill over medium heat for about 10-15 minutes. Turn occasionally for even cooking. Enjoy the charred bits!
Storage Info
Refrigerating Leftovers
Store any leftovers in an airtight container. This helps keep them fresh. You can place them in the fridge. They stay good for about 3 to 5 days. If you see any signs of spoilage, throw them away.
Reheating Recommendations
You have two options for reheating: oven or microwave. The oven keeps the bites crispy. Preheat it to 350°F (175°C) and heat for about 10 minutes. The microwave is faster, but it can make them soggy. If using a microwave, heat in 30-second intervals.
Freezing Tips
You can freeze roasted cauliflower bites if you want to save some. Let them cool completely first. Place them in a freezer-safe bag. They can last up to 3 months in the freezer. When ready to eat, thaw them in the fridge overnight. Reheat in the oven for the best texture.
FAQs
How do I make roasted garlic cauliflower bites crispy?
To make your roasted garlic cauliflower bites crispy, follow these tips:
– Cut the cauliflower into small, even pieces.
– Make sure to coat every floret with olive oil.
– Spread the florets out on the baking sheet, leaving space between them.
– Roast at a high temperature, around 425°F (220°C).
– Toss the cauliflower halfway through cooking to ensure even roasting.
– If you want extra crunch, broil for the last few minutes.
Can I use frozen cauliflower for this recipe?
Yes, you can use frozen cauliflower. However, it’s best to thaw it first. Pat it dry with a towel. This helps remove excess moisture, which can make your bites soggy. The cooking time may be shorter, so check for doneness a few minutes early.
What’s the best dipping sauce for roasted garlic cauliflower bites?
A great dipping sauce pairs well with roasted garlic cauliflower bites. Here are some tasty options:
– Ranch dressing for a classic taste.
– Garlic aioli for a creamy twist.
– Spicy sriracha for a kick of heat.
– Hummus for a healthy choice.
Feel free to try different sauces to find your favorite!
How can I adjust the recipe for more servings?
To adjust the recipe for more servings, simply multiply the ingredients. For example:
– Use two heads of cauliflower for eight servings.
– Keep the same ratio for olive oil and seasonings.
– Roast in batches if your baking sheet is too small.
This way, you’ll still get delicious, crispy bites!
Roasted garlic cauliflower is easy to make and very tasty. We covered the main ingredients, like cauliflower and garlic, and shared tips for perfect texture and flavors. You learned about storage and reheating methods to keep your dish fresh. Try different variations to suit your tastes or dietary needs. Enjoy this dish as a side or snack. It’s healthy, fun, and simple. You’ll love making it again and again!
![- 1 medium head of cauliflower, cut into bite-sized florets - 4 cloves fresh garlic, finely minced - 3 tablespoons extra virgin olive oil - 1 teaspoon smoked paprika - 1 teaspoon fine sea salt - ½ teaspoon freshly ground black pepper The main ingredients create a base of flavor. Cauliflower gives a nice texture and absorbs the garlic well. Garlic adds a strong taste that enhances the dish. Olive oil helps with roasting and adds richness. Smoked paprika brings depth, while salt and pepper balance the flavors. - 2 tablespoons grated Parmesan cheese - Fresh parsley, finely chopped You can add Parmesan cheese for a cheesy twist. It melts nicely and adds a savory note. Fresh parsley adds color and freshness on top. These add-ins make the bites even more delightful. - Baking sheet - Mixing bowl - Parchment paper A baking sheet is essential for roasting. Use a mixing bowl to combine all the ingredients. Parchment paper helps with easy cleanup and prevents sticking. These tools make the cooking process smooth and simple. You can find the Full Recipe above for more details. 1. Preheat the Oven: Start by preheating your oven to 425°F (220°C). This heat helps make the bites crispy and golden. 2. Prepare the Cauliflower: Cut one medium head of cauliflower into bite-sized florets. Make sure they are all similar in size. This helps them cook evenly. 1. Combine Cauliflower and Seasonings: In a large mixing bowl, add the cauliflower florets. Then, add 4 minced garlic cloves, 3 tablespoons of olive oil, 1 teaspoon of smoked paprika, 1 teaspoon of sea salt, and ½ teaspoon of black pepper. 2. Ensure Even Coating: Toss everything together well. You want the florets to be fully coated with the olive oil and seasonings. This gives them great flavor. 1. Arrange on Baking Sheet: Line a baking sheet with parchment paper for easy cleanup. Spread the cauliflower in a single layer. Make sure the florets have space. This helps them roast well. 2. Roast Duration and Tips: Place the sheet in the oven. Roast for 25-30 minutes. Keep an eye on them. Toss the florets halfway through. This helps them cook evenly. If you like cheese, sprinkle 2 tablespoons of grated Parmesan cheese on top in the last 5 minutes. This adds a nice touch. Enjoy the full recipe for all the details and tips for these delicious bites! Ensuring Tender Florets To get tender florets, cut them into uniform pieces. This helps them cook at the same rate. Toss them well with oil and seasonings. The olive oil locks in moisture and adds a nice flavor. Roasting at 425°F (220°C) gives the perfect balance of crispiness and tenderness. Avoiding Soggy Cauliflower Space the florets on the baking sheet. If they are too close, steam will build up and make them soggy. Use parchment paper to keep them from sticking. This also helps with cleanup. Remember to toss them halfway through roasting for even cooking. Adding Spices Spices can elevate the taste of your cauliflower bites. I love using smoked paprika for depth. You can also try garlic powder, cayenne, or cumin for a twist. Start with small amounts and adjust to your taste. Using Different Oils While olive oil is great, try other oils for different flavors. Avocado oil works well for high heat. You can also use sesame oil for a nutty taste. Just ensure the oil has a high smoke point to avoid burning. Serving Suggestions Serve the roasted garlic cauliflower bites on a rustic wooden platter. This adds warmth to your meal. You can also arrange them in a circle with a bowl of dipping sauce in the center. This invites guests to dig in. Garnishing Techniques Garnish with fresh parsley for a pop of color. You can also sprinkle some lemon zest on top for a refreshing zing. If you used Parmesan, let some shavings fall over the bites to enhance the look and flavor. For the complete recipe, check the [Full Recipe]. {{image_4}} Vegan Alternatives You can easily make these bites vegan. Just skip the Parmesan cheese. The garlic and spices keep the taste rich and satisfying. You can also add nutritional yeast for a cheesy flavor without dairy. Gluten-Free Options This recipe is naturally gluten-free! You can enjoy it without any worry. Always check labels on packaged spices or sauces to ensure they are gluten-free. Spice Variations Want a kick? Add cayenne pepper or chili powder. For a milder flavor, use paprika or turmeric. You can also try curry powder for an exotic twist. Herb Infusions Fresh herbs make a big difference. Add rosemary or thyme for earthy notes. Basil or cilantro can brighten the dish. Mix and match to find your favorite combination. Air Fryer Instructions Using an air fryer makes these bites super crispy. Set your air fryer to 400°F (200°C). Cook them for about 15-20 minutes, shaking the basket halfway through. Grilling Method Grilling adds a smoky flavor. Toss the cauliflower in a grill basket. Grill over medium heat for about 10-15 minutes. Turn occasionally for even cooking. Enjoy the charred bits! Store any leftovers in an airtight container. This helps keep them fresh. You can place them in the fridge. They stay good for about 3 to 5 days. If you see any signs of spoilage, throw them away. You have two options for reheating: oven or microwave. The oven keeps the bites crispy. Preheat it to 350°F (175°C) and heat for about 10 minutes. The microwave is faster, but it can make them soggy. If using a microwave, heat in 30-second intervals. You can freeze roasted cauliflower bites if you want to save some. Let them cool completely first. Place them in a freezer-safe bag. They can last up to 3 months in the freezer. When ready to eat, thaw them in the fridge overnight. Reheat in the oven for the best texture. To make your roasted garlic cauliflower bites crispy, follow these tips: - Cut the cauliflower into small, even pieces. - Make sure to coat every floret with olive oil. - Spread the florets out on the baking sheet, leaving space between them. - Roast at a high temperature, around 425°F (220°C). - Toss the cauliflower halfway through cooking to ensure even roasting. - If you want extra crunch, broil for the last few minutes. Yes, you can use frozen cauliflower. However, it’s best to thaw it first. Pat it dry with a towel. This helps remove excess moisture, which can make your bites soggy. The cooking time may be shorter, so check for doneness a few minutes early. A great dipping sauce pairs well with roasted garlic cauliflower bites. Here are some tasty options: - Ranch dressing for a classic taste. - Garlic aioli for a creamy twist. - Spicy sriracha for a kick of heat. - Hummus for a healthy choice. Feel free to try different sauces to find your favorite! To adjust the recipe for more servings, simply multiply the ingredients. For example: - Use two heads of cauliflower for eight servings. - Keep the same ratio for olive oil and seasonings. - Roast in batches if your baking sheet is too small. This way, you’ll still get delicious, crispy bites! For the complete instructions, check the Full Recipe. Roasted garlic cauliflower is easy to make and very tasty. We covered the main ingredients, like cauliflower and garlic, and shared tips for perfect texture and flavors. You learned about storage and reheating methods to keep your dish fresh. Try different variations to suit your tastes or dietary needs. Enjoy this dish as a side or snack. It’s healthy, fun, and simple. You'll love making it again and again!](https://goldendishy.com/wp-content/uploads/2025/06/58dc371e-82c7-47cc-93f2-9c36524126f6-300x300.webp)


![- 1 can refrigerated pizza dough - 4 tablespoons unsalted butter, melted - 4 cloves garlic, finely minced - 1 teaspoon dried oregano - 1 teaspoon dried parsley - 1/2 teaspoon sea salt - 1/4 teaspoon freshly cracked black pepper - Optional toppings: Grated Parmesan cheese To make these breadsticks, you need simple ingredients. The key is the pizza dough. It makes the process quick and easy. The butter and garlic blend perfectly to give a rich flavor. Oregano and parsley add freshness. Sea salt and black pepper enhance all the tastes. - Baking sheet - Parchment paper - Mixing bowl - Knife or pizza cutter - Measuring spoons You will need a few basic kitchen tools. A baking sheet and parchment paper help with easy cleanup. A mixing bowl mixes your garlic butter. A knife or pizza cutter cuts the dough into strips. Measuring spoons ensure you use the right amounts. Using the right ingredients and tools will make your garlic breadsticks tasty and fun to make. You can find the full recipe in the earlier section. Start by preheating your oven to 400°F (200°C). This ensures the oven is hot when you bake. Next, take your can of refrigerated pizza dough. On a clean, lightly floured surface, roll out the dough into a rectangle. Aim for a thickness of about 1/2 inch. A uniform thickness helps the breadsticks bake evenly. Now it’s time to cut the dough into strips. Use a sharp knife or pizza cutter for best results. Cut the dough into strips that are around 1-inch wide. This size is perfect for dipping. Make sure your cuts are even, as this will give you uniform breadsticks. In a small bowl, mix the melted butter with minced garlic, dried oregano, dried parsley, sea salt, and black pepper. Stir well until all the ingredients blend together. This garlic butter mixture adds tons of flavor. Make sure you coat each strip of dough evenly for the best taste. Line a baking sheet with parchment paper. Arrange the breadstick strips on the sheet, leaving about an inch of space between each one. This space allows them to bake evenly. Place the baking sheet in your preheated oven. Bake for 12-15 minutes, until the breadsticks turn golden brown. Keep an eye on them to avoid overbaking. When done, let them cool for a few minutes before serving. Enjoy your garlic breadsticks! For the complete recipe, check the Full Recipe section. To get that perfect breadstick texture, start with a hot oven. A preheated oven at 400°F (200°C) helps brown the breadsticks well. Place your baking sheet in the middle of the oven for even heat. Check them often as they bake. You want them golden brown, not burnt. Keep an eye on them during the last few minutes. If they look golden, they are ready. Overbaking can make them hard. So, watch closely! Adding herbs can boost the flavor of your breadsticks. Try mixing in fresh basil or thyme for a twist. If you like a spicy kick, add red pepper flakes to the garlic butter. You can also try mixing in some Italian seasoning or rosemary. Experimenting lets you find your favorite flavor. Use what you enjoy most! For a fun and creative way to serve your breadsticks, stand them upright in a tall glass. It looks nice and keeps them warm. You can also place them in a basket lined with a cloth. This adds a rustic touch. Pair your breadsticks with marinara sauce or garlic-infused olive oil for dipping. It makes each bite even better. Enjoy the flavors! {{image_4}} For a cheesy twist, you can stuff your breadsticks. First, roll out the pizza dough. Cut it into strips, about 1-inch wide. Place a small piece of cheese in the middle of each strip. Then, fold the dough over the cheese and pinch it to seal. Great cheese options include: - Mozzarella - Cheddar - Cream cheese These cheeses melt well and add a rich flavor. You can make garlic breadsticks even better by using fresh herbs. Try adding chopped basil or thyme to the garlic butter mix. This adds a bright flavor. You can also mix in a little lemon zest. It brightens up the taste even more. Combining flavors is easy. Use sun-dried tomatoes or olives in the dough. These give a unique twist to your breadsticks. If you want a vegan version, swap out the butter. You can use olive oil or vegan butter. Both give great flavor without dairy. Also, check your pizza dough. Some brands have dairy, so look for vegan options. Adjust your garlic butter mix to include your chosen fat. Enjoy the same delicious taste without any animal products. For the full recipe, check out the [Full Recipe]. To keep your leftover breadsticks fresh, follow these tips: - Refrigeration: Place the breadsticks in an airtight container. This helps keep them soft and tasty. They will last for up to three days in the fridge. - Freezing: For longer storage, freeze the breadsticks. Wrap them tightly in plastic wrap and then in foil. This prevents freezer burn. They can be frozen for up to three months. When you want to enjoy your breadsticks again, reheating is key. Here are two popular methods: - Oven Method: Preheat your oven to 350°F (175°C). Place the breadsticks on a baking sheet. Heat them for about 10 minutes. This will make them warm and crisp. - Microwave Method: If you need a quick fix, use the microwave. Place the breadsticks on a microwave-safe plate. Cover them with a damp paper towel. Heat for about 20-30 seconds. This keeps them soft but may not give the same crispness as the oven. Yes, you can use homemade pizza dough for these breadsticks. Just make sure your dough is soft and easy to roll out. If you choose to use a thicker dough, you may need to bake it a bit longer. Roll the dough to about 1/2 inch thick. This thickness helps the breadsticks cook evenly. Remember to season your garlic butter mixture well, as homemade dough can absorb flavors differently. To make gluten-free garlic breadsticks, use a gluten-free pizza dough mix. Many brands offer ready-made options. You can also make it from scratch with gluten-free flour. Make sure to follow the instructions on the package for best results. Add the same garlic butter mixture for great flavor. This way, everyone can enjoy tasty garlic breadsticks! Garlic breadsticks are great with many meals. They go well with pasta dishes, like spaghetti or fettuccine alfredo. You can also serve them with soups, like minestrone or tomato basil. For drinks, pair them with a light salad or a refreshing sparkling water. You can even enjoy them with a glass of red wine if you prefer. The flavors of garlic and herbs complement many dishes, making them a versatile side! You now know how to make easy garlic breadsticks from simple ingredients. With just a few steps, you can prepare delicious breadsticks that add flavor to any meal. Remember to experiment with toppings and herbs to create your own unique twist. Store any leftovers properly, or even freeze them for later. Enjoy baking these treats and sharing them with others. Your homemade garlic breadsticks will surely impress everyone!](https://goldendishy.com/wp-content/uploads/2025/07/3052f1a4-9d5f-43ae-ba15-9488150fef43-768x768.webp)