
Grilled Veggie Skewers Flavorful and Easy Recipe
![- Bell pepper (red, yellow, or green) - Zucchini and yellow squash - Red onion and cherry tomatoes - Mushrooms When I make grilled veggie skewers, I choose a mix of colorful vegetables. They not only look great but also taste fantastic. Bell peppers are a must. You can pick red, yellow, or green. Each type adds a sweet taste. Zucchini and yellow squash are next. Their soft texture and mild flavor work well on the grill. I like to cut them into thick rounds. This helps them hold their shape while cooking. Red onions add a nice bite. I cut them into wedges so they cook evenly. Cherry tomatoes are fun and juicy. I use them whole, so they burst with flavor when grilled. Finally, I love mushrooms. They soak up the marinade and get smoky when grilled. - Olive oil, garlic powder, smoked paprika - Salt and black pepper To bring out the flavors, I use a simple marinade. I drizzle extra virgin olive oil over the veggies. It helps the spices stick and adds richness. I sprinkle garlic powder for a savory kick and smoked paprika for a hint of smoke. Don’t forget to add salt and black pepper. They enhance all the natural flavors. I mix everything well, so each piece is coated. This step is crucial for a tasty outcome. - Fresh basil leaves After grilling, I like to add fresh basil leaves. They give a burst of color and flavor. Just tear them up and sprinkle on top of the skewers. This final touch makes the dish even more inviting. For the full recipe, check out the [Full Recipe]. First, we need to get our grill ready. Preheating is key to good grilling. It helps to cook the veggies evenly and gives them nice grill marks. Set your grill to medium-high heat. This temperature is perfect for cooking our colorful skewers. Let’s prep our vegetables. Start by cutting them into pieces. Cut the bell pepper into 1-inch chunks. Slice the zucchini and yellow squash into thick rounds. Cut the red onion into wedges. Keep the cherry tomatoes whole and use whole mushrooms or half them if they are large. Next, we’ll mix the veggies. Place all the cut veggies in a big bowl. Drizzle them with olive oil and sprinkle in garlic powder, smoked paprika, salt, and black pepper. Now, toss everything gently with your hands or a spatula. Make sure each piece is well-coated with the seasoning. This step adds a lot of flavor! Now comes the fun part: assembling the skewers. Take a skewer and start threading the veggies. Alternate the types of veggies to create a colorful mix. This not only looks great but also adds different flavors in every bite. Be careful when handling the skewers. The ends can be sharp, so keep your hands clear when you thread the veggies. Once you finish, your skewers are ready for the grill. For the full recipe, check out the details above. Grilling veggie skewers is simple and fun. Aim for a medium-high heat. This ensures your veggies cook well. Grill them for about 10-12 minutes. Turn them often to get nice grill marks. You want them tender but not mushy. To boost flavor, try adding spices like cumin or dill. A splash of lemon juice also brightens the taste. For a smoky flavor, use smoked paprika or a dash of liquid smoke. Marinades can add depth, too. A blend of olive oil, vinegar, and herbs works great. For a beautiful presentation, stand skewers upright in a holder. You can also lay them on a platter. Drizzle with olive oil and sprinkle fresh herbs. Pair the skewers with dips like hummus or tzatziki. These add flavor and make serving easier. Check out the Full Recipe for more ideas! {{image_4}} You can mix and match veggies for your skewers. Seasonal vegetables make great choices. In summer, try zucchini and corn. In fall, use butternut squash and Brussels sprouts. You can also add eggplant for a nice smoky taste. Asparagus gives a nice crunch and fresh flavor. If you can’t grill, you can bake or roast your skewers. For oven-baking, preheat your oven to 400°F (200°C). Place the skewers on a baking sheet. Bake for about 20 minutes. Keep an eye on them to ensure they don’t burn. Roasting gives a rich taste and helps the flavors blend well. This recipe is easy to adapt for different diets. For a vegan version, stick to the veggies and oil. If you need gluten-free options, all ingredients in this recipe work well. Just make sure to check labels on sauces or seasonings. You can enjoy tasty skewers that fit your needs by making small swaps. For the full recipe, check the details above. To keep your grilled veggie skewers fresh, use airtight containers. Store them in the fridge right after they cool down. Make sure to eat them within three days for the best taste and quality. If you notice any moisture, add a paper towel inside the container to soak it up. You can reheat skewers in the microwave or on the grill. For the microwave, place them on a plate and cover them with a damp paper towel. Heat in short bursts to avoid overcooking. To reheat on the grill, warm it up and place the skewers back on for a few minutes. This keeps the texture nice and doesn't make them soggy. To freeze skewers, wrap them tightly in plastic wrap and place them in a freezer bag. Make sure to remove as much air as possible. They can last for up to three months in the freezer. When you’re ready to eat them, thaw them in the fridge overnight. Reheat on the grill or in the oven to restore their flavor and texture. For the full recipe, check out the details above. I prefer metal skewers for grilling. They heat up quickly and help cook the veggies evenly. They are also reusable, making them eco-friendly. Wooden skewers are lighter but can burn easily. If you use wooden skewers, you need to soak them in water first. This helps prevent them from catching fire. Both types work well, so choose what you like best. Yes, you can use frozen vegetables. They are convenient and save time. However, frozen veggies may not have the same texture as fresh ones. They can become mushy when cooked. If you choose to use them, thaw them first. Pat them dry to remove extra moisture before grilling. This helps keep them from steaming and allows for better grilling. To prevent sticking, coat your vegetables with olive oil. This adds flavor and creates a barrier. Preheat your grill well before adding the skewers. A hot grill helps to sear the veggies quickly. Turn them gently with tongs. Avoid using a fork, as this can pierce the vegetables and let juices escape. Keep an eye on them, so they don't burn. Soaking wooden skewers is a good idea. It prevents them from burning on the grill. Soak them for at least 30 minutes before using. This helps them stay intact while grilling. If you skip soaking, watch them closely as they cook. You might need to turn down the heat to avoid burning. Soaking is a simple step that makes grilling easier. This blog post guides you on making vibrant vegetable skewers. We covered key ingredients, including bell peppers, zucchini, and cherry tomatoes. I shared tips for preparing the grill and veggies, along with assembling skewers safely. Remember optimal grilling time and temperature for the best results. You can try different vegetables or cooking methods for variety. Don’t forget about storing leftovers properly for later enjoyment. With the right techniques, you’ll create tasty skewers that impress. Your grilling skills can elevate any meal!](https://goldendishy.com/wp-content/uploads/2025/06/899b9bee-2fb2-475c-b5a5-3b543ce01d01.webp)
Looking to impress at your next cookout? My Grilled Veggie Skewers recipe is a must-try! Bursting with color and flavor, these skewers are simple to make and always a hit. You’ll learn how to choose the freshest veggies, master the perfect grill technique, and whip up a tasty marinade. Join me as I take you step-by-step through this delicious, crowd-pleasing dish that’s perfect for everyone!
Ingredients
Main Ingredients Needed
– Bell pepper (red, yellow, or green)
– Zucchini and yellow squash
– Red onion and cherry tomatoes
– Mushrooms
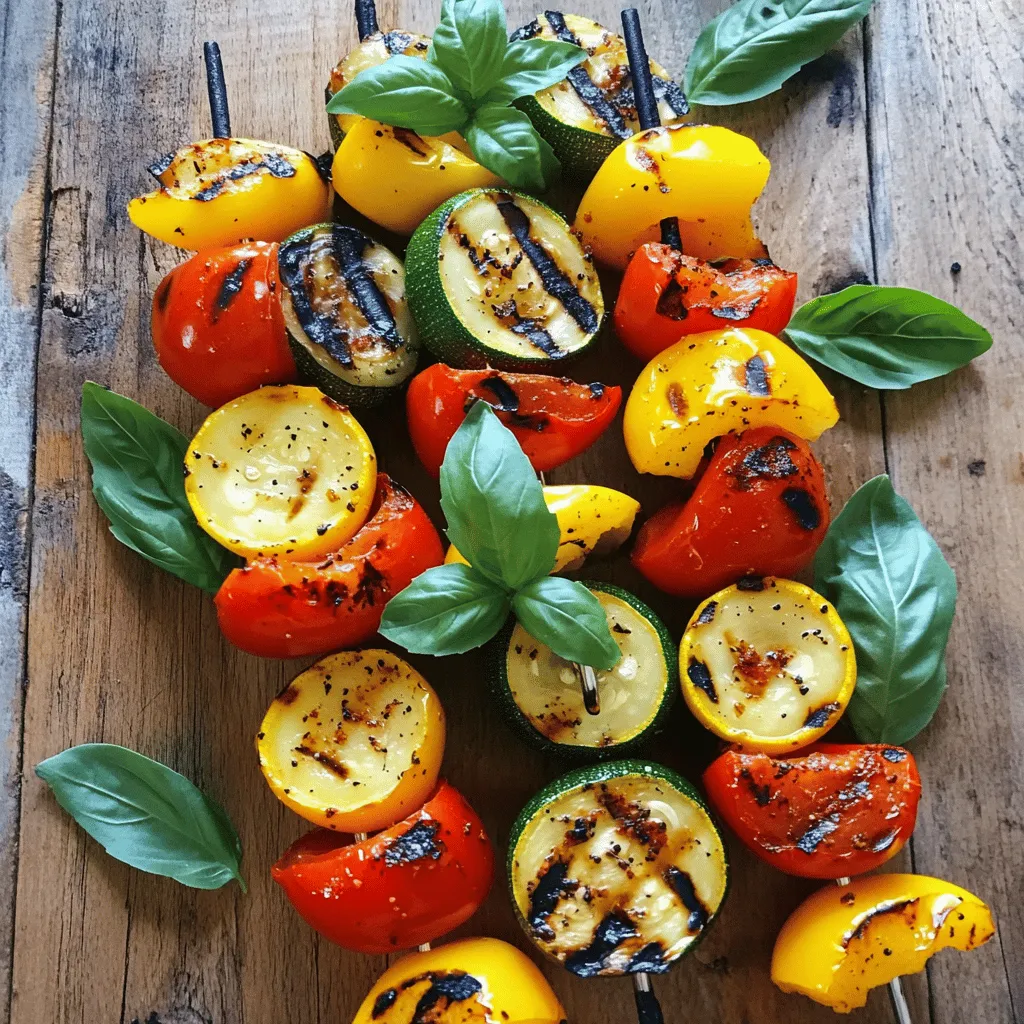
When I make grilled veggie skewers, I choose a mix of colorful vegetables. They not only look great but also taste fantastic. Bell peppers are a must. You can pick red, yellow, or green. Each type adds a sweet taste.
Zucchini and yellow squash are next. Their soft texture and mild flavor work well on the grill. I like to cut them into thick rounds. This helps them hold their shape while cooking.
Red onions add a nice bite. I cut them into wedges so they cook evenly. Cherry tomatoes are fun and juicy. I use them whole, so they burst with flavor when grilled. Finally, I love mushrooms. They soak up the marinade and get smoky when grilled.
Seasoning and Marinade
– Olive oil, garlic powder, smoked paprika
– Salt and black pepper
To bring out the flavors, I use a simple marinade. I drizzle extra virgin olive oil over the veggies. It helps the spices stick and adds richness. I sprinkle garlic powder for a savory kick and smoked paprika for a hint of smoke.
Don’t forget to add salt and black pepper. They enhance all the natural flavors. I mix everything well, so each piece is coated. This step is crucial for a tasty outcome.
Garnish
– Fresh basil leaves
After grilling, I like to add fresh basil leaves. They give a burst of color and flavor. Just tear them up and sprinkle on top of the skewers. This final touch makes the dish even more inviting.
Step-by-Step Instructions
Prepping the Grill
First, we need to get our grill ready. Preheating is key to good grilling. It helps to cook the veggies evenly and gives them nice grill marks. Set your grill to medium-high heat. This temperature is perfect for cooking our colorful skewers.
Preparing the Vegetables
Let’s prep our vegetables. Start by cutting them into pieces. Cut the bell pepper into 1-inch chunks. Slice the zucchini and yellow squash into thick rounds. Cut the red onion into wedges. Keep the cherry tomatoes whole and use whole mushrooms or half them if they are large.
Next, we’ll mix the veggies. Place all the cut veggies in a big bowl. Drizzle them with olive oil and sprinkle in garlic powder, smoked paprika, salt, and black pepper. Now, toss everything gently with your hands or a spatula. Make sure each piece is well-coated with the seasoning. This step adds a lot of flavor!
Assembling Skewers
Now comes the fun part: assembling the skewers. Take a skewer and start threading the veggies. Alternate the types of veggies to create a colorful mix. This not only looks great but also adds different flavors in every bite.
Be careful when handling the skewers. The ends can be sharp, so keep your hands clear when you thread the veggies. Once you finish, your skewers are ready for the grill.
Tips & Tricks
Grilling Tips
Grilling veggie skewers is simple and fun. Aim for a medium-high heat. This ensures your veggies cook well. Grill them for about 10-12 minutes. Turn them often to get nice grill marks. You want them tender but not mushy.
Flavor Enhancements
To boost flavor, try adding spices like cumin or dill. A splash of lemon juice also brightens the taste. For a smoky flavor, use smoked paprika or a dash of liquid smoke. Marinades can add depth, too. A blend of olive oil, vinegar, and herbs works great.
Serving Suggestions
For a beautiful presentation, stand skewers upright in a holder. You can also lay them on a platter. Drizzle with olive oil and sprinkle fresh herbs. Pair the skewers with dips like hummus or tzatziki. These add flavor and make serving easier.
Variations
Different Vegetable Combinations
You can mix and match veggies for your skewers. Seasonal vegetables make great choices. In summer, try zucchini and corn. In fall, use butternut squash and Brussels sprouts. You can also add eggplant for a nice smoky taste. Asparagus gives a nice crunch and fresh flavor.
Alternative Cooking Methods
If you can’t grill, you can bake or roast your skewers. For oven-baking, preheat your oven to 400°F (200°C). Place the skewers on a baking sheet. Bake for about 20 minutes. Keep an eye on them to ensure they don’t burn. Roasting gives a rich taste and helps the flavors blend well.
Vegan and Gluten-Free Options
This recipe is easy to adapt for different diets. For a vegan version, stick to the veggies and oil. If you need gluten-free options, all ingredients in this recipe work well. Just make sure to check labels on sauces or seasonings. You can enjoy tasty skewers that fit your needs by making small swaps.
Storage Info
Storing Leftovers
To keep your grilled veggie skewers fresh, use airtight containers. Store them in the fridge right after they cool down. Make sure to eat them within three days for the best taste and quality. If you notice any moisture, add a paper towel inside the container to soak it up.
Reheating Suggestions
You can reheat skewers in the microwave or on the grill. For the microwave, place them on a plate and cover them with a damp paper towel. Heat in short bursts to avoid overcooking. To reheat on the grill, warm it up and place the skewers back on for a few minutes. This keeps the texture nice and doesn’t make them soggy.
Freezing Instructions
To freeze skewers, wrap them tightly in plastic wrap and place them in a freezer bag. Make sure to remove as much air as possible. They can last for up to three months in the freezer. When you’re ready to eat them, thaw them in the fridge overnight. Reheat on the grill or in the oven to restore their flavor and texture.
FAQs
What type of skewers is best for grilling?
I prefer metal skewers for grilling. They heat up quickly and help cook the veggies evenly. They are also reusable, making them eco-friendly. Wooden skewers are lighter but can burn easily. If you use wooden skewers, you need to soak them in water first. This helps prevent them from catching fire. Both types work well, so choose what you like best.
Can I use frozen vegetables for this recipe?
Yes, you can use frozen vegetables. They are convenient and save time. However, frozen veggies may not have the same texture as fresh ones. They can become mushy when cooked. If you choose to use them, thaw them first. Pat them dry to remove extra moisture before grilling. This helps keep them from steaming and allows for better grilling.
How do I ensure my veggies don’t stick to the grill?
To prevent sticking, coat your vegetables with olive oil. This adds flavor and creates a barrier. Preheat your grill well before adding the skewers. A hot grill helps to sear the veggies quickly. Turn them gently with tongs. Avoid using a fork, as this can pierce the vegetables and let juices escape. Keep an eye on them, so they don’t burn.
Is it necessary to soak wooden skewers?
Soaking wooden skewers is a good idea. It prevents them from burning on the grill. Soak them for at least 30 minutes before using. This helps them stay intact while grilling. If you skip soaking, watch them closely as they cook. You might need to turn down the heat to avoid burning. Soaking is a simple step that makes grilling easier.
This blog post guides you on making vibrant vegetable skewers. We covered key ingredients, including bell peppers, zucchini, and cherry tomatoes. I shared tips for preparing the grill and veggies, along with assembling skewers safely. Remember optimal grilling time and temperature for the best results. You can try different vegetables or cooking methods for variety. Don’t forget about storing leftovers properly for later enjoyment. With the right techniques, you’ll create tasty skewers that impress. Your grilling skills can elevate any meal!
![- Bell pepper (red, yellow, or green) - Zucchini and yellow squash - Red onion and cherry tomatoes - Mushrooms When I make grilled veggie skewers, I choose a mix of colorful vegetables. They not only look great but also taste fantastic. Bell peppers are a must. You can pick red, yellow, or green. Each type adds a sweet taste. Zucchini and yellow squash are next. Their soft texture and mild flavor work well on the grill. I like to cut them into thick rounds. This helps them hold their shape while cooking. Red onions add a nice bite. I cut them into wedges so they cook evenly. Cherry tomatoes are fun and juicy. I use them whole, so they burst with flavor when grilled. Finally, I love mushrooms. They soak up the marinade and get smoky when grilled. - Olive oil, garlic powder, smoked paprika - Salt and black pepper To bring out the flavors, I use a simple marinade. I drizzle extra virgin olive oil over the veggies. It helps the spices stick and adds richness. I sprinkle garlic powder for a savory kick and smoked paprika for a hint of smoke. Don’t forget to add salt and black pepper. They enhance all the natural flavors. I mix everything well, so each piece is coated. This step is crucial for a tasty outcome. - Fresh basil leaves After grilling, I like to add fresh basil leaves. They give a burst of color and flavor. Just tear them up and sprinkle on top of the skewers. This final touch makes the dish even more inviting. For the full recipe, check out the [Full Recipe]. First, we need to get our grill ready. Preheating is key to good grilling. It helps to cook the veggies evenly and gives them nice grill marks. Set your grill to medium-high heat. This temperature is perfect for cooking our colorful skewers. Let’s prep our vegetables. Start by cutting them into pieces. Cut the bell pepper into 1-inch chunks. Slice the zucchini and yellow squash into thick rounds. Cut the red onion into wedges. Keep the cherry tomatoes whole and use whole mushrooms or half them if they are large. Next, we’ll mix the veggies. Place all the cut veggies in a big bowl. Drizzle them with olive oil and sprinkle in garlic powder, smoked paprika, salt, and black pepper. Now, toss everything gently with your hands or a spatula. Make sure each piece is well-coated with the seasoning. This step adds a lot of flavor! Now comes the fun part: assembling the skewers. Take a skewer and start threading the veggies. Alternate the types of veggies to create a colorful mix. This not only looks great but also adds different flavors in every bite. Be careful when handling the skewers. The ends can be sharp, so keep your hands clear when you thread the veggies. Once you finish, your skewers are ready for the grill. For the full recipe, check out the details above. Grilling veggie skewers is simple and fun. Aim for a medium-high heat. This ensures your veggies cook well. Grill them for about 10-12 minutes. Turn them often to get nice grill marks. You want them tender but not mushy. To boost flavor, try adding spices like cumin or dill. A splash of lemon juice also brightens the taste. For a smoky flavor, use smoked paprika or a dash of liquid smoke. Marinades can add depth, too. A blend of olive oil, vinegar, and herbs works great. For a beautiful presentation, stand skewers upright in a holder. You can also lay them on a platter. Drizzle with olive oil and sprinkle fresh herbs. Pair the skewers with dips like hummus or tzatziki. These add flavor and make serving easier. Check out the Full Recipe for more ideas! {{image_4}} You can mix and match veggies for your skewers. Seasonal vegetables make great choices. In summer, try zucchini and corn. In fall, use butternut squash and Brussels sprouts. You can also add eggplant for a nice smoky taste. Asparagus gives a nice crunch and fresh flavor. If you can’t grill, you can bake or roast your skewers. For oven-baking, preheat your oven to 400°F (200°C). Place the skewers on a baking sheet. Bake for about 20 minutes. Keep an eye on them to ensure they don’t burn. Roasting gives a rich taste and helps the flavors blend well. This recipe is easy to adapt for different diets. For a vegan version, stick to the veggies and oil. If you need gluten-free options, all ingredients in this recipe work well. Just make sure to check labels on sauces or seasonings. You can enjoy tasty skewers that fit your needs by making small swaps. For the full recipe, check the details above. To keep your grilled veggie skewers fresh, use airtight containers. Store them in the fridge right after they cool down. Make sure to eat them within three days for the best taste and quality. If you notice any moisture, add a paper towel inside the container to soak it up. You can reheat skewers in the microwave or on the grill. For the microwave, place them on a plate and cover them with a damp paper towel. Heat in short bursts to avoid overcooking. To reheat on the grill, warm it up and place the skewers back on for a few minutes. This keeps the texture nice and doesn't make them soggy. To freeze skewers, wrap them tightly in plastic wrap and place them in a freezer bag. Make sure to remove as much air as possible. They can last for up to three months in the freezer. When you’re ready to eat them, thaw them in the fridge overnight. Reheat on the grill or in the oven to restore their flavor and texture. For the full recipe, check out the details above. I prefer metal skewers for grilling. They heat up quickly and help cook the veggies evenly. They are also reusable, making them eco-friendly. Wooden skewers are lighter but can burn easily. If you use wooden skewers, you need to soak them in water first. This helps prevent them from catching fire. Both types work well, so choose what you like best. Yes, you can use frozen vegetables. They are convenient and save time. However, frozen veggies may not have the same texture as fresh ones. They can become mushy when cooked. If you choose to use them, thaw them first. Pat them dry to remove extra moisture before grilling. This helps keep them from steaming and allows for better grilling. To prevent sticking, coat your vegetables with olive oil. This adds flavor and creates a barrier. Preheat your grill well before adding the skewers. A hot grill helps to sear the veggies quickly. Turn them gently with tongs. Avoid using a fork, as this can pierce the vegetables and let juices escape. Keep an eye on them, so they don't burn. Soaking wooden skewers is a good idea. It prevents them from burning on the grill. Soak them for at least 30 minutes before using. This helps them stay intact while grilling. If you skip soaking, watch them closely as they cook. You might need to turn down the heat to avoid burning. Soaking is a simple step that makes grilling easier. This blog post guides you on making vibrant vegetable skewers. We covered key ingredients, including bell peppers, zucchini, and cherry tomatoes. I shared tips for preparing the grill and veggies, along with assembling skewers safely. Remember optimal grilling time and temperature for the best results. You can try different vegetables or cooking methods for variety. Don’t forget about storing leftovers properly for later enjoyment. With the right techniques, you’ll create tasty skewers that impress. Your grilling skills can elevate any meal!](https://goldendishy.com/wp-content/uploads/2025/06/899b9bee-2fb2-475c-b5a5-3b543ce01d01-300x300.webp)


![- 1 can (15 oz) chickpeas, drained and rinsed - 1 can (5 oz) tuna in water, drained - 1/4 cup Greek yogurt or vegan mayonnaise (optional) - 1 tablespoon Dijon mustard - 1/2 red bell pepper, finely chopped - 1/4 red onion, finely chopped - 1/4 cup fresh parsley, chopped - 1 tablespoon fresh lemon juice - Seasoning: Salt and pepper to taste - Optional: 1 ripe avocado, diced To make this salad, gather all the ingredients listed above. The chickpeas and tuna serve as the base. Chickpeas give a nice texture, while tuna adds protein. The Greek yogurt or vegan mayo brings creaminess. Dijon mustard gives it a tangy kick. Chop the red bell pepper and red onion finely for a nice crunch. Fresh parsley adds color and flavor. A squeeze of lemon juice brightens up the dish. You can also add diced avocado for extra creaminess. This Easy Chickpea Tuna Salad is perfect for lunch or a light dinner. You can follow the [Full Recipe] for step-by-step guidance. - Lightly mash the chickpeas in a large mixing bowl. - Combine the drained tuna with the chickpeas. - Whisk together Greek yogurt, Dijon mustard, and lemon juice in a small bowl. - Pour the yogurt mixture over the chickpeas and tuna. - Fold in the chopped red bell pepper, red onion, parsley, and optional avocado. - Season with salt and pepper to taste. - Serve immediately or chill before serving. This Easy Chickpea Tuna Salad is simple and quick. You can find the Full Recipe for more details. Enjoy it as a meal or snack! - Use freshly squeezed lemon juice for a brighter flavor. This adds freshness. - Adjust seasoning to taste. Start with a little and add more if needed. - Pair the salad with whole grain crackers. This adds crunch and fullness. - Serve as a filling for lettuce wraps. It makes a great low-carb meal. - Garnish with extra parsley and lemon wedges. This makes your dish look bright and inviting. - Use a colorful bowl to showcase the vibrant ingredients. This enhances the overall experience. For the full recipe, check the detailed steps to create this delicious dish! {{image_4}} You can easily change up the recipe to suit your taste. If you want a plant-based option, swap Greek yogurt for vegan mayonnaise. This keeps the salad creamy and tasty. You can also switch the chickpeas for different beans. Black beans or white beans both work well. These swaps give you a fun twist on the classic recipe. Want to add some crunch? Diced celery is a great choice. It brings a nice texture to the salad. If you like salty flavors, try adding olives. They give a briny kick that pairs well with the other ingredients. Feel free to get creative with your flavor choices! If you need to make it gluten-free, check the ingredients you use. Most of the items in the salad should be gluten-free. Just make sure that any sauces or extras are also gluten-free. This way, you can enjoy the salad without worry. For the Full Recipe, check out the complete guide for making this delicious dish! Store your chickpea tuna salad in an airtight container. This keeps it fresh. Make sure the lid is on tight. For the best taste, eat it within 3-4 days. After this time, it may lose flavor. This salad is best served cold or at room temperature. Avoid reheating to keep the texture and taste just right. Enjoy it straight from the fridge for a quick meal! Yes, you can make it a few hours in advance. This gives the flavors time to meld together. I often make this salad in the morning for lunch later. It’s easy and saves time! Absolutely! This salad holds up well for meal prep. You can store it in the fridge for a few days. It remains tasty and fresh, making it a great option for busy weeks. This salad is high in protein, fiber, and healthy fats. Chickpeas provide protein and fiber, while tuna adds more protein. Greek yogurt gives creaminess and healthy fats. Overall, it's a nutritious choice for any meal. In this article, we explored how to make a tasty and simple Chickpea Tuna Salad. You learned the key ingredients and followed easy steps to prepare it. We discussed tips for adding flavor and how to store any leftovers. Finally, the salad’s health benefits make it a smart choice for meals. This salad is quick, nutritious, and great for any occasion. Enjoy making it in your own kitchen!](https://goldendishy.com/wp-content/uploads/2025/07/30687038-eca4-4cc3-b428-c7157439eb59-768x768.webp)