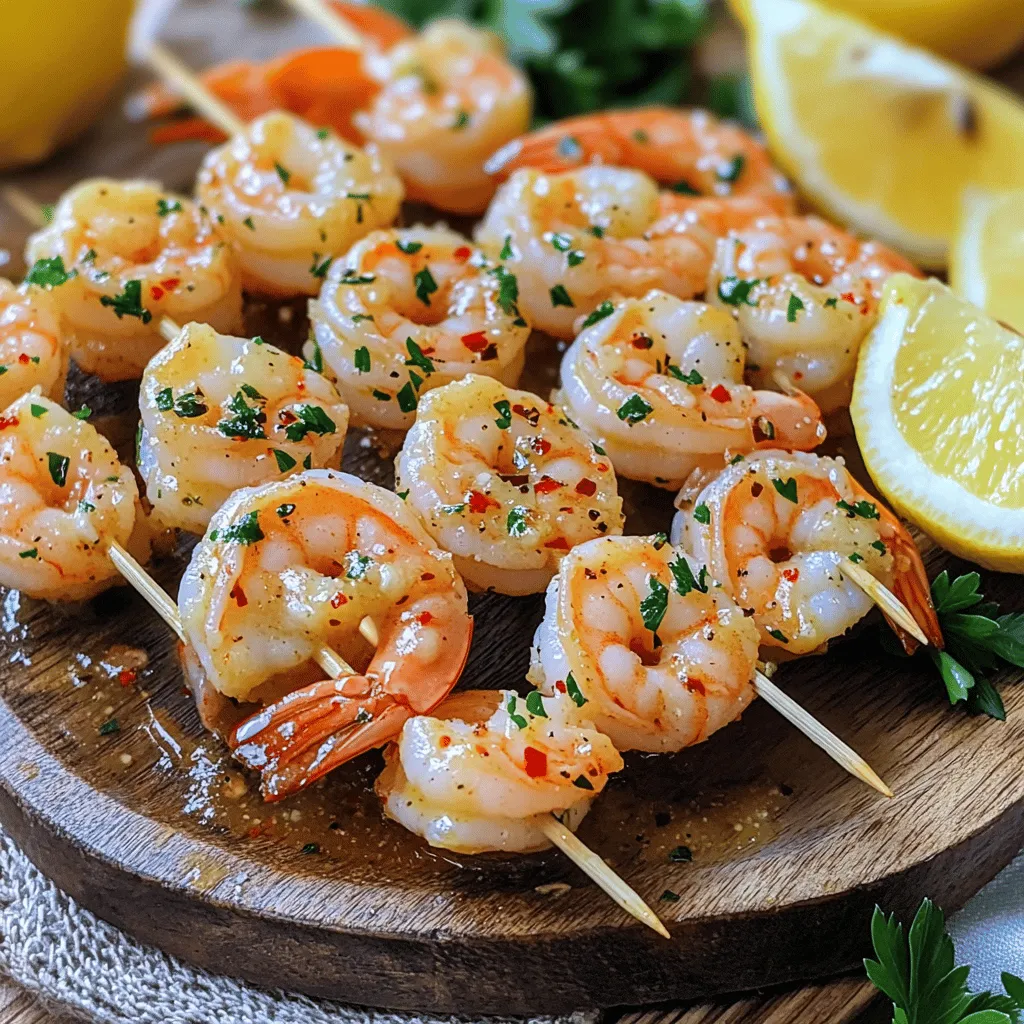
Garlic Butter Shrimp Skewers Flavorful and Easy Recipe
![To make Garlic Butter Shrimp Skewers, you'll need: - 1 pound large shrimp, peeled and deveined - 4 tablespoons unsalted butter - 4 cloves garlic, minced - 1 teaspoon red pepper flakes (adjust based on desired spiciness) - 1 tablespoon fresh parsley, finely chopped - 1 tablespoon freshly squeezed lemon juice - Salt and pepper to taste - 1 teaspoon smoked paprika - Skewers (either wooden, soaked, or metal) When choosing shrimp, fresh is often best. Look for shrimp that smell like the ocean, not fishy. The shells should be shiny and clean. If fresh shrimp isn’t available, frozen shrimp is a great option. Frozen shrimp can be just as good if they are properly handled. - Check for a firm texture. - Avoid shrimp that are mushy or have black spots. - If buying frozen, look for shrimp with no added ingredients. Using quality ingredients makes a big difference. For butter, I recommend brands like Kerrygold or Plugrá. They offer rich flavor that enhances the dish. For spices, consider McCormick or Penzeys. They have high-quality spices that bring out the best in your garlic butter. Using fresh herbs, like parsley, also boosts the flavor. Look for herbs that are bright and fragrant. This ensures your Garlic Butter Shrimp Skewers taste amazing! For the full recipe, check out the complete instructions above. Start by gathering your ingredients. If you use wooden skewers, soak them in water for at least 30 minutes. This step stops them from burning. While they soak, you can mince the garlic. Use a sharp knife to chop the garlic finely. The smaller the pieces, the better the flavor will blend. Next, melt 4 tablespoons of unsalted butter in a medium saucepan over medium heat. As it melts, add the minced garlic and red pepper flakes. Stir it often for about 1-2 minutes. Watch closely; you want the garlic fragrant but not browned. Once ready, remove the pan from heat. Add 1 tablespoon of lemon juice and chopped parsley. Then season with salt, pepper, and smoked paprika to taste. Mix well to create a rich garlic butter flavor. Now, it’s time to grill! Add the shrimp to a large bowl. Pour half of the garlic butter mixture over them. Toss gently to coat each shrimp. Thread 4-5 shrimp onto each skewer. Preheat your grill or grill pan over medium-high heat. Lightly grease the grill with oil. This helps prevent sticking. Place the skewers on the grill. Cook for about 2-3 minutes on each side. You’ll know they are done when the shrimp turn pink and opaque. Brush on some of the reserved garlic butter mixture while grilling for extra flavor. Once cooked, drizzle any remaining garlic butter over the skewers before serving. This dish is ready to impress! For the full recipe, check out the section above. To make perfect shrimp skewers, focus on time and heat. Grill the shrimp for about 2-3 minutes on each side. Use medium-high heat to get a nice sear. If your grill is too hot, the shrimp may cook too fast and become tough. Always keep an eye on them. One common mistake is not soaking wooden skewers. Soak them for at least 30 minutes. This stops them from burning. Another mistake is overcooking the shrimp. They should be pink and opaque when done. If they curl too much, they may be overcooked. Lastly, don’t forget to brush on more garlic butter while grilling. It boosts the flavor! You can easily enhance the flavor of your shrimp skewers. Add fresh herbs like basil or cilantro for a burst of freshness. Consider using spices like cumin or coriander for a warm twist. A dash of lemon zest can also brighten the dish. Feel free to play around with flavors to find your favorite mix. For a detailed recipe, check out the [Full Recipe]. {{image_4}} You can swap shrimp for other proteins. Chicken is a great choice. Use boneless, skinless chicken breast. Cut it into bite-sized pieces. Just marinate it in the same garlic butter mix. You can also use fish. Salmon or swordfish work well. They add a rich flavor. Follow the same steps for grilling. Adding veggies to your skewers makes a full meal. Bell peppers, zucchini, and cherry tomatoes are perfect. They add color and crunch. Cut all veggies into similar sizes. This way, they cook evenly with the shrimp. Thread them onto the skewers with the shrimp. This adds a tasty twist to your dish. You can change up the flavors easily. For a spicy kick, add more red pepper flakes. If you love herbs, try fresh basil or thyme. Mix these herbs into the garlic butter. For a citrus twist, add lime juice instead of lemon. You can even add zest from the citrus fruits. This will bring a fresh taste to your skewers. Enjoy experimenting with different flavors from the Full Recipe! Store leftover shrimp skewers in an airtight container. Let them cool to room temperature first. Place a piece of parchment paper between layers to avoid sticking. Keep them in the fridge for up to three days. To reheat, gently warm the skewers in a skillet over low heat. Add a little butter or oil to keep them moist. Heat for about 3-5 minutes until warm. You can also use a microwave, but be careful not to overcook. Heat for 30 seconds at a time, checking often. If you want to freeze shrimp skewers, first wrap them tightly in plastic wrap. Then, place them in a freezer bag. Remove as much air as possible. They can last up to three months in the freezer. When ready to eat, thaw in the fridge overnight before reheating. For the full recipe, check out the details above. Enjoy your garlic butter shrimp skewers! The best skewers for grilling shrimp are metal or soaked wooden skewers. Metal skewers handle high heat well and are reusable. Soaking wooden skewers for at least 30 minutes prevents them from burning. Both types work great for Garlic Butter Shrimp Skewers. Shrimp are fully cooked when they turn pink and opaque. They also curl into a "C" shape. If they look gray or have a rubbery texture, they need more time. For the best results, grill shrimp for about 2-3 minutes on each side. Yes, you can prepare Garlic Butter Shrimp Skewers ahead of time. Marinate the shrimp in the garlic butter mixture and store them in the fridge. They can stay fresh for up to 24 hours. Just grill them right before serving for the best taste. To sum up, this guide covered Garlic Butter Shrimp Skewers in detail. We explored key ingredients, cooking steps, and tips for the perfect dish. Remember, choosing good shrimp and seasoning well makes a difference. Enjoy grilling with variations like chicken or veggies to switch things up. Proper storage ensures your leftovers stay tasty. Follow these steps for delicious results every time. Your journey to perfect skewers starts here—enjoy every bite you take!](https://goldendishy.com/wp-content/uploads/2025/06/728f68f4-b8bf-4bba-b9a3-49ab34a89912.webp)
If you love quick and tasty meals, you’re in for a treat! Garlic Butter Shrimp Skewers are not only simple to make but also packed with flavor. In this recipe, I’ll guide you through the steps to create juicy shrimp topped with a rich garlic butter sauce. Whether you’re a novice in the kitchen or a seasoned chef, this dish will impress everyone. Let’s dive into the ingredients and get started on a meal that’s sure to delight!
Ingredients
List of necessary ingredients for Garlic Butter Shrimp Skewers
To make Garlic Butter Shrimp Skewers, you’ll need:
– 1 pound large shrimp, peeled and deveined
– 4 tablespoons unsalted butter
– 4 cloves garlic, minced
– 1 teaspoon red pepper flakes (adjust based on desired spiciness)
– 1 tablespoon fresh parsley, finely chopped
– 1 tablespoon freshly squeezed lemon juice
– Salt and pepper to taste
– 1 teaspoon smoked paprika
– Skewers (either wooden, soaked, or metal)
Tips for selecting the best shrimp (fresh vs. frozen)
When choosing shrimp, fresh is often best. Look for shrimp that smell like the ocean, not fishy. The shells should be shiny and clean. If fresh shrimp isn’t available, frozen shrimp is a great option. Frozen shrimp can be just as good if they are properly handled.
– Check for a firm texture.
– Avoid shrimp that are mushy or have black spots.
– If buying frozen, look for shrimp with no added ingredients.
Recommended brands for high-quality ingredients (butter, spices)
Using quality ingredients makes a big difference. For butter, I recommend brands like Kerrygold or Plugrá. They offer rich flavor that enhances the dish. For spices, consider McCormick or Penzeys. They have high-quality spices that bring out the best in your garlic butter.
Using fresh herbs, like parsley, also boosts the flavor. Look for herbs that are bright and fragrant. This ensures your Garlic Butter Shrimp Skewers taste amazing!
Step-by-Step Instructions
Preparation of ingredients (soaking skewers, mincing garlic)
Start by gathering your ingredients. If you use wooden skewers, soak them in water for at least 30 minutes. This step stops them from burning. While they soak, you can mince the garlic. Use a sharp knife to chop the garlic finely. The smaller the pieces, the better the flavor will blend.
Detailed cooking steps for garlic butter mixture
Next, melt 4 tablespoons of unsalted butter in a medium saucepan over medium heat. As it melts, add the minced garlic and red pepper flakes. Stir it often for about 1-2 minutes. Watch closely; you want the garlic fragrant but not browned. Once ready, remove the pan from heat. Add 1 tablespoon of lemon juice and chopped parsley. Then season with salt, pepper, and smoked paprika to taste. Mix well to create a rich garlic butter flavor.
Grilling techniques for perfectly cooked shrimp skewers
Now, it’s time to grill! Add the shrimp to a large bowl. Pour half of the garlic butter mixture over them. Toss gently to coat each shrimp. Thread 4-5 shrimp onto each skewer. Preheat your grill or grill pan over medium-high heat. Lightly grease the grill with oil. This helps prevent sticking.
Place the skewers on the grill. Cook for about 2-3 minutes on each side. You’ll know they are done when the shrimp turn pink and opaque. Brush on some of the reserved garlic butter mixture while grilling for extra flavor. Once cooked, drizzle any remaining garlic butter over the skewers before serving. This dish is ready to impress!
Tips & Tricks
Suggestions for perfecting shrimp skewers (ideal cooking time, heat settings)
To make perfect shrimp skewers, focus on time and heat. Grill the shrimp for about 2-3 minutes on each side. Use medium-high heat to get a nice sear. If your grill is too hot, the shrimp may cook too fast and become tough. Always keep an eye on them.
Common mistakes to avoid when making Garlic Butter Shrimp Skewers
One common mistake is not soaking wooden skewers. Soak them for at least 30 minutes. This stops them from burning. Another mistake is overcooking the shrimp. They should be pink and opaque when done. If they curl too much, they may be overcooked. Lastly, don’t forget to brush on more garlic butter while grilling. It boosts the flavor!
Enhancing flavor with additional ingredients (herbs, spices)
You can easily enhance the flavor of your shrimp skewers. Add fresh herbs like basil or cilantro for a burst of freshness. Consider using spices like cumin or coriander for a warm twist. A dash of lemon zest can also brighten the dish. Feel free to play around with flavors to find your favorite mix.
Variations
Different proteins for skewers (chicken, fish alternatives)
You can swap shrimp for other proteins. Chicken is a great choice. Use boneless, skinless chicken breast. Cut it into bite-sized pieces. Just marinate it in the same garlic butter mix. You can also use fish. Salmon or swordfish work well. They add a rich flavor. Follow the same steps for grilling.
Adding vegetables to the skewers for a complete meal
Adding veggies to your skewers makes a full meal. Bell peppers, zucchini, and cherry tomatoes are perfect. They add color and crunch. Cut all veggies into similar sizes. This way, they cook evenly with the shrimp. Thread them onto the skewers with the shrimp. This adds a tasty twist to your dish.
Flavor variations (spicy, herb-based, citrus-infused)
You can change up the flavors easily. For a spicy kick, add more red pepper flakes. If you love herbs, try fresh basil or thyme. Mix these herbs into the garlic butter. For a citrus twist, add lime juice instead of lemon. You can even add zest from the citrus fruits. This will bring a fresh taste to your skewers.
Storage Info
Best practices for storing leftover shrimp skewers
Store leftover shrimp skewers in an airtight container. Let them cool to room temperature first. Place a piece of parchment paper between layers to avoid sticking. Keep them in the fridge for up to three days.
Reheating instructions for optimal taste
To reheat, gently warm the skewers in a skillet over low heat. Add a little butter or oil to keep them moist. Heat for about 3-5 minutes until warm. You can also use a microwave, but be careful not to overcook. Heat for 30 seconds at a time, checking often.
Freezing tips for long-term storage of shrimp
If you want to freeze shrimp skewers, first wrap them tightly in plastic wrap. Then, place them in a freezer bag. Remove as much air as possible. They can last up to three months in the freezer. When ready to eat, thaw in the fridge overnight before reheating.Enjoy your garlic butter shrimp skewers!
FAQs
What kind of skewers work best for grilling shrimp?
The best skewers for grilling shrimp are metal or soaked wooden skewers. Metal skewers handle high heat well and are reusable. Soaking wooden skewers for at least 30 minutes prevents them from burning. Both types work great for Garlic Butter Shrimp Skewers.
How do I know when shrimp are fully cooked?
Shrimp are fully cooked when they turn pink and opaque. They also curl into a “C” shape. If they look gray or have a rubbery texture, they need more time. For the best results, grill shrimp for about 2-3 minutes on each side.
Can I make Garlic Butter Shrimp Skewers ahead of time?
Yes, you can prepare Garlic Butter Shrimp Skewers ahead of time. Marinate the shrimp in the garlic butter mixture and store them in the fridge. They can stay fresh for up to 24 hours. Just grill them right before serving for the best taste.
To sum up, this guide covered Garlic Butter Shrimp Skewers in detail. We explored key ingredients, cooking steps, and tips for the perfect dish. Remember, choosing good shrimp and seasoning well makes a difference. Enjoy grilling with variations like chicken or veggies to switch things up. Proper storage ensures your leftovers stay tasty. Follow these steps for delicious results every time. Your journey to perfect skewers starts here—enjoy every bite you take!
![To make Garlic Butter Shrimp Skewers, you'll need: - 1 pound large shrimp, peeled and deveined - 4 tablespoons unsalted butter - 4 cloves garlic, minced - 1 teaspoon red pepper flakes (adjust based on desired spiciness) - 1 tablespoon fresh parsley, finely chopped - 1 tablespoon freshly squeezed lemon juice - Salt and pepper to taste - 1 teaspoon smoked paprika - Skewers (either wooden, soaked, or metal) When choosing shrimp, fresh is often best. Look for shrimp that smell like the ocean, not fishy. The shells should be shiny and clean. If fresh shrimp isn’t available, frozen shrimp is a great option. Frozen shrimp can be just as good if they are properly handled. - Check for a firm texture. - Avoid shrimp that are mushy or have black spots. - If buying frozen, look for shrimp with no added ingredients. Using quality ingredients makes a big difference. For butter, I recommend brands like Kerrygold or Plugrá. They offer rich flavor that enhances the dish. For spices, consider McCormick or Penzeys. They have high-quality spices that bring out the best in your garlic butter. Using fresh herbs, like parsley, also boosts the flavor. Look for herbs that are bright and fragrant. This ensures your Garlic Butter Shrimp Skewers taste amazing! For the full recipe, check out the complete instructions above. Start by gathering your ingredients. If you use wooden skewers, soak them in water for at least 30 minutes. This step stops them from burning. While they soak, you can mince the garlic. Use a sharp knife to chop the garlic finely. The smaller the pieces, the better the flavor will blend. Next, melt 4 tablespoons of unsalted butter in a medium saucepan over medium heat. As it melts, add the minced garlic and red pepper flakes. Stir it often for about 1-2 minutes. Watch closely; you want the garlic fragrant but not browned. Once ready, remove the pan from heat. Add 1 tablespoon of lemon juice and chopped parsley. Then season with salt, pepper, and smoked paprika to taste. Mix well to create a rich garlic butter flavor. Now, it’s time to grill! Add the shrimp to a large bowl. Pour half of the garlic butter mixture over them. Toss gently to coat each shrimp. Thread 4-5 shrimp onto each skewer. Preheat your grill or grill pan over medium-high heat. Lightly grease the grill with oil. This helps prevent sticking. Place the skewers on the grill. Cook for about 2-3 minutes on each side. You’ll know they are done when the shrimp turn pink and opaque. Brush on some of the reserved garlic butter mixture while grilling for extra flavor. Once cooked, drizzle any remaining garlic butter over the skewers before serving. This dish is ready to impress! For the full recipe, check out the section above. To make perfect shrimp skewers, focus on time and heat. Grill the shrimp for about 2-3 minutes on each side. Use medium-high heat to get a nice sear. If your grill is too hot, the shrimp may cook too fast and become tough. Always keep an eye on them. One common mistake is not soaking wooden skewers. Soak them for at least 30 minutes. This stops them from burning. Another mistake is overcooking the shrimp. They should be pink and opaque when done. If they curl too much, they may be overcooked. Lastly, don’t forget to brush on more garlic butter while grilling. It boosts the flavor! You can easily enhance the flavor of your shrimp skewers. Add fresh herbs like basil or cilantro for a burst of freshness. Consider using spices like cumin or coriander for a warm twist. A dash of lemon zest can also brighten the dish. Feel free to play around with flavors to find your favorite mix. For a detailed recipe, check out the [Full Recipe]. {{image_4}} You can swap shrimp for other proteins. Chicken is a great choice. Use boneless, skinless chicken breast. Cut it into bite-sized pieces. Just marinate it in the same garlic butter mix. You can also use fish. Salmon or swordfish work well. They add a rich flavor. Follow the same steps for grilling. Adding veggies to your skewers makes a full meal. Bell peppers, zucchini, and cherry tomatoes are perfect. They add color and crunch. Cut all veggies into similar sizes. This way, they cook evenly with the shrimp. Thread them onto the skewers with the shrimp. This adds a tasty twist to your dish. You can change up the flavors easily. For a spicy kick, add more red pepper flakes. If you love herbs, try fresh basil or thyme. Mix these herbs into the garlic butter. For a citrus twist, add lime juice instead of lemon. You can even add zest from the citrus fruits. This will bring a fresh taste to your skewers. Enjoy experimenting with different flavors from the Full Recipe! Store leftover shrimp skewers in an airtight container. Let them cool to room temperature first. Place a piece of parchment paper between layers to avoid sticking. Keep them in the fridge for up to three days. To reheat, gently warm the skewers in a skillet over low heat. Add a little butter or oil to keep them moist. Heat for about 3-5 minutes until warm. You can also use a microwave, but be careful not to overcook. Heat for 30 seconds at a time, checking often. If you want to freeze shrimp skewers, first wrap them tightly in plastic wrap. Then, place them in a freezer bag. Remove as much air as possible. They can last up to three months in the freezer. When ready to eat, thaw in the fridge overnight before reheating. For the full recipe, check out the details above. Enjoy your garlic butter shrimp skewers! The best skewers for grilling shrimp are metal or soaked wooden skewers. Metal skewers handle high heat well and are reusable. Soaking wooden skewers for at least 30 minutes prevents them from burning. Both types work great for Garlic Butter Shrimp Skewers. Shrimp are fully cooked when they turn pink and opaque. They also curl into a "C" shape. If they look gray or have a rubbery texture, they need more time. For the best results, grill shrimp for about 2-3 minutes on each side. Yes, you can prepare Garlic Butter Shrimp Skewers ahead of time. Marinate the shrimp in the garlic butter mixture and store them in the fridge. They can stay fresh for up to 24 hours. Just grill them right before serving for the best taste. To sum up, this guide covered Garlic Butter Shrimp Skewers in detail. We explored key ingredients, cooking steps, and tips for the perfect dish. Remember, choosing good shrimp and seasoning well makes a difference. Enjoy grilling with variations like chicken or veggies to switch things up. Proper storage ensures your leftovers stay tasty. Follow these steps for delicious results every time. Your journey to perfect skewers starts here—enjoy every bite you take!](https://goldendishy.com/wp-content/uploads/2025/06/728f68f4-b8bf-4bba-b9a3-49ab34a89912-300x300.webp)

![- Bell peppers and their colors: You can use four large bell peppers. Choose any color you like: red, yellow, green, or orange. Each adds its own taste and look to the dish. - Protein options: For the filling, you can select either ground turkey or beef. Both options will give you a hearty and satisfying meal. - Base ingredients: You will need one cup of cooked rice. You can use either white or brown rice. Additionally, add one cup of black beans, rinsed and drained, and one cup of corn. You can choose fresh, frozen, or canned corn. - Flavor enhancers: To boost the flavor, use one cup of salsa. You can pick your favorite brand or make it homemade. Also, add one tablespoon of taco seasoning. You can use store-bought or make your own. - Toppings: For the top of the peppers, use one cup of shredded cheddar cheese. This cheese gives a nice gooey texture. You can add extra cheese for a more decadent touch. Fresh cilantro is a great garnish, adding color and a bit of fresh flavor. You can find the full recipe in the earlier sections of this article. Happy cooking! Preheat the oven to 375°F (190°C). This helps cook the peppers evenly. While it heats, grab a baking dish. Set it aside for the stuffed peppers. Prepare the bell peppers by slicing the tops off. Remove the seeds and membranes, which can taste bitter. Brush each pepper with olive oil. This adds flavor and helps them roast nicely. Place the peppers upright in the baking dish. Cook the meat in a large skillet over medium heat. Add 1 pound of ground turkey or beef. Break it apart with a spatula as it cooks. Make sure it browns well. Once cooked, drain any excess fat. This keeps the filling lean and tasty. Next, add rice, black beans, corn, salsa, and seasoning to the skillet. Use 1 cup of cooked rice, 1 cup of rinsed black beans, and 1 cup of corn. Pour in 1 cup of salsa and 1 tablespoon of taco seasoning. Sprinkle some salt and pepper too. Mix everything well. Simmer the mixture for about 5 minutes. This lets the flavors meld together, making the filling more delicious. Stir it occasionally to avoid sticking. Now, mix in half of the shredded cheddar cheese. This makes the filling creamy and rich. Remove the skillet from heat. Stuff the peppers by spooning the mixture into each one. Press down gently to pack it in well. This ensures every bite is full of flavor. Top with more cheese by sprinkling the remaining cheddar over each filled pepper. It will melt and brown nicely while baking. Bake the peppers by covering the baking dish with aluminum foil. Place it in the oven for 25-30 minutes. In the last 10 minutes, remove the foil. This helps the cheese bubble and turn golden. Once done, cool the peppers for a few minutes before serving. The filling will be very hot. If you like, garnish with fresh cilantro for extra flavor. Enjoy your taco stuffed bell peppers! Remember, you can find the full recipe above for all the details. How to choose fresh bell peppers: Pick bell peppers that are firm and shiny. Look for smooth skin with no blemishes. A good pepper feels heavy for its size. Colors like red, yellow, and orange are sweeter. Green peppers are a bit more bitter. All colors work well in this dish. Ensuring optimal cooking temperature and timing: Set your oven to 375°F (190°C) before you start cooking. This temperature helps the peppers cook evenly. Bake them for 25-30 minutes. In the last 10 minutes, uncover the dish to let the cheese brown. Suggestions for additional spices or ingredients: Add cumin or chili powder for an extra kick. You can also mix in diced tomatoes or jalapeños for more flavor. If you love heat, try adding some hot sauce to the filling. Offering a vegetarian option: For a vegetarian version, swap the meat for lentils or extra beans. You can use quinoa instead of rice for a healthy twist. This way, everyone can enjoy taco stuffed bell peppers! Plating ideas for presentation: Serve the peppers on a colorful platter. You can place them upright for a fun look. Add a dollop of sour cream on the side. Fresh cilantro on top adds a pop of green. Recommended side dishes for a complete meal: Pair your stuffed peppers with a fresh salad or tortilla chips. A side of guacamole or salsa also works great. These sides make the meal more fun and filling. For the full details, check out the Full Recipe! {{image_4}} You can mix up the protein in taco stuffed bell peppers. If you want a meatless option, try using black beans or lentils. They add great flavor and protein. For a twist, you can also use ground chicken or pork. When it comes to cheese, feel free to get creative. While cheddar is classic, you might try Monterey Jack or pepper jack for extra spice. You can also use cream cheese for a creamier filling. For salsa, any kind works! Chunky salsa adds texture, while smooth salsa blends in. You can even make your own with fresh tomatoes, onions, and peppers. Grilling adds a smoky flavor. Wrap the stuffed peppers in foil and place them on the grill. Cook for about 15 to 20 minutes until tender. You can also use a slow cooker. Place the stuffed peppers in the slow cooker with a bit of sauce. Cook on low for 4 to 6 hours for a hands-off approach. If you need a quick meal, the microwave is your friend. Just place the stuffed peppers in a microwave-safe dish. Cover with a lid or plastic wrap. Heat for about 5 to 7 minutes, checking for doneness. Using seasonal veggies makes your dish brighter. In summer, add fresh zucchini or corn. In fall, consider adding diced sweet potatoes or pumpkin. These add flavor and nutrition. For holidays, you can theme your peppers. For Halloween, use orange peppers and stuff them with spicy fillings. For Christmas, use red and green peppers and add festive spices. It’s a fun way to celebrate! For the full recipe, check out [Full Recipe]. To store leftovers, place the stuffed peppers in an airtight container. This keeps them fresh and tasty. You can keep them in the fridge for up to three days. Make sure they cool down first to avoid steam build-up. If you want to save some for later, freezing is a great option. Wrap each stuffed pepper tightly in plastic wrap. Then, place them in a freezer-safe bag. They can last for up to three months in the freezer. When you’re ready to eat, thaw them overnight in the fridge. To reheat, bake at 350°F (175°C) for about 25 minutes, or until heated through. For easy meal prep, you can cook a big batch in advance. Make the filling and stuff the peppers ahead of time. Store them in the fridge for two days before baking. This way, you can have a quick meal ready on busy nights. You can also use different colors of bell peppers for fun and variety. What can I substitute for rice in the recipe? You can use quinoa or cauliflower rice instead of regular rice. Quinoa adds protein and fiber. Cauliflower rice keeps it low-carb. Both options work well and keep the dish tasty. How do I know when the peppers are fully cooked? The peppers should be tender but not mushy. You can poke them with a fork. If they give easily but hold their shape, they are ready. The cheese should be melted and bubbly on top too! Caloric content and portion sizes Each stuffed pepper is about 300 calories. This includes the filling and toppings. If you use ground turkey, it may be lower in calories. Adjust the portion size based on your hunger. Health benefits of ingredients used Bell peppers are rich in vitamins A and C. They help boost your immune system. Black beans provide protein and fiber, promoting good digestion. Corn adds vitamins and a sweet crunch. What drinks pair well with taco stuffed bell peppers? A refreshing drink like lemonade or iced tea works great. For adults, a light beer or margarita adds fun. Choose drinks that balance the spice of the peppers. Can taco stuffed bell peppers be made in advance for gatherings? Yes! You can prepare the stuffed peppers ahead of time. Just store them in the fridge. Bake them when your guests arrive. They will taste fresh and hot from the oven! For the full recipe, check the earlier section. Taco stuffed bell peppers are fun and easy to make. We covered the key ingredients, steps, and helpful tips for a great dish. You learned how to mix flavors and pack ingredients for maximum yum. With ideas for storage and meal prep, you’re ready to enjoy these peppers anytime. Get creative with variations to keep things fresh. Whether for a family dinner or a gathering, these peppers can impress. Happy cooking!](https://goldendishy.com/wp-content/uploads/2025/06/e36cd186-0c48-4bd5-9184-2d07a9c06671-768x768.webp)