Greek Lemon Chicken Soup Comforting and Simple Recipe
![- 1 pound boneless, skinless chicken breasts - 6 cups low-sodium chicken broth - 1 medium onion, finely chopped - 2 cloves garlic, minced - 2 medium carrots, diced - 2 stalks celery, diced - 1 cup orzo pasta - 3 large eggs - 1/2 cup freshly squeezed lemon juice (about 2-3 lemons) This soup starts with tender chicken. I prefer boneless, skinless chicken breasts. They cook fast and stay juicy. Next, low-sodium chicken broth gives the soup its rich base. Fresh veggies add flavor and nutrition. Onion, garlic, carrots, and celery create a perfect mix. I chop them finely for even cooking. Orzo pasta makes the soup filling. It cooks well in the broth, soaking up all the flavors. To achieve that creamy texture, I use eggs and lemon juice. The eggs blend with the broth, creating a silky finish. Fresh lemon juice brightens the soup, making every bite refreshing. - 1 teaspoon dried oregano - 1 teaspoon sea salt - 1/2 teaspoon freshly ground black pepper - 2 tablespoons extra-virgin olive oil Seasoning is key in this recipe. Dried oregano adds a hint of earthiness. Sea salt and black pepper enhance the natural flavors. I always choose extra-virgin olive oil for sautéing. It has a wonderful taste and is healthy too. - Fresh parsley, finely chopped - Lemon wedges for serving Garnishes make a dish special. Fresh parsley adds color and freshness. I sprinkle it on top before serving. Lemon wedges are great for those who want extra zing. They brighten the dish and add a punch of flavor. For the full recipe, check out the Mediterranean Lemon Chicken Orzo Soup! It’s a perfect guide to make this comforting dish. Start by chopping the vegetables. You will need to dice the onion, carrots, and celery. Next, shred the cooked chicken. This can be done easily with two forks. For the egg mixture, whisk together the eggs and lemon juice in a medium bowl. Make sure they blend well. In a large pot, heat two tablespoons of olive oil over medium heat. Once hot, add the chopped onion, diced carrots, and celery. Sauté these vegetables for about 5 to 7 minutes. They should become tender and fragrant. Now, stir in two minced garlic cloves. Cook for one more minute. You want the garlic to smell wonderful, but not brown. Add the chicken breasts into the pot. Pour in six cups of low-sodium chicken broth. Increase the heat slightly and bring it to a gentle simmer. Let the chicken cook for 15 to 20 minutes. Once fully cooked, carefully remove the chicken from the pot and set it aside to cool. When cool, shred the chicken into bite-sized pieces. Return to the pot and add one cup of orzo pasta. Let the soup simmer for 8 to 10 minutes, stirring to prevent sticking. In your mixing bowl, you have the whisked eggs with lemon juice. Now, temper the eggs by slowly adding a ladleful of hot broth from the pot. Whisk constantly to prevent the eggs from cooking too quickly. Gradually mix the egg mixture back into the soup. This will give your soup a creamy texture. Now it’s time to adjust the seasoning. Taste the soup and add sea salt and black pepper as needed. Finally, garnish your soup with fresh parsley before serving. This adds a nice color and fresh flavor. Enjoy your comforting bowl of Greek lemon chicken soup! For the full recipe, see the detailed instructions above. - Choosing the right type of chicken: I recommend using boneless, skinless chicken breasts. This cut cooks quickly and stays tender in the soup. It also absorbs the rich flavors of the broth well. - Adjusting salt levels for broth versus soup: Start with low-sodium chicken broth. Taste as you cook, and add salt as needed. This way, you control the saltiness without overwhelming the dish. - Techniques for tempering eggs properly: To prevent egg curdling, whisk the eggs and lemon juice in a bowl. Slowly add hot broth while whisking. This warms the eggs without cooking them. - Continuous whisking for a smooth texture: Keep whisking as you add the broth. This ensures a creamy, smooth texture in your soup. It’s key for that authentic Greek flavor. - Suggestions for family dinners or special occasions: Greek Lemon Chicken Soup is perfect for family dinners. Serve it on cozy nights or special occasions like holidays. It brings warmth and comfort to the table. - Pairing with sides for a complete meal: I love pairing this soup with a fresh Greek salad or crusty bread. These sides complement the soup and make a full meal. Enjoy your cooking adventure with this classic dish! Check out the [Full Recipe] for step-by-step details on making this delightful soup. {{image_4}} If you can't find orzo, don't worry! You can use other small pasta shapes, like ditalini or acini di pepe. Both work great in this soup. For those who need gluten-free options, try rice or quinoa. These grains add texture and flavor while keeping the dish gluten-free. You can make your soup even better by adding greens. Spinach or kale works well. Simply toss them in during the last few minutes of cooking. This adds color and nutrients. You can also enhance the flavor by using herbs. Fresh dill or basil adds a lovely aroma and taste. Try adding a handful of either herb for a bright twist. If you want a meatless version, you can replace the chicken with plant-based proteins. Tofu or chickpeas are good choices. They soak up the soup's flavors nicely. Use vegetable broth instead of chicken broth to keep the taste rich and savory. This way, everyone can enjoy a bowl of this comforting soup! For the full recipe, check out the Mediterranean Lemon Chicken Orzo Soup . To keep your Greek Lemon Chicken Soup fresh, let it cool first. Pour it into airtight containers. Make sure to store it in the fridge. It should stay good for about 3 to 4 days. Always label your containers with the date. This helps you track how long it’s been there. When reheating, do it gently. You can use the stove or microwave. If using the stove, heat it on low heat. Stir often to prevent sticking. If it seems thick, add a splash of broth or water. This keeps the soup nice and smooth. To freeze Greek Lemon Chicken Soup, let it cool completely. Pour it into freezer-safe bags or containers. Remove as much air as possible. It can last up to 3 months in the freezer. When you’re ready to eat, thaw it in the fridge overnight. Reheat gently to enjoy the same great flavor. Greek Lemon Chicken Soup, also known as Avgolemono, is a classic dish. It features tender chicken, bright lemon, and creamy eggs. This soup warms the heart and soul, especially during cold months. It is a staple in Greek homes and often appears at family gatherings. The mix of flavors showcases the essence of Greek cooking. To achieve a creamy texture, temper the eggs. Whisk eggs and lemon juice together in a bowl. Gradually add hot broth while whisking. This method prevents the eggs from scrambling. Slowly stir the egg mixture back into the soup. This creates a smooth and velvety finish. Avoid boiling the soup after adding the egg to keep it creamy. Yes, you can make this soup ahead of time. Prepare the soup but skip adding the egg mixture until serving. Store the soup in an airtight container in the fridge for up to three days. When ready to serve, reheat gently and add the egg mixture. This keeps the soup fresh and creamy. This soup pairs well with a simple Greek salad. You can also serve it with warm pita bread or crusty bread. For a lighter meal, consider grilled vegetables on the side. These options enhance the flavors and create a lovely dining experience. In this post, I shared how to make Greek Lemon Chicken Soup. You learned about the key ingredients, like chicken, orzo, and the egg-lemon mixture that gives the soup its creamy texture. I provided steps for preparation, cooking, and tips for keeping the soup delicious and authentic. Don't hesitate to mix it up with different ingredients or share it with others. Enjoy this comforting dish anytime!](https://goldendishy.com/wp-content/uploads/2025/06/4ca94f54-e42c-42a8-b75c-f7048ee8bbd9.webp)
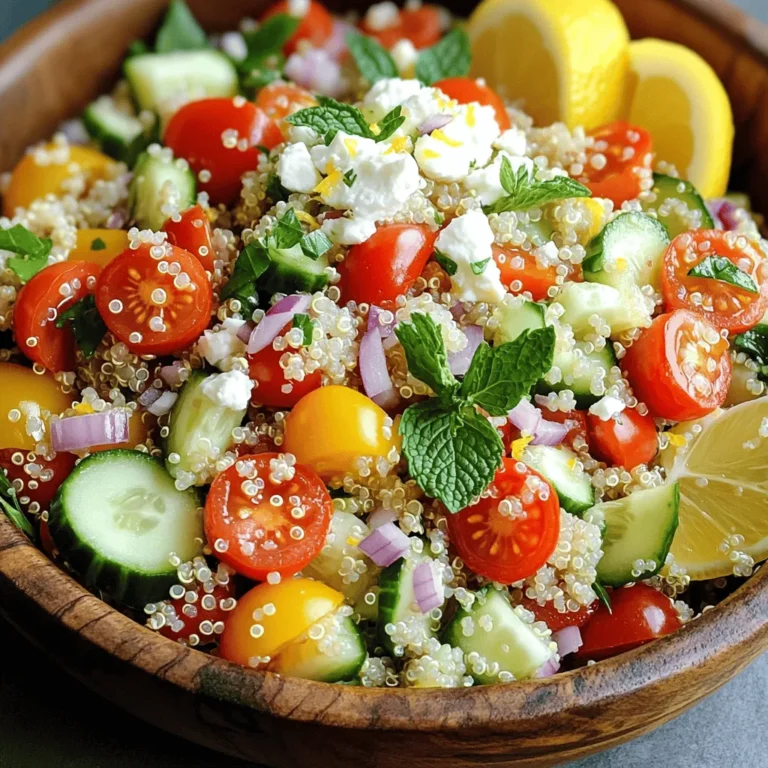
If you crave warmth and comfort, you’re in for a treat with Greek Lemon Chicken Soup. This simple recipe combines tender chicken, fresh veggies, and a splash of bright lemon, making it perfect for any day. Whether you’re feeling under the weather or just want a cozy meal, this soup promises to soothe your soul and satisfy your taste buds. Let’s dive into this delicious dish you can whip up in no time!
Ingredients
Essential Ingredients for Greek Lemon Chicken Soup
– 1 pound boneless, skinless chicken breasts
– 6 cups low-sodium chicken broth
– 1 medium onion, finely chopped
– 2 cloves garlic, minced
– 2 medium carrots, diced
– 2 stalks celery, diced
– 1 cup orzo pasta
– 3 large eggs
– 1/2 cup freshly squeezed lemon juice (about 2-3 lemons)
This soup starts with tender chicken. I prefer boneless, skinless chicken breasts. They cook fast and stay juicy. Next, low-sodium chicken broth gives the soup its rich base.
Fresh veggies add flavor and nutrition. Onion, garlic, carrots, and celery create a perfect mix. I chop them finely for even cooking. Orzo pasta makes the soup filling. It cooks well in the broth, soaking up all the flavors.
To achieve that creamy texture, I use eggs and lemon juice. The eggs blend with the broth, creating a silky finish. Fresh lemon juice brightens the soup, making every bite refreshing.
Spices and Seasoning
– 1 teaspoon dried oregano
– 1 teaspoon sea salt
– 1/2 teaspoon freshly ground black pepper
– 2 tablespoons extra-virgin olive oil
Seasoning is key in this recipe. Dried oregano adds a hint of earthiness. Sea salt and black pepper enhance the natural flavors. I always choose extra-virgin olive oil for sautéing. It has a wonderful taste and is healthy too.
Optional Garnishes
– Fresh parsley, finely chopped
– Lemon wedges for serving
Garnishes make a dish special. Fresh parsley adds color and freshness. I sprinkle it on top before serving. Lemon wedges are great for those who want extra zing. They brighten the dish and add a punch of flavor.It’s a perfect guide to make this comforting dish.
Step-by-Step Instructions
Preparation of Ingredients
Start by chopping the vegetables. You will need to dice the onion, carrots, and celery. Next, shred the cooked chicken. This can be done easily with two forks. For the egg mixture, whisk together the eggs and lemon juice in a medium bowl. Make sure they blend well.
Cooking the Base
In a large pot, heat two tablespoons of olive oil over medium heat. Once hot, add the chopped onion, diced carrots, and celery. Sauté these vegetables for about 5 to 7 minutes. They should become tender and fragrant. Now, stir in two minced garlic cloves. Cook for one more minute. You want the garlic to smell wonderful, but not brown.
Simmering and Shredding
Add the chicken breasts into the pot. Pour in six cups of low-sodium chicken broth. Increase the heat slightly and bring it to a gentle simmer. Let the chicken cook for 15 to 20 minutes. Once fully cooked, carefully remove the chicken from the pot and set it aside to cool. When cool, shred the chicken into bite-sized pieces. Return to the pot and add one cup of orzo pasta. Let the soup simmer for 8 to 10 minutes, stirring to prevent sticking.
Incorporating the Egg Mixture
In your mixing bowl, you have the whisked eggs with lemon juice. Now, temper the eggs by slowly adding a ladleful of hot broth from the pot. Whisk constantly to prevent the eggs from cooking too quickly. Gradually mix the egg mixture back into the soup. This will give your soup a creamy texture.
Final Touches
Now it’s time to adjust the seasoning. Taste the soup and add sea salt and black pepper as needed. Finally, garnish your soup with fresh parsley before serving. This adds a nice color and fresh flavor. Enjoy your comforting bowl of Greek lemon chicken soup!
Tips & Tricks
Cooking Tips for Authentic Flavor
– Choosing the right type of chicken: I recommend using boneless, skinless chicken breasts. This cut cooks quickly and stays tender in the soup. It also absorbs the rich flavors of the broth well.
– Adjusting salt levels for broth versus soup: Start with low-sodium chicken broth. Taste as you cook, and add salt as needed. This way, you control the saltiness without overwhelming the dish.
Preventing Egg Curdling
– Techniques for tempering eggs properly: To prevent egg curdling, whisk the eggs and lemon juice in a bowl. Slowly add hot broth while whisking. This warms the eggs without cooking them.
– Continuous whisking for a smooth texture: Keep whisking as you add the broth. This ensures a creamy, smooth texture in your soup. It’s key for that authentic Greek flavor.
Best Time to Serve
– Suggestions for family dinners or special occasions: Greek Lemon Chicken Soup is perfect for family dinners. Serve it on cozy nights or special occasions like holidays. It brings warmth and comfort to the table.
– Pairing with sides for a complete meal: I love pairing this soup with a fresh Greek salad or crusty bread. These sides complement the soup and make a full meal. Enjoy your cooking adventure with this classic dish!
Variations
Different Pasta Options
If you can’t find orzo, don’t worry! You can use other small pasta shapes, like ditalini or acini di pepe. Both work great in this soup. For those who need gluten-free options, try rice or quinoa. These grains add texture and flavor while keeping the dish gluten-free.
Adding Additional Ingredients
You can make your soup even better by adding greens. Spinach or kale works well. Simply toss them in during the last few minutes of cooking. This adds color and nutrients. You can also enhance the flavor by using herbs. Fresh dill or basil adds a lovely aroma and taste. Try adding a handful of either herb for a bright twist.
Vegetarian Adaptation
If you want a meatless version, you can replace the chicken with plant-based proteins. Tofu or chickpeas are good choices. They soak up the soup’s flavors nicely. Use vegetable broth instead of chicken broth to keep the taste rich and savory. This way, everyone can enjoy a bowl of this comforting soup!
Storage Info
How to Store Leftovers
To keep your Greek Lemon Chicken Soup fresh, let it cool first. Pour it into airtight containers. Make sure to store it in the fridge. It should stay good for about 3 to 4 days. Always label your containers with the date. This helps you track how long it’s been there.
Reheating Tips
When reheating, do it gently. You can use the stove or microwave. If using the stove, heat it on low heat. Stir often to prevent sticking. If it seems thick, add a splash of broth or water. This keeps the soup nice and smooth.
Freezing Instructions
To freeze Greek Lemon Chicken Soup, let it cool completely. Pour it into freezer-safe bags or containers. Remove as much air as possible. It can last up to 3 months in the freezer. When you’re ready to eat, thaw it in the fridge overnight. Reheat gently to enjoy the same great flavor.
FAQs
What is Greek Lemon Chicken Soup?
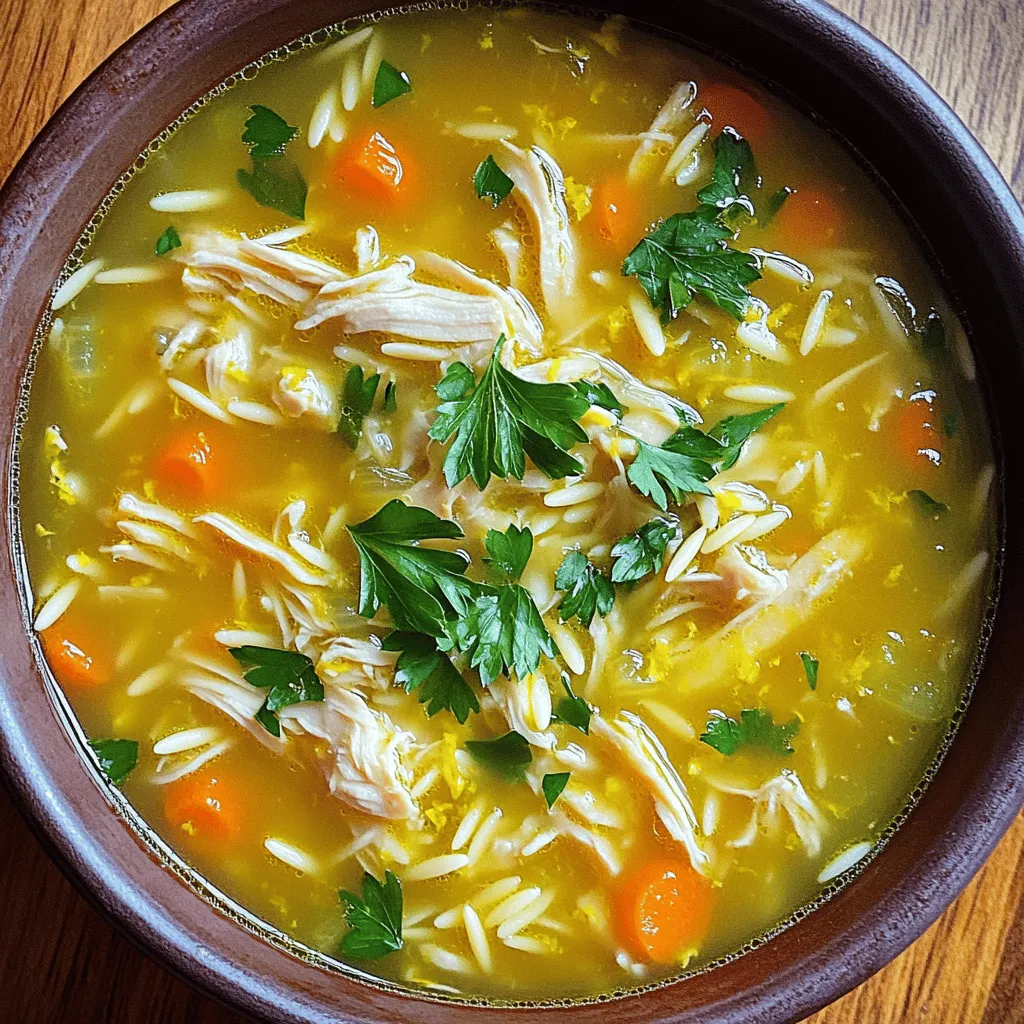
Greek Lemon Chicken Soup, also known as Avgolemono, is a classic dish. It features tender chicken, bright lemon, and creamy eggs. This soup warms the heart and soul, especially during cold months. It is a staple in Greek homes and often appears at family gatherings. The mix of flavors showcases the essence of Greek cooking.
How to make Greek Lemon Chicken Soup creamy?
To achieve a creamy texture, temper the eggs. Whisk eggs and lemon juice together in a bowl. Gradually add hot broth while whisking. This method prevents the eggs from scrambling. Slowly stir the egg mixture back into the soup. This creates a smooth and velvety finish. Avoid boiling the soup after adding the egg to keep it creamy.
Can I make Greek Lemon Chicken Soup in advance?
Yes, you can make this soup ahead of time. Prepare the soup but skip adding the egg mixture until serving. Store the soup in an airtight container in the fridge for up to three days. When ready to serve, reheat gently and add the egg mixture. This keeps the soup fresh and creamy.
What other dishes pair well with this soup?
This soup pairs well with a simple Greek salad. You can also serve it with warm pita bread or crusty bread. For a lighter meal, consider grilled vegetables on the side. These options enhance the flavors and create a lovely dining experience.
In this post, I shared how to make Greek Lemon Chicken Soup. You learned about the key ingredients, like chicken, orzo, and the egg-lemon mixture that gives the soup its creamy texture. I provided steps for preparation, cooking, and tips for keeping the soup delicious and authentic.
Don’t hesitate to mix it up with different ingredients or share it with others. Enjoy this comforting dish anytime!
![- 1 pound boneless, skinless chicken breasts - 6 cups low-sodium chicken broth - 1 medium onion, finely chopped - 2 cloves garlic, minced - 2 medium carrots, diced - 2 stalks celery, diced - 1 cup orzo pasta - 3 large eggs - 1/2 cup freshly squeezed lemon juice (about 2-3 lemons) This soup starts with tender chicken. I prefer boneless, skinless chicken breasts. They cook fast and stay juicy. Next, low-sodium chicken broth gives the soup its rich base. Fresh veggies add flavor and nutrition. Onion, garlic, carrots, and celery create a perfect mix. I chop them finely for even cooking. Orzo pasta makes the soup filling. It cooks well in the broth, soaking up all the flavors. To achieve that creamy texture, I use eggs and lemon juice. The eggs blend with the broth, creating a silky finish. Fresh lemon juice brightens the soup, making every bite refreshing. - 1 teaspoon dried oregano - 1 teaspoon sea salt - 1/2 teaspoon freshly ground black pepper - 2 tablespoons extra-virgin olive oil Seasoning is key in this recipe. Dried oregano adds a hint of earthiness. Sea salt and black pepper enhance the natural flavors. I always choose extra-virgin olive oil for sautéing. It has a wonderful taste and is healthy too. - Fresh parsley, finely chopped - Lemon wedges for serving Garnishes make a dish special. Fresh parsley adds color and freshness. I sprinkle it on top before serving. Lemon wedges are great for those who want extra zing. They brighten the dish and add a punch of flavor. For the full recipe, check out the Mediterranean Lemon Chicken Orzo Soup! It’s a perfect guide to make this comforting dish. Start by chopping the vegetables. You will need to dice the onion, carrots, and celery. Next, shred the cooked chicken. This can be done easily with two forks. For the egg mixture, whisk together the eggs and lemon juice in a medium bowl. Make sure they blend well. In a large pot, heat two tablespoons of olive oil over medium heat. Once hot, add the chopped onion, diced carrots, and celery. Sauté these vegetables for about 5 to 7 minutes. They should become tender and fragrant. Now, stir in two minced garlic cloves. Cook for one more minute. You want the garlic to smell wonderful, but not brown. Add the chicken breasts into the pot. Pour in six cups of low-sodium chicken broth. Increase the heat slightly and bring it to a gentle simmer. Let the chicken cook for 15 to 20 minutes. Once fully cooked, carefully remove the chicken from the pot and set it aside to cool. When cool, shred the chicken into bite-sized pieces. Return to the pot and add one cup of orzo pasta. Let the soup simmer for 8 to 10 minutes, stirring to prevent sticking. In your mixing bowl, you have the whisked eggs with lemon juice. Now, temper the eggs by slowly adding a ladleful of hot broth from the pot. Whisk constantly to prevent the eggs from cooking too quickly. Gradually mix the egg mixture back into the soup. This will give your soup a creamy texture. Now it’s time to adjust the seasoning. Taste the soup and add sea salt and black pepper as needed. Finally, garnish your soup with fresh parsley before serving. This adds a nice color and fresh flavor. Enjoy your comforting bowl of Greek lemon chicken soup! For the full recipe, see the detailed instructions above. - Choosing the right type of chicken: I recommend using boneless, skinless chicken breasts. This cut cooks quickly and stays tender in the soup. It also absorbs the rich flavors of the broth well. - Adjusting salt levels for broth versus soup: Start with low-sodium chicken broth. Taste as you cook, and add salt as needed. This way, you control the saltiness without overwhelming the dish. - Techniques for tempering eggs properly: To prevent egg curdling, whisk the eggs and lemon juice in a bowl. Slowly add hot broth while whisking. This warms the eggs without cooking them. - Continuous whisking for a smooth texture: Keep whisking as you add the broth. This ensures a creamy, smooth texture in your soup. It’s key for that authentic Greek flavor. - Suggestions for family dinners or special occasions: Greek Lemon Chicken Soup is perfect for family dinners. Serve it on cozy nights or special occasions like holidays. It brings warmth and comfort to the table. - Pairing with sides for a complete meal: I love pairing this soup with a fresh Greek salad or crusty bread. These sides complement the soup and make a full meal. Enjoy your cooking adventure with this classic dish! Check out the [Full Recipe] for step-by-step details on making this delightful soup. {{image_4}} If you can't find orzo, don't worry! You can use other small pasta shapes, like ditalini or acini di pepe. Both work great in this soup. For those who need gluten-free options, try rice or quinoa. These grains add texture and flavor while keeping the dish gluten-free. You can make your soup even better by adding greens. Spinach or kale works well. Simply toss them in during the last few minutes of cooking. This adds color and nutrients. You can also enhance the flavor by using herbs. Fresh dill or basil adds a lovely aroma and taste. Try adding a handful of either herb for a bright twist. If you want a meatless version, you can replace the chicken with plant-based proteins. Tofu or chickpeas are good choices. They soak up the soup's flavors nicely. Use vegetable broth instead of chicken broth to keep the taste rich and savory. This way, everyone can enjoy a bowl of this comforting soup! For the full recipe, check out the Mediterranean Lemon Chicken Orzo Soup . To keep your Greek Lemon Chicken Soup fresh, let it cool first. Pour it into airtight containers. Make sure to store it in the fridge. It should stay good for about 3 to 4 days. Always label your containers with the date. This helps you track how long it’s been there. When reheating, do it gently. You can use the stove or microwave. If using the stove, heat it on low heat. Stir often to prevent sticking. If it seems thick, add a splash of broth or water. This keeps the soup nice and smooth. To freeze Greek Lemon Chicken Soup, let it cool completely. Pour it into freezer-safe bags or containers. Remove as much air as possible. It can last up to 3 months in the freezer. When you’re ready to eat, thaw it in the fridge overnight. Reheat gently to enjoy the same great flavor. Greek Lemon Chicken Soup, also known as Avgolemono, is a classic dish. It features tender chicken, bright lemon, and creamy eggs. This soup warms the heart and soul, especially during cold months. It is a staple in Greek homes and often appears at family gatherings. The mix of flavors showcases the essence of Greek cooking. To achieve a creamy texture, temper the eggs. Whisk eggs and lemon juice together in a bowl. Gradually add hot broth while whisking. This method prevents the eggs from scrambling. Slowly stir the egg mixture back into the soup. This creates a smooth and velvety finish. Avoid boiling the soup after adding the egg to keep it creamy. Yes, you can make this soup ahead of time. Prepare the soup but skip adding the egg mixture until serving. Store the soup in an airtight container in the fridge for up to three days. When ready to serve, reheat gently and add the egg mixture. This keeps the soup fresh and creamy. This soup pairs well with a simple Greek salad. You can also serve it with warm pita bread or crusty bread. For a lighter meal, consider grilled vegetables on the side. These options enhance the flavors and create a lovely dining experience. In this post, I shared how to make Greek Lemon Chicken Soup. You learned about the key ingredients, like chicken, orzo, and the egg-lemon mixture that gives the soup its creamy texture. I provided steps for preparation, cooking, and tips for keeping the soup delicious and authentic. Don't hesitate to mix it up with different ingredients or share it with others. Enjoy this comforting dish anytime!](https://goldendishy.com/wp-content/uploads/2025/06/4ca94f54-e42c-42a8-b75c-f7048ee8bbd9-300x300.webp)
![To make Caprese Pasta with Balsamic Glaze, gather these key ingredients: - 12 oz pasta (fusilli or penne recommended) - 2 cups cherry tomatoes, halved - 1 cup fresh mozzarella balls (bocconcini), drained and patted dry - 1/2 cup fresh basil leaves, roughly torn - 1/4 cup extra virgin olive oil - 2 tablespoons balsamic glaze (store-bought or homemade) - 1 teaspoon garlic powder - Salt and freshly ground black pepper to taste Each ingredient plays a vital role. The pasta serves as the base. Cherry tomatoes add sweetness and color. Fresh mozzarella adds creaminess. Basil brings freshness, while balsamic glaze ties everything together with a sweet-tangy kick. You can enhance your dish with a few optional garnishes: - Freshly grated Parmesan cheese - Extra basil leaves for a pop of color - A drizzle of olive oil before serving These garnishes boost flavor and make your pasta look stunning. They add a gourmet touch that impresses everyone. Choosing high-quality ingredients makes a big difference. Here are some tips: - Use fresh pasta for a softer texture and richer flavor. - Select ripe cherry tomatoes for better sweetness. - Buy mozzarella balls packed in water for the best taste. - Pick fresh basil with vibrant green leaves. When you use quality ingredients, your Caprese Pasta will shine. Each bite will burst with flavor, making your meal truly special. For the full recipe, check the section above. Start by boiling a large pot of salted water. Once it reaches a rolling boil, add 12 ounces of pasta. I recommend using fusilli or penne for this dish. Cook the pasta according to the package instructions, usually around 8 to 10 minutes. You want it al dente, which means it should remain firm to the bite. After cooking, drain the pasta in a colander. Rinse it under cold water to stop the cooking process, then set it aside. In a small mixing bowl, combine 1/4 cup of extra virgin olive oil, 1 teaspoon of garlic powder, and salt and black pepper to taste. Whisk these ingredients together until they form a smooth mixture. This dressing adds flavor to your pasta and brings all the ingredients together. Set the dressing aside for now. In a large mixing bowl, add the drained pasta, 2 cups of halved cherry tomatoes, and 1 cup of fresh mozzarella balls. Use a spatula or wooden spoon to gently mix these ingredients together. Next, pour the prepared dressing over the pasta mix. Toss everything until all the ingredients are coated with the dressing. Then, gently fold in 1/2 cup of torn fresh basil leaves. Be careful not to bruise them. Just before serving, drizzle 2 tablespoons of balsamic glaze over the pasta. Toss the dish again for an even flavor. You can serve this pasta warm or chill it in the fridge for about 30 minutes for a cold salad. Enjoy your Caprese Pasta with Balsamic Glaze! For the complete recipe, check the Full Recipe section. To boost the flavors in your Caprese pasta, focus on fresh ingredients. The magic lies in ripe cherry tomatoes and creamy mozzarella. Use extra virgin olive oil for a rich taste. If you want a zesty kick, add a bit of lemon juice. It brightens the dish. Consider also using garlic powder for depth—just a teaspoon will do. Lastly, a sprinkle of salt and pepper can make all the difference. Cooking pasta to the right texture is key. Aim for al dente, which means it should be firm but cooked. Start with a large pot of salted boiling water. This helps flavor the pasta. Follow the package’s recommended cook time, usually about 8-10 minutes. Once cooked, drain it but do not rinse. Rinsing washes away the starch, which helps sauce cling to the pasta. A beautiful presentation makes any meal special. Use a large, shallow bowl for serving. This allows the colors to pop. Top your pasta with fresh basil leaves and a sprinkle of Parmesan cheese. You can drizzle a bit more balsamic glaze on top for that extra visual appeal. Serve it warm or chill it for a refreshing treat. Remember, we eat with our eyes first! For the full recipe, check out the Caprese Pasta Delight. {{image_4}} You can mix up this Caprese pasta recipe easily. Use different pasta shapes like spaghetti or farfalle for fun. Swap cherry tomatoes for sun-dried tomatoes if you want a bolder taste. You can also try adding grilled chicken or shrimp for protein. Instead of fresh mozzarella, use feta for a tangy twist. Seasonal ingredients can brighten this dish. In spring, add asparagus or peas for freshness. Summer is perfect for zucchini or bell peppers. In fall, consider roasted butternut squash for a sweet flavor. Winter calls for hearty greens like kale or spinach. These additions can enhance color and taste. You can make this dish fit many diets. To make it vegan, skip the mozzarella and use avocado or cashew cheese instead. For a gluten-free option, choose gluten-free pasta made from rice or quinoa. Adjust the dressing by using a vegan-friendly oil. This way, everyone can enjoy Caprese pasta. For the full recipe, check [Full Recipe]. To keep your Caprese pasta fresh, store it properly. Place any leftovers in an airtight container. This helps keep moisture in and prevents the pasta from drying out. If you have extra balsamic glaze, store it separately. This way, you can drizzle it on just before serving. When it's time to eat your leftovers, reheat the pasta gently. Use a microwave or a pan on low heat. If using the microwave, heat in short bursts to avoid overcooking. Add a splash of olive oil or a bit of water to keep it moist. Stir well to ensure even heat. Caprese pasta stays fresh for about 3 days in the fridge. After that, the flavors can fade. If you want to keep it longer, consider freezing it. But remember, the texture might change once it's thawed. Enjoy your delicious meal within those days for the best taste! To make balsamic glaze, start with balsamic vinegar. Pour one cup of vinegar into a small saucepan. Heat it over medium heat. Stir it often as it heats. Once it boils, reduce the heat. Let it simmer for about 15 to 20 minutes. The vinegar will reduce and thicken. You want it to coat the back of a spoon. Take it off the heat and let it cool. The glaze will thicken more as it cools. Yes, you can use many types of pasta. Fusilli and penne are great choices. You can also try rotini, farfalle, or spaghetti. Each type offers a unique texture. Choose what you like best. Just remember to cook it until it is al dente. Absolutely! Caprese pasta is great for meal prep. You can make it ahead of time. Store it in an airtight container in the fridge. It keeps well for up to three days. Just add the balsamic glaze right before serving. This will keep the flavors fresh. For the full recipe, check out the Caprese Pasta Delight section. This article covered key ingredients for Caprese pasta, how to cook it, and tips for flavor and texture. We also explored variations for different diets and seasonal tastes. Remember, quality ingredients make a big difference. Experiment with flavors and enjoy your meals. It’s all about making food that you love. Enjoy creating your perfect Caprese pasta!](https://goldendishy.com/wp-content/uploads/2025/05/8e484e0a-c503-4741-abc1-b7211b9a34a5-768x768.webp)
![To make maple glazed butternut squash, you’ll need the following items: - 1 medium butternut squash, peeled and cut into 1-inch cubes - 3 tablespoons pure maple syrup - 2 tablespoons extra virgin olive oil - 1 teaspoon ground cinnamon - 1/2 teaspoon freshly grated nutmeg - 1/4 teaspoon cayenne pepper (optional, for a kick) - Sea salt and freshly cracked black pepper, to taste - 1/4 cup pecans, roughly chopped (for garnish) - Fresh parsley, finely chopped (for garnish) When cooking, measuring accurately is key. Use dry measuring cups for solid items like squash and nuts. For liquids, use a liquid measuring cup. Always level off dry ingredients with a straight edge. This step ensures you get the right amount for best results. You can swap ingredients based on your needs. If you prefer a sweeter taste, try honey instead of maple syrup. For a nut-free option, skip the pecans or use seeds like pumpkin seeds. Always check for allergies, especially with nuts and spices. To make maple glazed butternut squash, start by gathering your ingredients. You'll need: - 1 medium butternut squash, peeled and cut into 1-inch cubes - 3 tablespoons pure maple syrup - 2 tablespoons extra virgin olive oil - 1 teaspoon ground cinnamon - 1/2 teaspoon freshly grated nutmeg - 1/4 teaspoon cayenne pepper (optional) - Sea salt and freshly cracked black pepper, to taste - 1/4 cup pecans, roughly chopped (for garnish) - Fresh parsley, finely chopped (for garnish) First, preheat your oven to 400°F (200°C). This step is key for good roasting. Next, peel and cube the butternut squash. Place the cubes in a large bowl. Drizzle the olive oil and maple syrup over the squash. Then, sprinkle the ground cinnamon, nutmeg, cayenne, sea salt, and black pepper. Toss gently until all the pieces are well coated. Now, it's time to roast your squash. Line a baking sheet with parchment paper. This helps prevent sticking and makes cleanup easy. Spread the coated squash in a single layer on the sheet. Place the baking sheet in the oven. Roast the squash for 25-30 minutes. About halfway through the cooking time, stir the squash. This ensures all sides caramelize and cook evenly. When the squash is fork-tender and has a nice golden color, it's done. Remove it from the oven and let it cool for 2-3 minutes. To get that perfect caramelization, watch your cooking time closely. Stirring halfway through helps. The key is to spread the squash out evenly. If it's too crowded, it will steam instead of roast. You can also adjust the maple syrup for sweetness. A little extra can help with caramelization. If you like a kick, add the cayenne pepper. It balances the sweet and savory flavors beautifully. Once cooked, transfer the squash to a serving dish. Top with chopped pecans and parsley for a fresh touch. This dish is sure to impress! For the complete recipe, check out the [Full Recipe]. When making maple glazed butternut squash, avoid cutting the squash too small. Smaller pieces cook too fast and can burn. Also, don’t skip the olive oil. It helps the squash caramelize and adds flavor. Overcrowding the baking sheet is another mistake. Leave space between the cubes to ensure even cooking. To boost the flavor, add a splash of balsamic vinegar before roasting. This adds depth to the sweetness. Try different spices, too. A pinch of smoked paprika can give a nice twist. For a savory touch, mix in garlic powder or fresh garlic. These will elevate your dish. Use a sturdy baking sheet lined with parchment paper. This helps with easy cleanup and prevents sticking. A large mixing bowl is great for tossing the squash and spices. If you have one, a vegetable peeler makes peeling the squash quick and easy. For a perfect roast, an oven thermometer ensures your oven is at the right temperature. For the full recipe, refer to the above instructions. {{image_4}} You can make this dish even better by adding other veggies. Try sweet potatoes for a richer flavor. Carrots add sweetness and color, while red onions bring a slight bite. Just cut them into similar sizes as the squash. Toss them in the same maple glaze for a yummy blend. You’ll create a colorful and flavorful dish that everyone will love. Want to change the taste? You can use different spices. Try ginger for a warm kick. If you like it spicy, add more cayenne pepper. You can also use smoked paprika for a smoky flavor. Experiment with herbs like thyme or rosemary. Just remember to keep it balanced, so no single flavor overpowers the dish. This recipe is naturally vegan and gluten-free. You can enjoy it without worry. If you want to add protein, try chickpeas. They pair well with the flavors and add a nice crunch. For those who need low-carb options, skip the maple syrup and use a sugar substitute. It’s easy to adapt this dish to fit your needs. For the full recipe, check out the detailed instructions above. To keep your maple glazed butternut squash fresh, store it in an airtight container. Let the squash cool down after cooking. Then, place it in the fridge. It will stay fresh for about 3 to 5 days. If you want to keep it longer, consider freezing. Reheat your butternut squash in the oven for the best results. Preheat your oven to 350°F (175°C). Spread the squash on a baking sheet. Heat it for about 10-15 minutes or until warm. You can also use the microwave. Place it in a microwave-safe dish and cover it. Heat in short bursts, checking to avoid overcooking. Freezing is a great way to save this dish for later. First, let the squash cool completely. Then, spread it on a baking sheet in a single layer. Freeze it for about 1-2 hours until firm. Once frozen, transfer the squash to a freezer-safe bag or container. It can last for up to 3 months in the freezer. When ready to eat, thaw overnight in the fridge before reheating. For more details, check the Full Recipe. Yes, you can prepare this dish ahead of time. Cook the butternut squash and let it cool. Store it in an airtight container in the fridge. You can make it up to two days in advance. When you're ready to eat, just reheat it in the oven or microwave. This makes it great for meal prep. Maple glazed butternut squash lasts about 3 to 5 days in the fridge. Make sure it’s in a sealed container. Check for any signs of spoilage before eating. If it looks or smells off, it’s best to toss it. Freshness is key for enjoying this tasty dish. You can pair this dish with many foods. It goes well with roasted chicken or turkey. You can also serve it with quinoa or brown rice for a healthy meal. For a vegetarian option, pair it with a bean salad. The sweet and savory flavors work well with many sides. For more details on how to whip up this incredible dish, check out the Full Recipe. This guide walked you through each step of making Maple Glazed Butternut Squash. We covered ingredients, how to prepare, cook, and store your dish. I shared tips to avoid mistakes and ideas for adding your own twist. Remember, the key to perfect caramelization is patience. Enjoy experimenting with flavors and variations. This dish can be a crowd-pleaser and is easy to adapt. I hope you feel ready to try it out. Enjoy your cooking!](https://goldendishy.com/wp-content/uploads/2025/07/e9e7eb41-1a1b-4d7a-9d20-35ffe8b1aa92-768x768.webp)

![- 2 boneless, skinless chicken breasts, sliced into thin strips - 8 ounces of fettuccine pasta - 4 cloves of garlic, finely minced - 1 cup of heavy cream - 1 teaspoon of Italian seasoning blend - ½ teaspoon of red pepper flakes (optional, for heat) - ½ cup of freshly grated Parmesan cheese - Fresh parsley, finely chopped, for a vibrant garnish - 1 tablespoon of extra virgin olive oil - 1 cup of chicken broth - Salt and freshly cracked black pepper, to taste When I prepare Creamy Garlic Chicken Pasta, I focus on fresh ingredients. The chicken must be juicy, the garlic fragrant, and the cream rich. I love using fettuccine because it holds the sauce well. The heavy cream makes the dish smooth and creamy, while the garlic brings a lovely flavor. For seasoning, I often use an Italian blend. It gives warmth and depth to the dish. The red pepper flakes add a tiny kick, but you can skip them if you want a milder taste. Fresh parsley not only adds color but also a fresh taste. Grated Parmesan cheese is a must for that cheesy goodness. Gathering these ingredients helps me create a quick and tasty meal. It’s all about balance—rich cream, savory garlic, and hearty chicken come together perfectly. If you want to see the full process, check out the Full Recipe. Start with a large pot. Fill it with water and add salt. Bring the water to a rolling boil. Once boiling, add 8 ounces of fettuccine pasta. Cook the pasta for about 8-10 minutes until it is al dente. When it’s done, drain the pasta in a colander. Remember to save about ½ cup of the pasta water for later. Grab a large skillet and place it over medium-high heat. Pour in 1 tablespoon of olive oil and let it warm up. While the oil heats, season 2 sliced chicken breasts with salt and pepper. Add the chicken strips to the hot skillet in a single layer. Cook them for about 5-6 minutes until golden brown and fully cooked. Once cooked, take the chicken out and keep it warm on a plate. In the same skillet, lower the heat to medium. Add 4 cloves of minced garlic and sauté for 1-2 minutes. Keep an eye on the garlic; you don’t want it to burn. After the garlic is fragrant, pour in 1 cup of chicken broth. Let it come to a gentle simmer. Next, stir in 1 cup of heavy cream, 1 teaspoon of Italian seasoning, and red pepper flakes if you like some heat. Allow this mixture to simmer for about 3-4 minutes until it thickens. Now it’s time to combine everything. Add the cooked fettuccine and the chicken back into the skillet. Toss them gently until they are well coated in the creamy sauce. If the sauce seems too thick, slowly add some reserved pasta water until you reach your desired consistency. Finally, sprinkle in ½ cup of grated Parmesan cheese. Stir it until it melts and blends into the sauce. Taste and adjust seasoning with salt and pepper if needed. For the full experience, check the Full Recipe. To make the cream sauce just right, simmering is key. Simmering helps all the flavors blend well. It also thickens the sauce without burning it. Keep the heat low, and stir often. This way, you can avoid garlic burnout. Garlic can turn bitter if cooked too long. Sauté it just until it smells good and turns light gold. Adjusting your seasonings can elevate this dish. Taste as you go. If you want more flavor, add salt or pepper. You can also use homemade broth for a fresh taste. Store-bought broth works too, but watch for added salt. This can affect your dish's flavor. Always check the label to control the salt level. Plating your creamy garlic chicken pasta can make a big difference. Use shallow bowls for a nice look. Make sure to spread the chicken and sauce evenly. For garnish, sprinkle fresh parsley on top. You can also add more Parmesan for richness. A drizzle of olive oil adds a shiny touch. Your guests will love the look and taste! {{image_4}} You can easily boost the nutrition of your creamy garlic chicken pasta by adding vegetables. I love using fresh spinach or mushrooms for a tasty twist. Spinach wilts nicely, adding color and flavor. Mushrooms bring a rich, earthy taste. To cook these veggies, add them to the skillet right after you sauté the garlic. Stir them in for just a few minutes until they're tender. This way, they soak up the garlic flavor while keeping their crunch. Switching up your pasta can bring new life to this dish. You can use whole wheat or gluten-free pasta if you want healthier options. Different pasta shapes, like penne or rotini, also work well. Just remember, cooking times may change. Whole wheat pasta takes a bit longer, while gluten-free pasta cooks faster. Keep an eye on it, and taste for doneness. If you want to try something new, swap the chicken for shrimp or tofu. Shrimp is quick to cook and adds a nice seafood flavor. Just sauté it for about 3-4 minutes until it turns pink. Tofu is a great plant-based option. Cut it into cubes and sauté it until golden brown. Adjust the cooking times based on what you choose to ensure all proteins are cooked through. Feel free to get creative with your creamy garlic chicken pasta. With these variations, you can make it your own! For a full recipe, check out the [Full Recipe]. To keep your Creamy Garlic Chicken Pasta fresh, store it in the fridge. Place the pasta in an airtight container. This helps prevent it from drying out. Make sure to consume it within three to four days for the best taste. When reheating, use the stovetop for the best results. Add a splash of chicken broth or water to help revive the sauce. Heat over low to medium heat, stirring often. This avoids overcooking the chicken and pasta. If you prefer the microwave, use a microwave-safe dish. Cover it with a lid or a damp paper towel to keep moisture in. Heat it in short bursts, stirring in between. Yes, you can freeze Creamy Garlic Chicken Pasta! However, the cream sauce may change texture. To freeze, let it cool completely. Place it in a freezer-safe container and seal tightly. Use it within one to two months. When ready to eat, thaw it overnight in the fridge. Reheat gently on the stovetop, adding a bit more cream or broth to restore creaminess. Making Creamy Garlic Chicken Pasta is quick and easy! It takes about 10 minutes to prep and 20 minutes to cook. In total, you're looking at around 30 minutes. This dish is perfect for a weeknight meal when you want something tasty without spending hours in the kitchen. Yes, you can easily make this recipe dairy-free! For the cream, use coconut cream or cashew cream instead. Both give a nice texture. Instead of Parmesan cheese, try nutritional yeast or a dairy-free cheese. This way, you still get a creamy dish without any dairy! Creamy Garlic Chicken Pasta pairs well with many side dishes. A simple green salad with a lemon vinaigrette adds freshness. You can also serve garlic bread for a comforting touch. If you prefer vegetables, steamed broccoli or roasted asparagus work well too. These sides balance the richness of the pasta nicely. Absolutely! You can control the spice level by adjusting the red pepper flakes. If you want more heat, add more flakes. For a milder dish, you can skip them entirely. Feel free to experiment until you get the flavor just right for your taste buds. You learned how to make Creamy Garlic Chicken Pasta with key ingredients like chicken, garlic, and cream. We walked through each step, from cooking pasta to making a rich sauce. I shared tips for perfecting flavors, including optional veggie and protein swaps. Storing leftovers was also covered. Remember, this dish is versatile and easy to adapt. Explore your creativity in the kitchen! Enjoy your meal and share the joy of cooking with others.](https://goldendishy.com/wp-content/uploads/2025/06/75e46cf8-cdb7-4cdf-96b4-9ca11b1b9102-768x768.webp)