
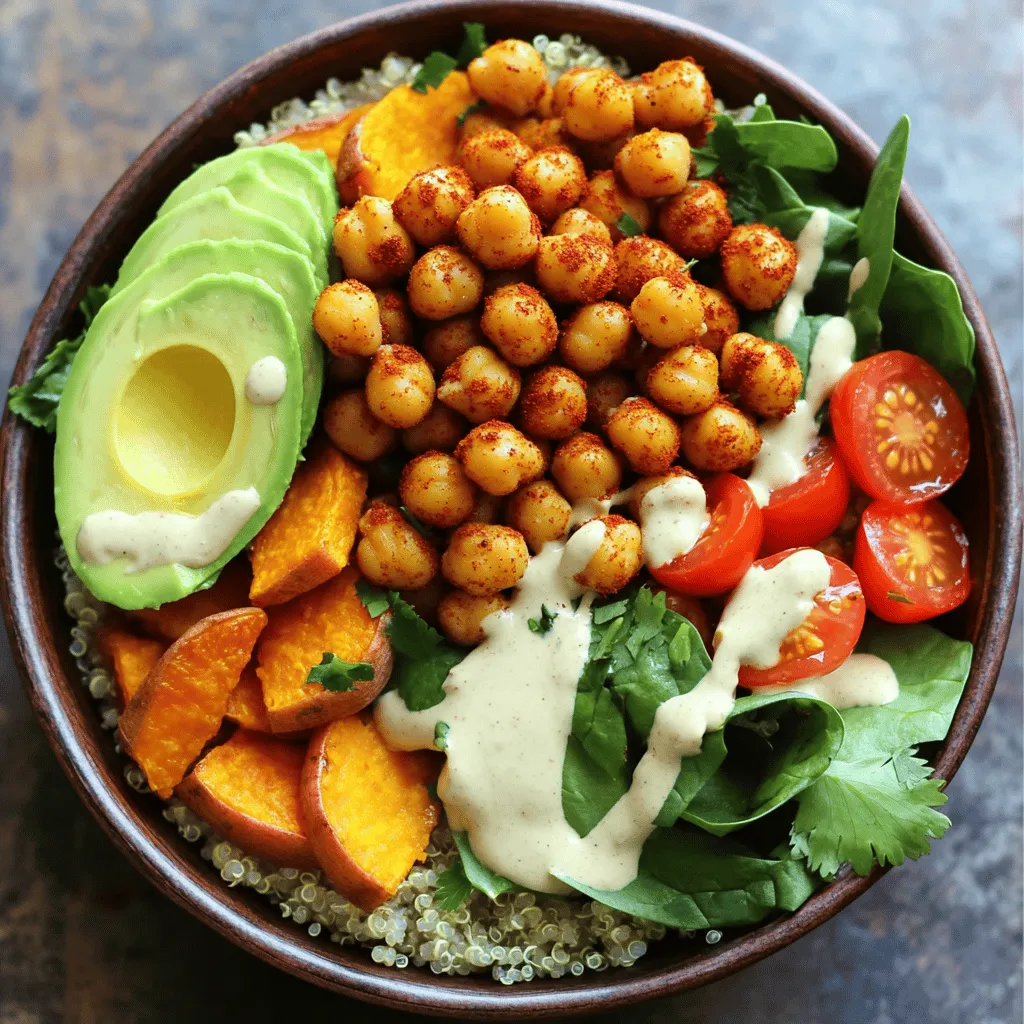
Spicy Chickpea Buddha Bowl Healthy and Flavorful Meal
![To make a Spicy Chickpea Buddha Bowl, you need the following main ingredients: - 1 can (15 oz) chickpeas, drained and rinsed - 2 tablespoons olive oil - 1 tablespoon smoked paprika - 1 teaspoon ground cumin - 1/2 teaspoon cayenne pepper (adjust for spiciness) - Salt and black pepper, to taste - 1 medium sweet potato, peeled and diced - 1 cup quinoa, rinsed - 2 cups vegetable broth (or water) - 1 cup fresh spinach, roughly chopped - 1/2 cup cherry tomatoes, halved - 1 ripe avocado, sliced - 1/4 cup tahini - 2 tablespoons fresh lemon juice - Fresh cilantro leaves for garnish These ingredients blend well to give you a burst of flavor. The chickpeas add protein, while the sweet potato brings sweetness. Quinoa provides a hearty base, and the veggies add freshness. You can enhance your bowl with these optional toppings: - Feta cheese, crumbled - Pumpkin seeds or sunflower seeds - Fresh herbs like parsley or basil - Sliced radishes for crunch - Hot sauce for extra heat These toppings let you customize each bowl. They add flavor, texture, and nutrition. This Buddha bowl offers great health perks: - Chickpeas are high in protein and fiber. - Sweet potatoes are rich in vitamins A and C. - Quinoa is a complete protein and gluten-free. - Spinach packs iron and antioxidants. - Avocado provides healthy fats for heart health. Together, these ingredients create a balanced meal. You get energy, nutrients, and delicious flavors. For the full recipe, click here: [Full Recipe]. Start by preheating your oven to 400°F (200°C). In a bowl, mix the drained chickpeas with olive oil, smoked paprika, ground cumin, cayenne pepper, salt, and black pepper. Toss until every chickpea gets the spice mix. Spread them out on a baking sheet in a single layer. Roast them for 20-25 minutes. Shake the pan halfway through to make sure they cook evenly. While the chickpeas roast, take a separate baking sheet for the sweet potatoes. Toss the diced sweet potato in olive oil. Season with salt and black pepper. Place the sweet potatoes in the oven alongside the chickpeas. Roast for about 25-30 minutes. Stir them once to help them caramelize and soften. Next, rinse the quinoa under cold water. In a medium pot, combine the rinsed quinoa with vegetable broth or water. Bring it to a boil on high heat. Once it boils, lower the heat, cover the pot, and let it simmer for 15 minutes. When done, the quinoa should be fluffy and all the liquid absorbed. Remove it from heat and let it sit for 5 minutes. Fluff it gently with a fork. For the tahini dressing, whisk together tahini, fresh lemon juice, and a few tablespoons of water in a small bowl. Keep whisking until smooth. Adjust the water to make it drizzle easily. Season with salt to taste. To assemble, take a serving bowl and add a generous scoop of fluffy quinoa as the base. Next, layer on the roasted sweet potatoes, crispy chickpeas, chopped spinach, halved cherry tomatoes, and slices of avocado. Make it colorful for a beautiful presentation! Drizzle your tahini dressing over the assembled bowls. Let it cascade down the ingredients for a lovely effect. Top it off with fresh cilantro leaves. Serve right away and enjoy the vibrant flavors of this wholesome meal! For the full recipe, check out the detailed instructions above. You can make this bowl your own. Try different grains like brown rice or farro. Add more veggies like bell peppers or carrots for color and crunch. If you love heat, add jalapeños or chili flakes. You can swap chickpeas for black beans for a different taste. Enjoy your personal twist on this spicy chickpea Buddha bowl. The cooking time can change based on your oven. If your oven runs hot, check the chickpeas and sweet potatoes early. You want them crispy but not burnt. If you prefer softer veggies, roast them longer. Just keep an eye on them to avoid overcooking. Adjusting the time helps you get the best texture. Serve this bowl warm for the best taste. Pair it with a crisp green salad for balance. You can also add a dollop of yogurt or a sprinkle of feta cheese for creaminess. This bowl is perfect for meal prep. Just store each element separately. When ready to eat, combine them for a quick, healthy meal. You can find the full recipe here: [Full Recipe]. {{image_4}} This dish is naturally vegan and gluten-free. Chickpeas, quinoa, and veggies make it great for all. You don’t need to change the recipe to fit these diets. Just enjoy! You can switch out chickpeas for black beans or lentils. Try brown rice instead of quinoa. Sweet potatoes can be replaced with butternut squash. Each swap brings a new flavor. Use seasonal veggies for freshness. In spring, add asparagus or peas. In summer, use zucchini or bell peppers. In fall, try roasted Brussels sprouts or pumpkin. In winter, root veggies shine. These changes keep your Buddha bowl exciting. Check the full recipe for more ideas. To keep your Spicy Chickpea Buddha Bowl fresh, place leftovers in an airtight container. Make sure it cools to room temperature before sealing. Store it in the fridge for up to three days. The flavors will meld, making it even tastier the next day! When you're ready to enjoy your leftovers, you can reheat them in a few ways. The microwave works well for quick meals. Heat in short bursts, stirring in between. If you prefer, you can also use a skillet over medium heat. Add a splash of water to keep it moist while you warm it up. If you want to save some for later, freezing is a great option. Place the chickpeas and sweet potatoes in a freezer-safe bag. Keep the quinoa and fresh veggies separate. They freeze best when stored this way. You can freeze the chickpeas and sweet potatoes for up to three months. Just thaw in the fridge overnight before reheating. Enjoy your meal anytime, even when you're busy! For the full recipe, check out [Full Recipe]. Chickpeas are packed with protein and fiber. They help you feel full longer. They also contain essential vitamins and minerals. Eating chickpeas can boost heart health and aid digestion. They may help regulate blood sugar levels too. Plus, they are versatile and fit in many dishes. Yes, you can make parts of the Spicy Chickpea Buddha Bowl ahead of time. You can roast the chickpeas and sweet potatoes a day before. Store them in airtight containers in the fridge. You can also cook the quinoa in advance. Just reheat it when you are ready to assemble the bowl. If you don’t have tahini, try using almond butter or sunflower seed butter. You can also make a quick dressing with yogurt or avocado. Each option brings a unique flavor to the bowl. Feel free to experiment and find what you like best! To change the spice level, adjust the cayenne pepper amount in the recipe. If you prefer it milder, use less or skip it entirely. For more heat, add extra cayenne or some hot sauce. Taste as you go to find your perfect balance. Absolutely! You can include any veggies you love. Roasted broccoli, bell peppers, or zucchini work well. Fresh ingredients like cucumber or radishes add crunch. Mix and match to create your ideal bowl. The more colors, the better it looks and tastes! The Spicy Chickpea Buddha Bowl packs flavor and nutrition. We explored key ingredients, step-by-step prep, and tips for easy customizations. You can adjust the heat, swap ingredients, or even try new seasonal veggies. In the end, this meal is fun to make and eat. It supports your health and keeps well, too. Dive into your own bowl and enjoy the amazing taste and benefits!](https://goldendishy.com/wp-content/uploads/2025/06/fbd17ced-051b-409f-8c76-69a7b070695a.webp)
Looking for a healthy and tasty meal? You’re in the right place! This Spicy Chickpea Buddha Bowl packs bold flavors and great nutrition into one dish. I’ll guide you through easy steps to make it yourself. Whether you’re a busy parent or a meal prep pro, you’ll love customizing this bowl with fresh ingredients. Let’s dive into the recipe and unleash your inner chef!
Ingredients
Main Ingredients for Spicy Chickpea Buddha Bowl
To make a Spicy Chickpea Buddha Bowl, you need the following main ingredients:
– 1 can (15 oz) chickpeas, drained and rinsed
– 2 tablespoons olive oil
– 1 tablespoon smoked paprika
– 1 teaspoon ground cumin
– 1/2 teaspoon cayenne pepper (adjust for spiciness)
– Salt and black pepper, to taste
– 1 medium sweet potato, peeled and diced
– 1 cup quinoa, rinsed
– 2 cups vegetable broth (or water)
– 1 cup fresh spinach, roughly chopped
– 1/2 cup cherry tomatoes, halved
– 1 ripe avocado, sliced
– 1/4 cup tahini
– 2 tablespoons fresh lemon juice
– Fresh cilantro leaves for garnish
These ingredients blend well to give you a burst of flavor. The chickpeas add protein, while the sweet potato brings sweetness. Quinoa provides a hearty base, and the veggies add freshness.
Optional Toppings
You can enhance your bowl with these optional toppings:
– Feta cheese, crumbled
– Pumpkin seeds or sunflower seeds
– Fresh herbs like parsley or basil
– Sliced radishes for crunch
– Hot sauce for extra heat
These toppings let you customize each bowl. They add flavor, texture, and nutrition.
Nutritional Benefits
This Buddha bowl offers great health perks:
– Chickpeas are high in protein and fiber.
– Sweet potatoes are rich in vitamins A and C.
– Quinoa is a complete protein and gluten-free.
– Spinach packs iron and antioxidants.
– Avocado provides healthy fats for heart health.
Together, these ingredients create a balanced meal. You get energy, nutrients, and delicious flavors.
Step-by-Step Instructions
Preparing the Chickpeas
Start by preheating your oven to 400°F (200°C). In a bowl, mix the drained chickpeas with olive oil, smoked paprika, ground cumin, cayenne pepper, salt, and black pepper. Toss until every chickpea gets the spice mix. Spread them out on a baking sheet in a single layer. Roast them for 20-25 minutes. Shake the pan halfway through to make sure they cook evenly.
Roasting the Sweet Potatoes
While the chickpeas roast, take a separate baking sheet for the sweet potatoes. Toss the diced sweet potato in olive oil. Season with salt and black pepper. Place the sweet potatoes in the oven alongside the chickpeas. Roast for about 25-30 minutes. Stir them once to help them caramelize and soften.
Cooking the Quinoa
Next, rinse the quinoa under cold water. In a medium pot, combine the rinsed quinoa with vegetable broth or water. Bring it to a boil on high heat. Once it boils, lower the heat, cover the pot, and let it simmer for 15 minutes. When done, the quinoa should be fluffy and all the liquid absorbed. Remove it from heat and let it sit for 5 minutes. Fluff it gently with a fork.
Making the Tahini Dressing
For the tahini dressing, whisk together tahini, fresh lemon juice, and a few tablespoons of water in a small bowl. Keep whisking until smooth. Adjust the water to make it drizzle easily. Season with salt to taste.
Assembling the Buddha Bowl
To assemble, take a serving bowl and add a generous scoop of fluffy quinoa as the base. Next, layer on the roasted sweet potatoes, crispy chickpeas, chopped spinach, halved cherry tomatoes, and slices of avocado. Make it colorful for a beautiful presentation!
Garnishing and Serving
Drizzle your tahini dressing over the assembled bowls. Let it cascade down the ingredients for a lovely effect. Top it off with fresh cilantro leaves. Serve right away and enjoy the vibrant flavors of this wholesome meal!
Tips & Tricks
Customization Ideas
You can make this bowl your own. Try different grains like brown rice or farro. Add more veggies like bell peppers or carrots for color and crunch. If you love heat, add jalapeños or chili flakes. You can swap chickpeas for black beans for a different taste. Enjoy your personal twist on this spicy chickpea Buddha bowl.
Cooking Time Adjustments
The cooking time can change based on your oven. If your oven runs hot, check the chickpeas and sweet potatoes early. You want them crispy but not burnt. If you prefer softer veggies, roast them longer. Just keep an eye on them to avoid overcooking. Adjusting the time helps you get the best texture.
Serving Suggestions
Serve this bowl warm for the best taste. Pair it with a crisp green salad for balance. You can also add a dollop of yogurt or a sprinkle of feta cheese for creaminess. This bowl is perfect for meal prep. Just store each element separately. When ready to eat, combine them for a quick, healthy meal.
Variations
Vegan and Gluten-Free Options
This dish is naturally vegan and gluten-free. Chickpeas, quinoa, and veggies make it great for all. You don’t need to change the recipe to fit these diets. Just enjoy!
Alternative Ingredients
You can switch out chickpeas for black beans or lentils. Try brown rice instead of quinoa. Sweet potatoes can be replaced with butternut squash. Each swap brings a new flavor.
Seasonal Variations
Use seasonal veggies for freshness. In spring, add asparagus or peas. In summer, use zucchini or bell peppers. In fall, try roasted Brussels sprouts or pumpkin. In winter, root veggies shine. These changes keep your Buddha bowl exciting.
Storage Info
How to Store Leftovers
To keep your Spicy Chickpea Buddha Bowl fresh, place leftovers in an airtight container. Make sure it cools to room temperature before sealing. Store it in the fridge for up to three days. The flavors will meld, making it even tastier the next day!
Reheating Instructions
When you’re ready to enjoy your leftovers, you can reheat them in a few ways. The microwave works well for quick meals. Heat in short bursts, stirring in between. If you prefer, you can also use a skillet over medium heat. Add a splash of water to keep it moist while you warm it up.
Freezing Guidelines
If you want to save some for later, freezing is a great option. Place the chickpeas and sweet potatoes in a freezer-safe bag. Keep the quinoa and fresh veggies separate. They freeze best when stored this way. You can freeze the chickpeas and sweet potatoes for up to three months. Just thaw in the fridge overnight before reheating. Enjoy your meal anytime, even when you’re busy!
FAQs
What are the health benefits of chickpeas?
Chickpeas are packed with protein and fiber. They help you feel full longer. They also contain essential vitamins and minerals. Eating chickpeas can boost heart health and aid digestion. They may help regulate blood sugar levels too. Plus, they are versatile and fit in many dishes.
Can I make this recipe in advance?
Yes, you can make parts of the Spicy Chickpea Buddha Bowl ahead of time. You can roast the chickpeas and sweet potatoes a day before. Store them in airtight containers in the fridge. You can also cook the quinoa in advance. Just reheat it when you are ready to assemble the bowl.
What can I substitute for tahini?
If you don’t have tahini, try using almond butter or sunflower seed butter. You can also make a quick dressing with yogurt or avocado. Each option brings a unique flavor to the bowl. Feel free to experiment and find what you like best!
How can I adjust the spiciness?
To change the spice level, adjust the cayenne pepper amount in the recipe. If you prefer it milder, use less or skip it entirely. For more heat, add extra cayenne or some hot sauce. Taste as you go to find your perfect balance.
Can I add other vegetables to the Buddha bowl?
Absolutely! You can include any veggies you love. Roasted broccoli, bell peppers, or zucchini work well. Fresh ingredients like cucumber or radishes add crunch. Mix and match to create your ideal bowl. The more colors, the better it looks and tastes!
The Spicy Chickpea Buddha Bowl packs flavor and nutrition. We explored key ingredients, step-by-step prep, and tips for easy customizations. You can adjust the heat, swap ingredients, or even try new seasonal veggies.
In the end, this meal is fun to make and eat. It supports your health and keeps well, too. Dive into your own bowl and enjoy the amazing taste and benefits!
![To make a Spicy Chickpea Buddha Bowl, you need the following main ingredients: - 1 can (15 oz) chickpeas, drained and rinsed - 2 tablespoons olive oil - 1 tablespoon smoked paprika - 1 teaspoon ground cumin - 1/2 teaspoon cayenne pepper (adjust for spiciness) - Salt and black pepper, to taste - 1 medium sweet potato, peeled and diced - 1 cup quinoa, rinsed - 2 cups vegetable broth (or water) - 1 cup fresh spinach, roughly chopped - 1/2 cup cherry tomatoes, halved - 1 ripe avocado, sliced - 1/4 cup tahini - 2 tablespoons fresh lemon juice - Fresh cilantro leaves for garnish These ingredients blend well to give you a burst of flavor. The chickpeas add protein, while the sweet potato brings sweetness. Quinoa provides a hearty base, and the veggies add freshness. You can enhance your bowl with these optional toppings: - Feta cheese, crumbled - Pumpkin seeds or sunflower seeds - Fresh herbs like parsley or basil - Sliced radishes for crunch - Hot sauce for extra heat These toppings let you customize each bowl. They add flavor, texture, and nutrition. This Buddha bowl offers great health perks: - Chickpeas are high in protein and fiber. - Sweet potatoes are rich in vitamins A and C. - Quinoa is a complete protein and gluten-free. - Spinach packs iron and antioxidants. - Avocado provides healthy fats for heart health. Together, these ingredients create a balanced meal. You get energy, nutrients, and delicious flavors. For the full recipe, click here: [Full Recipe]. Start by preheating your oven to 400°F (200°C). In a bowl, mix the drained chickpeas with olive oil, smoked paprika, ground cumin, cayenne pepper, salt, and black pepper. Toss until every chickpea gets the spice mix. Spread them out on a baking sheet in a single layer. Roast them for 20-25 minutes. Shake the pan halfway through to make sure they cook evenly. While the chickpeas roast, take a separate baking sheet for the sweet potatoes. Toss the diced sweet potato in olive oil. Season with salt and black pepper. Place the sweet potatoes in the oven alongside the chickpeas. Roast for about 25-30 minutes. Stir them once to help them caramelize and soften. Next, rinse the quinoa under cold water. In a medium pot, combine the rinsed quinoa with vegetable broth or water. Bring it to a boil on high heat. Once it boils, lower the heat, cover the pot, and let it simmer for 15 minutes. When done, the quinoa should be fluffy and all the liquid absorbed. Remove it from heat and let it sit for 5 minutes. Fluff it gently with a fork. For the tahini dressing, whisk together tahini, fresh lemon juice, and a few tablespoons of water in a small bowl. Keep whisking until smooth. Adjust the water to make it drizzle easily. Season with salt to taste. To assemble, take a serving bowl and add a generous scoop of fluffy quinoa as the base. Next, layer on the roasted sweet potatoes, crispy chickpeas, chopped spinach, halved cherry tomatoes, and slices of avocado. Make it colorful for a beautiful presentation! Drizzle your tahini dressing over the assembled bowls. Let it cascade down the ingredients for a lovely effect. Top it off with fresh cilantro leaves. Serve right away and enjoy the vibrant flavors of this wholesome meal! For the full recipe, check out the detailed instructions above. You can make this bowl your own. Try different grains like brown rice or farro. Add more veggies like bell peppers or carrots for color and crunch. If you love heat, add jalapeños or chili flakes. You can swap chickpeas for black beans for a different taste. Enjoy your personal twist on this spicy chickpea Buddha bowl. The cooking time can change based on your oven. If your oven runs hot, check the chickpeas and sweet potatoes early. You want them crispy but not burnt. If you prefer softer veggies, roast them longer. Just keep an eye on them to avoid overcooking. Adjusting the time helps you get the best texture. Serve this bowl warm for the best taste. Pair it with a crisp green salad for balance. You can also add a dollop of yogurt or a sprinkle of feta cheese for creaminess. This bowl is perfect for meal prep. Just store each element separately. When ready to eat, combine them for a quick, healthy meal. You can find the full recipe here: [Full Recipe]. {{image_4}} This dish is naturally vegan and gluten-free. Chickpeas, quinoa, and veggies make it great for all. You don’t need to change the recipe to fit these diets. Just enjoy! You can switch out chickpeas for black beans or lentils. Try brown rice instead of quinoa. Sweet potatoes can be replaced with butternut squash. Each swap brings a new flavor. Use seasonal veggies for freshness. In spring, add asparagus or peas. In summer, use zucchini or bell peppers. In fall, try roasted Brussels sprouts or pumpkin. In winter, root veggies shine. These changes keep your Buddha bowl exciting. Check the full recipe for more ideas. To keep your Spicy Chickpea Buddha Bowl fresh, place leftovers in an airtight container. Make sure it cools to room temperature before sealing. Store it in the fridge for up to three days. The flavors will meld, making it even tastier the next day! When you're ready to enjoy your leftovers, you can reheat them in a few ways. The microwave works well for quick meals. Heat in short bursts, stirring in between. If you prefer, you can also use a skillet over medium heat. Add a splash of water to keep it moist while you warm it up. If you want to save some for later, freezing is a great option. Place the chickpeas and sweet potatoes in a freezer-safe bag. Keep the quinoa and fresh veggies separate. They freeze best when stored this way. You can freeze the chickpeas and sweet potatoes for up to three months. Just thaw in the fridge overnight before reheating. Enjoy your meal anytime, even when you're busy! For the full recipe, check out [Full Recipe]. Chickpeas are packed with protein and fiber. They help you feel full longer. They also contain essential vitamins and minerals. Eating chickpeas can boost heart health and aid digestion. They may help regulate blood sugar levels too. Plus, they are versatile and fit in many dishes. Yes, you can make parts of the Spicy Chickpea Buddha Bowl ahead of time. You can roast the chickpeas and sweet potatoes a day before. Store them in airtight containers in the fridge. You can also cook the quinoa in advance. Just reheat it when you are ready to assemble the bowl. If you don’t have tahini, try using almond butter or sunflower seed butter. You can also make a quick dressing with yogurt or avocado. Each option brings a unique flavor to the bowl. Feel free to experiment and find what you like best! To change the spice level, adjust the cayenne pepper amount in the recipe. If you prefer it milder, use less or skip it entirely. For more heat, add extra cayenne or some hot sauce. Taste as you go to find your perfect balance. Absolutely! You can include any veggies you love. Roasted broccoli, bell peppers, or zucchini work well. Fresh ingredients like cucumber or radishes add crunch. Mix and match to create your ideal bowl. The more colors, the better it looks and tastes! The Spicy Chickpea Buddha Bowl packs flavor and nutrition. We explored key ingredients, step-by-step prep, and tips for easy customizations. You can adjust the heat, swap ingredients, or even try new seasonal veggies. In the end, this meal is fun to make and eat. It supports your health and keeps well, too. Dive into your own bowl and enjoy the amazing taste and benefits!](https://goldendishy.com/wp-content/uploads/2025/06/fbd17ced-051b-409f-8c76-69a7b070695a-300x300.webp)
![For this tasty dish, you need the following main ingredients: - 1 block (15 oz) firm tofu, pressed and cut into 1-inch cubes - ½ cup soy sauce (or tamari for a gluten-free option) - ¼ cup pure maple syrup - 2 tablespoons rice vinegar - 2 tablespoons sesame oil - 3 cloves garlic, finely minced - 1 tablespoon freshly grated ginger - 2 tablespoons cornstarch - 1 tablespoon sesame seeds (for garnish) - 3 green onions, thinly sliced (for garnish) These ingredients create a savory sauce that brings the tofu to life. Firm tofu works best because it absorbs flavors well and holds its shape during baking. The soy sauce adds saltiness, while maple syrup gives a hint of sweetness. Garlic and ginger provide warmth and depth to the dish. You can add a few optional ingredients to boost the flavor even more: - 1 tablespoon sriracha or chili paste for heat - 1 tablespoon mirin for extra sweetness - 1 teaspoon sesame oil for richer flavor These options allow you to customize the dish to your taste. If you like a little heat, sriracha will spice things up. Mirin adds a sweet and tangy note that pairs well with the other flavors. If you have dietary restrictions, here are some great substitutes: - Use tempeh instead of tofu for more protein and a firmer texture - Coconut aminos can replace soy sauce for a soy-free option - Use agave syrup instead of maple syrup for a different sweetness These substitutes keep the dish delicious while catering to different diets. Tempeh offers a nutty flavor and is packed with protein. Coconut aminos give a similar taste without soy. Agave syrup is a simple way to adjust sweetness levels. For more details, check the Full Recipe. First, you need to prepare the tofu. Start with one block of firm tofu. Press it between two plates to remove excess water. This step is key for better texture. After pressing, cut the tofu into 1-inch cubes. This size helps it cook evenly. Next, let’s make the teriyaki sauce. In a medium bowl, mix together the following ingredients: - ½ cup soy sauce (or tamari) - ¼ cup pure maple syrup - 2 tablespoons rice vinegar - 2 tablespoons sesame oil - 3 cloves garlic, finely minced - 1 tablespoon freshly grated ginger Whisk these ingredients until smooth. This sauce adds rich flavor to the tofu. Now, it’s time to bake the tofu. Preheat your oven to 400°F (200°C). Line a baking sheet with parchment paper. This prevents sticking. Place the cubed tofu in a bowl and sprinkle with 2 tablespoons of cornstarch. Gently toss until each piece is coated. Spread the tofu on the baking sheet in a single layer. Drizzle half of the teriyaki sauce over the tofu. Bake for 25-30 minutes. Halfway through, turn the tofu cubes for even cooking. After baking, pour the remaining teriyaki sauce over the tofu. Toss gently to coat. Return the tofu to the oven for another 5-10 minutes. This step caramelizes the sauce, making it sticky and flavorful. Once baked, remove the tofu from the oven. Finish by sprinkling sesame seeds and sliced green onions on top. This adds color and crunch. Enjoy your tasty baked teriyaki tofu! For the complete recipe, check out the Full Recipe. To get crispy tofu, press it well. Remove as much moisture as you can. After cutting it, coat each cube in cornstarch. This step is key for that crunch. Bake at 400°F for 25-30 minutes. Flip the tofu halfway through for even cooking. The golden brown color means it is ready. Use fresh garlic and ginger for the best taste. These ingredients boost the teriyaki sauce’s flavor. Let your tofu soak in the sauce for a bit. This helps it absorb all those yummy flavors. Drizzle some sauce just before the end of baking. It adds a sticky glaze that is hard to resist. Don’t skip pressing the tofu. It will turn out soggy if you do. Avoid using too much sauce too soon. This can make your tofu mushy instead of crispy. Make sure to coat each piece evenly with cornstarch. If you don’t, some cubes may not get crispy. For the best results, follow the [Full Recipe]. {{image_4}} You can make your baked teriyaki tofu even more colorful and tasty by adding vegetables. Carrots, bell peppers, and broccoli work well. Just chop them into bite-sized pieces. Toss them with the tofu before baking. This step adds nutrients and makes the dish pop with color. If you want to switch up the protein, try using tempeh or seitan instead of tofu. Both options absorb flavors well and have great textures. Tempeh is nutty and has a firm bite. Seitan mimics meat and is very chewy. These choices keep the meal exciting and cater to different tastes. To keep this dish gluten-free, use tamari instead of soy sauce. Tamari is a great choice and tastes the same. For a nut-free option, skip the sesame oil and use olive oil instead. This way, you can enjoy the dish while sticking to your dietary needs. For the full recipe, check the earlier section. To keep your baked teriyaki tofu fresh, store it in an airtight container. Let the tofu cool down first. It can last in the fridge for up to four days. If you notice any moisture, use a paper towel to absorb it before sealing the container. This helps keep the tofu from getting soggy. When you are ready to enjoy leftovers, the best way to reheat the tofu is in the oven. Preheat your oven to 350°F (175°C). Spread the tofu on a baking sheet and cover it with foil. Heat for about 10-15 minutes. This method helps restore some crispiness. You can also microwave it for quicker results. Just remember to cover it with a damp paper towel to keep it moist. Yes, you can freeze baked teriyaki tofu! Start by letting it cool completely. Place the tofu in a freezer bag, removing as much air as possible. It can stay frozen for up to three months. When you’re ready to eat, thaw it in the fridge overnight. Then, reheat as mentioned above. Enjoy your flavorful tofu anytime! Tofu is done when it turns golden brown and crispy. You should bake it for 25 to 30 minutes. Halfway through, turn the tofu cubes for even cooking. It should feel firm to the touch and have a nice texture. Once you see a beautiful caramel color, it's ready to enjoy! Yes, you can! Try soy sauce with honey or maple syrup. A sweet chili sauce works well too. For a spicy kick, use sriracha mixed with soy. Each sauce will give a new flavor twist to your baked tofu. Feel free to explore and find what you love! Baked teriyaki tofu pairs well with steamed rice or quinoa. You can also serve it with stir-fried vegetables for a colorful plate. A fresh salad adds crunch and balance. For a complete meal, add some pickled veggies on the side. This dish is versatile and fits many sides! In this guide, we explored how to make baked teriyaki tofu. We discussed key ingredients, step-by-step prep, and tips for crispiness. You learned about tasty variations and storage tips. Always remember, cooking is fun and easy. With the right ingredients and methods, you can make delicious meals. Enjoy your kitchen journey with baked teriyaki tofu. Happy cooking!](https://goldendishy.com/wp-content/uploads/2025/07/16dcdce2-c600-4865-9aa6-5e182bb228ee-768x768.webp)

![To make these crispy fish tacos, gather these key items: - 1 lb white fish fillets (cod or tilapia work great) - 1 cup all-purpose flour - 1 cup cornmeal - 1 teaspoon paprika - 1/2 teaspoon cayenne pepper - 1/2 teaspoon garlic powder - 1/2 teaspoon salt - 1/4 teaspoon black pepper - 2 large eggs, beaten - Vegetable oil, for frying - 8 small corn tortillas The toppings add flavor and texture to your tacos. Here are my favorites: - 1/2 cup red cabbage, thinly sliced - 1 avocado, sliced - Fresh cilantro leaves, for garnish - Lime wedges, for serving To round out your meal, consider these sides: - Fresh salsa for a zesty kick - A drizzle of spicy crema for creaminess - Mexican rice for a hearty addition These ingredients make crispy fish tacos a fun and tasty weeknight meal. For the full recipe, be sure to check out the details above! Start by drying the fish fillets with paper towels. This step helps the coating stick better. Cut the fish into strips that are about 1 inch wide. This size cooks evenly and fits nicely in the tacos. In a medium bowl, mix the flour, cornmeal, paprika, cayenne pepper, garlic powder, salt, and black pepper. Stir until well combined. In another bowl, beat the eggs until smooth. This egg wash will help the coating stick. Heat about 1 inch of vegetable oil in a large skillet over medium-high heat. Check if the oil is hot by dropping in a pinch of the flour mix; if it sizzles, it's ready. Dip each fish strip into the egg wash, letting excess drip off. Then coat it in the flour mixture, pressing lightly to ensure it sticks. Place the coated fish in the hot oil, frying in batches to prevent overcrowding. Cook for 3-4 minutes on each side until golden brown. Transfer the fried fish to a plate lined with paper towels to absorb extra oil. Warm each corn tortilla in a dry skillet for about 30 seconds on each side. This makes them soft and easy to fold. For each tortilla, place 2-3 pieces of crispy fish. Top with sliced red cabbage, avocado, and fresh cilantro. Don’t forget to serve the tacos with lime wedges. A squeeze of lime adds a bright, fresh flavor. For the full recipe, you can check the complete details above. To get that perfect crunch, follow these steps: - Dry the Fish: Start by patting the fish fillets with paper towels. This removes moisture and helps them get crispy. - Use Cornmeal: Mixing cornmeal with flour gives extra texture and crunch. It makes the coating thicker and crispier. - Hot Oil: Make sure the oil is hot enough before frying. If it’s too cool, the fish will absorb oil and turn soggy. - Don’t Overcrowd: Fry the fish in batches. Too many pieces at once cools the oil and affects crispiness. Here are some common mistakes you should steer clear of: - Skipping the Egg Wash: The egg wash helps the coating stick. Don’t skip this step! - Not Heating the Oil Properly: Always test the oil. If it’s not hot, you’ll end up with greasy fish. - Using Wet Fish: Wet fish won’t fry well. Always dry them before coating. - Flipping Too Soon: Let the fish cook fully on one side before flipping. This helps it stay intact and crispy. Enhance your tacos with these tasty garnishes: - Fresh Cilantro: Adds a burst of freshness and color. - Avocado: Creamy avocado pairs well with crispy fish. - Lime Wedges: A squeeze of lime brightens up the flavors. - Salsa or Crema: A drizzle of spicy crema or your favorite salsa adds flavor and moisture. For the full recipe, check out [Full Recipe]. {{image_4}} If you want to try a different protein, shrimp works great. Just peel and devein before cooking. You can also use chicken strips. They need a bit more time to cook, so adjust frying time. Another option is tofu for a different texture. Press it to remove water and cut into strips. For a vegetarian twist, use cauliflower. Cut it into small florets, coat, and fry. It gets nice and crispy. If you want a vegan option, tempeh is fantastic. Slice it thin and marinate for flavor before frying. Just make sure to use a plant-based egg wash or a mixture of flour and water. To boost flavor, add lime zest to the coating mix. It brightens each bite. For spice, increase the cayenne pepper in the coating. You can also create a spicy sauce for drizzling on top. Mix yogurt or mayo with hot sauce for a creamy kick. Fresh herbs like cilantro or parsley can add freshness too. These variations keep the dish exciting, ensuring you can enjoy crispy fish tacos in many ways! Try out the full recipe to explore these options. To keep your crispy fish tacos fresh, store leftovers in an airtight container. Place the fish in one container and the toppings in another. This keeps the fish crispy and the toppings fresh. You can also wrap the tortillas in foil for better storage. To reheat, use the oven or an air fryer for best results. Preheat your oven to 350°F (175°C). Place the fish on a baking sheet and bake for about 10 minutes. If using an air fryer, heat it to 350°F (175°C) and fry for 5 minutes. This way, the fish stays crispy. Cooked fish lasts about 2-3 days in the fridge. Fresh toppings, like cabbage and avocado, can last 1-2 days. Store each item separately. If you have leftover tortillas, they can stay fresh in a sealed bag for up to a week. Always check for signs of spoilage before using any of the ingredients. For the full recipe, check the complete list of ingredients. I recommend using white fish like cod or tilapia. These fish have a mild flavor and cook well. They stay tender inside while getting crispy on the outside. Other good options include haddock or snapper. Yes, you can prepare the fish ahead of time. Cut the fish into strips and coat them. Keep the coated fish in the fridge for up to an hour. This helps the coating stick better when you fry them. If you can't find corn tortillas, flour tortillas are a good choice. You can also use lettuce leaves for a low-carb option. They add a nice crunch and freshness to your tacos. Crispy fish tacos can be gluten-free if you use gluten-free flour. Make sure to check the labels on your ingredients. Corn tortillas are naturally gluten-free, so they work well for this dish. For the best results, use gluten-free breadcrumbs or a gluten-free flour blend for coating the fish. Crispy fish tacos are a fun dish to make at home. We discussed key ingredients, topped it with tasty options, and paired it with sides. The steps from preparing the fish to frying it were simple and clear. Use my tips for crispy results and avoid common mistakes. You can also explore variations for flavors and dietary choices. Proper storage will keep your tacos fresh. Now, enjoy making and sharing your crispy fish tacos! They’re sure to impress.](https://goldendishy.com/wp-content/uploads/2025/06/e15c4a6f-d152-43b4-ae39-d2f9004115b6-768x768.webp)