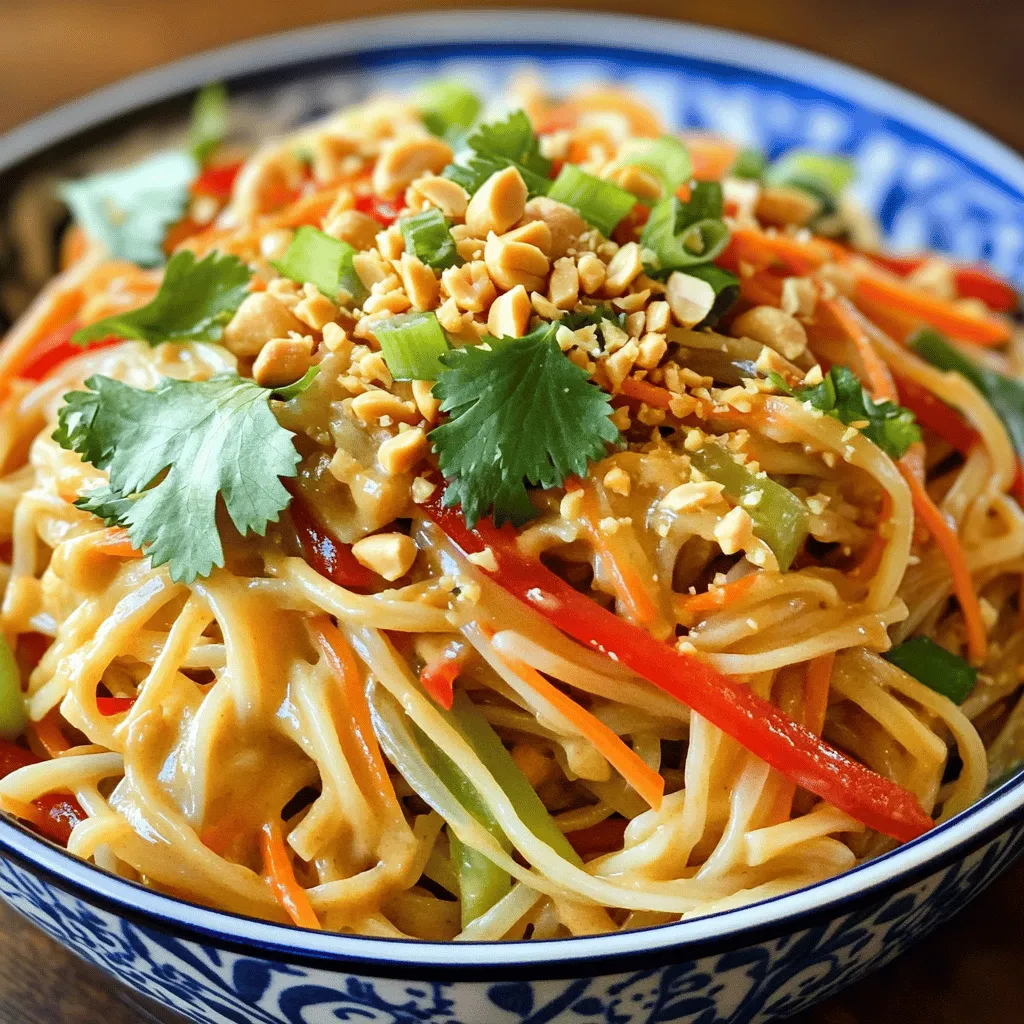
Easy Thai Peanut Noodles Simple and Flavorful Dish

If you’re craving a quick and tasty meal, Easy Thai Peanut Noodles are the answer! This simple dish combines creamy peanut butter, fresh veggies, and rice noodles for a flavor-packed dinner. Whether you’re a busy parent or just looking to impress, this recipe is perfect for everyone. In just a few steps, you can enjoy a delightful meal that’s as fun to make as it is to eat. Let’s dive into the world of these scrumptious noodles!
Ingredients
Complete List of Ingredients
– 8 oz rice noodles
– 1/2 cup creamy peanut butter
– 1/4 cup soy sauce
– 2 tablespoons freshly squeezed lime juice
– 2 tablespoons honey or agave syrup
– 1 tablespoon sesame oil
– 2 cloves garlic, finely minced
– 1 teaspoon freshly grated ginger
– 1 cup shredded carrots
– 1 red bell pepper, thinly sliced
– 1/4 cup green onions, chopped (plus extra for garnish)
– 1/4 cup crushed peanuts (for garnish)
– Fresh cilantro leaves (for garnish)
These ingredients form the heart of Easy Thai Peanut Noodles. Each one adds a unique flavor. The rice noodles serve as a soft base. Creamy peanut butter gives richness. Soy sauce adds saltiness. Lime juice brightens the dish. Honey or agave syrup adds a touch of sweetness.
You can also add more taste with garlic and ginger. Shredded carrots and bell peppers add crunch and color. The green onions and peanuts provide a nice finish. Don’t forget the fresh cilantro for a pop of freshness!
Optional Add-ins
– Protein options: chicken, shrimp, or tofu
– Vegetables: snap peas, broccoli, or bell peppers
Feel free to mix it up! Adding chicken, shrimp, or tofu boosts the protein. You can toss in snap peas or broccoli for extra greens. Explore different flavors based on what you enjoy!
Step-by-Step Instructions
Cooking the Noodles
– Boil a pot of water and add 8 oz of rice noodles.
– Cook the noodles as per the package instructions, about 4-6 minutes.
– Once they are tender, drain and rinse the noodles under cold water. This stops cooking and helps prevent sticking.
Making the Peanut Sauce
– In a medium bowl, combine 1/2 cup creamy peanut butter, 1/4 cup soy sauce, 2 tablespoons lime juice, 2 tablespoons honey, 1 tablespoon sesame oil, 2 minced garlic cloves, and 1 teaspoon grated ginger.
– Whisk the mixture until it is smooth and well mixed. If the sauce is thick, add warm water a little at a time until you reach the right consistency.
Mixing the Dish
– In a large bowl, add the cooled, drained rice noodles, 1 cup shredded carrots, and 1 thinly sliced red bell pepper.
– Use tongs or forks to gently mix the noodles and veggies until they are well combined.
– Pour the peanut sauce over the noodles and veggies. Toss everything together to coat each piece in the rich sauce.
Now you have a vibrant, tasty dish ready to enjoy!
Tips & Tricks
Perfecting the Sauce
To make your sauce just right, start by tasting it. You can adjust the sweetness by adding more honey or syrup. If you want it saltier, add a touch more soy sauce. If you like heat, try adding chili flakes or sriracha. Just a little can change the game!
Noodle Cooking Tips
Cooking noodles well is key. When boiling, set a timer for 4-6 minutes, based on the package. Once done, rinse them under cold water. This stops the cooking and helps reduce stickiness. Trust me; it makes a big difference!
Presentation Tips
How you serve your noodles matters. I love placing them on fresh lettuce leaves. It adds color and crunch! You can also garnish with lime wedges or extra cilantro. These small touches make your dish look fabulous!
Variations
Vegetarian Options
You can easily make this dish vegetarian. Here are a couple of ideas:
– Use vegetable broth instead of chicken broth. This change keeps the flavor rich and full.
– Explore different vegetable combinations, like zucchini, bell peppers, or snap peas. Feel free to mix and match what you like.
New Flavor Profiles
Want to switch things up? Here are some fun options:
– Incorporate different nut butters, like almond or cashew butter. Each nut brings a unique taste.
– Try adding sesame seeds for crunch. They add texture and a nutty flavor that pops!
Dietary Modifications
You can also modify the dish for different diets:
– For a gluten-free version, use rice noodles or bean noodles. These options work great and taste amazing.
– If you want low-calorie options, reduce the peanut butter or honey. You still get a great taste without the extra calories.
Feel free to experiment with these variations to make this dish your own!
Storage Info
Storing Leftovers
To keep your Easy Thai Peanut Noodles fresh, place them in an airtight container. Store the container in the refrigerator. These noodles taste best when eaten within 3-4 days. After that, their quality may drop. Always check for any signs of spoilage before serving leftovers.
Freezing Tips
If you want to save some for later, freezing is a great option. To keep the texture nice, freeze the noodles without any garnishes. When you’re ready to enjoy them, simply reheat and add fresh ingredients. This way, you get that great taste again!
FAQs
Can I use other types of noodles?
Yes, feel free to substitute with other noodles like soba or udon. Each type brings its own taste. Soba noodles are nutty, while udon is chewy and thick. You can choose based on your preference.
How can I make this recipe spicy?
Add red pepper flakes or sriracha for heat. Start with a little, then taste. You can always add more spice if needed. This will give your dish a nice kick.
Is this recipe suitable for meal prep?
Yes, it can be made in advance for quick meals throughout the week. Store it in an airtight container. This way, you can grab it for lunch or dinner.
What should I serve it with?
Pair with spring rolls or a light salad for a complete meal. Both sides add crunch and freshness. You can also serve it with steamed veggies for a balanced plate.
How to make Easy Thai Peanut Noodles gluten-free?
Substitute soy sauce with tamari or coconut aminos for a gluten-free option. Both choices work well in the sauce. This keeps the flavor but removes the gluten.
This blog post outlined the key ingredients, step-by-step instructions, and helpful tips for making Easy Thai Peanut Noodles. We explored variations, storage info, and answered common questions. With your newfound knowledge, you can customize this dish to fit your tastes and dietary needs. Don’t hesitate to experiment and make it your own. Enjoy creating a tasty meal that suits you!
. First, preheat your oven to 400°F (200°C). This step is key for even roasting. Gather your ingredients. You should have baby carrots, honey, olive oil, garlic, thyme, and lemon juice ready. In a large bowl, combine the honey, olive oil, minced garlic, and thyme. Add a good pinch of salt and pepper. Next, squeeze in the lemon juice. Whisk the mixture well until it is smooth. This glaze will give your carrots a sweet and savory flavor. Now, it's time to coat the carrots. Add them to your bowl with the glaze. Toss them gently until they are well coated. Line a baking sheet with parchment paper for easy cleanup. Spread the carrots out in a single layer, avoiding crowding. Place the baking sheet in the preheated oven. Roast the carrots for 25-30 minutes. Halfway through, toss the carrots again for even cooking. They should become tender and caramelized. Once done, let them cool for a few minutes. If you like, drizzle some extra glaze over the top for added flavor. Finally, garnish with fresh parsley before serving. This adds a pop of color and freshness. If you want the full recipe, check it out [Full Recipe]. To ensure your carrots roast perfectly, choose fresh carrots. Baby carrots work well, but regular ones are great too. If using regular carrots, slice them into sticks for even cooking. Spread the carrots out in a single layer on the baking sheet. This step keeps them from steaming and helps them caramelize nicely. Toss them halfway through cooking for even browning. For a great glaze, mix the honey, olive oil, garlic, and thyme well. The oil helps the honey coat the carrots. If your glaze feels too thick, add a splash of water or lemon juice. This can help thin it out and ensure it coats the carrots evenly. Remember, a smooth glaze means more flavor in every bite! To make your dish pop, use a nice platter. Once the carrots are roasted, transfer them carefully. Drizzle with extra honey for shine. Sprinkle fresh parsley or thyme over the top for color. This simple touch makes your dish look gourmet. Enjoy serving them at your next meal! For the full recipe, check out the details above. {{image_4}} You can easily change this dish by adding other vegetables. Try sweet potatoes or parsnips. They roast well and add new flavors. Just cut them to a similar size as the carrots. This helps them cook evenly. If you want to switch up the sweet taste, use maple syrup or agave. Both give a nice flavor and work well with the garlic. You can use the same amount as honey. Just mix it well with the other ingredients. Adding spices can boost the taste of your honey garlic roasted carrots. You might try a pinch of cumin or chili powder for warmth. Fresh herbs like rosemary or dill can also add a bright note. Experiment with what you love! Each change can make this dish new and exciting. You can find the full recipe to guide you through these variations. To store leftover honey garlic roasted carrots, first let them cool down. Use an airtight container to keep them fresh. If you have a lot, divide them into smaller portions. Place the container in the fridge. They will stay good for about 3 to 5 days. Keeping them sealed helps avoid drying out. When you're ready to enjoy the leftovers, preheat your oven to 350°F (175°C). Spread the carrots on a baking sheet. You can drizzle a little olive oil for extra moisture. Heat them for about 10 to 15 minutes, or until they feel warm. You can also use a microwave if you're in a hurry. Just cover them with a damp paper towel and heat in 30-second bursts. If you want to keep the carrots longer, freezing is a great option. First, let the carrots cool completely. Spread them in a single layer on a baking sheet. Freeze them for about 1 hour. This step prevents them from sticking together. After that, transfer the carrots to freezer bags. Remove as much air as possible before sealing. They can last for up to 3 months in the freezer. To eat, thaw them in the fridge overnight before reheating. For more details, check the Full Recipe. Yes, you can use frozen carrots. However, fresh carrots will taste better. Frozen carrots may lose some crunch. If you use them, roast them longer to ensure they cook fully. Just remember to thaw them before roasting for the best results. Honey garlic roasted carrots pair well with many dishes. You can serve them with grilled chicken, beef, or fish. They also taste great with rice or quinoa. Try them with a fresh salad for a balanced meal. Their sweet and savory flavor adds depth to any plate. You can make this dish ahead of time. Prepare the honey garlic glaze and coat the carrots. Store them in the fridge for up to 24 hours. When ready to serve, just roast them in the oven. This saves time and still gives you that amazing flavor. For the full recipe, check out the complete instructions above. We explored the key ingredients and steps to make honey garlic roasted carrots. You learned how to mix the glaze, roast the carrots, and personalize the dish. We also discussed useful tips for perfect roasting and presentation. Lastly, we covered variations and storage tips to keep your dish fresh. Use this guide to make a tasty meal. Enjoy these carrots with your loved ones for a delightful experience.](https://goldendishy.com/wp-content/uploads/2025/06/04a56f10-aefe-4807-b100-2b1e29675843-768x768.webp)
![To make your Fajita Veggie Sheet Pan, gather these simple and fresh ingredients: - Bell peppers (red, yellow, or green) - Zucchini - Red onion - Cherry tomatoes - Black beans - Olive oil - Spices and seasonings (chili powder, cumin, garlic powder, salt, pepper) - Fresh cilantro for garnish - Lime wedges for serving - Tortillas (corn or flour) These ingredients create a colorful and tasty dish. Using fresh veggies adds great flavor and texture. The spices make everything pop! You can adjust the veggies based on what you have or prefer. For example, you might try adding corn or mushrooms. Each change can lead to a new twist on this tasty recipe. This Fajita Veggie Sheet Pan really shows how simple ingredients can shine together. When you gather these items, you set the stage for a fun cooking adventure. Check out the Full Recipe for complete details on how to bring this delicious dish to life. 1. First, preheat your oven to 425°F (220°C). This helps the veggies cook just right. 2. Next, line a large sheet pan with parchment paper. This makes cleanup easy. 3. In a big mixing bowl, combine the sliced bell pepper, zucchini rounds, red onion wedges, halved cherry tomatoes, and rinsed black beans. 4. Drizzle 3 tablespoons of olive oil over the mixture. It helps the flavors blend. 5. Now, add 2 teaspoons of chili powder, 1 teaspoon of ground cumin, and 1 teaspoon of garlic powder. Don't forget a pinch of salt and black pepper. 6. Toss everything gently until each piece is well-coated with oil and spices. 1. Spread the veggie and bean mixture evenly on the prepared sheet pan. Make sure they are not crowded. 2. Place the pan in the preheated oven and roast for 20-25 minutes. Stir halfway through for even cooking. 3. The veggies should be tender and have slightly caramelized edges when done. 1. To warm the tortillas, you can use a skillet or microwave. Just a minute or two will do. 2. Fill each warm tortilla with the roasted fajita veggies. 3. Top with fresh cilantro and a drizzle of lime juice for extra flavor. 4. Serve the filled tortillas on a platter, garnished with lime wedges and extra cilantro for a beautiful display. For the complete recipe, check out the [Full Recipe]. To get the best from your fajita veggies, even cooking is key. Spread the veggies in a single layer on the sheet pan. This helps them roast well. Stir them halfway through cooking. This way, they brown nicely on all sides. Each oven runs a bit differently. You may need to adjust the cooking time. Keep an eye on the veggies. They should be tender and slightly charred. Want to kick up the flavor? Add more spices! A pinch of smoked paprika or cayenne pepper can work wonders. Fresh herbs like oregano or thyme also add depth. Don’t forget lime juice! A squeeze right before serving makes the dish pop. It gives a fresh, zesty flavor that brightens everything up. When serving, arrange the filled tortillas on a pretty platter. It makes the meal more inviting. Garnish with lime wedges and extra cilantro for color. You can also sprinkle some crumbled cheese on top. This adds a nice touch and looks great. A vibrant display makes your Fajita Veggie Sheet Pan Delight even more appetizing. {{image_4}} You can swap out veggies to suit your taste. Try adding mushrooms or sweet potatoes. Seasonal choices like asparagus or butternut squash work well, too. Think of what’s fresh at your local market. Broccoli and cauliflower also add great texture. Mix and match for a colorful plate. Want to make this dish heartier? Tofu or tempeh are great choices. Cube them and toss with your veggies. You can also add chickpeas for extra protein. They blend well with the spices. If you eat meat, grilled chicken or shrimp can elevate this dish. Just season them like your veggies for a tasty mix. Experimenting with spices can change your dish. For a mild flavor, stick with cumin and garlic. If you like heat, add cayenne or smoked paprika. Try a taco seasoning mix for a new twist. You could even toss in fresh herbs like cilantro or oregano. This will keep your fajita veggie sheet pan exciting each time! To keep your fajita veggies fresh, store them in an airtight container. Place the container in the fridge. This way, your flavors stay bright. Use leftover veggies within three to four days for best taste. For reheating, the oven is your best friend. Preheat it to 350°F (175°C). Spread the veggies on a baking sheet and heat for about 10 minutes. This restores texture and taste. You can also use the microwave, but the oven keeps them crisp. If you have extras, try adding them to a salad or a quesadilla for a tasty twist. To freeze the fajita veggie mix, let it cool first. Then, transfer it to a freezer-safe bag. Remove as much air as you can before sealing. This helps prevent freezer burn. When ready to use, move it to the fridge overnight to thaw. Reheat as mentioned above, and enjoy! It takes about 10 minutes to prep. Roasting in the oven takes 20-25 minutes. Altogether, you can enjoy this dish in about 30-35 minutes. Yes, you can easily swap veggies. Try adding mushrooms, asparagus, or even corn. Just make sure they cut evenly for even cooking. Absolutely! This dish is great for meal prep. You can store it in the fridge for up to four days. Just reheat portions as needed. Corn or flour tortillas are both great options. Corn tortillas give a nice crunch, while flour tortillas are soft and chewy. To spice things up, add more chili powder. You can also include fresh jalapeños or a splash of hot sauce. Experiment with heat to find your perfect level. You can prepare the veggies and seasoning ahead. Just store them in the fridge. When ready, roast them for a quick, fresh meal. For the full recipe, check out the details in the main article! This blog post covered how to make delicious fajita veggies on a sheet pan. We talked about the ingredients, preparation steps, and tips for perfect roasting. You learned about storing leftovers and customizing the recipe to fit your taste. In summary, this dish is both fun and easy to prepare. You can explore different veggies and spices, making it your own. Enjoy this tasty meal with friends or family, and remember, cooking should always bring joy!](https://goldendishy.com/wp-content/uploads/2025/07/261fee1c-f0d4-4ba8-a84d-53625610978f-768x768.webp)
![- Bell Peppers: I like using large bell peppers. You can choose any color you like: red, yellow, or green. They all taste great! Make sure they are firm and fresh. Each pepper should hold the stuffing well. - Ground Chicken and Dairy: Ground chicken adds a light flavor. It cooks quickly and blends well with other ingredients. Pair it with shredded cheddar cheese for a creamy touch. The cheese melts beautifully, making the dish extra yummy. - Enhancing Ingredients: I always add cooked rice to the mix. It gives the dish a nice texture. Black beans are great too; they add protein and fiber. Corn brings sweetness and color. Together, these ingredients create a hearty filling. - Essential Spices: Be sure to use chili powder, ground cumin, garlic powder, and onion powder. These spices pack flavor into the filling. A sprinkle of salt and pepper brings everything together. - Optional Garnishes: Fresh cilantro adds a burst of flavor. It makes the dish look more vibrant. You can also use a dollop of sour cream for creaminess. - Recommended Sides: Serve the stuffed peppers with a simple salad. A side of rice or quinoa pairs well too. You can also add some tortilla chips for crunch. - Display Ideas: For a beautiful presentation, place each stuffed pepper on a plate. Drizzle a bit of olive oil on top for shine. Add some chopped cilantro for color. This makes the meal look as good as it tastes! For the complete recipe, check out the Full Recipe. 1. Preheat your oven to 375°F (190°C). This step is key for even cooking. 2. Grab four large bell peppers. Cut off the tops and remove the seeds. Rinse the insides to clean them well. 3. Lightly coat the outside of each pepper with olive oil. Stand them upright in a 9x13 inch baking dish. 1. Heat a skillet over medium heat. Add 1 pound of ground chicken to the pan. 2. Cook the chicken for 5-7 minutes. Stir and break it apart until it turns brown. 3. Once cooked, mix in 1 cup of cooked rice, 1 cup of rinsed black beans, and 1 cup of corn. 4. Add 3/4 cup of shredded cheddar cheese, 1 teaspoon of chili powder, 1 teaspoon of cumin, 1 teaspoon of garlic powder, and 1/2 teaspoon of onion powder. Season with salt and pepper to taste. Stir for 2-3 minutes. 1. Generously fill each bell pepper with the chicken and cheese mixture. Pack it well. 2. Sprinkle the remaining 1/4 cup of cheese on top of the stuffed peppers. 3. Cover the dish with aluminum foil to trap steam. Bake in the preheated oven for 30 minutes. 4. After 30 minutes, remove the foil. Continue baking for 10-15 minutes, until the cheese is bubbly and golden. 5. Check if the peppers are tender by piercing them with a fork. 6. Allow them to cool for a few minutes after baking. Optionally, garnish with fresh cilantro for extra flavor. For the complete recipe, check out the [Full Recipe]. What are common mistakes to avoid? One mistake is overcooking the chicken. Cook it just until it's brown. If you use too much salt, it can ruin the flavor. Taste your mixture before stuffing the peppers. How can you ensure even cooking? Make sure all your peppers are the same size. This will help them cook at the same rate. Cover them with foil for part of the baking time. This keeps the heat in and helps them cook through. What are some suggestions for adding extra flavor? Try adding diced tomatoes or jalapeños for a kick. You can also mix in some spices like paprika or cayenne pepper. Fresh herbs like parsley or basil can brighten the dish. What are some ingredient swaps for dietary preferences? For a lower-carb option, replace rice with cauliflower rice. Use ground turkey or tofu for a different protein. You can also swap cheddar cheese for a dairy-free cheese for a vegan option. What cooking methods can you use? You can air fry the stuffed peppers for a crispy texture. Just set the air fryer to 375°F and cook them for about 15-20 minutes. Grilling is another fun method. Just wrap the peppers in foil and place them on the grill. How do you maintain moisture in stuffed peppers? Add a splash of chicken broth to the bottom of the baking dish. This creates steam as they cook. Avoid overstuffing the peppers; too much filling can lead to dryness. For the full recipe, check out the recipe section above. {{image_4}} You can change the ground chicken in your stuffed peppers. Use ground turkey or beef instead. These meats add different flavors and textures. If you want a vegetarian option, try using quinoa or lentils. These ingredients pack a protein punch and keep the dish hearty. For a vegan twist, use a mix of beans and mushrooms. They add a nice texture and flavor. You can also use tofu crumbles, which absorb spices well. This makes your meal rich and filling while keeping it plant-based. You can spice up your stuffed peppers with different flavors. Why not try a Mexican twist? Add taco seasoning or jalapeños for heat. A dash of lime juice brightens the dish. If you love Italian flavors, mix in some Italian herbs like oregano or basil. You could also add marinara sauce to the filling. This creates a rich and comforting taste. Want a twist? Try adding olives, capers, or feta cheese. These ingredients bring unique textures and flavors. They turn a simple meal into something exciting. For those needing gluten-free meals, this recipe is easy to adapt. Use rice instead of breadcrumbs for filling. Always check labels on canned items like beans and corn. They should be gluten-free. If you follow a low-carb diet, you can swap rice for cauliflower rice. This keeps the dish light and low in carbs. You can also skip the beans to reduce carbs even more. These variations help everyone enjoy this tasty meal. No matter your diet, you can find a way to enjoy chicken and cheese stuffed peppers. After you make your chicken and cheese stuffed peppers, let them cool down. This helps keep them fresh. Store them in an airtight container. They will stay good in the fridge for about 3 to 4 days. If you have leftovers, try to eat them within this time. To reheat, place them in the oven or microwave until warm. If you want to keep your stuffed peppers for a longer time, freezing is a great option. First, let them cool completely. Wrap each pepper tightly with plastic wrap. Then, put them in a freezer bag or container. This helps avoid freezer burn. They can last up to 3 months in the freezer. When you're ready to eat, take them out and thaw in the fridge overnight. Reheat them in the oven at 375°F until hot. This will keep the flavors and textures intact. Meal prepping can save time on busy weeknights. You can prepare the filling ahead of time. Cook the chicken and mix in the rice, beans, and spices. Store this mixture in the fridge for 2 to 3 days. When you're ready, stuff the peppers and bake them. For batch cooking, consider making a double recipe. Freeze half for later. This way, you have a tasty meal ready whenever you need it. How do you know when stuffed peppers are done? You can tell when stuffed peppers are done by checking the peppers and cheese. The peppers should be tender and the cheese melted and bubbly. If you pierce a pepper with a fork, it should feel soft but not mushy. Can you prepare them in advance? Yes, you can prepare stuffed peppers in advance. Just stuff them and store them in the fridge. Bake them when you're ready to eat. This makes for a quick and easy family meal. Can I use frozen peppers? Yes, you can use frozen peppers. Just thaw them before stuffing. They may cook faster, so keep an eye on them while baking. What to do if I don't have certain ingredients? If you lack certain ingredients, feel free to swap them out. For example, use quinoa instead of rice or a different type of cheese. Get creative based on what you have! Can stuffed peppers be made on the stovetop? Yes, you can make stuffed peppers on the stovetop. Just steam them in a skillet with a little water. Cover with a lid and cook until tender. How to adjust heating times for different ovens? Oven temperatures can vary. If your oven runs hot, check the peppers a few minutes early. If it runs cool, you may need to add a few extra minutes. Always trust your instincts! We covered the best way to make stuffed peppers. You learned about key ingredients like bell peppers, ground chicken, and spices. You also discovered tips for cooking and storing them. There are many ways to adjust the recipe for different diets and tastes. Incorporating these ideas will make your dish delicious. Get creative with flavors and toppings. With practice, you'll master this easy meal for any occasion. Enjoy your cooking journey!](https://goldendishy.com/wp-content/uploads/2025/06/69b5c483-258e-4498-8701-d043fb5fc497-768x768.webp)