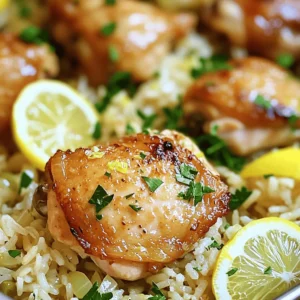
One Pot Lemon Chicken Rice Flavorful Dinner Delight

Are you ready for a dinner that bursts with flavor and is easy to make? One Pot Lemon Chicken Rice will delight your taste buds and simplify your weeknight cooking. Using just one pot, this dish combines juicy chicken, zesty lemon, and fluffy rice into a comforting meal. In this post, I’ll guide you through the simple steps to create this delicious dinner. Let’s get cooking!
Ingredients
Main Ingredients
– 1 pound boneless, skinless chicken thighs, cut into bite-sized pieces
– 1 cup long-grain rice, thoroughly rinsed
– 2 cups low-sodium chicken broth
Aromatics
– 1 medium onion, finely diced
– 3 cloves garlic, minced
– Zest and juice of 1 fresh lemon
Seasonings and Garnish
– 1 teaspoon dried oregano
– 1 teaspoon paprika
– 1 tablespoon extra virgin olive oil
– Salt and freshly ground black pepper, to taste
– Fresh parsley, finely chopped (for garnish)
– Optional: Thin lemon slices for decorative garnish
When I cook One Pot Lemon Chicken Rice, I focus on fresh ingredients. The chicken thighs are tender and juicy. Rinsing the rice helps remove excess starch. This makes it fluffy and perfect.
For aromatics, I love the smell of onion and garlic. They create a strong base for the dish. The fresh lemon adds brightness. Its zest and juice lift the flavors.
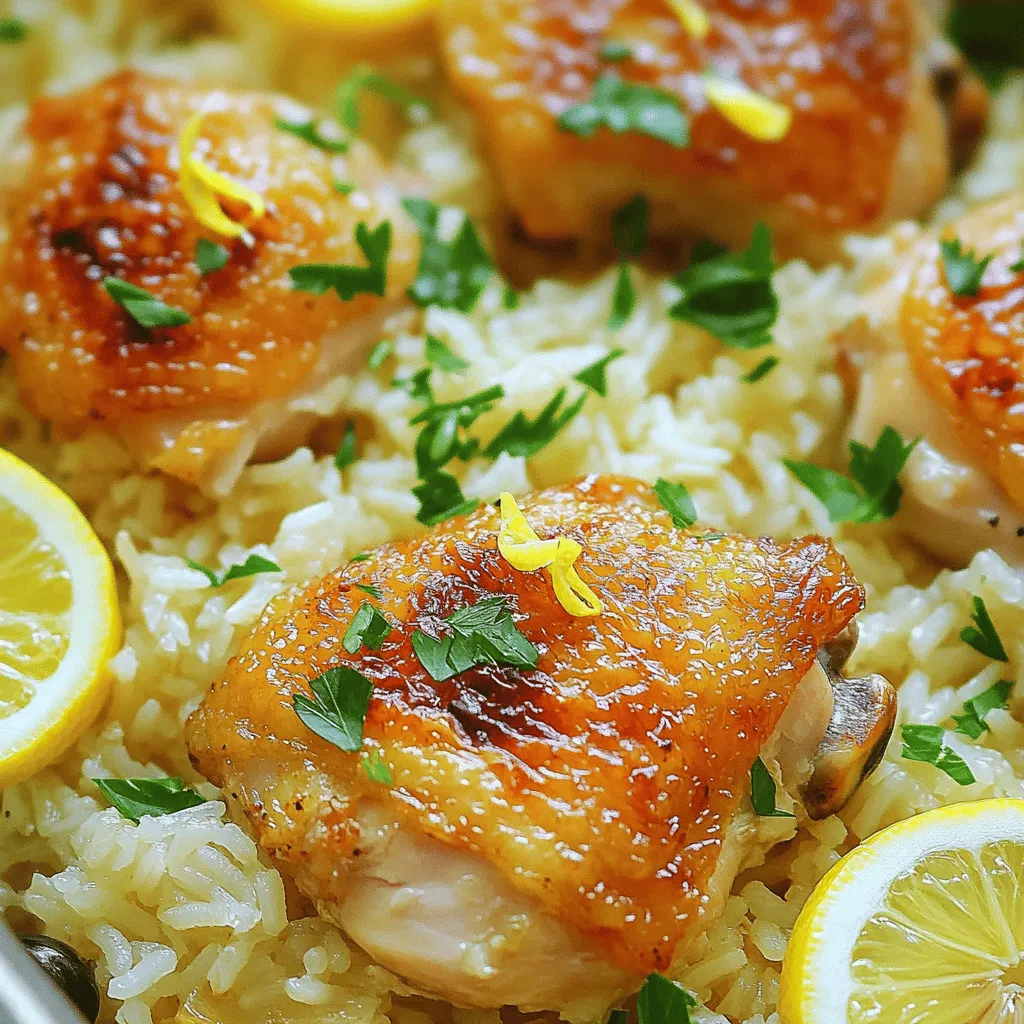
In terms of seasonings, oregano and paprika bring warmth. Olive oil adds a rich flavor. I always season with salt and pepper to enhance the taste. Fresh parsley gives a nice pop of color and freshness.It’s all about using quality ingredients to make your meal shine. Enjoy cooking!
Step-by-Step Instructions
Preparing Chicken and Seasoning
First, take 1 pound of boneless, skinless chicken thighs. Cut them into bite-sized pieces. In a mixing bowl, season the chicken generously with salt, black pepper, paprika, and dried oregano. Make sure each piece is coated evenly. This step is key for great flavor. If the chicken is not well seasoned, the dish will lack depth.
Sautéing the Aromatics
Next, heat 1 tablespoon of extra virgin olive oil in a large pot over medium heat. Add 1 medium diced onion and sauté for 3-4 minutes. Look for it to become soft and translucent. Then, add 3 cloves of minced garlic. Sauté for another minute, but watch closely. Garlic can burn quickly, and burnt garlic tastes bitter.
Cooking Chicken and Incorporating Rice
After the onion and garlic smell wonderful, it’s time to add the chicken. Raise the heat to medium-high. Carefully add the seasoned chicken pieces to the pot. Cook, stirring occasionally, for about 5-7 minutes. You want the chicken lightly browned on all sides. Once browned, stir in 1 cup of long-grain rice. Add the zest and juice of 1 fresh lemon, mixing well. Now, pour in 2 cups of low-sodium chicken broth. Raise the heat and bring everything to a brisk boil.
Simmering and Fluffing
Once it reaches a boil, reduce the heat to low and cover the pot. Let it simmer for 20 minutes. This allows the rice to absorb all the flavorful broth. After 20 minutes, remove the pot from heat but let it sit, covered, for another 5 minutes. This resting period is important; it makes the rice fluffy. Finally, use a fork to gently fluff the rice and mix it with the chicken. This helps ensure every bite is full of flavor.
Tips & Tricks
Cooking Tips for Perfect Results
To ensure your chicken is cooked through, cut the thighs into small, even pieces. This helps them cook faster and more evenly. Use a meat thermometer to check for doneness. The internal temperature should reach 165°F. Adjust seasoning to taste by starting with the basics. After cooking, taste the dish and add more salt, pepper, or lemon juice if needed. This will enhance the flavors and make the dish pop.
Fluffing Rice Techniques
When fluffing rice, use a fork instead of a spoon. A fork separates the grains better, giving a lighter texture. To prevent rice from sticking, rinse the rice thoroughly before cooking. This removes excess starch. You can also add a dash of olive oil to the pot before cooking. This will help keep the rice fluffy and separate.
Presentation Suggestions
For the best serving dishes, use wide, shallow bowls. This allows the chicken and rice to shine. Garnish with freshly chopped parsley for a burst of color. Thin lemon slices on top add a nice visual touch too. You can also use colorful vegetables to enhance the plate. Bright colors make the dish look more inviting and appetizing.

Variations
Adding Vegetables
You can make One Pot Lemon Chicken Rice even better by adding vegetables. Seasonal veggies not only boost flavor but also add nice color. Try adding:
– Bell peppers: Slice them thin and add with the onion.
– Carrots: Cut into small pieces and mix in at the start.
– Peas: Add them in the last few minutes of cooking for a pop of sweetness.
– Spinach: Stir in fresh spinach just before serving for added nutrition.
Different veggies have different cooking times. For example, carrots take about 10-12 minutes to soften. Peas only need a few minutes, so add them later. This way, they stay bright and fresh.
Protein Alternatives
If you’re not a fan of chicken, you have options. You can switch chicken with shrimp or tofu. Both will change the dish’s taste and texture.
– Shrimp: Cooked shrimp only needs about 3-5 minutes. Add it after the rice is halfway done to avoid overcooking.
– Tofu: Use firm tofu, cut into cubes. Sauté it with the onion for about 5-7 minutes before adding rice. This will help it absorb flavors.
Adjust cooking times based on the protein you choose. This keeps your dish tasty and enjoyable.
Flavor Enhancements
To make the flavors pop, add herbs and spices. Here are a few ideas:
– Fresh herbs: Basil, thyme, or dill can bring a fresh taste. Add them just before serving.
– Spices: Try adding cumin or coriander for a warm flavor. Mix these in with the chicken.
You can also explore citrus flavors. Besides lemon, you can use:
– Lime: It gives a zesty twist that brightens the dish.
– Orange: A splash of orange juice adds sweetness.
These enhancements will make your One Pot Lemon Chicken Rice a delightful dinner choice.
Storage Info
Storing Leftovers
To keep your One Pot Lemon Chicken Rice fresh, refrigerate it right away. Place it in an airtight container to keep out air and moisture. This helps maintain its flavor and texture. Aim to eat the leftovers within three days for the best taste.
Reheating Instructions
When reheating, you want to keep the rice fluffy. For the microwave, use a microwave-safe dish with a lid. Add a splash of broth or water to avoid dryness. Heat in short bursts, stirring in between. If you prefer the stovetop, use a non-stick pan. Add a little broth and heat on low, stirring gently until warm.
Freezing Options
To freeze One Pot Lemon Chicken Rice, allow it to cool completely. Use freezer-safe bags or containers. Remove as much air as possible before sealing. It can stay fresh for up to three months. When ready to eat, thaw it overnight in the fridge. You can also use the microwave on the defrost setting for quicker thawing.
FAQs
Can I make One Pot Lemon Chicken Rice ahead of time?
Yes, you can prepare One Pot Lemon Chicken Rice ahead of time.Let it cool completely.
– Store Properly: Place it in an airtight container. Refrigerate for up to three days.
– Reheat Gently: When ready to eat, reheat on the stove with a splash of broth.
This method keeps the chicken juicy and the rice tasty.
What can I serve with One Pot Lemon Chicken Rice?
You can serve many sides with One Pot Lemon Chicken Rice. Here are some ideas:
– Steamed Green Beans: They add color and crunch.
– Simple Salad: A fresh green salad with lemon vinaigrette pairs well.
– Roasted Vegetables: Carrots or zucchini add more nutrients and flavor.
Each side will enhance your meal and bring out the lemon taste.
How can I adjust this recipe for a larger crowd?
Scaling up this recipe is easy. Here’s how:
– Double the Ingredients: Use two pounds of chicken and two cups of rice.
– Increase Broth: Use four cups of chicken broth to keep it moist.
– Cooking Time: You may need a few extra minutes to simmer. Check the rice for doneness.
These adjustments will help you serve more people without losing flavor.
Is it possible to make this recipe in a slow cooker?
Yes, you can adapt this recipe for a slow cooker.
– Sauté First: Brown the chicken and onions in a pan first. This step adds flavor.
– Combine in Slow Cooker: Add all ingredients to the slow cooker.
– Cook on Low: Set it on low for 4-6 hours or high for 2-3 hours.
This method makes it easy to prepare your meal ahead of time.
This blog post covered how to make One Pot Lemon Chicken Rice. We explored key ingredients like chicken thighs, rice, and broth. I shared steps for seasoning, sautéing, and cooking. You learned tips for perfecting rice and ideas for fun variations.
In the end, you can create a delicious meal that’s easy and flexible. Enjoy making this dish for family and friends, and don’t be afraid to tweak it! Happy cooking!


![- 2 lbs baby potatoes, halved - 1/4 cup extra virgin olive oil - 1/2 cup vegetable or chicken broth (low sodium recommended) - Juice of 2 large fresh lemons - Zest of 1 lemon - 4 cloves garlic, finely minced - 1 tablespoon dried oregano - Salt and freshly ground black pepper to taste - Fresh parsley, finely chopped (for garnish) To make Easy Greek Lemon Potatoes, you need fresh ingredients. Start with baby potatoes. They are the star of this dish. Their small size makes them cook evenly and taste great. Extra virgin olive oil adds richness and depth. The broth keeps the potatoes moist and adds flavor. Lemon juice and zest give a bright, tangy taste. Fresh garlic brings a bold kick. Dried oregano adds a lovely herb note. Finally, salt and pepper balance all the flavors. Garnish with parsley for a pop of color. This adds freshness and makes the dish look inviting. For the full recipe, check out [Full Recipe]. Enjoy the magic of these simple, yet flavorful Greek lemon potatoes! 1. Preheat the oven to 400°F (200°C). This step helps the potatoes cook evenly and get a nice crust. 2. Mix ingredients in a large bowl. Combine the halved baby potatoes, olive oil, broth, lemon juice, lemon zest, garlic, oregano, salt, and pepper. Stir until all potatoes are coated. 3. Transfer potatoes to baking dish. Spread the potatoes evenly in a single layer. Pour any leftover liquid from the bowl over them for extra flavor. 1. Cover with aluminum foil and bake for 30 minutes. This traps steam, helping the potatoes cook through. 2. Uncover and stir, bake uncovered for 25-30 minutes. This allows the potatoes to brown and become tender. Check for doneness by piercing with a fork. 1. Cool and garnish with parsley before serving. Let the potatoes sit for a few minutes, then sprinkle fresh parsley on top. 2. Presentation tips for serving. Use a rustic wooden bowl or a white platter. Add lemon wedges for a bright touch. Enjoy your Easy Greek Lemon Potatoes! Check the Full Recipe for more details. Using fresh lemon and quality olive oil is key. The lemon gives a bright taste, while good olive oil adds depth. I always choose extra virgin for its rich flavor. When seasoning, I recommend marinating the potatoes in the lemon juice and olive oil mix. This enhances the taste. Let them sit for at least 30 minutes if you can. The longer, the better the flavor. To ensure even cooking and browning, cut the potatoes into similar sizes. This helps them cook at the same rate. Arrange them in a single layer in the baking dish. Avoid crowding them, as this traps steam and keeps them from getting crispy. I often use broth instead of water. Broth adds a savory touch that elevates the dish. These Greek lemon potatoes pair wonderfully with grilled meats, like chicken or lamb. They also complement fresh salads, such as Greek salad or tabbouleh. For a perfect dining experience, serve them with a crisp white wine, like Sauvignon Blanc. The wine matches the lemony flavors well. You can find the full recipe for these tasty potatoes in my collection. {{image_4}} You can change herbs for fun flavors. Try fresh thyme or rosemary instead of oregano. If you want a kick, add some crushed red pepper flakes. For vegan or gluten-free options, swap chicken broth for vegetable broth. This keeps the dish tasty without animal products. Always read labels for gluten-free broth to be safe. Want to make these in an air fryer? Simply set it to 400°F (200°C). Cook for about 20-25 minutes. Shake the basket halfway to get even browning. You can also use a slow cooker. Add all ingredients and cook on low for 6-8 hours. This method makes the potatoes very tender and flavorful. To boost flavor, add crumbled feta cheese or olives on top. This brings a lovely salty touch. You can also mix in seasonal veggies like cherry tomatoes or bell peppers. They roast well and add color. These little tweaks make your dish burst with extra zest and excitement! To keep your Greek lemon potatoes fresh, use an airtight container. Place the cooled potatoes inside. You can store them in the fridge for up to three days. This helps keep the flavor and texture intact. If you see any signs of spoilage, it’s best to toss them out. When reheating, the oven is your friend. Preheat it to 350°F (175°C). Spread the potatoes on a baking sheet. Bake for about 15-20 minutes. This method keeps them crispy. If you use a microwave, place them in a microwave-safe bowl. Heat in 30-second intervals. Stir between intervals. This helps warm them evenly. To freeze your cooked potatoes, let them cool completely. Then, spread them on a baking sheet in a single layer. Freeze for about an hour. This prevents them from sticking together. Once frozen, transfer them to a freezer bag. Be sure to remove as much air as possible. When you want to eat them, just thaw in the fridge overnight. Reheat them in the oven at 350°F (175°C). Bake for 20-25 minutes until heated through. This keeps their flavor and texture nice. Enjoy your tasty Greek lemon potatoes anytime! For the full recipe, check out the [Full Recipe]. You bake Greek lemon potatoes for about 55 to 60 minutes. Start by covering them with foil for the first 30 minutes. This helps them cook well. After that, remove the foil and stir the potatoes. Bake them uncovered for another 25 to 30 minutes. Check if they are soft by poking them with a fork. If the fork goes in easily, they are done! You can use regular potatoes, but cooking times will change. Regular potatoes take longer to cook. Cut them into smaller pieces to match the cooking time of baby potatoes. This helps them cook evenly. The texture may also be different. Baby potatoes have a creamy texture, while regular potatoes can be a bit fluffier. Greek lemon potatoes pair well with many dishes. You can serve them with grilled chicken or lamb for a tasty meal. They also go great with a fresh Greek salad. The bright lemon flavor complements the rich dishes well. For a fun twist, add some tzatziki on the side. It adds a cool, creamy touch to the meal. For the full recipe, check out the Full Recipe section. In this blog post, we covered how to make Greek Lemon Potatoes. We explored the key ingredients, preparation steps, and the baking process. I shared tips for flavor and cooking techniques, plus variations to customize your dish. Proper storage and reheating tips help keep leftovers fresh. Remember, using fresh ingredients greatly enhances the taste. Enjoy these potatoes with your favorite Mediterranean meals. They are tasty and easy to make. Your cooking will impress friends and family alike. Dig in and savor every bite!](https://goldendishy.com/wp-content/uploads/2025/06/8502e506-5824-4799-8038-5c3f7491fce4-768x768.webp)
. {{image_4}} To make your Lemon Basil Pasta Salad heartier, add protein. Grilled chicken is a great choice. Cook it simply with salt and pepper. Shrimp also works well when sautéed until just pink. For a vegetarian twist, use chickpeas or black beans. They add good texture and flavor. You can even sprinkle in some diced tofu for a plant-based option. The key is to balance flavors while keeping it light. Feel free to mix up the veggies in your salad. Instead of cherry tomatoes, try sun-dried tomatoes for a richer taste. Bell peppers can be swapped for zucchini or carrots. You can even toss in some spinach for a nutrient boost. Just remember to use fresh, crisp veggies for the best flavor. The colors will make your dish pop while adding more vitamins. While the lemon vinaigrette shines, other dressings can change the salad's vibe. A balsamic vinaigrette brings a sweet tang, while a creamy dressing adds richness. Consider a pesto for an Italian twist. Just be mindful of the dressing amount; you want to enhance, not overpower. Experimenting with dressings keeps your pasta salad exciting and fresh. For the full recipe, check the details above. After you enjoy your Lemon Basil Pasta Salad, store any leftovers in an airtight container. Keep the salad in the fridge. Make sure it is cool before sealing it. This helps to keep the flavors fresh. If you added feta cheese, cover it with a bit of extra dressing. This keeps it from drying out. Your Lemon Basil Pasta Salad can last up to three days in the fridge. After that, the veggies may lose their crispness. The salad may still taste good, but it won’t be as fresh. Always check for any off smells before eating. This salad is best served cold. If you want to refresh it, add a splash of olive oil and lemon juice. Toss it gently to mix. If you must reheat, do so briefly in the microwave. Heat it for just 15-30 seconds. This will warm it without cooking the veggies. Yes, you can make this pasta salad ahead. It tastes better after sitting in the fridge. I suggest preparing it up to a day in advance. Store it in an airtight container. Just remember to leave out the basil until you serve it. This keeps the basil fresh and bright. If you need gluten-free pasta, there are great choices. Look for pasta made from rice, quinoa, or chickpeas. Brands like Banza or Tinkyada offer tasty options. They hold up well in salads. Cook them according to the package directions for the best results. To make this pasta salad vegan, skip the feta cheese. You can add extra veggies for flavor. Consider using avocado for creaminess. Nutritional yeast can add a cheesy taste, too. Just mix it in with the dressing for a nice touch. For the dressing, all the other ingredients are already vegan-friendly. In this blog post, I shared how to make a refreshing lemon basil pasta salad. We covered key ingredients, step-by-step instructions, and tips for perfecting your dish. You learned how to add variety with proteins and different veggies. Storing leftover salad properly ensures it stays fresh. By answering important FAQs, I aimed to make this recipe easy for you. Enjoy this tasty dish at your next meal or gathering. With these insights, you'll impress everyone with your delicious creation!](https://goldendishy.com/wp-content/uploads/2025/06/6f7717e1-8c71-4a8f-834a-cf8283cfe0e6-768x768.webp)

![- 2 boneless, skinless chicken breasts, sliced into thin strips - 8 ounces of fettuccine pasta - 4 cloves of garlic, finely minced - 1 cup of heavy cream - 1 teaspoon of Italian seasoning blend - ½ teaspoon of red pepper flakes (optional, for heat) - ½ cup of freshly grated Parmesan cheese - Fresh parsley, finely chopped, for a vibrant garnish - 1 tablespoon of extra virgin olive oil - 1 cup of chicken broth - Salt and freshly cracked black pepper, to taste When I prepare Creamy Garlic Chicken Pasta, I focus on fresh ingredients. The chicken must be juicy, the garlic fragrant, and the cream rich. I love using fettuccine because it holds the sauce well. The heavy cream makes the dish smooth and creamy, while the garlic brings a lovely flavor. For seasoning, I often use an Italian blend. It gives warmth and depth to the dish. The red pepper flakes add a tiny kick, but you can skip them if you want a milder taste. Fresh parsley not only adds color but also a fresh taste. Grated Parmesan cheese is a must for that cheesy goodness. Gathering these ingredients helps me create a quick and tasty meal. It’s all about balance—rich cream, savory garlic, and hearty chicken come together perfectly. If you want to see the full process, check out the Full Recipe. Start with a large pot. Fill it with water and add salt. Bring the water to a rolling boil. Once boiling, add 8 ounces of fettuccine pasta. Cook the pasta for about 8-10 minutes until it is al dente. When it’s done, drain the pasta in a colander. Remember to save about ½ cup of the pasta water for later. Grab a large skillet and place it over medium-high heat. Pour in 1 tablespoon of olive oil and let it warm up. While the oil heats, season 2 sliced chicken breasts with salt and pepper. Add the chicken strips to the hot skillet in a single layer. Cook them for about 5-6 minutes until golden brown and fully cooked. Once cooked, take the chicken out and keep it warm on a plate. In the same skillet, lower the heat to medium. Add 4 cloves of minced garlic and sauté for 1-2 minutes. Keep an eye on the garlic; you don’t want it to burn. After the garlic is fragrant, pour in 1 cup of chicken broth. Let it come to a gentle simmer. Next, stir in 1 cup of heavy cream, 1 teaspoon of Italian seasoning, and red pepper flakes if you like some heat. Allow this mixture to simmer for about 3-4 minutes until it thickens. Now it’s time to combine everything. Add the cooked fettuccine and the chicken back into the skillet. Toss them gently until they are well coated in the creamy sauce. If the sauce seems too thick, slowly add some reserved pasta water until you reach your desired consistency. Finally, sprinkle in ½ cup of grated Parmesan cheese. Stir it until it melts and blends into the sauce. Taste and adjust seasoning with salt and pepper if needed. For the full experience, check the Full Recipe. To make the cream sauce just right, simmering is key. Simmering helps all the flavors blend well. It also thickens the sauce without burning it. Keep the heat low, and stir often. This way, you can avoid garlic burnout. Garlic can turn bitter if cooked too long. Sauté it just until it smells good and turns light gold. Adjusting your seasonings can elevate this dish. Taste as you go. If you want more flavor, add salt or pepper. You can also use homemade broth for a fresh taste. Store-bought broth works too, but watch for added salt. This can affect your dish's flavor. Always check the label to control the salt level. Plating your creamy garlic chicken pasta can make a big difference. Use shallow bowls for a nice look. Make sure to spread the chicken and sauce evenly. For garnish, sprinkle fresh parsley on top. You can also add more Parmesan for richness. A drizzle of olive oil adds a shiny touch. Your guests will love the look and taste! {{image_4}} You can easily boost the nutrition of your creamy garlic chicken pasta by adding vegetables. I love using fresh spinach or mushrooms for a tasty twist. Spinach wilts nicely, adding color and flavor. Mushrooms bring a rich, earthy taste. To cook these veggies, add them to the skillet right after you sauté the garlic. Stir them in for just a few minutes until they're tender. This way, they soak up the garlic flavor while keeping their crunch. Switching up your pasta can bring new life to this dish. You can use whole wheat or gluten-free pasta if you want healthier options. Different pasta shapes, like penne or rotini, also work well. Just remember, cooking times may change. Whole wheat pasta takes a bit longer, while gluten-free pasta cooks faster. Keep an eye on it, and taste for doneness. If you want to try something new, swap the chicken for shrimp or tofu. Shrimp is quick to cook and adds a nice seafood flavor. Just sauté it for about 3-4 minutes until it turns pink. Tofu is a great plant-based option. Cut it into cubes and sauté it until golden brown. Adjust the cooking times based on what you choose to ensure all proteins are cooked through. Feel free to get creative with your creamy garlic chicken pasta. With these variations, you can make it your own! For a full recipe, check out the [Full Recipe]. To keep your Creamy Garlic Chicken Pasta fresh, store it in the fridge. Place the pasta in an airtight container. This helps prevent it from drying out. Make sure to consume it within three to four days for the best taste. When reheating, use the stovetop for the best results. Add a splash of chicken broth or water to help revive the sauce. Heat over low to medium heat, stirring often. This avoids overcooking the chicken and pasta. If you prefer the microwave, use a microwave-safe dish. Cover it with a lid or a damp paper towel to keep moisture in. Heat it in short bursts, stirring in between. Yes, you can freeze Creamy Garlic Chicken Pasta! However, the cream sauce may change texture. To freeze, let it cool completely. Place it in a freezer-safe container and seal tightly. Use it within one to two months. When ready to eat, thaw it overnight in the fridge. Reheat gently on the stovetop, adding a bit more cream or broth to restore creaminess. Making Creamy Garlic Chicken Pasta is quick and easy! It takes about 10 minutes to prep and 20 minutes to cook. In total, you're looking at around 30 minutes. This dish is perfect for a weeknight meal when you want something tasty without spending hours in the kitchen. Yes, you can easily make this recipe dairy-free! For the cream, use coconut cream or cashew cream instead. Both give a nice texture. Instead of Parmesan cheese, try nutritional yeast or a dairy-free cheese. This way, you still get a creamy dish without any dairy! Creamy Garlic Chicken Pasta pairs well with many side dishes. A simple green salad with a lemon vinaigrette adds freshness. You can also serve garlic bread for a comforting touch. If you prefer vegetables, steamed broccoli or roasted asparagus work well too. These sides balance the richness of the pasta nicely. Absolutely! You can control the spice level by adjusting the red pepper flakes. If you want more heat, add more flakes. For a milder dish, you can skip them entirely. Feel free to experiment until you get the flavor just right for your taste buds. You learned how to make Creamy Garlic Chicken Pasta with key ingredients like chicken, garlic, and cream. We walked through each step, from cooking pasta to making a rich sauce. I shared tips for perfecting flavors, including optional veggie and protein swaps. Storing leftovers was also covered. Remember, this dish is versatile and easy to adapt. Explore your creativity in the kitchen! Enjoy your meal and share the joy of cooking with others.](https://goldendishy.com/wp-content/uploads/2025/06/75e46cf8-cdb7-4cdf-96b4-9ca11b1b9102-768x768.webp)
![To make honey lemon roasted salmon, you need a few simple items: - 4 salmon fillets (6 oz each) - 1/4 cup honey - 2 tablespoons freshly squeezed lemon juice - Zest of 1 lemon (about 1 teaspoon) - 2 tablespoons extra virgin olive oil - 3 cloves garlic, finely minced - Salt and black pepper to taste These ingredients work well together. The honey adds sweetness, while the lemon gives a bright flavor. The olive oil helps keep the salmon moist. Garlic brings a nice kick to the dish. You can add some optional garnishes to make your dish look even better. Consider these: - Fresh dill sprigs for a pop of color and taste - Extra lemon wedges for serving These garnishes add freshness and make the dish more appealing. They also enhance the flavors. If you don't have all the ingredients, don't worry! You can swap some things out: - Use maple syrup instead of honey for a different sweet flavor. - Lime juice can replace lemon juice for a zesty twist. - If you lack fresh garlic, garlic powder works in a pinch. These swaps can still give you a tasty meal. Feel free to get creative! For the full recipe, check the detailed steps. To start, preheat your oven to 400°F (200°C). This gives the salmon a nice roast. In a bowl, mix honey, lemon juice, lemon zest, olive oil, and minced garlic. Whisk it well until smooth. Next, take your salmon fillets and season both sides with salt and black pepper. This will boost the flavor. Place the fillets skin-side down on a baking sheet lined with parchment paper. This step makes cleanup easy. Now, use a brush or spoon to spread the honey lemon mix over the salmon fillets. Make sure to coat them well for great taste. Now, place the baking sheet in the oven. Roast the salmon for 12-15 minutes. It’s done when the flesh looks opaque and flakes easily with a fork. This means it's tender and juicy. After roasting, take the salmon out of the oven. Let it rest for a few minutes. This keeps it warm and moist. When serving, lay the salmon on a white platter. Drizzle any leftover honey lemon mixture from the baking sheet on top. For a nice touch, add lemon wedges around the salmon. If you like, you can garnish with fresh dill sprigs. This adds color and flavor. You can find the full recipe and more tips at [Full Recipe]. Enjoy your meal! To get perfectly roasted salmon, start with fresh fillets. Fresh fish tastes better. Always preheat your oven to 400°F (200°C). This helps the salmon cook evenly. Make sure to line your baking sheet with parchment paper. This keeps the salmon from sticking. For a nice glaze, brush the honey lemon mixture on thick. This adds more flavor and caramelizes well. Roast for 12 to 15 minutes. The salmon is done when it flakes easily with a fork. One common mistake is overcooking the salmon. This makes it dry and tough. Always check it a few minutes before the time is up. Another mistake is not seasoning enough. Salt and pepper bring out the salmon's natural taste. Skipping the marinade is also a no-go. The honey and lemon mix adds great flavor. Lastly, don’t skip resting the salmon after cooking. This keeps it juicy and tender. Marinating is key to enhancing flavor. You can use the honey lemon mix as a marinade. Let the salmon sit in the mixture for 30 minutes before cooking. This allows the fish to soak up all the flavors. Feel free to add herbs like thyme or rosemary. These herbs pair well with salmon. You can also try different citrus juices for a twist. Orange or lime can add a nice touch. For more ideas, check out the Full Recipe. {{image_4}} Grilling salmon gives it a lovely smoky flavor. Start with the same honey lemon mix. Marinate the salmon in this blend for about 30 minutes. Preheat your grill to medium-high heat. Cook each side for about 5-7 minutes. Look for grill marks and a nice char. This method adds depth to the dish. Fresh herbs can brighten your meal. Add herbs like thyme or parsley to the honey lemon mix. These herbs work well with the salmon's rich flavor. Simply brush the mixture over the salmon fillets before cooking. It gives each bite a fresh taste. You can also sprinkle herbs on top after cooking for added color and flavor. Want a faster option? Pan-searing is quick and easy. Heat a bit of olive oil in a skillet over medium heat. Season the salmon with the honey lemon mix. Place the fillets skin-side down in the hot skillet. Cook for about 4-5 minutes per side. This method gives you a crispy skin and juicy inside. It's a great way to enjoy salmon on a busy night. For more cooking ideas, check out the Full Recipe. After cooking your honey lemon roasted salmon, let it cool down. Place the leftover salmon in an airtight container. This keeps it fresh. Store it in the fridge for up to three days. If you want to enjoy it later, do not wait too long. The sooner you store it, the better it tastes when you reheat. You can freeze honey lemon salmon if you have extra. Wrap each piece tightly in plastic wrap. Then, place them in a freezer-safe bag. Squeeze out the air before sealing. Label the bag with the date. You can freeze it for up to three months. When you're ready to eat it, thaw it overnight in the fridge. To reheat salmon, the oven works best. Preheat the oven to 275°F (135°C). Place the salmon on a baking sheet. Cover it with foil to prevent drying. Heat for about 15 minutes or until warm. You can also use a microwave. Put it on a plate and cover it with a microwave-safe lid. Heat for 30 seconds at a time until warm. Enjoy your meal again! For the full recipe, check back to our earlier section. You can tell salmon is done when it looks opaque. The flesh should flake easily with a fork. Use a meat thermometer if you want to be sure. The internal temp should reach 145°F (63°C). If you cut into the fish, it should look moist and tender. Overcooked salmon can be dry, so check it closely. Yes, you can use frozen salmon for honey lemon roasted salmon. Just make sure to thaw it first. Place the salmon in the fridge overnight or run it under cold water. Once thawed, pat it dry with a paper towel. Then, follow the recipe as usual. Cooking from frozen may require a few extra minutes. Honey lemon roasted salmon pairs well with many sides. Here are some ideas: - Steamed broccoli - Roasted asparagus - Quinoa salad - Garlic mashed potatoes - Lemon rice - Mixed greens with vinaigrette These sides add color and nutrition to your meal. You can mix and match based on your taste. Enjoy trying out different combinations! For the full recipe, check out the section above. This blog post covered how to make honey lemon roasted salmon. We explored key ingredients, including essential and optional items. I shared step-by-step cooking instructions and tips to avoid mistakes. You also learned about variations and how to store salmon. Try these methods to create simple and tasty meals. With practice, you'll impress yourself and others with your cooking skills. Enjoy your journey to making delicious honey lemon salmon!](https://goldendishy.com/wp-content/uploads/2025/07/988a6f99-fc0c-4e25-b6bc-fd8b1dc60d33-768x768.webp)
