
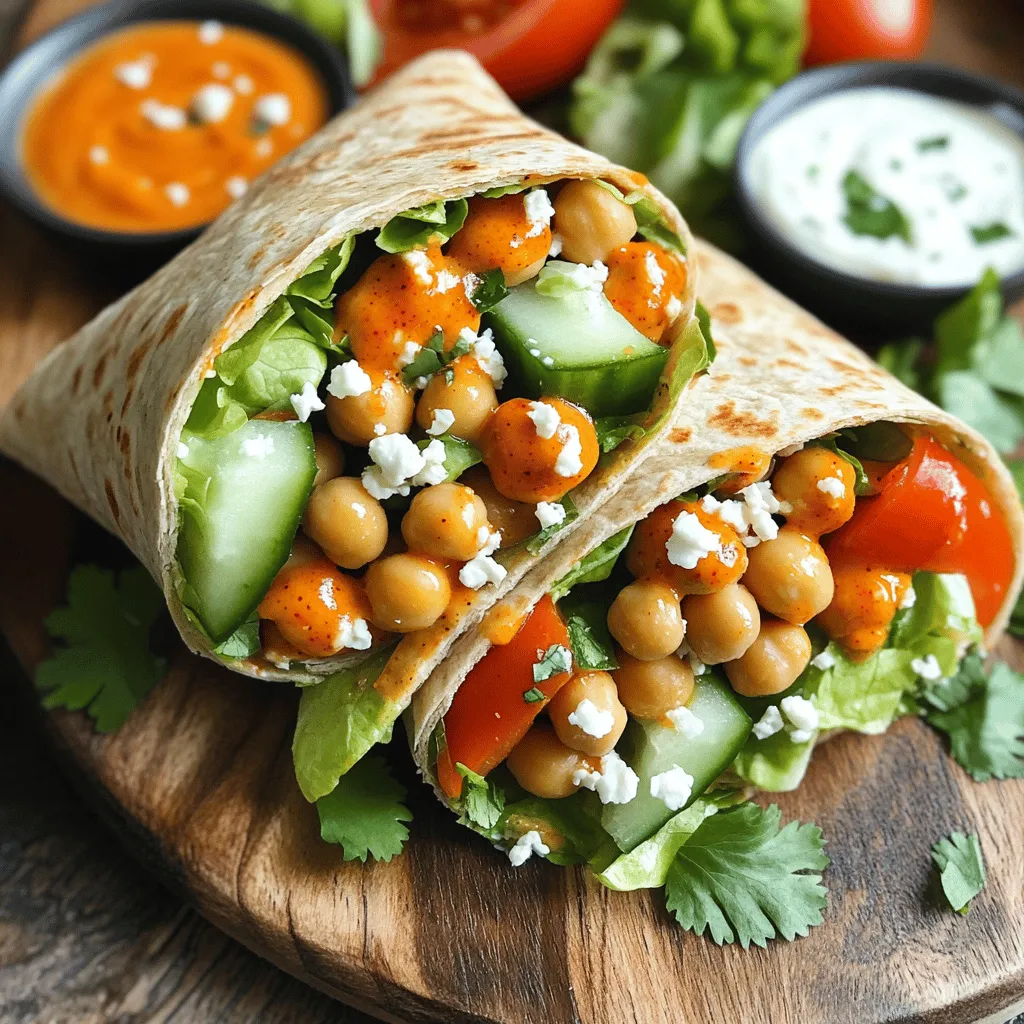
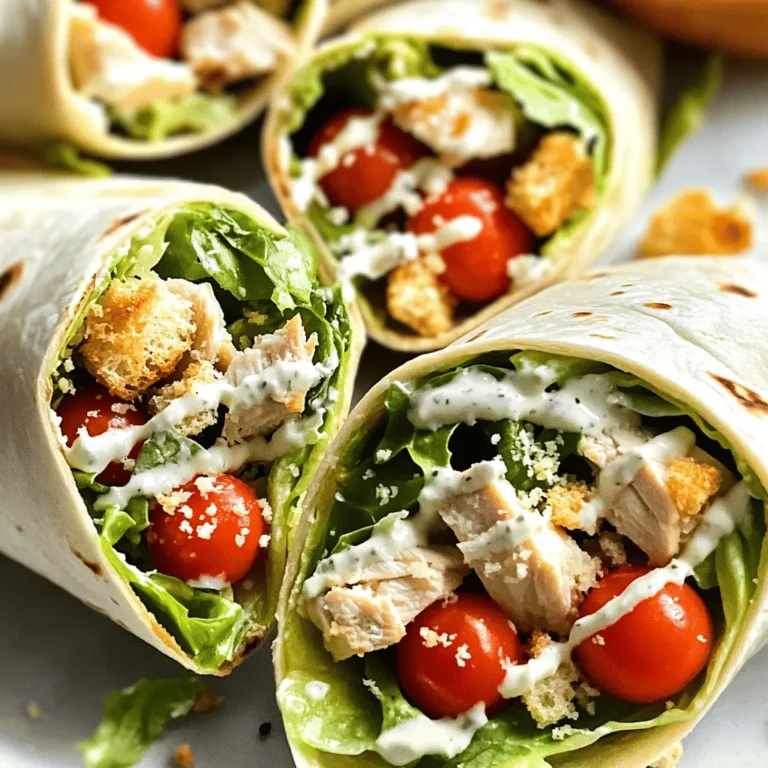
Buffalo Ranch Chickpea Wraps Flavorful and Easy Meal

Looking for a quick, tasty meal? Buffalo Ranch Chickpea Wraps might just be your new favorite dish! Packed with flavor and easy to make, these wraps are perfect for busy weeknights or casual gatherings. With simple ingredients like chickpeas, buffalo sauce, and fresh veggies, you can whip up a satisfying meal in no time. Ready to dive into this flavorful adventure? Let’s get started!
Ingredients
Main Ingredients
– 1 can chickpeas (15 oz)
– 2 tablespoons buffalo sauce
– 2 tablespoons ranch dressing (vegan option available)
– Olive oil
– 1/2 teaspoon garlic powder
– 1/2 teaspoon onion powder
– Tortillas
– Lettuce
– Tomatoes
– Cucumbers
– Feta cheese
The main ingredients in Buffalo Ranch Chickpea Wraps come together to create a tasty meal. Chickpeas are the star here. They give the wraps protein and fiber. You might want to choose a good buffalo sauce. The spiciness of the sauce brings a fun kick. Ranch dressing adds creaminess to balance it out.
You can use any tortillas you like—whole wheat or spinach are great options. Fresh veggies like lettuce, tomatoes, and cucumbers add crunch and freshness. Feta cheese is optional but adds a nice salty flavor.
Optional Add-ins
– Fresh herbs for garnish (cilantro or parsley)
– Additional veggies for crunch
Feel free to get creative! Fresh herbs like cilantro or parsley can brighten your wraps. You can also add other veggies for more texture. Try bell peppers, carrots, or even shredded cabbage.
Equipment Needed
– Mixing bowls
– Fork or potato masher
– Skillet (optional for grilling)
You will need a few kitchen tools to make these wraps. Mixing bowls are essential for combining ingredients. A fork or potato masher helps you smash the chickpeas. If you want a crispy texture, a skillet is useful for grilling the wraps.
Step-by-Step Instructions
Preparing the Chickpeas
– Smash the drained chickpeas in a mixing bowl.
– Achieve a chunky texture for best results.
To start, open a can of chickpeas. Drain and rinse them under cold water. In a mixing bowl, use a fork or potato masher to gently smash the chickpeas. You want a mix of chunky bits and some whole chickpeas. This texture adds a nice bite to the wrap. Don’t over-mash. A little chunkiness keeps it fun!
Making the Buffalo Sauce Mixture
– Combine buffalo sauce, ranch dressing, and seasonings.
– Adjust to taste for desired spice level.
Now, let’s make the buffalo sauce blend. In a small bowl, mix two tablespoons of buffalo sauce with two tablespoons of ranch dressing. Add one tablespoon of olive oil, half a teaspoon of garlic powder, and half a teaspoon of onion powder. Season with salt and pepper. Whisk until smooth. Taste it, and if you want more heat, add more buffalo sauce. It’s all about finding your perfect spice level!
Assembling the Wraps
– Layer chickpea mixture on tortillas.
– Add fresh veggies and optional feta.
Next, it’s time to build the wraps. Take a tortilla and lay it flat. Spoon a generous amount of the buffalo chickpea mixture down the center. Top it with shredded lettuce, diced tomatoes, and sliced cucumbers. If you like, sprinkle some crumbled feta cheese on top for an extra kick. This mix of flavors will make your wrap shine!
Grilling the Wraps (Optional)
– Heat skillet over medium and grill wraps for crunch.
– Tips for achieving perfect grill marks and texture.
If you want a crispy wrap, heat a skillet over medium heat. Place the wraps seam-side down in the skillet. Grill each wrap for about 2-3 minutes on each side. Look for that golden color and nice grill marks. This step adds a lovely crunch and makes the wraps even more enjoyable. Enjoy the process, and your wraps will be amazing!
Tips & Tricks
How to Customize Your Wrap
You can easily change this recipe to fit your tastes. For a gluten-free option, use gluten-free tortillas. If you’re vegan, swap regular ranch for a vegan version. You can also try adding avocado for creaminess. Consider using different sauces to change the flavor. Try barbecue sauce for a sweet twist or a spicy sriracha for heat.
Best Pairings
These wraps are great with crunchy side dishes. Serve them with carrot sticks or celery for a fresh crunch. You can also pair them with a light salad. A simple green salad with lemon vinaigrette works well. For drinks, iced tea or lemonade makes a refreshing choice. You could even serve a light beer if you like.
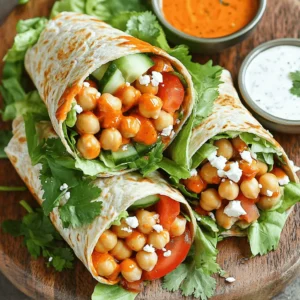
Presentation Ideas
Make your wraps look great for gatherings. Cut each wrap in half to show off the colorful filling. Arrange them on a big platter for everyone to admire. For extra flair, add a sprinkle of fresh herbs on top. Fresh cilantro or parsley adds a nice touch. You can even serve them with small bowls of extra sauce for dipping. This adds fun and keeps everyone happy.
Variations
Vegan Adaptation
To make this wrap fully plant-based, choose the right dressings. Look for vegan ranch dressings at your local store. They often taste just as good as regular ranch. Brands like Kite Hill and Follow Your Heart are my favorites. Always check the label to make sure it is dairy-free.
Protein Boost Options
Want more protein? Add grilled tofu or tempeh to your wrap. These options are tasty and filling. You can also mix in beans or lentils for added texture. Black beans or chickpeas work well. They pack a protein punch and add flavor.
Spicy Alternatives
If you love heat, try adding jalapeños or chili flakes. They give your wrap a nice kick. You can also switch up your hot sauce. Sriracha or a chipotle sauce can add a smoky flavor. Adjust the spice to suit your taste!
Storage Info
Refrigeration Tips
To store your Buffalo Ranch Chickpea Wraps, wrap them tightly in foil or plastic wrap. This keeps them fresh and prevents drying. You can also place them in an airtight container. These wraps will stay good in the fridge for about 3 days. After that, the veggies may lose their crunch.
Freezing Instructions
Yes, you can freeze these wraps! To freeze, wrap each one in plastic wrap and place them in a freezer-safe bag. They will keep well for up to 2 months. When you’re ready to eat, thaw them in the fridge overnight. To reheat, place them in a skillet over medium heat. This method helps keep the wrap crisp and tasty.
Upcycling Leftovers
Got extra filling? Use it as a salad topping! Just add it to greens with your favorite dressing. You can also mix it into a grain bowl with quinoa or rice. If you have leftover veggies, toss them into a stir-fry or omelet. These ideas can help reduce waste and create new meals.
FAQs
Can I make Buffalo Ranch Chickpea Wraps ahead of time?
Yes, you can. These wraps are great for meal prep. You can make the chickpea filling a day in advance. Store it in an airtight container in the fridge. Just assemble the wraps when ready to eat. This keeps the tortillas fresh and prevents sogginess.
What can I substitute for ranch dressing?
If you want a different taste, try yogurt or vinaigrette. You can also make your own ranch dressing. Mix Greek yogurt, herbs, and a splash of lemon juice. This adds a fresh twist while keeping it creamy.
Are Buffalo Ranch Chickpea Wraps gluten-free?
Yes, they can be gluten-free! Look for gluten-free tortillas at your store. Many brands offer tasty options made from rice or corn. Just check the labels to be sure.
How can I elevate the flavor of this recipe?
To boost the flavor, add more spices like paprika or cayenne. You can also mix in fresh herbs like dill or chives. Another option is to add a splash of lime juice for brightness. Each addition brings a new layer of taste.
What other veggies work well in wraps?
Many veggies fit well in wraps! Try adding bell peppers, shredded carrots, or avocado. These add crunch and nutrition, making your wraps more colorful and fun. Don’t be afraid to mix and match your favorites!
Buffalo Ranch Chickpea Wraps are fun, tasty, and easy to make. You learned how to prepare chickpeas, mix a zesty sauce, and customize your wraps with fresh veggies. Remember, you can store leftovers or even freeze them for later. Try different proteins or sauces to fit your taste. With a few tweaks, your wraps can be a hit at any meal. Enjoy exploring these ideas and make the recipe your own!
![To make easy garlic parmesan knots, gather these key items: - 1 package (16 oz) refrigerated pizza dough - 4 tablespoons unsalted butter, melted - 4 cloves garlic, minced - 1/4 cup grated Parmesan cheese - 1/2 teaspoon salt - 1/4 teaspoon black pepper These ingredients create the base for your tasty knots. The pizza dough gives them a nice texture, while butter and garlic add rich flavor. You might consider adding these for extra taste: - 1 tablespoon fresh parsley, chopped (or 1 teaspoon dried parsley) - Pinch of red pepper flakes Fresh parsley adds color and a fresh taste. Red pepper flakes give a little heat, so use them if you like spice. To make your cooking easier, have these tools on hand: - Sharp knife or pizza cutter - Baking sheet - Parchment paper - Small bowl - Pastry brush Using these tools helps with cutting the dough and baking the knots evenly. They make the process smooth and simple. For the full recipe, refer to the details above. Start by preheating your oven to 400°F (200°C). This heat helps the knots rise and bake well. Line a baking sheet with parchment paper. This keeps the knots from sticking. Next, take the refrigerated pizza dough. Roll it out on a clean, floured surface. Aim for a rectangle about ¼ inch thick. This thickness ensures even cooking. Slice the dough into strips. Each strip should be about 1 inch wide and 6 inches long. Take one strip and tie it into a knot. Tuck the ends underneath to keep them secure. Place each knot on the prepared baking sheet, leaving space between them. In a small bowl, combine melted butter, minced garlic, salt, black pepper, and red pepper flakes if desired. This garlic butter mixture gives the knots a rich flavor. Use a brush to apply the mixture on top of each knot. Make sure to get some garlic pieces on top. Now, it’s time to bake! Place the baking sheet in the oven and bake for 12-15 minutes. Watch for a golden brown color on the knots. When done, take them out and let them cool for a few minutes. Brush any leftover garlic butter on top for extra flavor. You can find the full recipe in the ingredients section. To get your knots just right, oven temperature matters. Always preheat to 400°F (200°C). This helps them cook evenly. Roll your pizza dough to about ¼ inch thick. If it's too thick, the knots may not cook well inside. Cut the strips 1 inch wide and 6 inches long. This size allows them to twist easily and cook evenly. For a burst of flavor, use fresh garlic. Fresh garlic gives more taste than jarred. Add herbs like rosemary or thyme for more depth. You can also mix in different cheeses, like mozzarella or cheddar. A pinch of red pepper flakes adds a nice kick. Try different spices to find your perfect blend. One common mistake is overcrowding the baking sheet. Leave space between knots so they rise well. Don't skip brushing the garlic butter mixture on top. It adds flavor and a nice shine. Lastly, keep an eye on them while baking. They can go from golden brown to burnt quickly. For the full recipe, click here: [Full Recipe]. {{image_4}} You can play with the cheese in your garlic knots. Instead of Parmesan, try mozzarella for a melty twist. You might also use cheddar for a sharp taste. Goat cheese adds creaminess, while feta offers a salty kick. Combine different cheeses for a fun mix. Each choice brings a unique flavor to your knots. Want to spice things up? Add herbs like oregano or thyme for extra flavor. A pinch of cayenne pepper gives a nice heat. You could also add lemon zest for a fresh twist. Try mixing in Italian seasoning for a classic touch. Be creative to find your perfect blend of spices. If you want to change the base, you have options. You can use bread dough for a fluffier texture. Biscuit dough makes a quick and easy choice, too. For a gluten-free option, try a gluten-free pizza dough. Each dough type gives a different taste and texture to your knots. Check out the Full Recipe for more ideas. To store your leftover garlic parmesan knots, first let them cool down. Place them in an airtight container. This keeps them fresh and prevents drying out. If you plan to eat them in a day or two, the fridge works well. For longer storage, the freezer is a better choice. Reheating your garlic parmesan knots is easy. For the best taste, use the oven. Preheat it to 350°F (175°C). Place the knots on a baking sheet. Heat them for about 5-7 minutes. This restores the crispy texture. You can also use a microwave. Heat them for about 30 seconds. However, the texture may not be as nice as oven heating. If you want to freeze garlic parmesan knots, wrap them well. Use plastic wrap or aluminum foil. Then, place them in a freezer bag. Squeeze out as much air as you can. They can stay in the freezer for up to three months. When ready to eat, thaw them in the fridge overnight. Reheat as described earlier. Your knots will taste almost fresh! For the full recipe, check out the earlier section. Yes, you can use homemade dough. Just make sure it has the right texture. If your dough is soft, it may not hold the knot shape well. Use a simple recipe that yields a stretchy and firm dough for best results. This way, you get that fresh flavor and texture right from your kitchen. Garlic parmesan knots last about 2-3 days at room temperature. Store them in an airtight container to keep them fresh. If you want to save them longer, put them in the fridge, where they can last up to a week. Just remember, they taste best when fresh! Yes, you can make garlic knots without garlic. You can swap garlic with herbs or spices. Try using Italian seasoning or even pesto for flavor. This way, you still get a tasty knot without the garlic punch. Garlic parmesan knots pair well with many dishes. You can serve them with marinara sauce for dipping. They also go great alongside pasta, salads, or soups. If you want a fun snack, try them with cheese or charcuterie boards. The options are endless! You’ve learned how to make delicious garlic parmesan knots. We covered all the key ingredients, tools, and step-by-step baking instructions. I shared tips to avoid common mistakes and enhance flavors. You also discovered fun variations and how to store and reheat your knots. With these skills, you can impress anyone at your next meal. Enjoy your tasty creation and make it your own! Happy cooking!](https://goldendishy.com/wp-content/uploads/2025/07/36d16f76-26da-465a-ba33-0a5ce8f4ea78-768x768.webp)

![- 2 cups shredded cooked chicken - 1 (8 oz) package of cream cheese - 1/2 cup buffalo sauce - 1/2 cup ranch dressing For buffalo chicken dip, the main ingredients create a creamy and rich base. Shredded cooked chicken gives it that hearty texture. You can use rotisserie chicken to save time. Cream cheese adds smoothness, while buffalo sauce brings the heat. Ranch dressing balances the flavors and adds a nice creaminess. - 1/2 cup crumbled blue cheese - 1 green onion for garnish - Tortilla chips or celery sticks for serving Optional ingredients enhance the dip. Crumbled blue cheese adds a bold taste that many love. It pairs well with the spicy buffalo flavor. A sprinkle of green onion on top looks great and adds freshness. For serving, I recommend crunchy tortilla chips or crisp celery sticks. They both complement the dip's rich and creamy texture. Always remember to adjust the buffalo sauce to match your spice preference. You can find the full recipe in the section above for more detailed steps! 1. First, preheat your oven to 350°F (175°C). This helps the dip cook evenly. 2. In a large bowl, combine the shredded chicken, cream cheese, buffalo sauce, and ranch dressing. Mix until smooth. 1. Now, gently fold in the shredded cheddar cheese and blue cheese, if you use it. This adds great flavor and creaminess. 2. Next, transfer the chicken mixture to a baking dish. Spread it evenly with a spatula. 3. Bake the dip for 20-25 minutes. Look for bubbling edges and a slightly golden top. 1. When your dip is done, take it out and garnish with sliced green onions. This adds freshness. 2. Serve it warm with tortilla chips or celery sticks. Enjoy this creamy and flavorful delight! For the full recipe, check out the details above. Adjusting buffalo sauce is key for your dip. If you love heat, add more buffalo sauce. If you prefer mild dishes, use less. Start small and taste as you go. You can always add more but can’t take it out. If you want a cream cheese alternative, try Greek yogurt. It gives a nice tang and cuts some fat. You can also use vegan cream cheese for a plant-based option. This keeps the dip creamy without dairy. To get the perfect crust, bake your dip until it’s bubbly and golden. This usually takes about 20-25 minutes at 350°F. You want the edges to have a light brown color. This shows the dip is ready and adds flavor. For a crispy top, use a broiler after baking. Set your oven to broil and watch closely. Just a few minutes under the broiler can give your dip a nice crunch. Be careful not to burn it! When serving at parties, focus on presentation. Put the dip in the center of a colorful platter. Surround it with chips and celery sticks. This makes it look inviting and fun. For drinks, consider pairing it with light beers or sparkling water. The lightness balances the richness of the dip. You can also serve it with a side of fresh veggies for a nice crunch. {{image_4}} You can make buffalo chicken dip healthier with just a few swaps. - Low-fat cream cheese options: Use low-fat cream cheese. It cuts fat and calories but keeps the creaminess. - Using Greek yogurt instead of ranch dressing: Greek yogurt adds a tangy taste and protein. It's a great way to lower calories while keeping it creamy. You might want to kick up the flavor in your dip. - Additions like diced jalapeños or hot peppers: These add heat and a fresh taste. Adjust to your spice level. - Incorporating other cheeses for unique flavors: Try mixing in mozzarella or gouda. Each cheese adds its own twist to the dip's flavor. Change how you serve your buffalo chicken dip for fun. - Buffalo chicken dip stuffed in peppers: Hollow out mini bell peppers and fill them with the dip. Bake until warm for a tasty bite. - Spinach and buffalo chicken dip combo: Mix in fresh spinach. It adds color and nutrition, making the dip even better. For the complete recipe, check out the [Full Recipe]. To keep buffalo chicken dip fresh, place it in an airtight container. This helps prevent it from drying out. Store the dip in the fridge for up to five days. You may notice the flavors deepen as it sits. Just be sure to cover it well to avoid any fridge odors. You can freeze buffalo chicken dip for longer storage. First, let the dip cool completely. Then, transfer it to a freezer-safe container. Press plastic wrap directly on the dip before sealing. It can last for up to three months in the freezer. When you're ready to enjoy it, thaw it in the fridge overnight. You have two great options to reheat buffalo chicken dip: the oven or microwave. If using the oven, preheat it to 350°F (175°C). Place the dip in an oven-safe dish and heat for about 20 minutes. Stir halfway through for even warming. If you choose the microwave, heat in 30-second intervals. This prevents hot spots and keeps the dip creamy. To maintain texture, avoid overheating. Let the dip sit for a minute after reheating. This helps the flavors come back together. Enjoy your dip warm with chips or celery sticks! Yes, you can make buffalo chicken dip ahead of time. To prepare in advance, follow these steps: - Mix the ingredients: Combine the shredded chicken, cream cheese, buffalo sauce, and ranch dressing. - Store it: Place the mixture in a baking dish, cover it with plastic wrap, and put it in the fridge. - Bake when ready: When you are ready to serve, take it out and bake it at 350°F for 20-25 minutes. This way, you save time and enjoy a warm dip at your gathering. If you want to swap ranch dressing, here are some great options: - Blue cheese dressing: This adds a tangy flavor that works well. - Greek yogurt: Use plain Greek yogurt for a healthier twist. - Caesar dressing: This offers a different but tasty flavor profile. Feel free to experiment with your favorite dressings! To kick up the spice level, try these ideas: - Extra buffalo sauce: Add more buffalo sauce to your mix. - Diced jalapeños: Mix in fresh or pickled jalapeños for heat. - Hot sauce: Drizzle hot sauce on top before serving for an extra kick. Adjust the spice to match your taste, and enjoy the heat! Buffalo chicken dip can be gluten-free, but check your ingredients. Here’s what to know: - Buffalo sauce: Most brands are gluten-free, but confirm by reading the label. - Ranch dressing: Look for gluten-free options if using store-bought. - Dipping options: Use gluten-free tortilla chips or fresh veggies for dipping. With careful choices, everyone can enjoy this dip! You now know how to make buffalo chicken dip from scratch. We covered key ingredients like chicken, cream cheese, and buffalo sauce. I shared step-by-step instructions to get delicious results. You learned tips for adjustments and variations to suit your taste. Remember, this dip is versatile; you can customize it for any gathering. Enjoy experimenting with flavors and serving styles. Your next snack night will be a hit!](https://goldendishy.com/wp-content/uploads/2025/07/99cdad4a-7337-4a60-a9b0-2f79e024797e-768x768.webp)