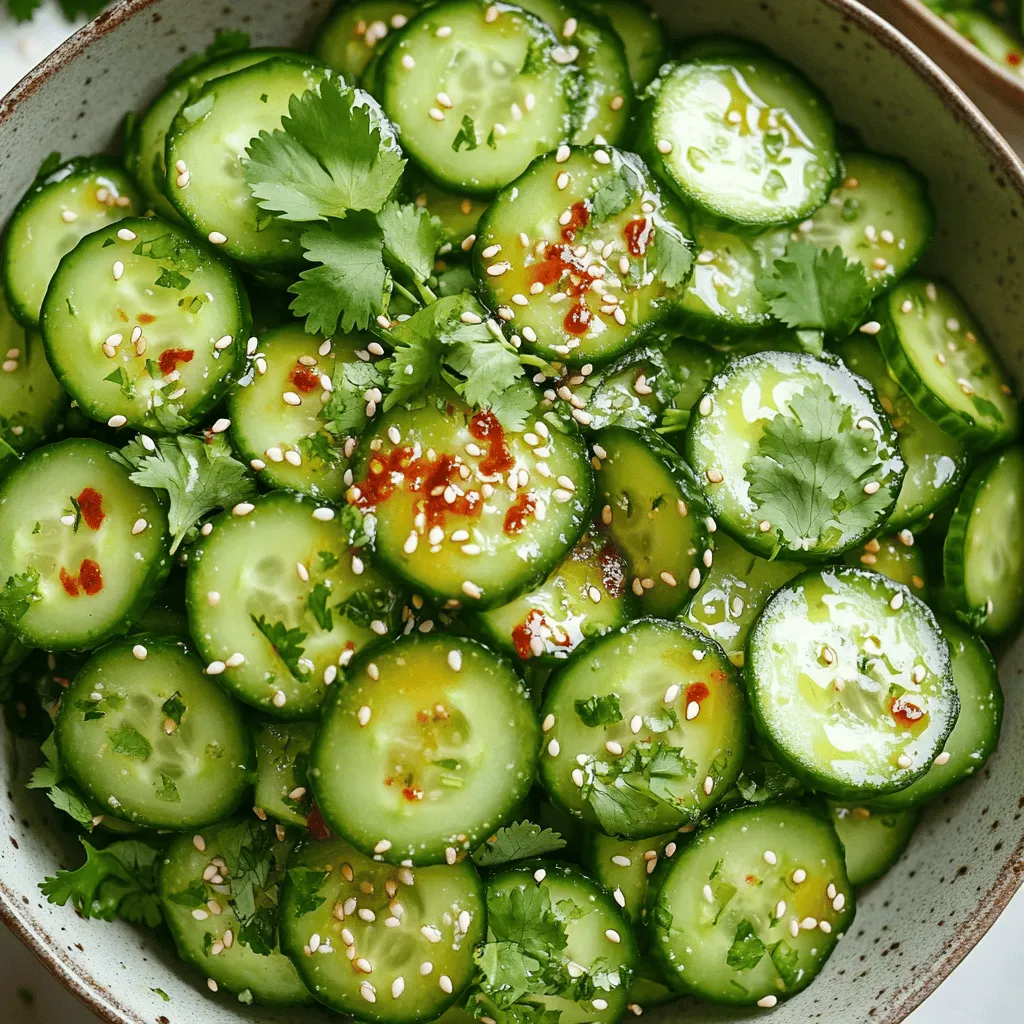
Spicy Garlic Cucumber Salad Fresh and Flavorful Recipe

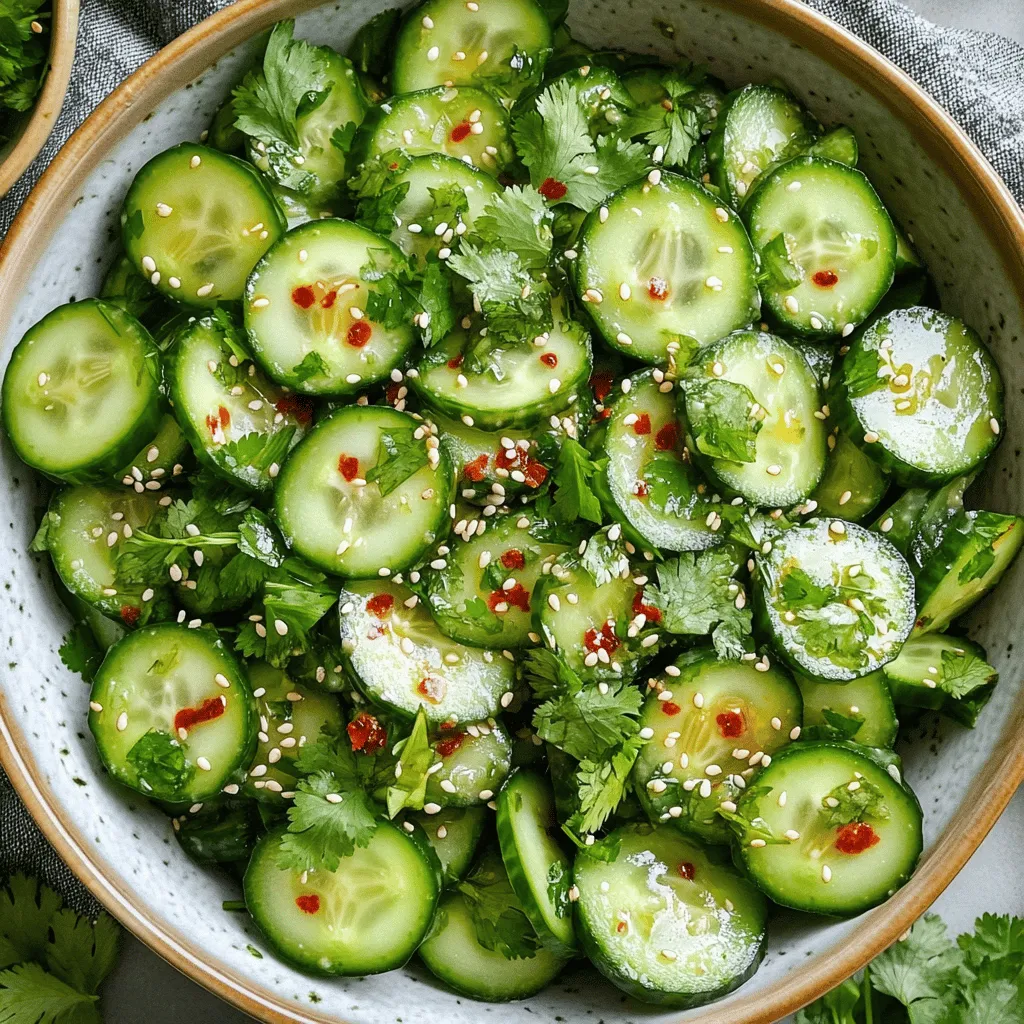
Looking for a fresh and exciting dish? Try my Spicy Garlic Cucumber Salad! This crunchy delight combines simple ingredients to create a bold, tangy flavor. Perfect as a side or a light meal, this recipe not only tastes great but also offers plenty of health benefits. Join me as we dive into the ingredients, easy steps, and tips to make this salad a must-try for your next meal!
Ingredients
Overview of Main Ingredients
This salad shines with a few key ingredients. You will need:
– 2 large cucumbers, peeled and thinly sliced
– 4 cloves garlic, finely minced
– 1 tablespoon red chili flakes
– 3 tablespoons rice vinegar
– 2 tablespoons sesame oil
– 1 tablespoon soy sauce
– 1 tablespoon honey (or agave syrup)
– Salt, to taste
– Fresh cilantro, chopped (for garnish)
– Toasted sesame seeds, for garnish
The cucumbers give a refreshing crunch. Garlic adds a strong flavor. Red chili flakes bring the heat, while rice vinegar adds acidity. Sesame oil adds richness. Soy sauce gives depth, and honey balances it all.
Optional Ingredients for Personalization
You can customize this salad to your taste. Here are some ideas:
– Add sliced bell peppers for sweetness.
– Toss in radishes for extra crunch.
– Include avocado for creaminess.
– Use lime juice instead of vinegar for a zesty twist.
– Try different herbs like mint or basil for a fresh touch.
Feel free to mix and match to find your favorite flavor profile.
Nutritional Benefits of Key Ingredients
Each ingredient brings health benefits. Here’s what you get:
– Cucumbers: Low in calories and high in water. They keep you hydrated.
– Garlic: Known for its immune-boosting properties. It may improve heart health.
– Chili flakes: They can boost metabolism and add flavor without extra calories.
– Rice vinegar: It may help with digestion and is lower in calories than other dressings.
– Sesame oil: Rich in healthy fats and antioxidants.
– Honey: A natural sweetener with antibacterial properties.
This salad is not just delicious; it also helps support your health.
Step-by-Step Instructions
Preparation of Cucumbers
First, get your cucumbers ready. Peel the skin off with a vegetable peeler. Then, slice them thinly. A mandoline slicer works great for uniform slices, but a sharp knife is fine too. Place the cucumber slices in a large mixing bowl. They will be the star of your salad.
Making the Spicy Garlic Dressing
Next, let’s whip up the dressing. In a small bowl, add minced garlic and red chili flakes. Remember, you can adjust the chili for more or less heat. Then, pour in rice vinegar, sesame oil, soy sauce, and honey. Whisk these ingredients together until they blend well. The dressing should look smooth and inviting.
Combining Ingredients and Marinating
Now, it’s time to bring it all together. Drizzle the spicy garlic dressing over the cucumber slices. Add salt to taste. Gently toss the cucumbers so they are well coated. For the best flavor, let the salad sit for at least 15 minutes. If you have time, refrigerate it for up to 30 minutes. This helps the flavors mix well. Before serving, toss it again and garnish with fresh cilantro and toasted sesame seeds. Your salad is ready to impress!
Tips & Tricks
Achieving the Best Flavor
To get the best flavor in your Spicy Garlic Cucumber Salad, let the salad rest. After you mix the cucumbers and the spicy dressing, let it sit for at least 15 minutes. This time helps the flavors blend. If you want even more flavor, chill it in the fridge for up to 30 minutes. The cold temperature enhances the taste. Adjust the amount of red chili flakes to suit your spice level. You can always add more, but you cannot take it out!
Tools to Simplify Preparation
Using the right tools can make this recipe easier. A mandoline slicer helps you cut the cucumbers evenly. This tool ensures all slices are the same thickness. A large mixing bowl is great for tossing everything together. A whisk is perfect for mixing the dressing smoothly. If you want to save time, consider using a garlic press for mincing the garlic. These tools can speed up your prep and make cooking fun.
Presentation Suggestions
Presentation matters when serving this salad. Use a large, shallow bowl to showcase the bright colors. You can also serve it in individual cups for a fun twist. Just before serving, sprinkle extra cilantro and sesame seeds on top. This adds a nice crunch and makes the dish look fresh. Remember, we eat with our eyes first! A beautiful presentation makes the salad even more appealing.

Variations
Adding Extra Vegetables
You can make this salad even better by adding more veggies. Consider adding sliced bell peppers for crunch and sweetness. Shredded carrots also add color and texture. Radishes bring a nice bite and a pop of flavor. Feel free to mix and match based on your taste. Just keep the extra veggies thinly sliced for even flavor.
Vegan Options
If you want a vegan twist, simply swap honey for agave syrup. This sweetener gives the same taste without any animal products. You can also add a splash of lime juice for extra zing. This keeps your spicy garlic cucumber salad fresh and bright. You can enjoy this dish while sticking to your vegan lifestyle.
Protein Additions (Tofu, Chicken)
Want to make this salad a meal? Add some protein! Grilled chicken works well, giving a hearty touch. For a plant-based option, use cubed, sautéed tofu. It soaks up the dressing and adds good texture. Both options make this dish more filling and satisfying. Enjoy your salad as a light lunch or dinner.
Storage Info
Best Practices for Storing Leftovers
To keep your spicy garlic cucumber salad fresh, store it in an airtight container. Make sure the lid seals tightly. You can use glass or plastic containers. Avoid leaving it out at room temperature for too long. If you do, the cucumbers will become soggy.
How Long It Lasts in the Fridge
This salad stays good in the fridge for about 3 to 5 days. After that, the cucumbers lose their crunch. Always check for any signs of spoilage, like a bad smell or slimy texture. If you notice these, it’s best to toss it.
Freezing Considerations
Freezing this salad is not recommended. Cucumbers have high water content. When frozen, they become mushy and lose their texture. Instead, enjoy the salad fresh. That way, you can savor the crispness and flavor. If you want to make it ahead, simply prepare the dressing and store it separately. Then, mix it with fresh cucumbers when ready to serve.
FAQs
What makes this salad spicy?
The spiciness in this salad comes from the red chili flakes. I use one tablespoon, but you can adjust this to fit your taste. If you want more heat, add more chili flakes. For less heat, just use a little. The garlic also adds a nice kick, making each bite flavorful.
Can I use other types of vinegar?
Yes, you can use different vinegars. Rice vinegar gives a mild taste, but you can try apple cider vinegar or white wine vinegar if you prefer. Each type changes the flavor a bit, but they all work well in this salad. Just remember, the taste may vary based on your choice.
How can I make this salad gluten-free?
To make this salad gluten-free, just use gluten-free soy sauce. Many brands offer this option. Always check the label to ensure it is safe for your needs. The rest of the ingredients are already gluten-free, so you won’t have to change much. Enjoy this fresh and spicy salad without worry!
This blog post covers a tasty salad recipe, from ingredients to storage. We explored main and optional ingredients, highlighting their nutritional perks. You learned how to make a spicy garlic dressing and combine the flavors. Tips helped you enhance flavor and presentation.
In the end, this salad is easy to adapt. Feel free to add veggies or protein for a personal touch. Remember to store your leftovers right to enjoy them later. This dish is sure to impress and nourish. Enjoy every bite!


![- 2 medium zucchinis, grated - 1 cup feta cheese, crumbled - 1/2 cup all-purpose flour - 1 teaspoon salt - 1/2 teaspoon black pepper - 1/2 teaspoon garlic powder - 1/2 cup fresh dill, chopped - 1/2 cup green onions, finely chopped - 2 large eggs - Olive oil, for frying To make Greek zucchini fritters, you need fresh and simple ingredients. Start with two medium zucchinis. Grate them finely and set them aside. This step is crucial because zucchini holds a lot of water. Next, grab a cup of feta cheese. Crumble it into small pieces to add a salty, creamy punch. You will also need half a cup of all-purpose flour. This helps bind the fritters together. For seasoning, use one teaspoon of salt, half a teaspoon of black pepper, and half a teaspoon of garlic powder. This mixture will give your fritters a nice flavor. Don’t forget the herbs! A half cup of fresh dill and a half cup of finely chopped green onions add freshness. Finally, you need two large eggs to hold everything together. For frying, have olive oil on hand. These ingredients come together to create a dish that is tasty and simple. For the full recipe, check the detailed instructions. First, grate the zucchinis into a large bowl. Sprinkle 1 teaspoon of salt over the grated zucchini. Let it rest for about 10 minutes. This step helps pull out moisture from the zucchini, which is key for great fritters. After 10 minutes, take a clean kitchen towel. Wrap the zucchini and squeeze it gently. Remove as much liquid as you can. This makes the fritters crispier. In another bowl, mix the squeezed zucchini with crumbled feta cheese, chopped dill, and finely chopped green onions. Add the flour, eggs, black pepper, and garlic powder. Stir everything well until you have a smooth batter. Now, heat about 1/4 inch of olive oil in a skillet over medium heat. The oil should be hot enough that a small drop of batter sizzles when added. Using a spoon, drop spoonfuls of the batter into the hot oil. Flatten each fritter slightly with the back of the spoon. Be careful not to overcrowd the pan; fry in batches if needed. Cook for about 3-4 minutes on each side. You want them to be golden brown and crispy. Once done, place the fritters on a plate lined with paper towels to soak up extra oil. Serve them warm. For extra flavor, top with more crumbled feta and a dollop of Greek yogurt or tzatziki sauce. Enjoy your tasty Greek Zucchini Fritters! For the full recipe, check [Full Recipe]. To make great Greek zucchini fritters, start by squeezing out excess moisture from the grated zucchini. After salting, let the zucchini sit for ten minutes. This helps draw out the water. Next, use a clean towel to squeeze the zucchini until it feels dry. If you skip this step, the fritters might turn out soggy. Adjust cooking time for crispiness. Fry the fritters for three to four minutes on each side. If your fritters are not crispy, try increasing the heat slightly. But be careful! Too high a heat can burn them. Garnishing can elevate your fritters. Try crumbled feta cheese on top. Fresh dill adds a nice touch too. A dollop of Greek yogurt or tzatziki sauce pairs perfectly. These add creaminess and flavor. For side dishes, think about serving a light salad. A fresh cucumber salad or a simple tomato salad works well. These sides balance the rich flavors of the fritters. Using the right frying pan is key. A non-stick skillet helps with even cooking. It also makes flipping the fritters easier. For shaping and flipping, have a spatula handy. A spoon works well for dropping the batter into the oil. If you want uniform fritters, use an ice cream scoop. This helps you get the same size every time. For the full recipe, check out the details above. Enjoy your cooking! {{image_4}} You can switch up the cheese in your fritters. Goat cheese adds a tangy flavor that pairs well with zucchini. If you want a milder taste, use mozzarella. Fresh herbs can also change the taste. Adding parsley gives a fresh touch, while mint adds a sweet note. Experiment with both for a unique twist! You can bake your fritters instead of frying them. This method cuts down the oil and keeps them light. Preheat your oven to 400°F (200°C). Place the fritters on a baking sheet and lightly spray them with oil. Bake for around 20 minutes, flipping halfway for an even cook. If you own an air fryer, use it for a crispier finish. Set your air fryer to 375°F (190°C). Cook the fritters in a single layer for about 10 minutes. Shake the basket halfway through to ensure they cook evenly. Serve your fritters on a bed of fresh salad. This adds crunch and freshness to your meal. You can top them with diced tomatoes, cucumber, and a drizzle of olive oil. Pair your fritters with different dipping sauces. Tzatziki is a classic choice, but you can try a spicy yogurt dip or a sweet chili sauce. These sauces will elevate the flavors and make your dish even more enjoyable. For the full recipe, check out the complete guide on Greek Zucchini Fritters! To store your Greek zucchini fritters, first let them cool completely. Place them in an airtight container. This keeps them fresh and tasty. Refrigerate the fritters for up to three days. If you want to keep them longer, freezing is a great option. To reheat your fritters, use an oven or skillet. Preheat your oven to 350°F (175°C). Place the fritters on a baking sheet for about 10 minutes. This will keep them crispy. If you use a skillet, add a bit of olive oil. Heat on medium until they are warm and crispy. Avoid microwaving, as this can make them soggy. You can freeze the fritters before or after cooking. To freeze before cooking, shape the fritters and place them on a baking sheet. Freeze them for about an hour. Then, transfer them to a freezer bag. To freeze after cooking, let them cool completely first. Then, store them in an airtight container. For thawing, place them in the fridge overnight. Reheat them in the oven or skillet for best results. Enjoy your Greek zucchini fritters any time! For the complete recipe, check the Full Recipe. To keep your zucchini fritters from falling apart, you must remove excess moisture. Grate the zucchinis and sprinkle them with salt. Let them rest for about 10 minutes. This helps draw out water. Afterward, use a clean towel to squeeze out the liquid. The drier the zucchini, the better the fritters will hold together. Next, bind the mixture well. Use enough flour and eggs to hold everything together. The flour acts as a glue, while the eggs provide structure. If your batter feels too loose, add a bit more flour until it thickens. Yes, you can make the batter ahead of time. Store it in the fridge for up to two hours. This way, you save time when you are ready to fry. Just remember that fresh batter is best for frying. If you wait too long, the zucchini may release more moisture. Give the batter a quick stir before cooking. Greek zucchini fritters are great with several sides. You can serve them with Greek yogurt or tzatziki sauce. These dips add a cool and creamy contrast. A simple salad with tomatoes and cucumbers pairs well too. For a heartier meal, try serving them with grilled chicken or lamb. To make gluten-free zucchini fritters, swap the all-purpose flour for a gluten-free flour blend. You can also use almond flour or chickpea flour. These options work well and provide a nice flavor. Just keep in mind that different flours absorb moisture differently. You may need to adjust the amount based on your chosen flour. Start with the same amount and tweak as needed for the right batter consistency. For the best results, follow the Full Recipe for guidance. In this article, we explored making delicious Greek zucchini fritters. You learned about key ingredients, preparation steps, and helpful tips. I also shared variations to suit your taste and how to store leftovers. These fritters are easy to make and can be adjusted for different diets. Enjoy the tasty result and impress your family or friends. Happy cooking!](https://goldendishy.com/wp-content/uploads/2025/07/cb7a2661-c5f6-4b7c-b480-ad49d75e704d-768x768.webp)

![For the best peach avocado salsa, gather these fresh ingredients: - 2 ripe peaches, diced - 2 ripe avocados, peeled and diced - 1/2 medium red onion, finely chopped - 1 small jalapeño pepper, minced - 1/4 cup fresh cilantro leaves - Juice from 2 fresh limes - 1 tablespoon honey (optional) - Salt and freshly cracked black pepper Each ingredient brings its own flavor. Ripe peaches add sweetness, while avocados give creaminess. Red onion adds a sharp bite, and jalapeño provides heat. Cilantro brightens everything up, and lime juice gives freshness. Honey is optional, but it can enhance the sweetness if desired. This mix creates a vibrant salsa perfect for any occasion. When selecting your peaches, choose ones that yield slightly to pressure. They should be fragrant and free from bruises. For avocados, look for ones that are dark and firm but not rock hard. Freshness in these ingredients is key to a tasty dip. You can find the full recipe at the end of this section. Enjoy making this salsa! To make this peach avocado salsa, follow these simple steps. Each step brings you closer to a fresh and tasty dip. - Combine diced peaches and avocados Start by adding the diced peaches and avocados to a medium bowl. Use a spatula to mix them gently. Be careful not to mash the avocados. You want nice chunks for the perfect texture. - Add red onion and jalapeño Next, sprinkle in the finely chopped red onion and minced jalapeño. Mix them in lightly. This adds crunch and a little heat to the salsa. - Fold in cilantro gently Now, add the freshly chopped cilantro. Fold it into the mixture carefully. This keeps the avocados and peaches intact while adding a fresh flavor. - Squeeze lime juice and add honey Squeeze the juice from the limes over the salsa. This brightens the flavors. If you'd like a touch of sweetness, drizzle in the honey. Mix gently to coat everything evenly. - Season with salt and pepper Taste your salsa and season with salt and freshly cracked black pepper. Adjust according to your preference. Toss everything gently to combine the seasonings. - Let sit for flavor development For the best taste, let your salsa sit at room temperature for about 10 minutes. This allows the flavors to blend well together. If you want to see the full recipe, check out the [Full Recipe]. Enjoy making this vibrant, fresh dip! Choosing ripe peaches and avocados is key to a great salsa. Look for peaches that yield slightly to pressure. They should smell sweet and juicy. For avocados, pick ones that feel soft but not mushy. This ensures a creamy texture in your dip. Adjusting heat levels with jalapeño is easy. For less heat, remove the seeds and inner ribs. This part holds most of the spice. If you like it spicy, leave some seeds in. Start with a small amount and add more as needed. Enhancing sweetness with honey can balance the flavors. If your peaches aren't as sweet as you'd like, a tablespoon of honey works wonders. Mix it in gently so you don’t mash the fruit. This extra touch can make your salsa shine. Best pairings for your salsa include chips, grilled chicken, or fish. Tortilla chips add a nice crunch. For a healthy twist, serve it with grilled chicken or fish. The mild flavors of the salsa complement these dishes well. Presentation tips can help impress your guests. Serve the salsa in a rustic bowl. Top it with extra cilantro leaves for a fresh look. A colorful spread makes your table inviting and fun. You can even add lime wedges on the side for a pop of color. For the full recipe, check out the Peach Avocado Salsa section above. {{image_4}} You can get creative with your salsa by switching up ingredients. - Using mango instead of peaches: Mango adds a sweet twist. It gives a tropical flair to your salsa. Simply replace diced peaches with diced mango in equal amounts. - Adding diced bell peppers for crunch: For extra texture, you can add bell peppers. Diced red, yellow, or green peppers work well. They will add a nice crunch and color to your dish. - Incorporating garlic for additional flavor: If you love garlic, try adding a clove of minced garlic. It enhances the flavor profile and gives your salsa a savory kick. Making simple changes can fit different diets. - Making it vegan-friendly: This salsa is already vegan! Use natural sweeteners like agave instead of honey for a completely plant-based option. - Gluten-free serving options: All ingredients are gluten-free. Serve with gluten-free tortilla chips or fresh veggies. This makes it a great snack for everyone. For more details on making this delicious dip, check out the Full Recipe. To keep your peach avocado salsa fresh, place it in an airtight container. This helps prevent air exposure. It is best to refrigerate it right away. The cool temperature slows down spoilage. You can store it in the fridge for 2 to 3 days. After that, the avocados may brown and change in texture. If you notice browning, you can mix in a bit of lime juice to refresh it. Freezing salsa can be a great way to save extra. To freeze it effectively, put the salsa in a freezer-safe bag. Make sure to remove as much air as possible. This helps prevent freezer burn. You can freeze it for up to 3 months. When you want to use it, take it out and thaw in the fridge overnight. Once thawed, the texture may change slightly. It's still safe to eat and can be used in cooked dishes, like tacos or soups. For the best taste, try to use thawed salsa within a week. Peach avocado salsa shines with many dishes. It pairs wonderfully with tortilla chips, making it a great snack. You can also use it to top grilled chicken or fish for a fresh twist. It adds a burst of flavor to tacos or quesadillas too. This salsa can elevate any summer barbecue or picnic, making your meal feel bright and fun. Homemade peach avocado salsa stays fresh in the fridge for about three days. Store it in an airtight container to keep it from browning. After this time, the flavors may fade, and the texture can change. Always check for any off smells before eating. If it looks or smells funny, it’s best to toss it. Yes, you can easily adjust the spice in your salsa. If you want it milder, remove the seeds from the jalapeño. You can also skip the jalapeño entirely for a sweet salsa. For more heat, add extra minced jalapeño or even some crushed red pepper. Taste as you go to find your perfect balance. Making Peach Avocado Salsa is simple and fun. We covered fresh ingredients, step-by-step prep, and useful tips. Plus, we explored tasty variations and smart storage options. This salsa enhances any dish, from chips to seafood. Remember, you can change ingredients to match your taste. Enjoy sharing this bright, flavorful mix at your next meal. With a few tweaks, your salsa can shine every time.](https://goldendishy.com/wp-content/uploads/2025/06/096320e8-25bc-4efd-9183-2f1d952cbb9e-768x768.webp)
. Prep Time: 15 minutes Total Time: 1 hour 30 minutes Servings: 6 This potato salad is great for summer meals. You can serve it at picnics, barbecues, or potlucks. I love to garnish it with extra dill and chives for a colorful touch. Enjoy! In this post, I shared how to make a classic potato salad. We covered the ingredients, tips for cooking the potatoes, and mixing the dressing. I showed you how to add flavors and enhance your dish. Remember, you can store leftovers correctly or even try tasty variations. Potato salad is easy to make and perfect for any meal. Enjoy your cooking adventure!](https://goldendishy.com/wp-content/uploads/2025/07/3d114334-7953-4aa3-9cf8-99466b57d4b6-768x768.webp)

