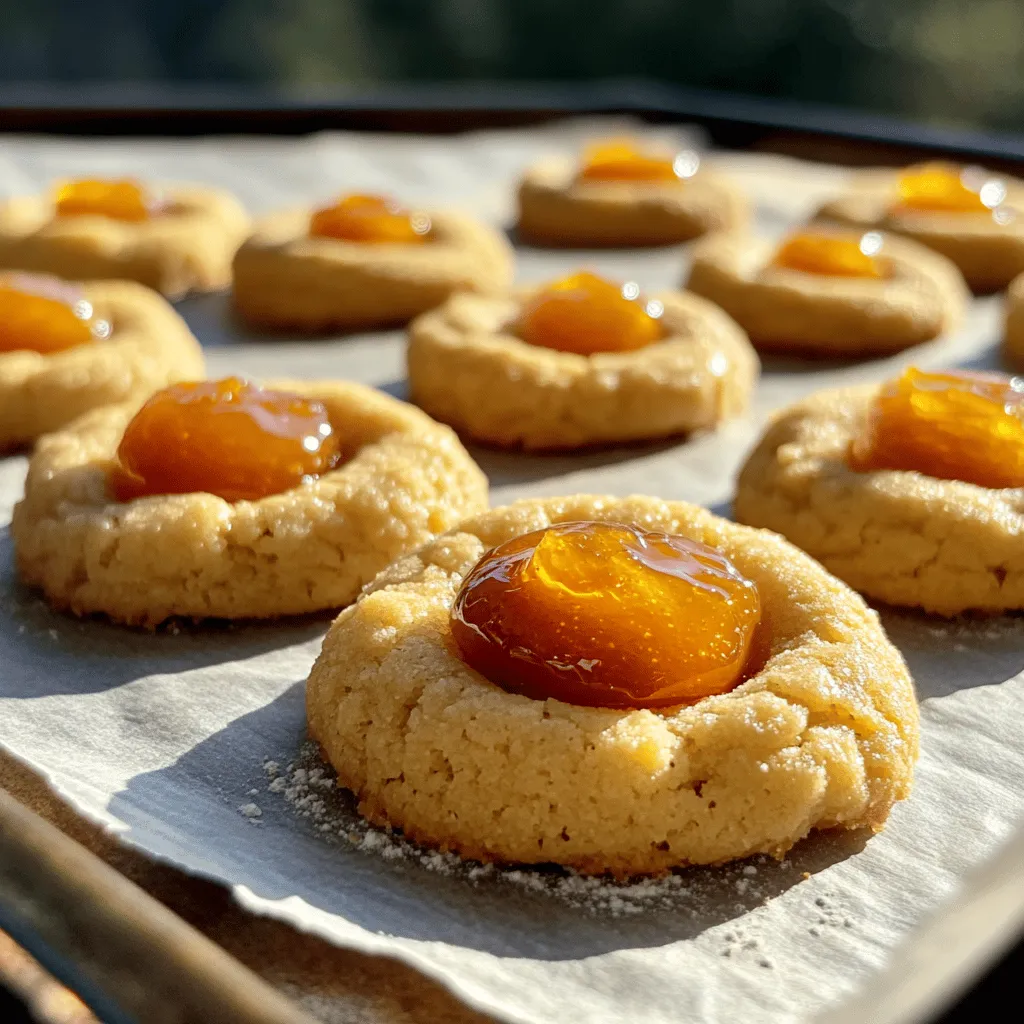
Peach Jam Thumbprint Cookies Easy and Tasty Delight

Are you ready to bake a treat that’s as easy as it is delicious? Peach Jam Thumbprint Cookies are the perfect choice! With their tender texture and fruity filling, these cookies shine at any gathering. In this guide, I’ll share simple steps, helpful tips, and flavorful variations. Let’s dive in and make these sweet delights that everyone will love!
Ingredients
Essential Ingredients for Peach Jam Thumbprint Cookies
To make the best peach jam thumbprint cookies, gather these key ingredients:
– 2 cups all-purpose flour
– 1/2 teaspoon baking powder
– 1/4 teaspoon baking soda
– 1/4 teaspoon salt
– 1/2 cup unsalted butter, softened to room temperature
– 1/2 cup granulated sugar
– 1 large egg yolk
– 1 teaspoon vanilla extract
– 1/2 cup peach jam
These items create a rich and tender cookie that pairs perfectly with sweet jam.
Optional Ingredients for Extra Flavor
For an extra layer of taste, consider adding:
– 1/2 teaspoon almond extract
Almond extract gives a lovely nutty note. It enhances the peach flavor, making each bite even more delightful.
Best Type of Peach Jam to Use
When choosing peach jam, look for a brand that uses real fruit. A high-quality, thick jam gives the best texture. You can also use homemade jam for a personal touch. A smooth jam works best, as it fills the thumbprint nicely. For a twist, try other fruit jams like raspberry or apricot. Remember, the jam should complement the cookie, so pick one you love!
Step-by-Step Instructions
Preparing the Dough
First, preheat your oven to 350°F (175°C). This step is crucial for even baking. Next, line a baking sheet with parchment paper. This helps the cookies not stick. In a medium bowl, mix the dry ingredients: flour, baking powder, baking soda, and salt. Whisk them well to combine, then set this bowl aside. In a large bowl, cream softened butter and granulated sugar together. Beat on medium speed for about 2-3 minutes until the mix is light and fluffy. After that, add the egg yolk, vanilla extract, and almond extract if you choose. Mix until smooth. Gradually add the dry mix to the wet mix. Stir gently to combine, stopping when the flour disappears. Over-mixing can make your cookies tough.
Shaping the Cookies
Now, it’s time to shape your cookies. Use a cookie scoop or your hands to make small balls of dough. Aim for about 1 inch in diameter. Place these dough balls on the lined baking sheet, spacing them about 2 inches apart. This distance allows them to spread while baking. Next, make a small indentation in the center of each ball. You can use your thumb or the back of a teaspoon for this. Be careful not to press all the way through. This little well is where the peach jam will go.
Baking and Cooling Process
After shaping the cookies, fill each indentation with a dollop of peach jam. Aim for a neat and centered look. Now, place the baking sheet in the preheated oven. Bake for 10-12 minutes. Watch for the edges to turn light golden. Once they are ready, take them out and let them cool on the baking sheet for about 5 minutes. This helps them set. After that, transfer the cookies to a wire rack to cool completely. Enjoy the sweet aroma while they cool!
Tips & Tricks
How to Achieve the Perfect Soft Texture
To make Peach Jam Thumbprint Cookies soft, focus on your butter. Use room temperature butter to keep the texture light. Avoid overmixing the dough. Mix just until the flour blends in. This keeps the cookies tender. Once baked, let them cool on a rack. This helps them stay soft and chewy.
Common Mistakes to Avoid
One common mistake is using cold butter. Cold butter makes the dough dense. Another mistake is overbaking. Watch for a light golden edge to know when they are done. Don’t skip the parchment paper; it helps prevent sticking. Lastly, don’t pack the flour. Lightly spoon it into your measuring cup for accuracy.
Enhancing Flavor with Almond Extract
Almond extract adds a lovely depth to these cookies. Just a half teaspoon can change the flavor profile. If you love almond, don’t skip this step! It pairs wonderfully with peach jam. Feel free to experiment with other extracts like vanilla or lemon for a twist. For the best results, use pure extracts instead of imitation ones. They give a cleaner taste.
Variations
Using Different Fruit Jams
You can mix it up with different fruit jams. Raspberry, strawberry, or apricot work great. Each jam adds a unique taste. For a tart flavor, try cherry jam. You can even use citrus jams for a zesty twist. Just pick your favorite jam and follow the same steps in the recipe. This way, you can create a whole range of thumbprint cookies.
Adding Nuts or Chocolate Chips
For added crunch, consider adding nuts or chocolate chips. Chopped walnuts or pecans enhance the texture and flavor. Simply mix them into the dough before forming the balls. You could also add chocolate chips for a sweet touch. Dark chocolate pairs well with peach jam. This way, you can customize your cookies to suit your taste.
Making Gluten-Free Peach Jam Thumbprint Cookies
If you need gluten-free cookies, use a gluten-free flour blend. Many blends work well in this recipe. Just swap the all-purpose flour with your favorite blend in the same amount. Check that the jam you choose is gluten-free too. This way, everyone can enjoy these tasty treats, no matter their dietary needs.
Storage Info
Best Practices for Storing Cookies
To keep your Peach Jam Thumbprint Cookies fresh, store them in an airtight container. Make sure the cookies cool completely before placing them in the container. This step stops steam from forming and keeps your cookies from getting soggy. For added freshness, add a slice of bread in the container. The bread helps maintain moisture.
How to Freeze Peach Jam Thumbprint Cookies
Freezing these cookies is easy and keeps them tasty. Start by letting the cookies cool completely. Then, place them on a baking sheet in a single layer. Freeze the cookies for 1-2 hours until they are firm. After that, transfer them to a freezer-safe bag. Be sure to remove as much air as possible before sealing. You can freeze them for up to three months.
Shelf Life of Homemade Cookies
Homemade Peach Jam Thumbprint Cookies last about one week at room temperature. Store them in an airtight container to keep them fresh. If you freeze them, they can last up to three months. Always check for any signs of spoilage before eating. Enjoy your cookies fresh for the best taste, or save some for later!
FAQs
Can I use other types of fruit preserves?
Yes, you can use other fruit preserves. Raspberry, strawberry, and apricot work well. Each jam adds its own flavor twist. You can mix and match to find your favorite. Just ensure the jam is thick enough to hold its shape when baked.
What is the best way to reheat leftover cookies?
To reheat leftover cookies, place them on a baking sheet. Heat your oven to 300°F (150°C). Bake for about 5-7 minutes. This warms them up and makes them soft again. You can also use the microwave for a quick fix. Just heat for about 10-15 seconds. Be careful not to overdo it or they may become tough.
Are thumbprint cookies supposed to be soft or crunchy?
Thumbprint cookies should be soft with a slight crunch on the edges. The center stays chewy, which pairs well with the jam. If you prefer them crunchier, you can bake them a bit longer. Just watch them closely to avoid burning.
In this blog post, we explored how to make delicious peach jam thumbprint cookies. We discussed the essential and optional ingredients, including how to enhance the flavor. I shared step-by-step instructions for making, baking, and cooling the cookies. We also covered tips for texture and common mistakes to avoid. Finally, we looked at fun variations and how to store your cookies properly.
Now you can enjoy these tasty treats at home. Happy baking!


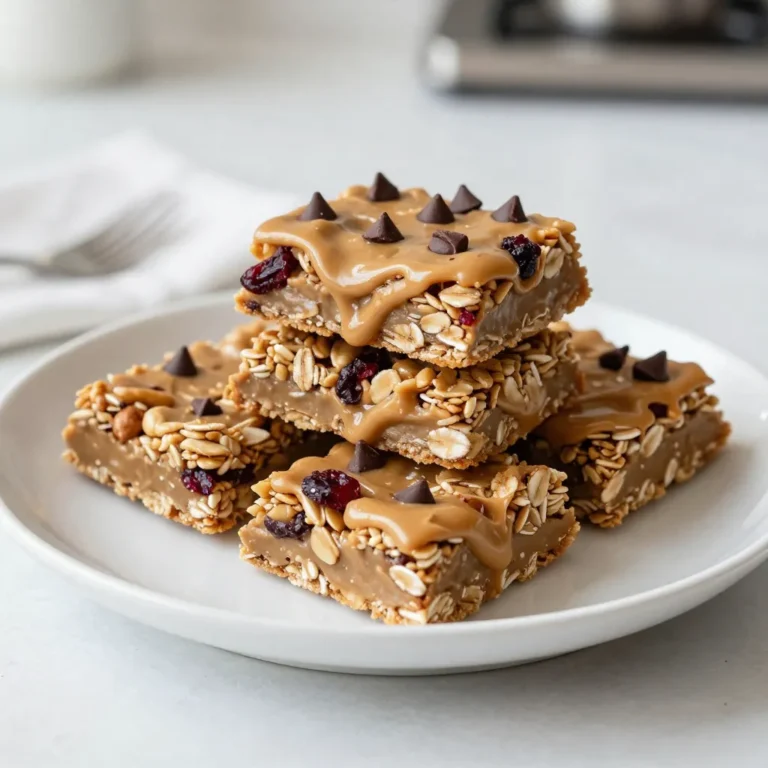
![- 1 cup cherries, pitted and chopped - 1 cup unsweetened applesauce - 1/2 cup peanut butter or almond butter - 1/2 cup honey or maple syrup - 1 teaspoon vanilla extract - 2 cups rolled oats - 1/2 cup chocolate protein powder - 1 teaspoon baking powder - 1/2 teaspoon baking soda - 1/4 teaspoon salt - 1/3 cup dark chocolate chips To make the best Cherry Chocolate Protein Muffins, you need fresh ingredients. Start with cherries. Choose ripe cherries for a sweet taste. Pitting and chopping them helps mix them into the batter easily. Next, use unsweetened applesauce. It adds moisture and replaces some fat. This keeps the muffins light and fluffy. If you prefer a nutty flavor, choose between peanut butter or almond butter. Both work well. For sweetness, you can pick honey or maple syrup. Each adds a unique flavor. Don’t forget the vanilla extract. It enhances the overall taste. Now, let’s talk about the dry ingredients. Rolled oats add texture and fiber. They also help bind the muffins. The chocolate protein powder is key for a protein boost. It makes these muffins a healthy snack. Add baking powder and baking soda for lift. This ensures your muffins rise well. Lastly, sprinkle in some salt to balance the sweetness. The dark chocolate chips are the fun part. They melt in the oven and create pockets of gooey chocolate. This makes every bite a treat! For the full recipe, check out the instructions in the next section. Enjoy every step of making these delicious muffins! 1. First, preheat your oven to 350°F (175°C). This step is key to baking muffins evenly. 2. Prepare your muffin tin by lining it with paper liners. You can also lightly grease each cup to help prevent sticking. 3. In a large mixing bowl, combine the unsweetened applesauce, your choice of nut butter, honey, and vanilla extract. Mix well with a whisk or spatula until smooth. 4. Now, it’s time to fold in the chopped cherries. Gently stir them into the wet mixture. Make sure they spread evenly throughout the batter. 5. In another bowl, whisk together the rolled oats, chocolate protein powder, baking powder, baking soda, and salt. This mix will give your muffins a nice rise. 6. Gradually add the dry mix to the wet mixture. Fold them together gently, being careful not to overmix. Overmixing can make your muffins tough. 7. Next, fold in the dark chocolate chips. Ensure they are well-distributed, so you get a chocolate burst in every bite. 8. Use a spoon or an ice cream scoop to pour the batter into the muffin tin. Fill each cup about 2/3 full to allow room for rising. 9. Bake the muffins in your preheated oven for 18-20 minutes. Check for doneness by inserting a toothpick into the center. If it comes out clean, they are ready! 10. Once baked, remove the muffins and let them cool in the tin for 5 minutes. Then, transfer them to a wire rack to cool completely. This step helps keep the texture light and fluffy. For the full recipe, check out the details above. Enjoy your delicious Cherry Chocolate Protein Muffins! To make the best Cherry Chocolate Protein Muffins, avoid overmixing the batter. Overmixing can lead to tough muffins. Mix just until the dry and wet ingredients combine. This keeps your muffins light and fluffy. Measuring ingredients accurately is also key. Use dry measuring cups for solids like oats and protein powder. For liquids, use a liquid measuring cup. This ensures you add the right amounts for great results. I love serving these muffins warm. They taste best right out of the oven. A light dusting of powdered sugar or a drizzle of melted dark chocolate adds a special touch. You can also pair them with Greek yogurt for extra protein and creaminess. For a balanced meal, enjoy these muffins with a side of fruit. Slices of banana or a handful of berries can brighten your plate and add freshness. These muffins are packed with health benefits. Protein powder offers a great source of protein. It helps build and repair muscles. This makes them perfect for post-workout snacks. Cherries are rich in antioxidants. They help fight inflammation and support heart health. Oats provide fiber, which is good for digestion. They also keep you feeling full longer, making these muffins a smart choice for any time of day. For the complete recipe, check out the [Full Recipe]. {{image_4}} You can make Cherry Chocolate Protein Muffins gluten-free by using certified gluten-free oats. Almond flour also works well here. For a vegan option, replace honey with maple syrup. Use a vegan protein powder to keep it plant-based. This way, everyone can enjoy these tasty muffins, no matter their diet. - Gluten-free: Use gluten-free oats and almond flour. - Vegan: Swap honey for maple syrup and use vegan protein powder. Spicing up your muffins can add a fun twist. Try adding 1 teaspoon of cinnamon or nutmeg to the mix. This small change can bring warmth and depth to the flavor. You might also want to mix in nuts or seeds. Chopped walnuts or sunflower seeds can add crunch and nutrition to your muffins. - Spices: Add 1 teaspoon of cinnamon or nutmeg. - Nuts or seeds: Incorporate chopped walnuts or sunflower seeds. You can customize these muffins with fruits that are in season. In summer, try adding blueberries or peaches. In fall, diced apples or pumpkin puree would be delightful. Different types of chocolate can also change the taste. Dark chocolate, milk chocolate, or even white chocolate can make the muffins exciting and unique. - Seasonal fruits: Use blueberries in summer or apples in fall. - Chocolate types: Experiment with dark, milk, or white chocolate. To keep your Cherry Chocolate Protein Muffins fresh, follow these simple steps: - Allow the muffins to cool completely before storage. - Use an airtight container to maintain moisture. - Place parchment paper between layers to avoid sticking. I find that glass containers work best because they help keep the muffins soft and fresh. Freezing muffins is a great way to enjoy them later. Here’s how to do it: - Allow the muffins to cool fully. - Wrap each muffin in plastic wrap or aluminum foil, then place them in a freezer bag. - Label the bag with the date for easy tracking. When you’re ready to eat, thaw the muffins by leaving them out at room temperature. For quicker results, pop them in the microwave for about 20 seconds. This method keeps them moist and tasty. Cherry Chocolate Protein Muffins can last: - At room temperature: 3 to 4 days in an airtight container. - In the fridge: 1 week if stored properly. This means you can enjoy these muffins without worry for several days! Remember to check for freshness before eating. Enjoy your delicious snacks! Can I make these muffins ahead of time? Yes, you can make these muffins ahead of time. They store well for a few days. Just make sure to keep them in an airtight container. You can also freeze them for longer storage. What can I use instead of protein powder? If you don't have protein powder, you can use ground oats or almond flour. This will change the texture a bit but keeps the muffins tasty. You might need to adjust the liquid in the recipe. How can I reduce sugar in the recipe? To cut down on sugar, use less honey or maple syrup. You can also swap in a sugar substitute like stevia. This will help keep the sweetness but lower the sugar content. Is it possible to use fresh cherries instead of frozen? Yes, fresh cherries work great too! Just chop them up and remove the pits. Fresh cherries can add a nice burst of flavor. They may make the muffins a bit moister, so keep an eye on baking time. What is the protein content per muffin? Each muffin has about 7 grams of protein. This comes mainly from the protein powder and nut butter. It makes a healthy snack or breakfast option. Are these muffins suitable for kids? Absolutely! These muffins are great for kids. They are tasty and packed with nutrients. Plus, the chocolate bits make them fun to eat. In this article, we explored how to make delicious Cherry Chocolate Protein Muffins. We covered ingredients, step-by-step instructions, and tips for perfecting the recipe. You learned how to store these muffins and adapt them for different diets. These muffins are not just tasty; they offer health benefits too. Experiment with flavors and enjoy them as snacks or meals. Now, grab your ingredients and start baking your own batch today!](https://goldendishy.com/wp-content/uploads/2025/07/bcf12119-4bc4-4824-810e-f617231ac2e7-768x768.webp)

![To make these healthy pumpkin muffins, you will need: - 1 cup canned pumpkin puree - 1/2 cup Greek yogurt - 1/3 cup honey or maple syrup - 1/4 cup coconut oil, melted - 2 large eggs - 1 teaspoon vanilla extract - 1 1/2 cups whole wheat flour - 1 teaspoon baking powder - 1/2 teaspoon baking soda - 1 teaspoon ground cinnamon - 1/2 teaspoon ground nutmeg - 1/4 teaspoon ground ginger - 1/4 teaspoon salt - 1/2 cup chopped walnuts or pecans (optional) - 1/2 cup dark chocolate chips (optional) These ingredients come together to create a moist and flavorful muffin. Pumpkin adds natural sweetness and moisture, while Greek yogurt gives it a light texture. Whole wheat flour boosts fiber content, making these muffins a healthier choice. You can easily swap some ingredients for healthier options: - Instead of whole wheat flour, try almond flour for a gluten-free version. - Use unsweetened applesauce in place of honey or maple syrup to cut sugar. - Replace coconut oil with unsweetened mashed banana for a lower-fat option. - Use flax eggs instead of regular eggs for a vegan version. These substitutions help enhance the health benefits without losing flavor. Each swap keeps the muffins light and tasty. To make these muffins even more special, consider adding in: - 1/2 cup chopped nuts for a crunchy texture. - 1/2 cup dark chocolate chips for a sweet surprise. - Dried fruit like cranberries or raisins for added sweetness. - A sprinkle of pumpkin seeds on top for a nutty taste. These add-ins can enhance the flavor and make your muffins unique. Feel free to get creative and mix in your favorite ingredients. You can find the complete details in the Full Recipe for Healthy Pumpkin Muffins. Start by preheating your oven to 350°F (175°C). This helps the muffins bake evenly. Line your muffin tin with paper liners or lightly spray it with non-stick spray. In a large bowl, mix together the pumpkin puree, Greek yogurt, honey (or maple syrup), melted coconut oil, eggs, and vanilla extract. Stir until smooth and creamy. Make sure every ingredient is well blended. In another bowl, sift the whole wheat flour, baking powder, baking soda, ground cinnamon, nutmeg, ginger, and salt. This step helps distribute the leavening agents and spices evenly. Now, slowly add the dry ingredients to the wet mixture. Stir gently just until blended. Avoid overmixing. This keeps the muffins light and fluffy. If you want, fold in the chopped walnuts or pecans and dark chocolate chips for extra flavor. Pour the batter into the muffin cups. Fill each cup about two-thirds full to allow the muffins to rise. Place the muffin tin in the preheated oven. Bake for 18-20 minutes. To check if the muffins are done, insert a toothpick into the center of one muffin. If it comes out clean, they are ready. Let the muffins cool in the tin for about 5 minutes. Then, transfer them to a wire rack to cool completely. Enjoy your healthy pumpkin muffins! For the complete recipe, check [Full Recipe]. To get the best muffin texture, mix your wet and dry ingredients gently. Overmixing can cause dense muffins. I recommend folding the dry mix into the wet mix until you see no flour pockets. This method keeps your muffins light and fluffy. Also, use room-temperature ingredients. They blend better and help the muffins rise. Store your muffins in an airtight container. This keeps them moist and fresh. If you plan to eat them in a few days, place a slice of bread in the container. The bread helps absorb excess moisture, which keeps muffins from getting soggy. For added freshness, keep them in the fridge. Freezing muffins is a great way to save them for later. Allow them to cool completely, then wrap each muffin in plastic wrap. Place them in a freezer bag, squeezing out as much air as possible. They stay fresh for up to three months. When you're ready to eat one, thaw it at room temperature or warm it in the microwave. Enjoy your delicious pumpkin muffins anytime! For the full recipe, check out the detailed guide above. {{image_4}} You can easily make these muffins gluten-free. Use 1 ½ cups of gluten-free flour blend. Look for blends that include xanthan gum for the best results. Mix the dry ingredients just like in the original recipe. The muffins still taste great and stay moist! To make vegan pumpkin muffins, swap the eggs for flax eggs. Mix 1 tablespoon of ground flaxseed with 2.5 tablespoons of water for each egg. Let it sit for about 5 minutes to thicken. Replace Greek yogurt with a plant-based yogurt. Use maple syrup instead of honey for sweetness. The muffins will be just as tasty without any animal products! You can cut back on sugar or use sugar-free options. Replace honey or maple syrup with a sugar substitute, like erythritol or stevia. You can also reduce the amount of sweetener by a third. This keeps your muffins light without losing flavor. Feel free to add more spices for extra taste! For the full recipe, check out Pumpkin Spice Delight Muffins 🥮. To keep your pumpkin muffins fresh, store them in an airtight container. This helps prevent them from drying out. You can also place a slice of bread inside the container. The bread will help keep the muffins moist. If you want to keep them for longer, consider freezing them. Wrap each muffin tightly in plastic wrap, then place them in a freezer bag. This keeps them safe from freezer burn. When kept at room temperature, these muffins stay fresh for about 2-3 days. If you place them in the fridge, they can last up to a week. For longer storage, freeze them. In the freezer, they can last for about 2-3 months. Just make sure to label the bag with the date, so you remember when you made them. To enjoy your leftover muffins, you can reheat them in the microwave. Heat them for about 10-15 seconds. This warms them up nicely without drying them out. If you prefer a crispier texture, pop them in the oven at 350°F (175°C) for about 5-7 minutes. This will make the tops nice and crunchy. If you want to add a little extra flavor, spread a bit of butter or cream cheese on top before reheating. Enjoy these delicious treats again! Yes, you can use fresh pumpkin. Start by roasting a pumpkin until it’s soft. Scoop out the flesh and mash it until smooth. This fresh pumpkin gives a vibrant taste and rich texture. Just remember, you need about the same amount as the canned puree. Pumpkin muffins are healthy for many reasons. First, pumpkin is full of vitamins, especially vitamin A. It also has fiber, which helps your digestion. Using whole wheat flour adds more nutrients and fiber than white flour. Greek yogurt keeps the muffins moist while adding protein and cutting down on fat. Honey or maple syrup provides natural sweetness without refined sugar. To lower the fat in these muffins, you can replace coconut oil with unsweetened applesauce. Applesauce keeps the muffins moist while cutting fat. You can also use egg whites instead of whole eggs. This change reduces fat while still providing structure. Another tip is to skip the nuts or chocolate chips, or use less. These simple swaps can help you enjoy delicious muffins with less fat. For the complete recipe, check out the Full Recipe. Healthy pumpkin muffins are easy to make and enjoy. We covered key ingredients, like whole grains and spices. You can swap ingredients for healthier choices, too. I shared steps for mixing the batter and baking. Tips for perfect texture and storage help keep them fresh. Variations like gluten-free and vegan options make these muffins fit everyone's diet. In the end, these muffins are tasty and good for you. Enjoy making them in your kitchen!](https://goldendishy.com/wp-content/uploads/2025/07/7aede86b-29cc-40d2-aae7-1e9b0f50f077-768x768.webp)