Lemon Garlic Roasted Brussels Sprouts Simple and Tasty
If you’re looking for a simple and tasty side dish, Lemon Garlic Roasted Brussels Sprouts are perfect for you. These sprouts are packed with flavor and a touch of tanginess. Plus, they are easy to make! In this post, I’ll share the ingredients, step-by-step instructions, and helpful tips to master this delicious dish. Trust me, your dinner guests will ask for seconds! Ready to dive in? Let’s get started!
Ingredients
Complete list of ingredients for Lemon Garlic Roasted Brussels Sprouts
To make Lemon Garlic Roasted Brussels Sprouts, gather these items:
– 1 lb Brussels sprouts, trimmed and halved
– 3 tablespoons extra-virgin olive oil
– 4 cloves fresh garlic, minced
– Zest of 1 medium lemon
– 2 tablespoons freshly squeezed lemon juice
– 1 teaspoon honey (or maple syrup for a vegan option)
– Sea salt and freshly ground black pepper to taste
– ¼ teaspoon red pepper flakes (optional, for a spicy kick)
– Fresh parsley, finely chopped (for garnish)
Substitutions for essential ingredients
If you can’t find an ingredient, here are some easy swaps:
– Use regular olive oil instead of extra-virgin.
– Garlic powder can replace fresh garlic in a pinch.
– Lime juice works if you don’t have lemon juice.
– Maple syrup can substitute honey for sweetness.
Optional add-ins for enhanced flavor
Want to make this dish even tastier? Here are some fun extras:
– Add grated Parmesan cheese for a rich flavor.
– Toss in cooked bacon bits for a savory touch.
– Mix in some sliced almonds for crunch.
– Try adding a splash of balsamic vinegar for depth.Enjoy cooking!
Step-by-Step Instructions
Preheating the oven and preparing the baking sheet
Start by preheating your oven to 400°F (200°C). This heat is perfect for roasting. While the oven warms up, grab a rimmed baking sheet. This will catch any drips and keep your oven clean.
How to prep and season Brussels sprouts
Take 1 pound of Brussels sprouts and trim the ends. Cut each sprout in half. Place them in a large bowl. Add 3 tablespoons of extra-virgin olive oil. Toss in 4 minced garlic cloves and the zest of one lemon. Pour in 2 tablespoons of fresh lemon juice and 1 teaspoon of honey. The honey adds a nice touch. Season with sea salt and black pepper. If you like heat, add ¼ teaspoon of red pepper flakes. Mix everything well until the sprouts are coated nicely.
Roasting process: Timing and techniques
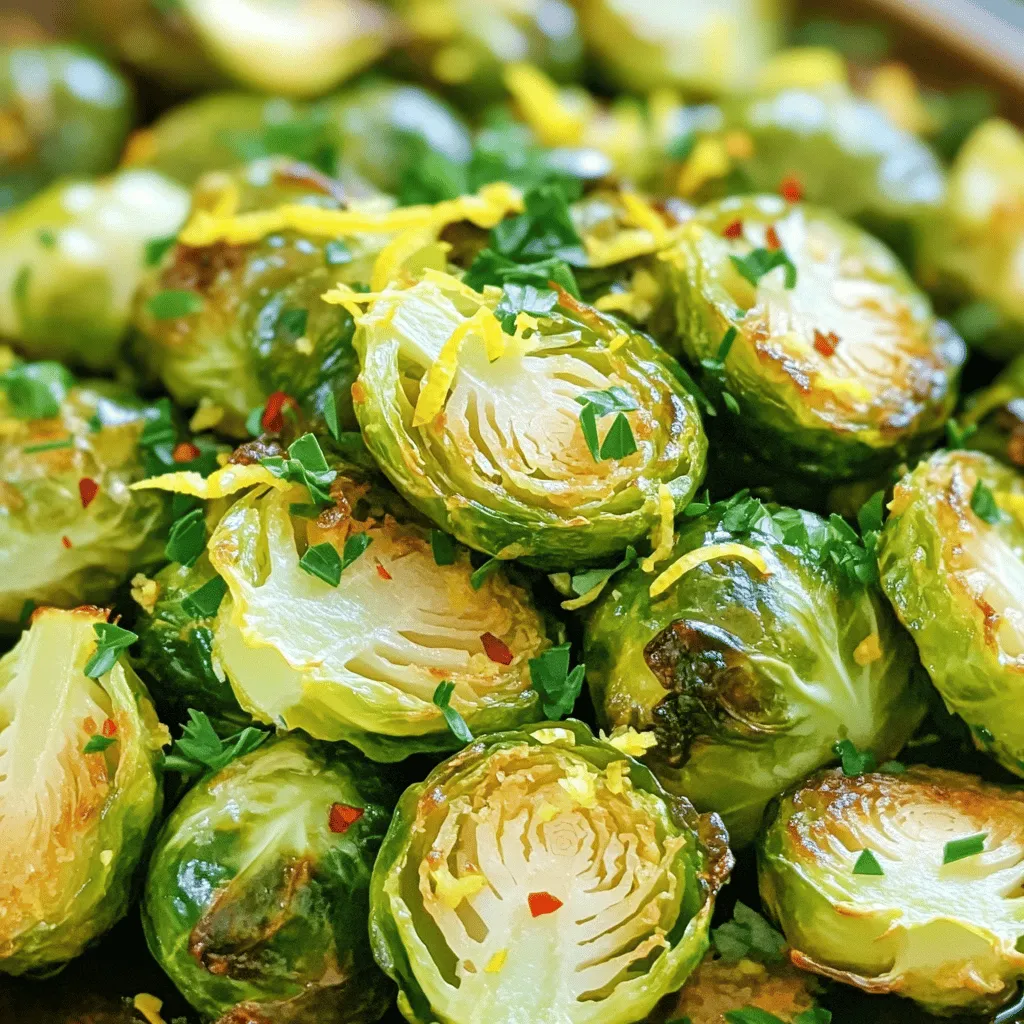
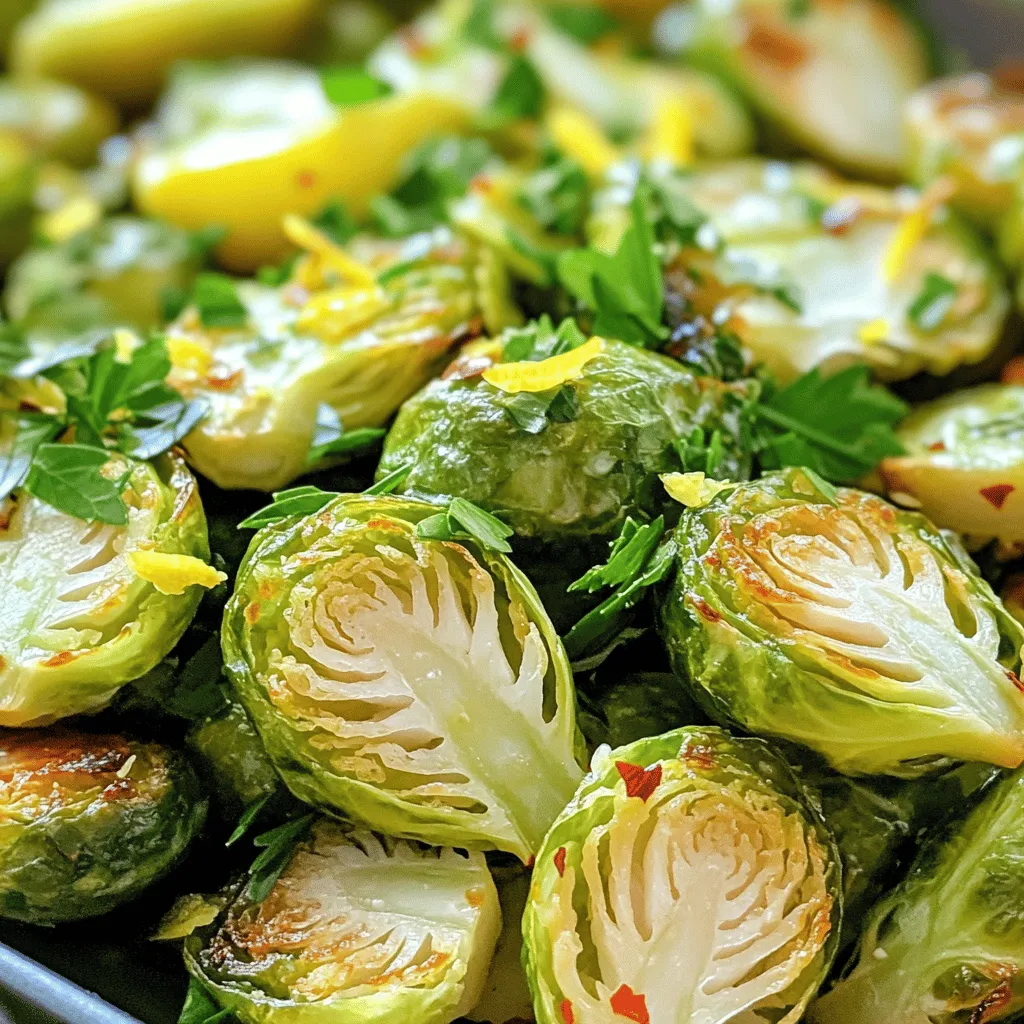
Spread the Brussels sprouts on the prepared baking sheet. Make sure they are in a single layer. This helps them roast evenly. Place the sheet in the oven and roast for 25 to 30 minutes. Halfway through, stir the sprouts. This helps them get that nice golden-brown color. Check for doneness when they look crispy on the edges and tender inside. Let them cool for a few minutes before serving. Transfer to a dish and sprinkle with fresh parsley for a pop of color.
Tips & Tricks
How to achieve crispy Brussels sprouts
To get crispy Brussels sprouts, follow these steps. First, dry the sprouts well after washing. Any moisture can make them soggy. Next, use enough olive oil to coat them, but don’t drown them. A light drizzle works best. Spread them out on the baking sheet. Crowding the pan traps steam and keeps them soft. Finally, roast them until they are golden brown. This takes about 25 to 30 minutes at 400°F (200°C). Stir them halfway through to help them crisp up evenly.
Common mistakes to avoid when roasting
One common mistake is not trimming the sprouts properly. Make sure to trim the ends and remove any yellow leaves. Another mistake is skipping the seasoning. Salt and pepper are key to enhancing the flavor. Don’t forget the garlic and lemon; they add a bright taste. Lastly, don’t rush the roasting. Keep an eye on them, but let them cook long enough to get that nice char.
Suggestions for pairing and serving
Lemon garlic roasted Brussels sprouts pair well with many dishes. Try them with roasted chicken or grilled fish for a complete meal. They also work great as a side for pasta dishes. For a fresh twist, serve them with lemon wedges to squeeze on top just before eating. You can also add grated Parmesan for a rich flavor. For a fun touch, sprinkle pomegranate seeds on top for color and sweetness.
Variations
Vegan and gluten-free adaptations
You can easily make this dish vegan and gluten-free. Just swap honey for maple syrup. Use gluten-free soy sauce if you want a savory twist. The rest stays the same. This way, everyone can enjoy the zesty flavor.
Alternative flavor profiles
Want to change up the taste? Try balsamic vinegar for a sweet tang. Just drizzle it over the sprouts before roasting. You can also sprinkle Parmesan cheese on top after cooking for a rich flavor. Both options give a new twist to this classic dish.
Seasonal variations using different vegetables
Feel free to mix in other veggies for variety. Try carrots, sweet potatoes, or cauliflower. These can roast alongside the Brussels sprouts. Just keep an eye on cooking times. Each season brings fresh options, so get creative and enjoy!
Storage Info
Proper cooling and storing guidelines
After cooking your Brussels sprouts, let them cool to room temperature. This step helps avoid condensation, which can make them soggy. Once cool, place them in an airtight container. They stay fresh in the fridge for about 3 to 5 days. Be sure to keep the container tightly sealed to lock in flavor.
Reheating tips to maintain texture and flavor
When reheating, avoid the microwave if possible. Microwaving can make Brussels sprouts mushy. Instead, use the oven or a skillet. Preheat your oven to 350°F (175°C) and spread the sprouts on a baking sheet. Heat for about 10-15 minutes. If using a skillet, add a bit of olive oil over medium heat and stir frequently until warm. This helps keep them crispy and tasty.
Freezing options for longer storage
To freeze, first cool the Brussels sprouts completely. Then, arrange them in a single layer on a baking sheet. Freeze for about an hour until firm. After that, transfer them to a freezer bag. They can stay frozen for up to 3 months. When you’re ready to eat, you can roast them directly from frozen. Just add a few extra minutes to the cooking time. For the best flavor, use them in soups or stir-fries after thawing.
FAQs
How long do Brussels sprouts take to roast?
Brussels sprouts take about 25 to 30 minutes to roast at 400°F (200°C). They need this time to become crispy on the outside and tender on the inside. Roasting them evenly is key, so remember to stir them halfway through. This ensures they brown nicely and don’t burn.
Can I make Lemon Garlic Roasted Brussels Sprouts ahead of time?
Yes, you can make Lemon Garlic Roasted Brussels sprouts ahead of time. You can roast them, let them cool, and then store them in an airtight container. They stay fresh in the fridge for up to 3 days. When you are ready to eat, just reheat them in the oven or a skillet. This way, you save time on busy days.
What to serve with Lemon Garlic Roasted Brussels Sprouts?
Lemon Garlic Roasted Brussels sprouts go well with many dishes. You can serve them with grilled chicken or fish for a healthy meal. They also pair nicely with quinoa or brown rice for a filling vegetarian dish. If you want something lighter, serve them with a fresh salad. These sprouts add a tasty twist to any meal.
This blog post covered how to make Lemon Garlic Roasted Brussels Sprouts. We discussed the ingredients, including key substitutions and optional add-ins for more flavor. I shared step-by-step instructions for prepping, seasoning, and roasting. You learned tips for crispy results and common mistakes to avoid. We also explored variations for different diets and flavor profiles, along with storage tips.
These sprouts are not only tasty but also easy to make. Enjoy your cooking adventures!


![- 4 large eggs - 1 ripe avocado, mashed - 2 tablespoons Greek yogurt - 1 tablespoon Dijon mustard - 1 small red onion, finely chopped - 1 celery stalk, finely chopped - 1 tablespoon fresh lemon juice - 1 tablespoon fresh dill, chopped (or 1 teaspoon dried dill) - Salt and pepper to taste Gather these simple ingredients for a creamy and flavorful dish. The eggs provide protein, while the avocado brings richness. Greek yogurt adds a tangy creaminess that makes this salad stand out. Don't forget the Dijon mustard for a zesty kick. The red onion and celery add crunch and flavor. The fresh lemon juice brightens the dish and keeps it fresh. Dill offers a wonderful herbal note that complements the other flavors. For the full recipe, you can check out my detailed guide on making Avocado Egg Salad. This dish is not just easy but also very satisfying. Enjoy the blend of textures and tastes in every bite! - Place eggs in a saucepan with cold water. - Bring to a boil, then simmer for 9-12 minutes. Boiling eggs is simple. The cold water helps cook them evenly. If you like your yolks soft, aim for 9 minutes. For firmer yolks, 12 minutes works best. - Transfer to a bowl of ice water. - Peel under running water. After boiling, cool the eggs fast. The ice water stops the cooking. Let them sit for about 5-7 minutes. When peeling, run the eggs under water. This helps the shell come off easily. - Combine mashed avocado, Greek yogurt, Dijon mustard, and lemon juice. In a mixing bowl, mash the ripe avocado. Add Greek yogurt for creaminess, Dijon mustard for kick, and lemon juice for zest. Mix until smooth and creamy. - Add chopped eggs, onion, celery, and dill. - Fold gently to combine. Now, add the chopped eggs, onion, celery, and dill to the avocado mix. Use a spatula to fold everything together. Be gentle so the eggs stay in chunks. That’s how you get the perfect texture. For the full recipe, check out the details above! To make the best Avocado Egg Salad, start with the eggs. For a soft yolk, boil for 9 minutes. For a firm yolk, go for 12 minutes. Timing is key! After boiling, cool the eggs quickly. An ice bath is great for this. It stops the eggs from cooking further and makes peeling easy. For that rich and creamy texture, I use Greek yogurt instead of mayo. Greek yogurt adds protein and a tangy taste. If you want even more creaminess, check your avocado. A perfectly ripe avocado will give a smooth texture. If it's too firm, let it ripen a bit. Spice it up! A pinch of paprika or a dash of cayenne can add a kick. Fresh herbs can also change the game. Try adding dill, parsley, or chives for a flavor boost. Each herb brings a unique taste and aroma that makes this dish shine. These tips will help you create a delicious Avocado Egg Salad. For the complete recipe, check the [Full Recipe]. Enjoy your cooking! {{image_4}} You can easily swap ingredients to fit your diet. To make it vegan, use chickpeas instead of eggs. Just mash them up and mix well. They provide a nice texture and protein. For a lighter option, substitute Greek yogurt with low-fat yogurt. This keeps the salad creamy while cutting down on calories. Want to spice things up? Try adding diced bell peppers. They add crunch and a pop of color. You can also sprinkle in spices like paprika or garlic powder. These enhance the flavor and give your salad a unique twist. Experimenting with different herbs can also elevate your dish. How you serve this salad makes a big difference. You can spread it on toast or crackers for a quick snack. It also works great as a filling for sandwiches or wraps. This makes it perfect for lunch or picnics. You can even serve it in lettuce leaves for a light meal. Each option offers a new way to enjoy your creamy, flavorful dish. For the full recipe, check out Avocado Egg Salad with a Zesty Twist. To keep your avocado egg salad fresh, store it in the fridge. Use an airtight container to prevent air from spoiling the ingredients. This salad stays good for about 2-3 days. After that, the avocado may brown, and the flavor might fade. Always check for any off smells or changes in texture before eating leftovers. Freezing avocado egg salad is not recommended. The texture of avocado changes when frozen. If you freeze it, it may become mushy once thawed. Instead, prepare only what you need. If you have to freeze it, use an airtight container. This will help protect it from freezer burn. This salad is best served cold. If you must reheat it, do so gently. Use a microwave on low power for a short time. Stir it frequently to help maintain its texture. However, I suggest enjoying it cold for the best flavor and creaminess. If you want to mix things up, serve it on toasted bread or in a wrap. Enjoy the zesty taste! Yes, you can make Avocado Egg Salad ahead of time. It tastes even better after chilling. To prepare in advance, follow these tips: - Cook and cool the eggs, then chop them. - Mix the avocado, yogurt, mustard, and lemon juice. - Combine right before serving to keep the eggs fresh. - Store in an airtight container in the fridge for up to 24 hours. If you want creaminess, here are some substitutes: - Sour cream for a tangy flavor. - Silken tofu if you prefer a vegan option. - Cream cheese for a rich texture. Each option will change the taste a bit, so choose what you like best. To check if your avocado is ripe, look for these signs: - The skin should be dark green or black. - Gently press the avocado; it should yield slightly. - If it feels hard, it’s not ripe yet. Choose avocados that feel soft but not too mushy for the best results. Yes, store-bought mayonnaise works well in this recipe. Use it if you prefer a classic taste. Here’s how: - Replace Greek yogurt with an equal amount of mayo. - Mix it with the avocado and mustard for a creamy blend. This will give your egg salad a rich flavor. To make Avocado Egg Salad fit dietary needs, try these suggestions: - For nut-free, just stick to the original recipe. - For lactose-free, use a dairy-free yogurt or mayo. - For vegan, swap eggs with mashed chickpeas for protein. These options keep your dish tasty and inclusive. In this blog post, I shared a simple recipe for Avocado Egg Salad. We reviewed key ingredients, including eggs, avocado, and Greek yogurt. You learned steps to boil and mix the ingredients perfectly. I also offered tips for adding flavor and making dietary swaps. This dish is fun, healthy, and easy to make. Try it your way and enjoy the flavors! Whether you eat it in a wrap or on toast, it will be a hit. Prepare it fresh or store leftovers; you won't regret it.](https://goldendishy.com/wp-content/uploads/2025/06/e93c3c70-9342-49f9-9c4a-33a1a85bd889-768x768.webp)