Healthy Chicken Lettuce Wraps Tasty and Simple Dish
![- 1 lb ground chicken - 1 tablespoon olive oil - 1 red bell pepper, diced - 1 carrot, grated - 3 green onions, finely chopped - 2 cloves garlic, minced - 1 tablespoon fresh ginger, grated - 3 tablespoons low-sodium soy sauce - 1 tablespoon rice vinegar - 1 tablespoon sesame oil - 1 tablespoon honey - Salt and pepper to taste - 1 head of butter lettuce or iceberg lettuce, leaves carefully separated - Optional toppings: chopped almonds, fresh cilantro, shredded coconut I love cooking with ground chicken. It cooks fast and takes on great flavors. Olive oil helps to keep the chicken moist. Fresh vegetables add color and crunch to the wraps. I use red bell pepper, carrot, and green onions for taste and texture. Aromatics like garlic and ginger bring warmth and depth to the dish. They make the kitchen smell amazing while cooking. For the sauce, I mix low-sodium soy sauce, rice vinegar, sesame oil, and honey. This gives the wraps a sweet and savory kick. I prefer using butter or iceberg lettuce for the wraps. They provide a nice, crisp bite. You can also add toppings like chopped almonds or fresh cilantro. These add extra flavor and crunch. For a touch of sweetness, consider shredded coconut. For the full recipe, check out the details I provided earlier. Enjoy making these tasty, healthy chicken lettuce wraps! 1. Heating the Oil: Start by adding olive oil to a large skillet. Heat it over medium until it shimmers. 2. Cooking the Chicken: Add ground chicken to the skillet. Cook it for about 5-7 minutes, stirring often, until it turns brown. Break up any large clumps with a spatula. 3. Adding Aromatics: Stir in minced garlic and grated ginger. Sauté for 1-2 minutes until the garlic turns a light gold and the smell fills the kitchen. 4. Incorporating Vegetables: Toss in diced red bell pepper and grated carrot. Sauté for 3-4 minutes, or until the veggies soften nicely. 1. Whisking the Sauce Ingredients Together: In a small bowl, whisk together the soy sauce, rice vinegar, sesame oil, and honey. Mix until it's smooth. 2. Combining Sauce with Chicken and Veggies: Pour the sauce over the chicken and veggie mixture in the skillet. Stir well to coat everything. Cook for another 2-3 minutes until heated through. 3. Finishing with Green Onions: Remove the skillet from heat. Gently fold in chopped green onions for a fresh kick. 1. Spoon Chicken Filling into Lettuce Leaves: Take a lettuce leaf and spoon in a generous amount of the chicken mix. 2. Adding Optional Toppings for Extra Flavor: For added flavor, sprinkle chopped almonds, fresh cilantro, or shredded coconut on top. This method creates a fun and tasty meal that’s easy to make. For the full recipe, check the earlier section. To prevent the chicken from becoming dry, cook it over medium heat. Stir often and break up clumps. This helps it brown evenly and stay juicy. For chopping vegetables, use a sharp knife. Dice the red bell pepper and grate the carrot into thin pieces. This makes them blend well in the wraps and adds great texture. For plating, arrange the filled lettuce wraps on a colorful platter. Add some lime wedges and extra cilantro around them. This creates a vibrant look that is sure to impress. Ideal sides for your wraps include brown rice or a light salad. You could also serve a soy dipping sauce for added flavor. To make ahead, cook the chicken filling and store it in an airtight container. You can keep it in the fridge for up to three days. When reheating, use a microwave or a skillet. Heat it slowly to keep the chicken moist. Always check the temperature; it should be hot all the way through. For the [Full Recipe], follow the detailed steps for a delicious meal. {{image_4}} You can switch up the protein in your wraps. Turkey works well instead of chicken. Ground turkey has a similar taste and texture. If you want a plant-based option, use lentils or mushrooms. They add a nice, hearty feel to your dish. Ground beef or shrimp can also shine in these wraps. Just adjust your cooking time for each protein. Adding different sauces can change the whole meal. For a spicy kick, try adding sriracha or chili paste. You can also mix in some hot sauce for extra heat. If you like sweet flavors, swap honey for maple syrup or agave. Different vinegars can change the taste too. Try apple cider vinegar for a fruity twist or balsamic vinegar for a rich flavor. You can explore new veggies in your wraps. Bell peppers, carrots, and green onions are great, but don’t stop there! Try zucchini, shredded cabbage, or even corn. They add color and crunch. Adding spices like cumin or coriander can boost flavor. Fresh herbs, like basil or mint, can add a bright taste. The more you mix and match, the more fun your wraps will be! For the full recipe, check here. To keep your chicken filling fresh, store it in an airtight container. This will lock in flavor and moisture. Place the chicken in the fridge right after it cools. It can stay good for about 3 to 4 days. For the lettuce, wrap the leaves in a damp paper towel. Then, place them in a plastic bag. This helps keep them crisp and fresh for about 2 to 3 days. Yes, you can freeze the chicken filling! It’s best to freeze it in a sturdy container or bag. Make sure to remove as much air as possible. The filling can last up to 3 months in the freezer. When you’re ready to eat, thaw the chicken in the fridge overnight. Reheat it in a skillet over medium heat until hot. This keeps the flavor and texture nice. Cooked chicken can be safely stored in the fridge for 3 to 4 days. Always check for signs of spoilage before eating. If the chicken smells off or has a slimy texture, it’s best to throw it away. Freshness is key to enjoying your Healthy Chicken Lettuce Wraps. For the best taste, eat them as soon as possible! Enjoy the full recipe for more guidance on this dish. You can add heat in several ways. Use crushed red pepper flakes for a kick. Sriracha or chili sauce also works well. If you like fresh heat, add sliced jalapeños. For a smoky flavor, try smoked paprika. Adjust the amount based on your spice level. Each option adds a unique twist to your wraps. Yes, you can use regular soy sauce. However, it has more salt than low-sodium options. This will change the flavor, making it saltier. If you're watching your sodium intake, low-sodium is better. You might need to cut back on other salty ingredients too. Always taste as you go to avoid over-salting. Chicken lettuce wraps have many health benefits. Ground chicken is lean and high in protein. The fresh vegetables add vitamins and minerals. Lettuce is low in calories and high in fiber, which aids digestion. Using low-sodium soy sauce helps keep sodium levels in check. This meal is light yet filling, making it a great choice. To make the wraps vegan, swap ground chicken for plant-based meat. You can use lentils, chickpeas, or tofu as great options. Replace honey with maple syrup or agave for sweetness. Use tamari instead of soy sauce for a gluten-free option. With these changes, you can enjoy a tasty vegan version of the dish. For the complete recipe, check out the Full Recipe. Healthy chicken lettuce wraps are simple and tasty. We covered key ingredients like ground chicken, fresh veggies, and flavorful sauces. The step-by-step guide helps you cook and assemble them perfectly. Tips on meal prep and variations let you get creative. In the end, you can enjoy a delicious dish tailored to your taste. These wraps are healthy, fun, and easy to make. Make them for a light dinner or a snack! Enjoy your cooking adventure!](https://goldendishy.com/wp-content/uploads/2025/06/f37706c1-09e0-4508-86ce-50d139ffc9b7.webp)
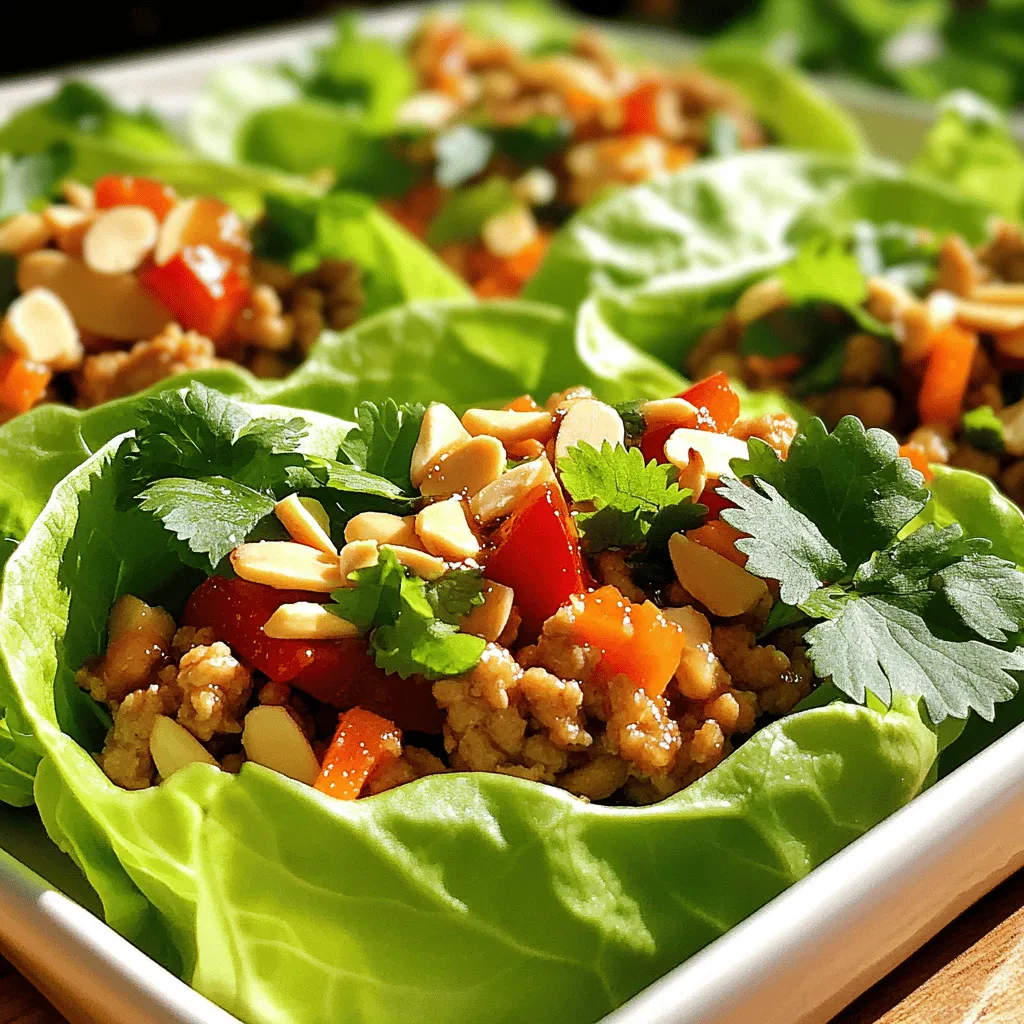
Looking for a quick and healthy meal that packs a punch? Dive into my recipe for Healthy Chicken Lettuce Wraps! This tasty dish brings together savory ground chicken, fresh veggies, and a simple sauce, all wrapped in crisp lettuce leaves. Not only is it easy to make, but it’s also a fun and light option for lunch or dinner. Let’s get cooking and enjoy a delicious meal that your taste buds will love!
Ingredients
Main Ingredients for Healthy Chicken Lettuce Wraps
– 1 lb ground chicken
– 1 tablespoon olive oil
– 1 red bell pepper, diced
– 1 carrot, grated
– 3 green onions, finely chopped
– 2 cloves garlic, minced
– 1 tablespoon fresh ginger, grated
– 3 tablespoons low-sodium soy sauce
– 1 tablespoon rice vinegar
– 1 tablespoon sesame oil
– 1 tablespoon honey
– Salt and pepper to taste
– 1 head of butter lettuce or iceberg lettuce, leaves carefully separated
– Optional toppings: chopped almonds, fresh cilantro, shredded coconut
I love cooking with ground chicken. It cooks fast and takes on great flavors. Olive oil helps to keep the chicken moist. Fresh vegetables add color and crunch to the wraps. I use red bell pepper, carrot, and green onions for taste and texture.
Aromatics like garlic and ginger bring warmth and depth to the dish. They make the kitchen smell amazing while cooking. For the sauce, I mix low-sodium soy sauce, rice vinegar, sesame oil, and honey. This gives the wraps a sweet and savory kick.
I prefer using butter or iceberg lettuce for the wraps. They provide a nice, crisp bite. You can also add toppings like chopped almonds or fresh cilantro. These add extra flavor and crunch. For a touch of sweetness, consider shredded coconut.Enjoy making these tasty, healthy chicken lettuce wraps!
Step-by-Step Instructions
Preparation and Cooking
1. Heating the Oil: Start by adding olive oil to a large skillet. Heat it over medium until it shimmers.
2. Cooking the Chicken: Add ground chicken to the skillet. Cook it for about 5-7 minutes, stirring often, until it turns brown. Break up any large clumps with a spatula.
3. Adding Aromatics: Stir in minced garlic and grated ginger. Sauté for 1-2 minutes until the garlic turns a light gold and the smell fills the kitchen.
4. Incorporating Vegetables: Toss in diced red bell pepper and grated carrot. Sauté for 3-4 minutes, or until the veggies soften nicely.
Sauce Preparation and Final Mixing
1. Whisking the Sauce Ingredients Together: In a small bowl, whisk together the soy sauce, rice vinegar, sesame oil, and honey. Mix until it’s smooth.
2. Combining Sauce with Chicken and Veggies: Pour the sauce over the chicken and veggie mixture in the skillet. Stir well to coat everything. Cook for another 2-3 minutes until heated through.
3. Finishing with Green Onions: Remove the skillet from heat. Gently fold in chopped green onions for a fresh kick.
Assembling the Wraps
1. Spoon Chicken Filling into Lettuce Leaves: Take a lettuce leaf and spoon in a generous amount of the chicken mix.
2. Adding Optional Toppings for Extra Flavor: For added flavor, sprinkle chopped almonds, fresh cilantro, or shredded coconut on top.
This method creates a fun and tasty meal that’s easy to make.
Tips & Tricks
Cooking Tips
To prevent the chicken from becoming dry, cook it over medium heat. Stir often and break up clumps. This helps it brown evenly and stay juicy.
For chopping vegetables, use a sharp knife. Dice the red bell pepper and grate the carrot into thin pieces. This makes them blend well in the wraps and adds great texture.
Presentation and Serving
For plating, arrange the filled lettuce wraps on a colorful platter. Add some lime wedges and extra cilantro around them. This creates a vibrant look that is sure to impress.
Ideal sides for your wraps include brown rice or a light salad. You could also serve a soy dipping sauce for added flavor.
Meal Prep Advice
To make ahead, cook the chicken filling and store it in an airtight container. You can keep it in the fridge for up to three days.
When reheating, use a microwave or a skillet. Heat it slowly to keep the chicken moist. Always check the temperature; it should be hot all the way through.
Variations
Different Proteins to Use
You can switch up the protein in your wraps. Turkey works well instead of chicken. Ground turkey has a similar taste and texture. If you want a plant-based option, use lentils or mushrooms. They add a nice, hearty feel to your dish. Ground beef or shrimp can also shine in these wraps. Just adjust your cooking time for each protein.
Flavored Sauces
Adding different sauces can change the whole meal. For a spicy kick, try adding sriracha or chili paste. You can also mix in some hot sauce for extra heat. If you like sweet flavors, swap honey for maple syrup or agave. Different vinegars can change the taste too. Try apple cider vinegar for a fruity twist or balsamic vinegar for a rich flavor.
Additional Ingredients
You can explore new veggies in your wraps. Bell peppers, carrots, and green onions are great, but don’t stop there! Try zucchini, shredded cabbage, or even corn. They add color and crunch. Adding spices like cumin or coriander can boost flavor. Fresh herbs, like basil or mint, can add a bright taste. The more you mix and match, the more fun your wraps will be!
Storage Info
Storing Leftovers
To keep your chicken filling fresh, store it in an airtight container. This will lock in flavor and moisture. Place the chicken in the fridge right after it cools. It can stay good for about 3 to 4 days. For the lettuce, wrap the leaves in a damp paper towel. Then, place them in a plastic bag. This helps keep them crisp and fresh for about 2 to 3 days.
Freezing Instructions
Yes, you can freeze the chicken filling! It’s best to freeze it in a sturdy container or bag. Make sure to remove as much air as possible. The filling can last up to 3 months in the freezer. When you’re ready to eat, thaw the chicken in the fridge overnight. Reheat it in a skillet over medium heat until hot. This keeps the flavor and texture nice.
Shelf Life Details
Cooked chicken can be safely stored in the fridge for 3 to 4 days. Always check for signs of spoilage before eating. If the chicken smells off or has a slimy texture, it’s best to throw it away. Freshness is key to enjoying your Healthy Chicken Lettuce Wraps. For the best taste, eat them as soon as possible!
FAQs
How do I make Healthy Chicken Lettuce Wraps more spicy?
You can add heat in several ways. Use crushed red pepper flakes for a kick. Sriracha or chili sauce also works well. If you like fresh heat, add sliced jalapeños. For a smoky flavor, try smoked paprika. Adjust the amount based on your spice level. Each option adds a unique twist to your wraps.
Can I use regular soy sauce instead of low-sodium?
Yes, you can use regular soy sauce. However, it has more salt than low-sodium options. This will change the flavor, making it saltier. If you’re watching your sodium intake, low-sodium is better. You might need to cut back on other salty ingredients too. Always taste as you go to avoid over-salting.
What are the health benefits of chicken lettuce wraps?
Chicken lettuce wraps have many health benefits. Ground chicken is lean and high in protein. The fresh vegetables add vitamins and minerals. Lettuce is low in calories and high in fiber, which aids digestion. Using low-sodium soy sauce helps keep sodium levels in check. This meal is light yet filling, making it a great choice.
How do I make the wraps vegan?
To make the wraps vegan, swap ground chicken for plant-based meat. You can use lentils, chickpeas, or tofu as great options. Replace honey with maple syrup or agave for sweetness. Use tamari instead of soy sauce for a gluten-free option. With these changes, you can enjoy a tasty vegan version of the dish.
Healthy chicken lettuce wraps are simple and tasty. We covered key ingredients like ground chicken, fresh veggies, and flavorful sauces. The step-by-step guide helps you cook and assemble them perfectly. Tips on meal prep and variations let you get creative.
In the end, you can enjoy a delicious dish tailored to your taste. These wraps are healthy, fun, and easy to make. Make them for a light dinner or a snack! Enjoy your cooking adventure!
![- 1 lb ground chicken - 1 tablespoon olive oil - 1 red bell pepper, diced - 1 carrot, grated - 3 green onions, finely chopped - 2 cloves garlic, minced - 1 tablespoon fresh ginger, grated - 3 tablespoons low-sodium soy sauce - 1 tablespoon rice vinegar - 1 tablespoon sesame oil - 1 tablespoon honey - Salt and pepper to taste - 1 head of butter lettuce or iceberg lettuce, leaves carefully separated - Optional toppings: chopped almonds, fresh cilantro, shredded coconut I love cooking with ground chicken. It cooks fast and takes on great flavors. Olive oil helps to keep the chicken moist. Fresh vegetables add color and crunch to the wraps. I use red bell pepper, carrot, and green onions for taste and texture. Aromatics like garlic and ginger bring warmth and depth to the dish. They make the kitchen smell amazing while cooking. For the sauce, I mix low-sodium soy sauce, rice vinegar, sesame oil, and honey. This gives the wraps a sweet and savory kick. I prefer using butter or iceberg lettuce for the wraps. They provide a nice, crisp bite. You can also add toppings like chopped almonds or fresh cilantro. These add extra flavor and crunch. For a touch of sweetness, consider shredded coconut. For the full recipe, check out the details I provided earlier. Enjoy making these tasty, healthy chicken lettuce wraps! 1. Heating the Oil: Start by adding olive oil to a large skillet. Heat it over medium until it shimmers. 2. Cooking the Chicken: Add ground chicken to the skillet. Cook it for about 5-7 minutes, stirring often, until it turns brown. Break up any large clumps with a spatula. 3. Adding Aromatics: Stir in minced garlic and grated ginger. Sauté for 1-2 minutes until the garlic turns a light gold and the smell fills the kitchen. 4. Incorporating Vegetables: Toss in diced red bell pepper and grated carrot. Sauté for 3-4 minutes, or until the veggies soften nicely. 1. Whisking the Sauce Ingredients Together: In a small bowl, whisk together the soy sauce, rice vinegar, sesame oil, and honey. Mix until it's smooth. 2. Combining Sauce with Chicken and Veggies: Pour the sauce over the chicken and veggie mixture in the skillet. Stir well to coat everything. Cook for another 2-3 minutes until heated through. 3. Finishing with Green Onions: Remove the skillet from heat. Gently fold in chopped green onions for a fresh kick. 1. Spoon Chicken Filling into Lettuce Leaves: Take a lettuce leaf and spoon in a generous amount of the chicken mix. 2. Adding Optional Toppings for Extra Flavor: For added flavor, sprinkle chopped almonds, fresh cilantro, or shredded coconut on top. This method creates a fun and tasty meal that’s easy to make. For the full recipe, check the earlier section. To prevent the chicken from becoming dry, cook it over medium heat. Stir often and break up clumps. This helps it brown evenly and stay juicy. For chopping vegetables, use a sharp knife. Dice the red bell pepper and grate the carrot into thin pieces. This makes them blend well in the wraps and adds great texture. For plating, arrange the filled lettuce wraps on a colorful platter. Add some lime wedges and extra cilantro around them. This creates a vibrant look that is sure to impress. Ideal sides for your wraps include brown rice or a light salad. You could also serve a soy dipping sauce for added flavor. To make ahead, cook the chicken filling and store it in an airtight container. You can keep it in the fridge for up to three days. When reheating, use a microwave or a skillet. Heat it slowly to keep the chicken moist. Always check the temperature; it should be hot all the way through. For the [Full Recipe], follow the detailed steps for a delicious meal. {{image_4}} You can switch up the protein in your wraps. Turkey works well instead of chicken. Ground turkey has a similar taste and texture. If you want a plant-based option, use lentils or mushrooms. They add a nice, hearty feel to your dish. Ground beef or shrimp can also shine in these wraps. Just adjust your cooking time for each protein. Adding different sauces can change the whole meal. For a spicy kick, try adding sriracha or chili paste. You can also mix in some hot sauce for extra heat. If you like sweet flavors, swap honey for maple syrup or agave. Different vinegars can change the taste too. Try apple cider vinegar for a fruity twist or balsamic vinegar for a rich flavor. You can explore new veggies in your wraps. Bell peppers, carrots, and green onions are great, but don’t stop there! Try zucchini, shredded cabbage, or even corn. They add color and crunch. Adding spices like cumin or coriander can boost flavor. Fresh herbs, like basil or mint, can add a bright taste. The more you mix and match, the more fun your wraps will be! For the full recipe, check here. To keep your chicken filling fresh, store it in an airtight container. This will lock in flavor and moisture. Place the chicken in the fridge right after it cools. It can stay good for about 3 to 4 days. For the lettuce, wrap the leaves in a damp paper towel. Then, place them in a plastic bag. This helps keep them crisp and fresh for about 2 to 3 days. Yes, you can freeze the chicken filling! It’s best to freeze it in a sturdy container or bag. Make sure to remove as much air as possible. The filling can last up to 3 months in the freezer. When you’re ready to eat, thaw the chicken in the fridge overnight. Reheat it in a skillet over medium heat until hot. This keeps the flavor and texture nice. Cooked chicken can be safely stored in the fridge for 3 to 4 days. Always check for signs of spoilage before eating. If the chicken smells off or has a slimy texture, it’s best to throw it away. Freshness is key to enjoying your Healthy Chicken Lettuce Wraps. For the best taste, eat them as soon as possible! Enjoy the full recipe for more guidance on this dish. You can add heat in several ways. Use crushed red pepper flakes for a kick. Sriracha or chili sauce also works well. If you like fresh heat, add sliced jalapeños. For a smoky flavor, try smoked paprika. Adjust the amount based on your spice level. Each option adds a unique twist to your wraps. Yes, you can use regular soy sauce. However, it has more salt than low-sodium options. This will change the flavor, making it saltier. If you're watching your sodium intake, low-sodium is better. You might need to cut back on other salty ingredients too. Always taste as you go to avoid over-salting. Chicken lettuce wraps have many health benefits. Ground chicken is lean and high in protein. The fresh vegetables add vitamins and minerals. Lettuce is low in calories and high in fiber, which aids digestion. Using low-sodium soy sauce helps keep sodium levels in check. This meal is light yet filling, making it a great choice. To make the wraps vegan, swap ground chicken for plant-based meat. You can use lentils, chickpeas, or tofu as great options. Replace honey with maple syrup or agave for sweetness. Use tamari instead of soy sauce for a gluten-free option. With these changes, you can enjoy a tasty vegan version of the dish. For the complete recipe, check out the Full Recipe. Healthy chicken lettuce wraps are simple and tasty. We covered key ingredients like ground chicken, fresh veggies, and flavorful sauces. The step-by-step guide helps you cook and assemble them perfectly. Tips on meal prep and variations let you get creative. In the end, you can enjoy a delicious dish tailored to your taste. These wraps are healthy, fun, and easy to make. Make them for a light dinner or a snack! Enjoy your cooking adventure!](https://goldendishy.com/wp-content/uploads/2025/06/f37706c1-09e0-4508-86ce-50d139ffc9b7-300x300.webp)

![- 1 lb Brussels sprouts, cleaned and halved - 3 tablespoons extra virgin olive oil - 4 cloves garlic, finely minced - 1/2 cup freshly grated Parmesan cheese - Zest of 1 lemon - 1/2 teaspoon red pepper flakes (optional for heat) - Fresh parsley for garnish - Sea salt and freshly cracked black pepper When I make Garlic Parmesan Brussels sprouts, I always start with the basics. Fresh Brussels sprouts are key. I buy about a pound and clean them well. Halving them helps them cook evenly and adds texture. Next, I add extra virgin olive oil. It coats the sprouts and gives them a rich flavor. I use about three tablespoons. Garlic is a must. Four cloves of finely minced garlic bring a great kick to the dish. Parmesan cheese is what makes these sprouts shine. I use half a cup of freshly grated cheese. The cheese melts and creates a tasty crust when roasted. For extra brightness, I often add zest from one lemon. It lifts the flavors and adds a fresh note. If you like heat, a half teaspoon of red pepper flakes gives the dish a spicy kick. Lastly, I season with sea salt and freshly cracked black pepper. These simple seasonings enhance the flavor without overpowering it. Don't forget to garnish with fresh parsley for a pop of color. This combination of ingredients makes a flavorful side dish that everyone will love. For the full recipe, check out the details above. - Preheat oven to 400°F (200°C). - Prepare a baking sheet with parchment paper. First, you want to make your oven hot. This helps cook the Brussels sprouts fast. The parchment paper makes cleanup simple and helps them roast better. - Mix Brussels sprouts with olive oil, garlic, and seasonings. Take your cleaned and halved Brussels sprouts and put them in a big bowl. Add the olive oil, minced garlic, sea salt, and black pepper. Toss everything together. Make sure each sprout gets coated nicely. This mix gives them great flavor. - Spread Brussels sprouts on the baking sheet. - Roast for 20 minutes, stirring halfway through. Now, spread the Brussels sprouts out on the baking sheet. Keep them in a single layer to roast evenly. Set the timer for 20 minutes, but remember to stir them halfway. This helps them get golden and crispy all over. - Add Parmesan cheese and return to oven for additional 5-7 minutes. - Garnish with parsley before serving. After roasting, take them out and sprinkle the grated Parmesan cheese on top. You can also add lemon zest and red pepper flakes if you like some heat. Put them back in the oven for 5-7 minutes. This melts the cheese and makes it bubbly. Once done, take them out and garnish with parsley. Serve them warm for the best taste. For the full details, check the Full Recipe. To get great Brussels sprouts, keep them in a single layer. This helps them cook evenly. If you crowd them, they will steam instead of roast. Stir them halfway through cooking. This ensures every side gets that nice, crispy brown. Want to brighten the dish? Add lemon zest before serving. It gives a fresh taste that pairs well with the savory flavors. You can also try different cheeses. Parmesan is great, but Pecorino Romano adds a nice twist. One common mistake is overcrowding the baking sheet. This leads to uneven cooking. Also, watch your cooking time. Undercooking makes them tough, while overcooking turns them mushy. Follow the recipe closely for the best results. For the full recipe, check out the details above. {{image_4}} To switch up the taste, try using different cheeses. Pecorino Romano adds a salty, sharp flavor. It brings a new twist to the dish. If you want a vegan option, use nutritional yeast. It gives a cheesy flavor without dairy. Plus, it's packed with nutrients! Adding protein can make your dish heartier. Toss in crispy bacon or pancetta for a savory touch. Their rich flavor pairs well with the sprouts. You can also add cooked chicken pieces. This makes the dish more filling and satisfying. For a vegetarian option, substitute the cheese with vegan alternatives. There are many great cheese substitutes that melt well. Use plant-based oil for roasting instead of olive oil. This keeps the dish fully vegan while still being delicious. For the full recipe, check out Garlic Parmesan Brussels Sprouts Delight! Store your Garlic Parmesan Brussels Sprouts in an airtight container. Refrigerating them helps keep their flavor fresh. They are best eaten within 3-5 days for optimal taste and texture. To restore crispiness, reheat the sprouts in the oven. Set your oven to 350°F (175°C) and bake for about 10-15 minutes. If you're in a hurry, you can use the microwave. However, be aware that the texture may suffer a bit. You can freeze Brussels sprouts before roasting for long-term storage. This way, they maintain their flavor. To reheat, simply thaw them first, then roast as per the [Full Recipe]. This will help you enjoy them fresh and tasty! To make your Brussels sprouts crispy, follow these tips: - Use high heat: Roasting at 400°F (200°C) gives the best results. - Spread them out: Place Brussels sprouts in a single layer on your baking sheet. - Don’t overcrowd: Give them room to breathe, which helps them roast better. - Toss halfway: Stir them at the halfway point of roasting for even browning. - Add cheese last: Sprinkle Parmesan cheese towards the end of the cooking time so it melts but does not burn. Yes, you can prepare Brussels sprouts in advance. Here’s how: - Clean and cut: Clean and halve the Brussels sprouts the day before. - Store properly: Keep them in an airtight container in the fridge. - Roast fresh: When ready to eat, toss them with oil and seasonings, and roast right before serving. Garlic Parmesan Brussels sprouts go well with many dishes. Here are a few: - Roasted chicken: The savory flavors complement crispy chicken well. - Grilled steak: The rich flavors of steak pair nicely with the sprouts. - Pasta dishes: They add a fresh, crunchy element to creamy pastas. Yes, Brussels sprouts are very healthy! They are: - Low in calories: Great for weight management. - High in fiber: Good for digestion. - Rich in vitamins: They provide vitamin C, vitamin K, and folate. Plus, they have antioxidants that help your body fight disease. Yes, you can use frozen Brussels sprouts. Here are some tips: - Thaw first: Thaw them completely before cooking for even roasting. - Pat dry: Remove moisture with a paper towel to help them crisp up. - Adjust cooking time: You may need to roast them a bit longer to achieve the same crispiness. For the full recipe, check out Garlic Parmesan Brussels Sprouts Delight. Garlic Parmesan Brussels sprouts are simple to make and full of flavor. We covered essential ingredients like fresh Brussels sprouts, olive oil, and cheese. You learned step-by-step how to prepare, toss, and roast them. Plus, I shared tips for perfecting your dish and variations to keep it exciting. Remember, the key to great Brussels sprouts is even cooking and the right flavors. Take your time to enjoy this healthy side dish. You’ll love the taste and how easy it is to make!](https://goldendishy.com/wp-content/uploads/2025/05/a403e98b-d04b-46c1-bd99-9a315ef16e11-768x768.webp)
![- 3 medium zucchinis, grated - 200g feta cheese, crumbled - 1 cup Greek yogurt Zucchini brings moisture and a light taste. Feta adds saltiness and creaminess. Greek yogurt keeps the pie rich and tangy. This trio creates a tasty base for the pie. - 1 cup all-purpose flour - 1 teaspoon baking powder - 1 teaspoon dried oregano - 1 teaspoon garlic powder - Salt and pepper to taste The flour gives the pie structure. Baking powder helps it rise and become fluffy. Oregano adds a hint of herb, while garlic powder brings depth. Salt and pepper enhance all the flavors. - 1 tablespoon olive oil (for greasing) - 1 tablespoon sesame seeds (for topping) - 1/2 cup fresh dill, chopped (optional for garnish) Olive oil keeps the pie from sticking. Sesame seeds add crunch and a nutty flavor. Fresh dill makes the dish pop with color and fragrance. You can skip the dill but it really brightens the pie. Explore the full recipe to get all the steps for this delightful dish! 1. Preheat the Oven: Set your oven to 180°C (350°F). This ensures your pie bakes evenly. 2. Grease the Pie Dish: Use 1 tablespoon of olive oil to lightly grease a round pie dish. This helps the pie not stick. 3. Drain the Zucchini: Grate 3 medium zucchinis and sprinkle them with salt. Let them sit for 10 minutes. Gather the zucchini in a clean kitchen towel and squeeze out the extra water. This step is key to avoiding a soggy pie. 1. Combine Wet Ingredients: In a separate bowl, whisk together 1 cup of Greek yogurt and 3 large eggs. Mix until smooth. 2. Add Dry Ingredients: To the wet mixture, add 200g of crumbled feta cheese, 1 cup of all-purpose flour, 1 teaspoon of baking powder, 1 teaspoon of dried oregano, and 1 teaspoon of garlic powder. Stir in the drained zucchini, then season with salt and pepper. 3. Mix Thoroughly: Use a spatula to combine everything well. You want a thick and smooth batter. 1. Transfer the Batter: Pour your zucchini mixture into the greased pie dish. Smooth the top with a spatula for an even layer. 2. Top with Sesame Seeds: Evenly sprinkle 1 tablespoon of sesame seeds across the top. This adds a nice crunch. 3. Baking Time and Temperature: Place the dish in the oven and bake for 35-40 minutes. The top should be golden brown and a toothpick inserted should come out clean. Follow these steps for a tasty Zucchini and Feta Pie! For the complete recipe, check out the [Full Recipe]. Draining Zucchini Effectively Draining zucchini is key for great texture. First, grate the zucchini and sprinkle a pinch of salt on top. Let it sit for 10 minutes. This step draws out excess moisture. Next, gather the zucchini in a clean kitchen towel. Squeeze hard to remove the water. This helps avoid a soggy pie. Avoiding Sogginess To keep your pie firm, use the drained zucchini right away. If you let it sit too long, it can release moisture again. Bake your pie soon after mixing. This keeps the crust crispy and the filling light. Seasoning Tips Zucchini can be mild, so season well. Use salt and pepper generously. Adding garlic powder brings warmth to the flavor. Dried oregano adds a nice herb taste. Feel free to experiment with spices! Optional Ingredients to Add Consider adding chopped onions for extra flavor. Fresh herbs like basil or parsley can brighten the dish. You can also mix in sun-dried tomatoes for a sweet touch. These additions can make your pie even more delicious. Pairing Suggestions Zucchini and feta pie pairs well with fresh salads. A simple green salad with lemon dressing works great. You can also serve it with a yogurt dip for a creamy contrast. Presentation Tips Cut the pie into wedges and place them on a colorful platter. Garnish with fresh dill for a pop of color. For an extra touch, add a dollop of Greek yogurt on the side. This adds creaminess and flavor. Enjoy sharing this tasty dish! {{image_4}} Alternative Cheeses You can easily swap feta cheese. Try goat cheese for a tangy twist. Ricotta adds creaminess and pairs well too. These options keep the dish flavorful and fun. Gluten-Free Options For a gluten-free version, replace all-purpose flour with almond flour or a gluten-free blend. This change maintains the pie's texture and taste, perfect for those avoiding gluten. Adding Fresh Herbs Fresh herbs can enhance your zucchini and feta pie. Basil, parsley, or chives are great choices. These herbs add brightness and depth to your dish. Just chop them finely and mix in before baking. Spices to Consider Consider adding spices for extra flavor. A pinch of cayenne pepper gives heat. Paprika adds smokiness, while cumin lends an earthy note. Experiment with these spices to find your favorite flavor combo. Hot vs. Cold This pie tastes great both hot and cold. Serve it warm right from the oven for a comforting meal. If you prefer, let it cool and serve at room temperature for a lighter option. Appetizer vs. Main Course You can serve zucchini and feta pie as an appetizer or a main dish. Cut it into small wedges for a fun starter. For a main course, pair it with a salad or roasted veggies to make a filling meal. - Refrigeration Tips: Store your zucchini and feta pie in the fridge. Let it cool completely first. Wrap it tightly in plastic wrap. This keeps it fresh for up to three days. You can also place it in an airtight container. This helps prevent moisture loss. - Best Containers to Use: Use glass or plastic containers that seal well. They help keep your pie tasting great. If you have a large piece, a pie dish with a lid is perfect. Just make sure it’s completely sealed to avoid drying out. - Oven vs. Microwave: The oven is best for reheating. Preheat it to 180°C (350°F). Place the pie on a baking sheet to catch any drips. Heat for about 10-15 minutes. This keeps the crust crispy. The microwave is quicker but can make the pie soggy. If you use the microwave, heat in short bursts, checking often. - Maintaining Texture: To keep the pie’s texture, cover it with foil in the oven. This helps it heat evenly. In the microwave, add a cup of water in the microwave. This adds moisture and helps avoid dryness. - How to Freeze Zucchini Pie: To freeze, wrap individual slices in plastic wrap. Then, place them in a freezer bag. Squeeze out the air before sealing. You can also freeze the whole pie. Just wrap it tightly in two layers of plastic wrap. - Thawing and Reheating: When ready to eat, thaw slices in the fridge overnight. For a whole pie, leave it on the counter for a few hours. Reheat using the oven to keep the crust crispy. Enjoy your tasty pie even after freezing! Yes, you can! Other veggies work well in this pie. Try adding spinach for a fresh taste. Bell peppers add a nice crunch. Grated carrots give a touch of sweetness. Just make sure the veggies are not too watery. Drain them like you do with zucchini. Definitely! Zucchini and feta pie is great for meal prep. Once cooled, slice it and store it in the fridge. Use an airtight container to keep it fresh. It lasts up to five days. This pie pairs well with a simple salad. A mixed green salad adds freshness. You can also serve it with a dollop of Greek yogurt. For drinks, try a light white wine or sparkling water. Check the top for a golden brown color. Insert a toothpick into the center. If it comes out clean, your pie is ready. If it’s still wet, bake it a few more minutes. Yes, you can! Prepare the pie and keep it in the fridge. Bake it the next day for fresh flavors. You can also freeze it before baking. Thaw overnight in the fridge before baking. For a complete guide, check the Full Recipe for all the details! Zucchini and Feta Pie is easy to make and full of flavor. We explored key ingredients, step-by-step instructions, and helpful tips for the best results. You can vary the recipe to fit your taste. Enjoy it hot or cold, as a main dish or appetizer. Proper storage keeps it fresh. With these insights, you can serve this dish with confidence. Try it out, and impress your family and friends with your skills. Happy cooking!](https://goldendishy.com/wp-content/uploads/2025/07/7ca7cda4-3dfb-4b99-98f1-545ca5d8f2b3-768x768.webp)