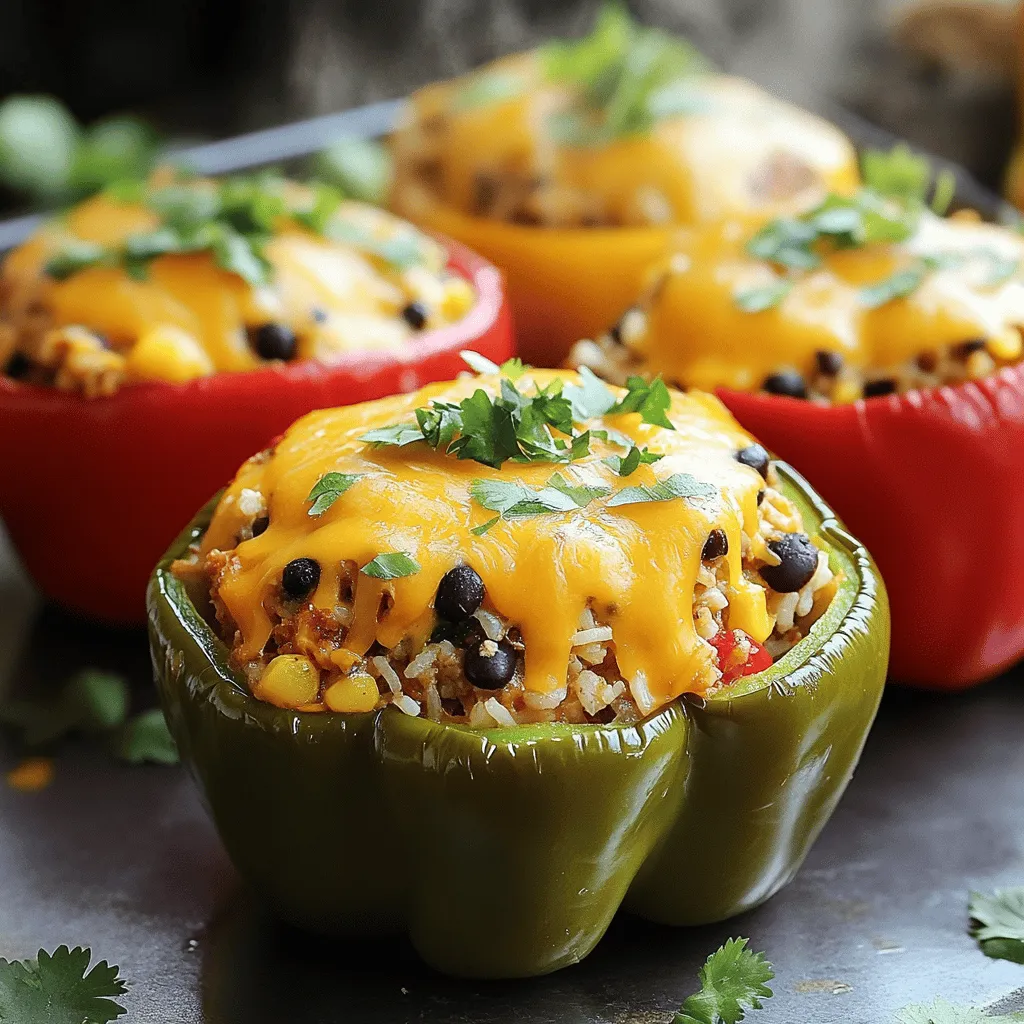
Chicken and Cheese Stuffed Peppers Tasty Family Meal
![- Bell Peppers: I like using large bell peppers. You can choose any color you like: red, yellow, or green. They all taste great! Make sure they are firm and fresh. Each pepper should hold the stuffing well. - Ground Chicken and Dairy: Ground chicken adds a light flavor. It cooks quickly and blends well with other ingredients. Pair it with shredded cheddar cheese for a creamy touch. The cheese melts beautifully, making the dish extra yummy. - Enhancing Ingredients: I always add cooked rice to the mix. It gives the dish a nice texture. Black beans are great too; they add protein and fiber. Corn brings sweetness and color. Together, these ingredients create a hearty filling. - Essential Spices: Be sure to use chili powder, ground cumin, garlic powder, and onion powder. These spices pack flavor into the filling. A sprinkle of salt and pepper brings everything together. - Optional Garnishes: Fresh cilantro adds a burst of flavor. It makes the dish look more vibrant. You can also use a dollop of sour cream for creaminess. - Recommended Sides: Serve the stuffed peppers with a simple salad. A side of rice or quinoa pairs well too. You can also add some tortilla chips for crunch. - Display Ideas: For a beautiful presentation, place each stuffed pepper on a plate. Drizzle a bit of olive oil on top for shine. Add some chopped cilantro for color. This makes the meal look as good as it tastes! For the complete recipe, check out the Full Recipe. 1. Preheat your oven to 375°F (190°C). This step is key for even cooking. 2. Grab four large bell peppers. Cut off the tops and remove the seeds. Rinse the insides to clean them well. 3. Lightly coat the outside of each pepper with olive oil. Stand them upright in a 9x13 inch baking dish. 1. Heat a skillet over medium heat. Add 1 pound of ground chicken to the pan. 2. Cook the chicken for 5-7 minutes. Stir and break it apart until it turns brown. 3. Once cooked, mix in 1 cup of cooked rice, 1 cup of rinsed black beans, and 1 cup of corn. 4. Add 3/4 cup of shredded cheddar cheese, 1 teaspoon of chili powder, 1 teaspoon of cumin, 1 teaspoon of garlic powder, and 1/2 teaspoon of onion powder. Season with salt and pepper to taste. Stir for 2-3 minutes. 1. Generously fill each bell pepper with the chicken and cheese mixture. Pack it well. 2. Sprinkle the remaining 1/4 cup of cheese on top of the stuffed peppers. 3. Cover the dish with aluminum foil to trap steam. Bake in the preheated oven for 30 minutes. 4. After 30 minutes, remove the foil. Continue baking for 10-15 minutes, until the cheese is bubbly and golden. 5. Check if the peppers are tender by piercing them with a fork. 6. Allow them to cool for a few minutes after baking. Optionally, garnish with fresh cilantro for extra flavor. For the complete recipe, check out the [Full Recipe]. What are common mistakes to avoid? One mistake is overcooking the chicken. Cook it just until it's brown. If you use too much salt, it can ruin the flavor. Taste your mixture before stuffing the peppers. How can you ensure even cooking? Make sure all your peppers are the same size. This will help them cook at the same rate. Cover them with foil for part of the baking time. This keeps the heat in and helps them cook through. What are some suggestions for adding extra flavor? Try adding diced tomatoes or jalapeños for a kick. You can also mix in some spices like paprika or cayenne pepper. Fresh herbs like parsley or basil can brighten the dish. What are some ingredient swaps for dietary preferences? For a lower-carb option, replace rice with cauliflower rice. Use ground turkey or tofu for a different protein. You can also swap cheddar cheese for a dairy-free cheese for a vegan option. What cooking methods can you use? You can air fry the stuffed peppers for a crispy texture. Just set the air fryer to 375°F and cook them for about 15-20 minutes. Grilling is another fun method. Just wrap the peppers in foil and place them on the grill. How do you maintain moisture in stuffed peppers? Add a splash of chicken broth to the bottom of the baking dish. This creates steam as they cook. Avoid overstuffing the peppers; too much filling can lead to dryness. For the full recipe, check out the recipe section above. {{image_4}} You can change the ground chicken in your stuffed peppers. Use ground turkey or beef instead. These meats add different flavors and textures. If you want a vegetarian option, try using quinoa or lentils. These ingredients pack a protein punch and keep the dish hearty. For a vegan twist, use a mix of beans and mushrooms. They add a nice texture and flavor. You can also use tofu crumbles, which absorb spices well. This makes your meal rich and filling while keeping it plant-based. You can spice up your stuffed peppers with different flavors. Why not try a Mexican twist? Add taco seasoning or jalapeños for heat. A dash of lime juice brightens the dish. If you love Italian flavors, mix in some Italian herbs like oregano or basil. You could also add marinara sauce to the filling. This creates a rich and comforting taste. Want a twist? Try adding olives, capers, or feta cheese. These ingredients bring unique textures and flavors. They turn a simple meal into something exciting. For those needing gluten-free meals, this recipe is easy to adapt. Use rice instead of breadcrumbs for filling. Always check labels on canned items like beans and corn. They should be gluten-free. If you follow a low-carb diet, you can swap rice for cauliflower rice. This keeps the dish light and low in carbs. You can also skip the beans to reduce carbs even more. These variations help everyone enjoy this tasty meal. No matter your diet, you can find a way to enjoy chicken and cheese stuffed peppers. After you make your chicken and cheese stuffed peppers, let them cool down. This helps keep them fresh. Store them in an airtight container. They will stay good in the fridge for about 3 to 4 days. If you have leftovers, try to eat them within this time. To reheat, place them in the oven or microwave until warm. If you want to keep your stuffed peppers for a longer time, freezing is a great option. First, let them cool completely. Wrap each pepper tightly with plastic wrap. Then, put them in a freezer bag or container. This helps avoid freezer burn. They can last up to 3 months in the freezer. When you're ready to eat, take them out and thaw in the fridge overnight. Reheat them in the oven at 375°F until hot. This will keep the flavors and textures intact. Meal prepping can save time on busy weeknights. You can prepare the filling ahead of time. Cook the chicken and mix in the rice, beans, and spices. Store this mixture in the fridge for 2 to 3 days. When you're ready, stuff the peppers and bake them. For batch cooking, consider making a double recipe. Freeze half for later. This way, you have a tasty meal ready whenever you need it. How do you know when stuffed peppers are done? You can tell when stuffed peppers are done by checking the peppers and cheese. The peppers should be tender and the cheese melted and bubbly. If you pierce a pepper with a fork, it should feel soft but not mushy. Can you prepare them in advance? Yes, you can prepare stuffed peppers in advance. Just stuff them and store them in the fridge. Bake them when you're ready to eat. This makes for a quick and easy family meal. Can I use frozen peppers? Yes, you can use frozen peppers. Just thaw them before stuffing. They may cook faster, so keep an eye on them while baking. What to do if I don't have certain ingredients? If you lack certain ingredients, feel free to swap them out. For example, use quinoa instead of rice or a different type of cheese. Get creative based on what you have! Can stuffed peppers be made on the stovetop? Yes, you can make stuffed peppers on the stovetop. Just steam them in a skillet with a little water. Cover with a lid and cook until tender. How to adjust heating times for different ovens? Oven temperatures can vary. If your oven runs hot, check the peppers a few minutes early. If it runs cool, you may need to add a few extra minutes. Always trust your instincts! We covered the best way to make stuffed peppers. You learned about key ingredients like bell peppers, ground chicken, and spices. You also discovered tips for cooking and storing them. There are many ways to adjust the recipe for different diets and tastes. Incorporating these ideas will make your dish delicious. Get creative with flavors and toppings. With practice, you'll master this easy meal for any occasion. Enjoy your cooking journey!](https://goldendishy.com/wp-content/uploads/2025/06/69b5c483-258e-4498-8701-d043fb5fc497.webp)
Looking for a family meal that packs flavor and nutrition? Chicken and Cheese Stuffed Peppers are the answer! They’re easy to make and fun to eat. With colorful bell peppers filled with ground chicken, rice, and a cheesy blend, your dinner just became a hit. Join me as I guide you through every step to create this delicious dish that will have everyone asking for seconds!
Ingredients
Key Ingredients Needed
– Bell Peppers: I like using large bell peppers. You can choose any color you like: red, yellow, or green. They all taste great! Make sure they are firm and fresh. Each pepper should hold the stuffing well.
– Ground Chicken and Dairy: Ground chicken adds a light flavor. It cooks quickly and blends well with other ingredients. Pair it with shredded cheddar cheese for a creamy touch. The cheese melts beautifully, making the dish extra yummy.
– Enhancing Ingredients: I always add cooked rice to the mix. It gives the dish a nice texture. Black beans are great too; they add protein and fiber. Corn brings sweetness and color. Together, these ingredients create a hearty filling.
Spices and Seasonings
– Essential Spices: Be sure to use chili powder, ground cumin, garlic powder, and onion powder. These spices pack flavor into the filling. A sprinkle of salt and pepper brings everything together.
– Optional Garnishes: Fresh cilantro adds a burst of flavor. It makes the dish look more vibrant. You can also use a dollop of sour cream for creaminess.
Serving Suggestions
– Recommended Sides: Serve the stuffed peppers with a simple salad. A side of rice or quinoa pairs well too. You can also add some tortilla chips for crunch.
– Display Ideas: For a beautiful presentation, place each stuffed pepper on a plate. Drizzle a bit of olive oil on top for shine. Add some chopped cilantro for color. This makes the meal look as good as it tastes!
Step-by-Step Instructions
Preparation
1. Preheat your oven to 375°F (190°C). This step is key for even cooking.
2. Grab four large bell peppers. Cut off the tops and remove the seeds. Rinse the insides to clean them well.
3. Lightly coat the outside of each pepper with olive oil. Stand them upright in a 9×13 inch baking dish.
Cooking the Filling
1. Heat a skillet over medium heat. Add 1 pound of ground chicken to the pan.
2. Cook the chicken for 5-7 minutes. Stir and break it apart until it turns brown.
3. Once cooked, mix in 1 cup of cooked rice, 1 cup of rinsed black beans, and 1 cup of corn.
4. Add 3/4 cup of shredded cheddar cheese, 1 teaspoon of chili powder, 1 teaspoon of cumin, 1 teaspoon of garlic powder, and 1/2 teaspoon of onion powder. Season with salt and pepper to taste. Stir for 2-3 minutes.
Stuffing and Baking
1. Generously fill each bell pepper with the chicken and cheese mixture. Pack it well.
2. Sprinkle the remaining 1/4 cup of cheese on top of the stuffed peppers.
3. Cover the dish with aluminum foil to trap steam. Bake in the preheated oven for 30 minutes.
4. After 30 minutes, remove the foil. Continue baking for 10-15 minutes, until the cheese is bubbly and golden.
5. Check if the peppers are tender by piercing them with a fork.
6. Allow them to cool for a few minutes after baking. Optionally, garnish with fresh cilantro for extra flavor.
Tips & Tricks
Perfecting the Recipe
What are common mistakes to avoid?
One mistake is overcooking the chicken. Cook it just until it’s brown. If you use too much salt, it can ruin the flavor. Taste your mixture before stuffing the peppers.
How can you ensure even cooking?
Make sure all your peppers are the same size. This will help them cook at the same rate. Cover them with foil for part of the baking time. This keeps the heat in and helps them cook through.
Enhancements
What are some suggestions for adding extra flavor?
Try adding diced tomatoes or jalapeños for a kick. You can also mix in some spices like paprika or cayenne pepper. Fresh herbs like parsley or basil can brighten the dish.
What are some ingredient swaps for dietary preferences?
For a lower-carb option, replace rice with cauliflower rice. Use ground turkey or tofu for a different protein. You can also swap cheddar cheese for a dairy-free cheese for a vegan option.
Cooking Techniques
What cooking methods can you use?
You can air fry the stuffed peppers for a crispy texture. Just set the air fryer to 375°F and cook them for about 15-20 minutes. Grilling is another fun method. Just wrap the peppers in foil and place them on the grill.
How do you maintain moisture in stuffed peppers?
Add a splash of chicken broth to the bottom of the baking dish. This creates steam as they cook. Avoid overstuffing the peppers; too much filling can lead to dryness.
Variations
Different Protein Options
You can change the ground chicken in your stuffed peppers. Use ground turkey or beef instead. These meats add different flavors and textures. If you want a vegetarian option, try using quinoa or lentils. These ingredients pack a protein punch and keep the dish hearty.
For a vegan twist, use a mix of beans and mushrooms. They add a nice texture and flavor. You can also use tofu crumbles, which absorb spices well. This makes your meal rich and filling while keeping it plant-based.
Flavor Profile Adjustments
You can spice up your stuffed peppers with different flavors. Why not try a Mexican twist? Add taco seasoning or jalapeños for heat. A dash of lime juice brightens the dish.
If you love Italian flavors, mix in some Italian herbs like oregano or basil. You could also add marinara sauce to the filling. This creates a rich and comforting taste.
Want a twist? Try adding olives, capers, or feta cheese. These ingredients bring unique textures and flavors. They turn a simple meal into something exciting.
Dietary Restrictions
For those needing gluten-free meals, this recipe is easy to adapt. Use rice instead of breadcrumbs for filling. Always check labels on canned items like beans and corn. They should be gluten-free.
If you follow a low-carb diet, you can swap rice for cauliflower rice. This keeps the dish light and low in carbs. You can also skip the beans to reduce carbs even more.
These variations help everyone enjoy this tasty meal. No matter your diet, you can find a way to enjoy chicken and cheese stuffed peppers.
Storage Info
Refrigeration Guidelines
After you make your chicken and cheese stuffed peppers, let them cool down. This helps keep them fresh. Store them in an airtight container. They will stay good in the fridge for about 3 to 4 days. If you have leftovers, try to eat them within this time. To reheat, place them in the oven or microwave until warm.
Freezing Instructions
If you want to keep your stuffed peppers for a longer time, freezing is a great option. First, let them cool completely. Wrap each pepper tightly with plastic wrap. Then, put them in a freezer bag or container. This helps avoid freezer burn. They can last up to 3 months in the freezer.
When you’re ready to eat, take them out and thaw in the fridge overnight. Reheat them in the oven at 375°F until hot. This will keep the flavors and textures intact.
Meal Prep Tips
Meal prepping can save time on busy weeknights. You can prepare the filling ahead of time. Cook the chicken and mix in the rice, beans, and spices. Store this mixture in the fridge for 2 to 3 days. When you’re ready, stuff the peppers and bake them.
For batch cooking, consider making a double recipe. Freeze half for later. This way, you have a tasty meal ready whenever you need it.
FAQs
Common Questions
How do you know when stuffed peppers are done?
You can tell when stuffed peppers are done by checking the peppers and cheese. The peppers should be tender and the cheese melted and bubbly. If you pierce a pepper with a fork, it should feel soft but not mushy.
Can you prepare them in advance?
Yes, you can prepare stuffed peppers in advance. Just stuff them and store them in the fridge. Bake them when you’re ready to eat. This makes for a quick and easy family meal.
Ingredient Concerns
Can I use frozen peppers?
Yes, you can use frozen peppers. Just thaw them before stuffing. They may cook faster, so keep an eye on them while baking.
What to do if I don’t have certain ingredients?
If you lack certain ingredients, feel free to swap them out. For example, use quinoa instead of rice or a different type of cheese. Get creative based on what you have!
Cooking Techniques
Can stuffed peppers be made on the stovetop?
Yes, you can make stuffed peppers on the stovetop. Just steam them in a skillet with a little water. Cover with a lid and cook until tender.
How to adjust heating times for different ovens?
Oven temperatures can vary. If your oven runs hot, check the peppers a few minutes early. If it runs cool, you may need to add a few extra minutes. Always trust your instincts!
We covered the best way to make stuffed peppers. You learned about key ingredients like bell peppers, ground chicken, and spices. You also discovered tips for cooking and storing them. There are many ways to adjust the recipe for different diets and tastes.
Incorporating these ideas will make your dish delicious. Get creative with flavors and toppings. With practice, you’ll master this easy meal for any occasion. Enjoy your cooking journey!
![- Bell Peppers: I like using large bell peppers. You can choose any color you like: red, yellow, or green. They all taste great! Make sure they are firm and fresh. Each pepper should hold the stuffing well. - Ground Chicken and Dairy: Ground chicken adds a light flavor. It cooks quickly and blends well with other ingredients. Pair it with shredded cheddar cheese for a creamy touch. The cheese melts beautifully, making the dish extra yummy. - Enhancing Ingredients: I always add cooked rice to the mix. It gives the dish a nice texture. Black beans are great too; they add protein and fiber. Corn brings sweetness and color. Together, these ingredients create a hearty filling. - Essential Spices: Be sure to use chili powder, ground cumin, garlic powder, and onion powder. These spices pack flavor into the filling. A sprinkle of salt and pepper brings everything together. - Optional Garnishes: Fresh cilantro adds a burst of flavor. It makes the dish look more vibrant. You can also use a dollop of sour cream for creaminess. - Recommended Sides: Serve the stuffed peppers with a simple salad. A side of rice or quinoa pairs well too. You can also add some tortilla chips for crunch. - Display Ideas: For a beautiful presentation, place each stuffed pepper on a plate. Drizzle a bit of olive oil on top for shine. Add some chopped cilantro for color. This makes the meal look as good as it tastes! For the complete recipe, check out the Full Recipe. 1. Preheat your oven to 375°F (190°C). This step is key for even cooking. 2. Grab four large bell peppers. Cut off the tops and remove the seeds. Rinse the insides to clean them well. 3. Lightly coat the outside of each pepper with olive oil. Stand them upright in a 9x13 inch baking dish. 1. Heat a skillet over medium heat. Add 1 pound of ground chicken to the pan. 2. Cook the chicken for 5-7 minutes. Stir and break it apart until it turns brown. 3. Once cooked, mix in 1 cup of cooked rice, 1 cup of rinsed black beans, and 1 cup of corn. 4. Add 3/4 cup of shredded cheddar cheese, 1 teaspoon of chili powder, 1 teaspoon of cumin, 1 teaspoon of garlic powder, and 1/2 teaspoon of onion powder. Season with salt and pepper to taste. Stir for 2-3 minutes. 1. Generously fill each bell pepper with the chicken and cheese mixture. Pack it well. 2. Sprinkle the remaining 1/4 cup of cheese on top of the stuffed peppers. 3. Cover the dish with aluminum foil to trap steam. Bake in the preheated oven for 30 minutes. 4. After 30 minutes, remove the foil. Continue baking for 10-15 minutes, until the cheese is bubbly and golden. 5. Check if the peppers are tender by piercing them with a fork. 6. Allow them to cool for a few minutes after baking. Optionally, garnish with fresh cilantro for extra flavor. For the complete recipe, check out the [Full Recipe]. What are common mistakes to avoid? One mistake is overcooking the chicken. Cook it just until it's brown. If you use too much salt, it can ruin the flavor. Taste your mixture before stuffing the peppers. How can you ensure even cooking? Make sure all your peppers are the same size. This will help them cook at the same rate. Cover them with foil for part of the baking time. This keeps the heat in and helps them cook through. What are some suggestions for adding extra flavor? Try adding diced tomatoes or jalapeños for a kick. You can also mix in some spices like paprika or cayenne pepper. Fresh herbs like parsley or basil can brighten the dish. What are some ingredient swaps for dietary preferences? For a lower-carb option, replace rice with cauliflower rice. Use ground turkey or tofu for a different protein. You can also swap cheddar cheese for a dairy-free cheese for a vegan option. What cooking methods can you use? You can air fry the stuffed peppers for a crispy texture. Just set the air fryer to 375°F and cook them for about 15-20 minutes. Grilling is another fun method. Just wrap the peppers in foil and place them on the grill. How do you maintain moisture in stuffed peppers? Add a splash of chicken broth to the bottom of the baking dish. This creates steam as they cook. Avoid overstuffing the peppers; too much filling can lead to dryness. For the full recipe, check out the recipe section above. {{image_4}} You can change the ground chicken in your stuffed peppers. Use ground turkey or beef instead. These meats add different flavors and textures. If you want a vegetarian option, try using quinoa or lentils. These ingredients pack a protein punch and keep the dish hearty. For a vegan twist, use a mix of beans and mushrooms. They add a nice texture and flavor. You can also use tofu crumbles, which absorb spices well. This makes your meal rich and filling while keeping it plant-based. You can spice up your stuffed peppers with different flavors. Why not try a Mexican twist? Add taco seasoning or jalapeños for heat. A dash of lime juice brightens the dish. If you love Italian flavors, mix in some Italian herbs like oregano or basil. You could also add marinara sauce to the filling. This creates a rich and comforting taste. Want a twist? Try adding olives, capers, or feta cheese. These ingredients bring unique textures and flavors. They turn a simple meal into something exciting. For those needing gluten-free meals, this recipe is easy to adapt. Use rice instead of breadcrumbs for filling. Always check labels on canned items like beans and corn. They should be gluten-free. If you follow a low-carb diet, you can swap rice for cauliflower rice. This keeps the dish light and low in carbs. You can also skip the beans to reduce carbs even more. These variations help everyone enjoy this tasty meal. No matter your diet, you can find a way to enjoy chicken and cheese stuffed peppers. After you make your chicken and cheese stuffed peppers, let them cool down. This helps keep them fresh. Store them in an airtight container. They will stay good in the fridge for about 3 to 4 days. If you have leftovers, try to eat them within this time. To reheat, place them in the oven or microwave until warm. If you want to keep your stuffed peppers for a longer time, freezing is a great option. First, let them cool completely. Wrap each pepper tightly with plastic wrap. Then, put them in a freezer bag or container. This helps avoid freezer burn. They can last up to 3 months in the freezer. When you're ready to eat, take them out and thaw in the fridge overnight. Reheat them in the oven at 375°F until hot. This will keep the flavors and textures intact. Meal prepping can save time on busy weeknights. You can prepare the filling ahead of time. Cook the chicken and mix in the rice, beans, and spices. Store this mixture in the fridge for 2 to 3 days. When you're ready, stuff the peppers and bake them. For batch cooking, consider making a double recipe. Freeze half for later. This way, you have a tasty meal ready whenever you need it. How do you know when stuffed peppers are done? You can tell when stuffed peppers are done by checking the peppers and cheese. The peppers should be tender and the cheese melted and bubbly. If you pierce a pepper with a fork, it should feel soft but not mushy. Can you prepare them in advance? Yes, you can prepare stuffed peppers in advance. Just stuff them and store them in the fridge. Bake them when you're ready to eat. This makes for a quick and easy family meal. Can I use frozen peppers? Yes, you can use frozen peppers. Just thaw them before stuffing. They may cook faster, so keep an eye on them while baking. What to do if I don't have certain ingredients? If you lack certain ingredients, feel free to swap them out. For example, use quinoa instead of rice or a different type of cheese. Get creative based on what you have! Can stuffed peppers be made on the stovetop? Yes, you can make stuffed peppers on the stovetop. Just steam them in a skillet with a little water. Cover with a lid and cook until tender. How to adjust heating times for different ovens? Oven temperatures can vary. If your oven runs hot, check the peppers a few minutes early. If it runs cool, you may need to add a few extra minutes. Always trust your instincts! We covered the best way to make stuffed peppers. You learned about key ingredients like bell peppers, ground chicken, and spices. You also discovered tips for cooking and storing them. There are many ways to adjust the recipe for different diets and tastes. Incorporating these ideas will make your dish delicious. Get creative with flavors and toppings. With practice, you'll master this easy meal for any occasion. Enjoy your cooking journey!](https://goldendishy.com/wp-content/uploads/2025/06/69b5c483-258e-4498-8701-d043fb5fc497-300x300.webp)
![For perfect Greek lemon potatoes, gather these simple ingredients: - 2 pounds baby potatoes, halved - 1 cup chicken or vegetable broth - 2 tablespoons extra virgin olive oil - 3 tablespoons freshly squeezed lemon juice - 2 teaspoons fresh lemon zest - 4 cloves garlic, minced - 1 tablespoon dried oregano - Sea salt and freshly cracked pepper to taste - Fresh parsley, chopped (for garnish) You can swap baby potatoes for Yukon Gold or red potatoes. Both work well and add great taste. If you want a vegan option, use vegetable broth instead of chicken broth. Fresh lemon juice is best, but bottled works in a pinch. You can add fresh herbs like thyme or rosemary to change the flavor. For a spicy kick, consider a pinch of red pepper flakes. Using high-quality ingredients makes a big difference. Fresh potatoes give the best texture and flavor. Extra virgin olive oil adds richness. Fresh lemon juice and zest brighten the dish. Quality broth enhances the taste. When you use good ingredients, you create an authentic Greek experience. They help your dish shine and make every bite delicious. Check out the Full Recipe for more tips and tricks on how to make these zesty potatoes. To make Greek lemon potatoes, start by gathering your ingredients. You need baby potatoes, broth, olive oil, fresh lemon juice, lemon zest, garlic, oregano, salt, and pepper. 1. Preheat the oven to 425°F (220°C). This heat helps the potatoes become crispy. 2. Halve the baby potatoes. This allows them to soak up all the flavors. 3. In a large bowl, mix the broth, olive oil, lemon juice, lemon zest, garlic, oregano, salt, and pepper. Stir well to combine. 4. Add the halved potatoes to the bowl. Toss them until they are fully coated with the mixture. Once your potatoes are ready, it’s time to roast them. 1. Pour the potato mix into a roasting pan. Spread the potatoes out in a single layer. This step ensures they cook evenly. 2. Roast in the oven for about 30-35 minutes. Check for a golden brown color and fork-tender texture. 3. Stir the potatoes halfway through roasting. This helps them absorb more flavors and become crispy all around. Sometimes things don’t go as planned. Here are some tips to help. - If your potatoes are not browning, increase the oven temperature by 25°F. This can help them crisp up. - If they seem too dry, add a splash more broth. This will keep them moist and flavorful. - If they are not tender after 35 minutes, roast them a bit longer. Just keep an eye on them to prevent burning. For a full recipe, refer to the [Full Recipe]. Enjoy the deliciousness of Greek lemon potatoes! To boost the taste of Greek lemon potatoes, use fresh ingredients. Fresh garlic and herbs add a lot of flavor. When using oregano, choose dried or fresh based on what you have. For a zingy kick, try adding a pinch of red pepper flakes. This little touch makes a big difference. You can also let the potatoes marinate in the broth mixture for an hour before cooking. This extra time helps the flavors soak in deeply. To get potatoes that are both soft and crispy, cut them evenly. Halving the baby potatoes helps ensure they cook at the same rate. Use a hot oven, around 425°F (220°C). The high heat helps the outside crisp up while keeping the inside tender. Halfway through cooking, give the potatoes a good stir. This helps them brown evenly. If you want extra crispiness, broil them for the last 2-3 minutes. Just keep an eye on them to avoid burning. Prep the ingredients ahead of time to save effort later. You can wash and cut the potatoes a day before. Store them in water in the fridge to keep them fresh. You can also mix the broth and seasonings ahead. Just combine everything in a bowl and cover it. When you are ready to cook, simply combine the potatoes with the mixture. This makes dinner quick and easy. For even faster meals, consider roasting a larger batch. Leftovers taste great and can be enjoyed in many ways. For the full recipe, check out the complete cooking guide for Greek lemon potatoes. {{image_4}} You can easily make Greek lemon potatoes vegan. Just swap chicken broth for vegetable broth. This change keeps the rich flavor intact. Make sure your broth is gluten-free if needed. You can use any vegetable broth you like. This way, everyone can enjoy this dish! Feel free to mix up the flavors! Add fresh herbs like thyme or rosemary. These herbs give a nice twist. You can also try spices like paprika or cumin for heat. For a creamier taste, sprinkle some feta cheese on top before serving. You can even toss in some olives for a salty kick. Each of these options makes the dish unique! Greek lemon potatoes shine as a side dish. Pair them with grilled chicken or fish for a full meal. They also go well with a fresh salad or tzatziki sauce. If you want to make it special, serve with warm pita bread. These potatoes are great for any gathering. They will impress your guests, and they are easy to share. For the full recipe, check out the Full Recipe link above. To keep your Greek Lemon Potatoes fresh, let them cool first. Then, place them in an airtight container. You can also cover them tightly with plastic wrap. Store them in the fridge for up to three days. This method helps keep their flavor and texture. When reheating, use the oven for the best taste. Preheat your oven to 350°F (175°C). Spread the potatoes on a baking sheet. Heat them for about 15 to 20 minutes. This way, they will regain their crispiness. If you’re in a hurry, you can use the microwave. Just heat them in 30-second bursts, but they may not be as crispy. Greek Lemon Potatoes stay good in the fridge for three days. If you want to keep them longer, you can freeze them. Place the cooled potatoes in a freezer-safe bag. They can last up to three months in the freezer. When ready to eat, thaw them in the fridge overnight. Then, reheat them as mentioned above. Greek Lemon Potatoes are a delicious side dish. They are made with baby potatoes, lemon juice, and herbs. The dish is known for its bright, zesty flavor. The potatoes become tender and crisp when roasted. You can enjoy them with grilled meats or fish. They add a refreshing touch to any meal. You can prepare Greek Lemon Potatoes ahead of time. First, follow the recipe up to the roasting step. After mixing the ingredients, cover the dish and store it in the fridge. This way, the flavors will blend. When you're ready to cook, just preheat your oven and roast them. You may need to add a few extra minutes to the cooking time. Yes, you can use other potatoes like Yukon Gold or red potatoes. These types work well due to their creamy texture. Just remember to cut them into similar sizes. This helps them cook evenly. Each potato type will offer a slightly different taste and texture. Feel free to experiment with your favorites! Greek Lemon Potatoes are a delightful dish that you can easily make. You learned the key ingredients that make them special, and tips for the best flavor. Following the step-by-step guide ensures perfect roasting every time. You also discovered tasty variations for different diets and ways to store leftovers. In closing, use fresh ingredients and don't rush the cooking process. Enjoy this dish with friends and family. Each bite will showcase Greek flavors. Happy cooking!](https://goldendishy.com/wp-content/uploads/2025/07/055e8462-33de-483e-a53c-599291ba0dde-768x768.webp)