Chicken and Cheese Quesadillas Flavorful Family Meal

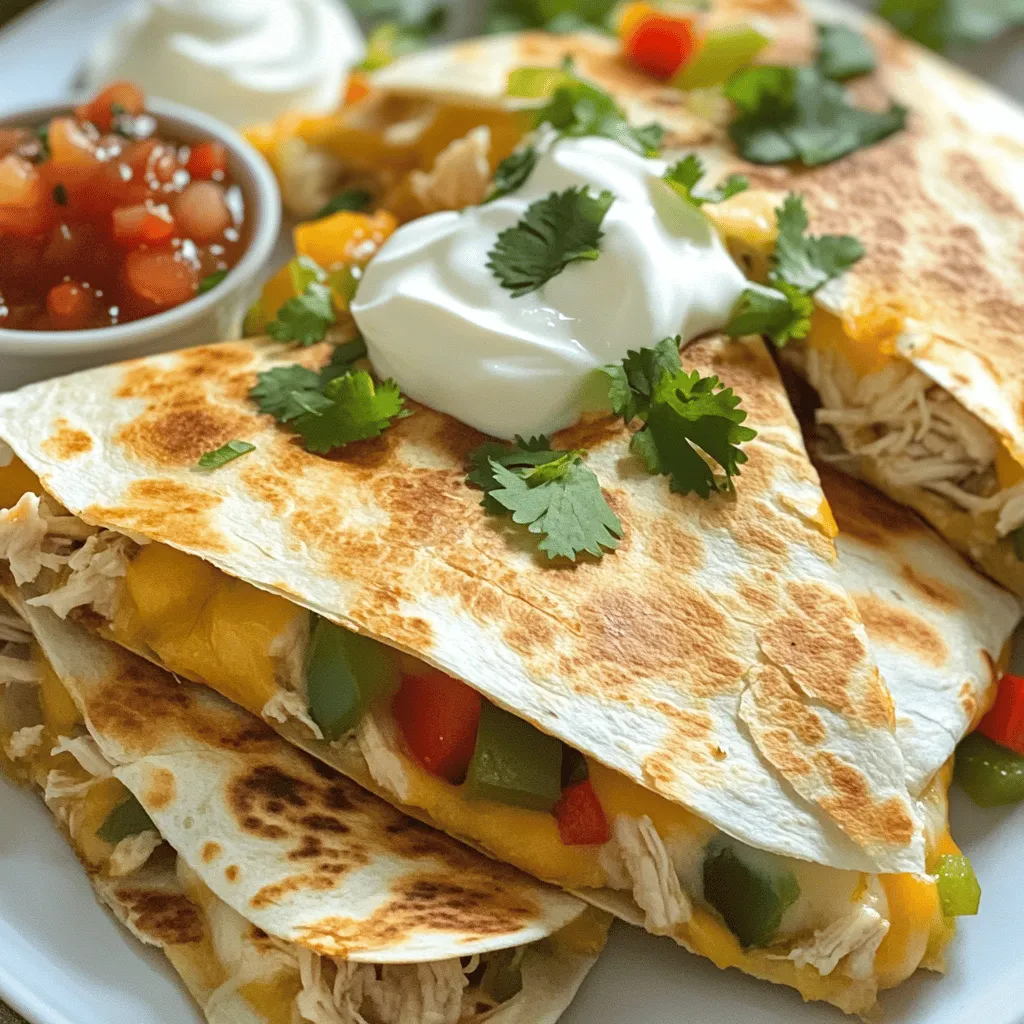
Looking for a quick and tasty family meal? Chicken and cheese quesadillas are your answer! This dish combines tender chicken with melting cheese and vibrant bell peppers. Not only are they delicious, but they’re also easy to whip up. I’ll guide you through every step, from gathering your ingredients to cooking the perfect quesadilla. Let’s get started on this flavorful family favorite!
Ingredients
List of Essential Ingredients
– 2 cups cooked chicken, shredded
– 1 cup shredded Monterey Jack cheese
– 1 cup shredded cheddar cheese
– 1 small red bell pepper, finely diced
– 1 small green bell pepper, finely diced
For a tasty chicken and cheese quesadilla, you need simple ingredients. I love using cooked chicken. It makes the dish quick and easy. Shredded Monterey Jack and cheddar cheese create a creamy texture. The bell peppers add a nice crunch and color.
Optional Add-ins
– Fresh cilantro, chopped (for garnish)
– Additional spices (e.g., chili powder, cayenne pepper)
You can make this dish even better with optional add-ins. Fresh cilantro gives a pop of flavor. Spices like chili powder can add some heat. You choose how spicy you want it.
Serving Suggestions
– Sour cream
– Salsa
– Guacamole
When serving your quesadillas, think about sides. Sour cream adds creaminess. Salsa brings freshness and zest. Guacamole is always a hit. These dips make your meal even more enjoyable.
Step-by-Step Instructions
Preparing the Vegetables
Start by sautéing the onion, garlic, and bell peppers. Heat 1 tablespoon of olive oil in a large skillet over medium heat. Add the finely chopped onion, minced garlic, and diced bell peppers. Sauté for about 5 minutes. Stir occasionally until the onions turn translucent and the bell peppers soften. This step adds great flavor to your quesadilla.
Mixing Chicken and Spices
Now, add the shredded cooked chicken to your skillet. Sprinkle in ground cumin, paprika, and a pinch of salt and pepper. Mix everything well. Cook for another 3-4 minutes to ensure the chicken heats through. Proper heating helps blend all the flavors together.
Melting the Cheese
Next, remove the skillet from heat. Gradually stir in both cheeses—Monterey Jack and cheddar. Keep stirring until they melt and mix with the chicken and vegetables. This step is crucial for a gooey, cheesy filling.
Cooking the Quesadilla
In a separate frying pan, heat 1 teaspoon of olive oil over medium heat. Place one tortilla in the pan. On one half of the tortilla, spread half of your cheesy chicken mixture evenly. Fold the other half over to shape it like a half-moon. Cook for about 3-4 minutes until the bottom is golden brown and the cheese melts. Flip it carefully and cook the other side for 2-3 minutes to achieve that perfect golden color.
Repeating the Process
Once cooked, take the quesadilla out and place it on a cutting board. Repeat this process with the remaining tortillas and filling. This way, you can make multiple quesadillas efficiently. Cooking in batches keeps everything warm and tasty.
Serving Suggestions
Slice each quesadilla into wedges for easy serving. Arrange them on a large platter and sprinkle fresh cilantro on top for added flavor. Serve them hot with small bowls of sour cream and salsa for dipping. This presentation makes your meal look appealing and inviting.
Tips & Tricks
Achieving the Perfect Quesadilla
To make a great quesadilla, you need to focus on crispiness. Start with a hot pan. Use medium heat to cook your quesadilla. This helps the cheese melt without burning the tortilla. Aim for a golden brown color on both sides.
The right amount of cheese is key. Too little cheese makes it dry. Too much cheese can make it messy. I recommend using a mix of Monterey Jack and cheddar. This combo gives flavor and creaminess.
Flavor Enhancements
Want to amp up the flavor? Try adding spices like chili powder or cayenne pepper. A pinch can make a big difference. Fresh herbs like cilantro add freshness too.
You can also switch proteins. Instead of chicken, try beef or tofu. Each option brings its own taste, making your meal unique.
Cooking Tools
For making quesadillas, you’ll need a few essential tools. A large skillet is a must. Non-stick pans work best for easy flipping. A spatula helps you turn the quesadilla without spilling.
Consider using a griddle if you cook many quesadillas. It can hold multiple tortillas at once. This saves time and keeps your family happy.
Variations
Vegetarian Quesadilla
For a meat-free option, you can swap out chicken for veggies. Use ingredients like:
– 2 cups black beans, drained and rinsed
– 1 cup corn
– 1 cup sautéed mushrooms
– 1 cup shredded zucchini
To keep the flavor strong without chicken, add spices like cumin and paprika from the original recipe. These spices boost taste and give a nice kick. You can also add more cheese to keep it rich and creamy.
Gluten-Free Options
If you need gluten-free quesadillas, choose gluten-free tortillas instead of regular flour ones. Many brands offer tasty options. Just be sure to check the label for gluten-free certification.
You might need to adjust other ingredients too. For example, some cheese blends may contain gluten. Stick to pure cheeses to avoid any issues. Always read labels to ensure every ingredient fits your needs.
Different Cheese Combinations
Cheese is key in quesadillas. While Monterey Jack and cheddar work well, try mixing it up. Consider using:
– Pepper Jack for a spicy kick
– Queso Blanco for a milder taste
– Gouda for a smoky flavor
Changing the cheese can change the whole dish. Each cheese brings its unique taste and texture. Experiment to find your favorite blend. This way, you can enjoy a new flavor profile every time you make quesadillas.
Storage Info
Refrigeration
To keep your chicken and cheese quesadillas fresh, store them in an airtight container. Place a paper towel inside to absorb moisture. This helps keep the tortillas crispy. You can refrigerate them for up to three days. After that, they may lose flavor and texture.
Freezing Quesadillas
If you want to save quesadillas for later, freezing is a great option. First, let them cool completely. Wrap each quesadilla in plastic wrap, then place them in a freezer bag. This method prevents freezer burn. To reheat, remove the plastic wrap and place the quesadilla in a skillet. Heat over medium until crispy, about 5-7 minutes. To avoid sogginess, skip using the microwave.
Using Leftovers
Don’t let leftover filling go to waste! You can use it in many creative ways. Try making a chicken and cheese omelet or mixing it into scrambled eggs for breakfast. You can also add it to salads for extra flavor. If you have extra tortillas, make mini quesadillas or wraps for lunch. Use your leftovers to create new meals and reduce waste.
FAQs
How do I know when my quesadilla is done?
A properly cooked quesadilla shows a few clear signs. First, the tortilla turns golden brown on both sides. You should also see melted cheese oozing from the edges. The filling should be warm inside. If you see these signs, take it off the heat.
Can I prepare chicken and cheese quesadillas in advance?
Yes, you can prepare chicken and cheese quesadillas ahead of time. Cook the filling early and store it in the fridge. Use it within two days for best taste. You can also assemble the quesadillas and wrap them in foil. Keep them in the fridge for up to one day. Just cook them when you’re ready to eat.
What’s the best way to reheat quesadillas?
To reheat quesadillas, use a skillet for the best results. Heat it on medium-low heat. Place the quesadilla in the pan and cover it with a lid. This method keeps the outside crispy and the filling warm. You can also use an oven. Preheat it to 350°F, place the quesadilla on a baking sheet, and heat for 10 minutes.
Are chicken and cheese quesadillas healthy?
Chicken and cheese quesadillas can be healthy, depending on your choices. They contain protein from chicken and calcium from cheese. You can make them healthier by using whole grain tortillas. Add more vegetables, like spinach or mushrooms, for extra nutrients. You can also use low-fat cheese or skip it altogether for a lighter option.
You now have all you need to make delicious chicken and cheese quesadillas. We covered essential ingredients, easy cooking steps, and tasty serving ideas. Don’t forget to try variations and tips for perfecting your quesadilla.
Enjoy experimenting with flavors and ingredients to make the dish your own. With practice, you’ll master the art of creating crispy, cheesy quesadillas that everyone will love. Happy cooking!

![- 2 cups cooked chicken breast, shredded - 1 ripe avocado, mashed until smooth - 1/4 cup smooth Greek yogurt - 1 tablespoon freshly squeezed lemon juice - 1/4 cup red onion, finely chopped - 1/2 cup cherry tomatoes, halved - 1/4 cup celery, finely diced - 1/4 teaspoon garlic powder - Salt and freshly ground black pepper to taste - Fresh cilantro or parsley, chopped, for garnish The ingredients in creamy avocado chicken salad make it tasty and healthy. The chicken provides protein, while avocado adds healthy fats. Greek yogurt makes it creamy without extra calories. Fresh veggies like tomatoes and celery give a nice crunch. Using fresh ingredients is key. This brings out the best flavors. You can adjust the amounts based on what you like. For example, add more tomatoes if you love them. Don’t forget the seasoning! Salt and pepper enhance the taste. Fresh herbs like cilantro or parsley top it off perfectly. They add color and flavor. I recommend checking the full recipe for detailed steps. Enjoy making this delicious dish! - Combine mashed avocado, Greek yogurt, and lemon juice in a bowl. - Mix until smooth using a fork or whisk. To make the creamy dressing, start with a ripe avocado. Mash it in a bowl until it is smooth. Next, add 1/4 cup of Greek yogurt. This adds creaminess and protein. Then, squeeze in 1 tablespoon of lemon juice. This will brighten the flavor. Mix these three ingredients well with a fork or whisk. You want a creamy and smooth texture. This creamy dressing is the base of your salad and full of healthy fats. - Add shredded chicken to the avocado mixture. - Stir thoroughly to coat the chicken evenly. Now it’s time to add in the chicken. Use 2 cups of cooked chicken breast, shredded. You can use leftover chicken or rotisserie chicken for ease. Add the chicken to the creamy dressing. Stir well so every piece of chicken is coated. This adds protein and makes the salad filling. The creamy dressing brings all the flavors together. - Gently fold in red onion, cherry tomatoes, and celery. - Season with garlic powder, salt, and black pepper to taste. Next, let’s add some crunch and color. Gently fold in 1/4 cup of finely chopped red onion, 1/2 cup of halved cherry tomatoes, and 1/4 cup of diced celery. These veggies add freshness and texture. Now, season your salad. Add a pinch of garlic powder, salt, and freshly ground black pepper. Taste it and adjust the seasoning as needed. Mix gently so you don’t break the veggies. Now, your creamy avocado chicken salad is ready to serve! Check out the Full Recipe for more details. - Look for avocados that yield slightly to pressure. - Check the color; ripe avocados usually have a darker skin. Selecting the perfect avocado is key for your creamy avocado chicken salad. When you gently press the avocado, it should give a bit. This tells you it is ripe and ready to use. A darker skin tone often means ripeness, but don't rely on color alone. Always feel for that slight softness! - Use rotisserie chicken for convenience. - Ensure chicken is fully cooked; internal temperature should reach 165°F (75°C). Cooking the chicken can take time, but using rotisserie chicken saves you effort. It offers great flavor and saves cooking time. If you cook your own chicken, make sure to check the internal temperature. It needs to reach 165°F (75°C) to be safe to eat. - Serve in individual bowls, atop lettuce leaves, or in a wrap. - Consider a lemon wedge on the side for added flavor. Serving your salad can be fun! You can use individual bowls or place it on crisp lettuce leaves. If you want a wrap, that works too. A lemon wedge on the side brightens the meal and adds a zesty kick. For the full experience, try the [Full Recipe]. Enjoy your tasty and healthy choice! {{image_4}} You can make your creamy avocado chicken salad even better by adding fruits. Diced apples or grapes bring a nice sweetness. They also add a nice crunch. If you want a tropical twist, try adding mango. Its juicy flavor blends well with creamy avocado. Not in the mood for chicken? You can easily swap it out. Canned tuna or chickpeas work well for a vegetarian option. Both of these options add protein and flavor. If you love seafood, consider using grilled shrimp. It adds a fresh, light taste to the salad. Want to spice things up? Adding spices can really boost the flavor. Try cumin or smoked paprika for a warm kick. If you like heat, toss in some jalapeños. These will give your salad a spicy edge that keeps it exciting. Feel free to get creative with your mix-ins! Each variation gives you a new twist on this delicious dish. Check out the Full Recipe for more ideas. Store your creamy avocado chicken salad in an airtight container in the refrigerator. It will stay fresh for up to 2 days. I suggest enjoying it right after you make it. However, if you keep the ingredients separate, it can last a little longer. This way, you keep the textures nice. Do not freeze the salad. Avocado gets mushy when frozen. If you want to prepare ahead, consider freezing the chicken on its own. This will keep it fresh and ready for your salad. Prep your ingredients ahead of time. Store them separately to mix later. This salad is a great option for busy weeks. You can have a tasty meal ready in minutes! For the full recipe, check out the detailed instructions above. Typically lasts for about 2 days when stored properly. I recommend using an airtight container. This helps keep your salad fresh and tasty. After two days, the avocado may brown and lose its creamy texture. Yes, but it’s best to combine the ingredients just before serving to maintain freshness. If you prepare it early, store the salad components separately. This way, the avocado stays bright and creamy. Great with whole-grain bread, crackers, or a side of fruit. I love serving it on toast for a hearty lunch. Pairing it with fresh fruit offers a nice, sweet contrast. You can also use it as a filling in wraps for a tasty twist. For the full recipe, check out the detailed steps above. This creamy avocado chicken salad is easy to make and full of flavor. We covered the main ingredients, steps, and tips to perfect it. You learned how to mix chicken with creamy dressing and fresh veggies. Remember to store leftovers properly for the best taste. Enjoy this salad as a quick meal or snack. Feel free to customize with your favorite ingredients. With these simple tips, you can create a dish that is both healthy and delicious.](https://goldendishy.com/wp-content/uploads/2025/06/50306de2-9119-4a0c-8cb7-3da0c4c0a2a4-768x768.webp)
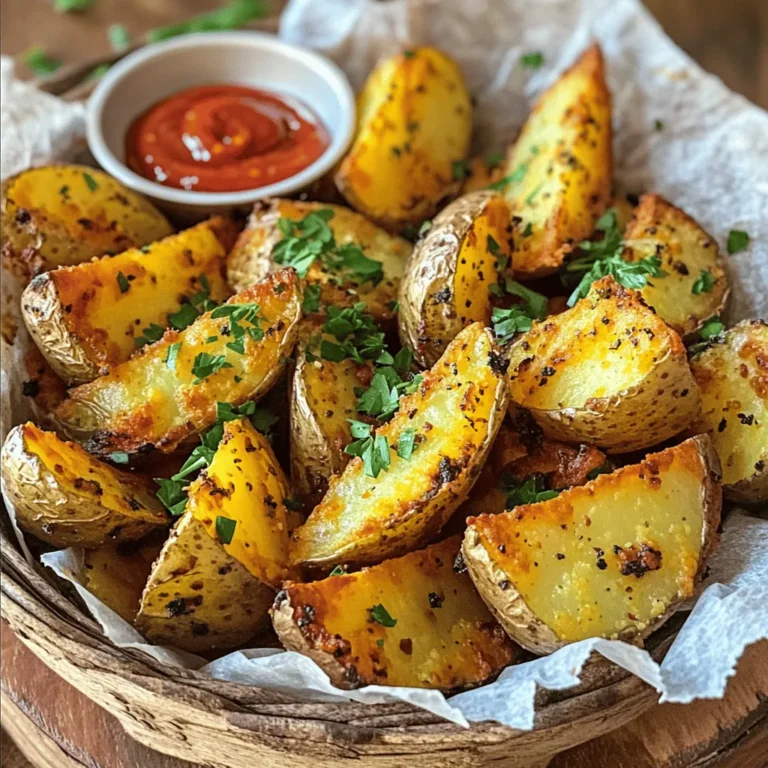
![To make Cheesy Ranch Potatoes, you will need a few simple items. Gather these ingredients before you start cooking: - 2 pounds baby potatoes, halved - 1 cup shredded sharp cheddar cheese - ½ cup creamy sour cream - 1 packet ranch dressing mix (about 1 ounce) - 3 tablespoons extra virgin olive oil - 1 teaspoon garlic powder - 1 teaspoon onion powder - Salt and freshly ground black pepper to taste - 2 green onions, finely sliced (for garnish) Each ingredient plays a key role in creating that cheesy, ranch-flavored goodness. The baby potatoes serve as the base, providing a tender texture. Sharp cheddar cheese adds a rich, creamy taste. Sour cream brings a tangy flavor, while the ranch dressing mix ties everything together with its herby notes. The garlic and onion powders enhance the overall taste, making every bite delicious. Don't forget the green onions; they add a fresh crunch on top! For the complete recipe, check out the [Full Recipe]. - Preheat the oven to 400°F (200°C). This makes sure your potatoes cook evenly. - In a large bowl, mix the olive oil, ranch dressing mix, garlic powder, onion powder, salt, and pepper. Stir until well combined. - Add the halved baby potatoes to the bowl. Toss them until every piece is coated in the ranch mixture. This step adds great flavor. - Line a baking sheet with parchment paper. This helps with easy cleanup. - Spread the coated potatoes on the lined baking sheet in a single layer. This helps them roast evenly. - Roast the potatoes for 25-30 minutes. They should turn golden brown and be tender when pierced. - Take the baking sheet out of the oven and sprinkle cheddar cheese over the hot potatoes. - Return the baking sheet to the oven for 5-7 minutes. Wait until the cheese melts and bubbles. - Drizzle sour cream over the cheesy potatoes and top with sliced green onions. This adds a fresh touch. Check out the Full Recipe for more details! To make Cheesy Ranch Potatoes, start by preheating your oven to 400°F (200°C). This helps the potatoes roast evenly. Spread the potatoes out on a lined baking sheet. This ensures they cook well and get crispy. Check for doneness by piercing them with a fork. They should be tender and golden brown. To boost flavor, try adding herbs like parsley or dill. You can also mix in spices like paprika or cayenne for a kick. If you want a different cheese, use mozzarella or pepper jack. Each type brings a unique taste and texture to the dish. For serving, use a colorful bowl to show off the cheesy ranch potatoes. Add a sprinkle of extra cheddar on top for flair. You can also place whole green onion tops around the edge for a fresh look. These simple steps make your dish appealing and ready for guests. For the full recipe, follow the steps provided in the earlier sections. Enjoy your cooking! {{image_4}} You can make Cheesy Ranch Potatoes even more fun with simple swaps. - Using different types of cheese: Try mozzarella for a milder taste or pepper jack for a kick. You can even mix cheeses for a rich flavor. - Substituting Greek yogurt for sour cream: Greek yogurt gives you a nice tang and adds protein. It’s a healthier option that keeps your potatoes creamy. Change the flavor to keep things exciting. - Spicy ranch version: Add a teaspoon of cayenne pepper to the ranch mix. This will give your potatoes a nice heat. - Herb-infused options: Mix in dried herbs like thyme or rosemary. This adds a fresh taste that pairs well with the cheese. Making Cheesy Ranch Potatoes work for everyone is easy! - Vegan adaptations: Swap the cheese for a vegan cheese and use coconut yogurt. This keeps all the creamy goodness without dairy. - Gluten-free adjustments: Use a gluten-free ranch mix. Most ranch mixes are gluten-free, but always check the labels. Feel free to explore these variations to make this dish your own! For the full recipe, check out Cheesy Ranch Potatoes Delight. To keep your cheesy ranch potatoes fresh, store them in the fridge. Place them in an airtight container. They will last about 3 to 5 days. Make sure they cool completely before sealing. For longer storage, you can freeze them. Put the cooled potatoes in a freezer-safe bag. They can last up to 2 months in the freezer. To reheat your potatoes, the best method is using an oven. Preheat the oven to 350°F (175°C). Spread the potatoes on a baking sheet. Heat them for about 15 to 20 minutes. This will help keep the texture crispy. You can also use a microwave. Place the potatoes in a microwave-safe dish. Heat them in short bursts of 1 minute. Stir in between to ensure even heating. To keep flavor and texture, avoid reheating them too long. If they dry out, add a little bit of sour cream or cheese on top. These tips will help you enjoy the cheesy ranch potatoes just as much as the first time. You can tell the potatoes are done by checking a few signs. First, they should be golden brown and crispy on the outside. Second, when you poke them with a fork, they should feel soft inside. If the fork slides in easily, your potatoes are ready to enjoy! Yes, you can prepare Cheesy Ranch Potatoes ahead of time! Start by following the recipe steps, but stop before roasting. Cover the potatoes and store them in the fridge for up to 24 hours. When you’re ready to bake, simply add extra time in the oven if they are cold. This way, you can enjoy them fresh without much fuss. These cheesy potatoes pair well with many dishes. Serve them alongside grilled chicken or steak for a filling meal. They also go great with a fresh salad or steamed veggies. For a fun twist, try them with barbecue or as a side for tacos. The options are endless, making it easy to create a delicious meal. For the complete cooking steps, check out the Cheesy Ranch Potatoes Delight 🥔. In this blog post, we covered how to make Cheesy Ranch Potatoes. We started with the ingredients, then walked through easy steps to prepare and roast them. I shared helpful tips, variations, and storage info to keep your dish fresh. These potatoes are a tasty side for any meal. You can customize them to fit your taste. Enjoy making this dish, and let it add flavor to your table!](https://goldendishy.com/wp-content/uploads/2025/06/4f138a04-3393-4361-b7e8-8b602e29b2ef-768x768.webp)