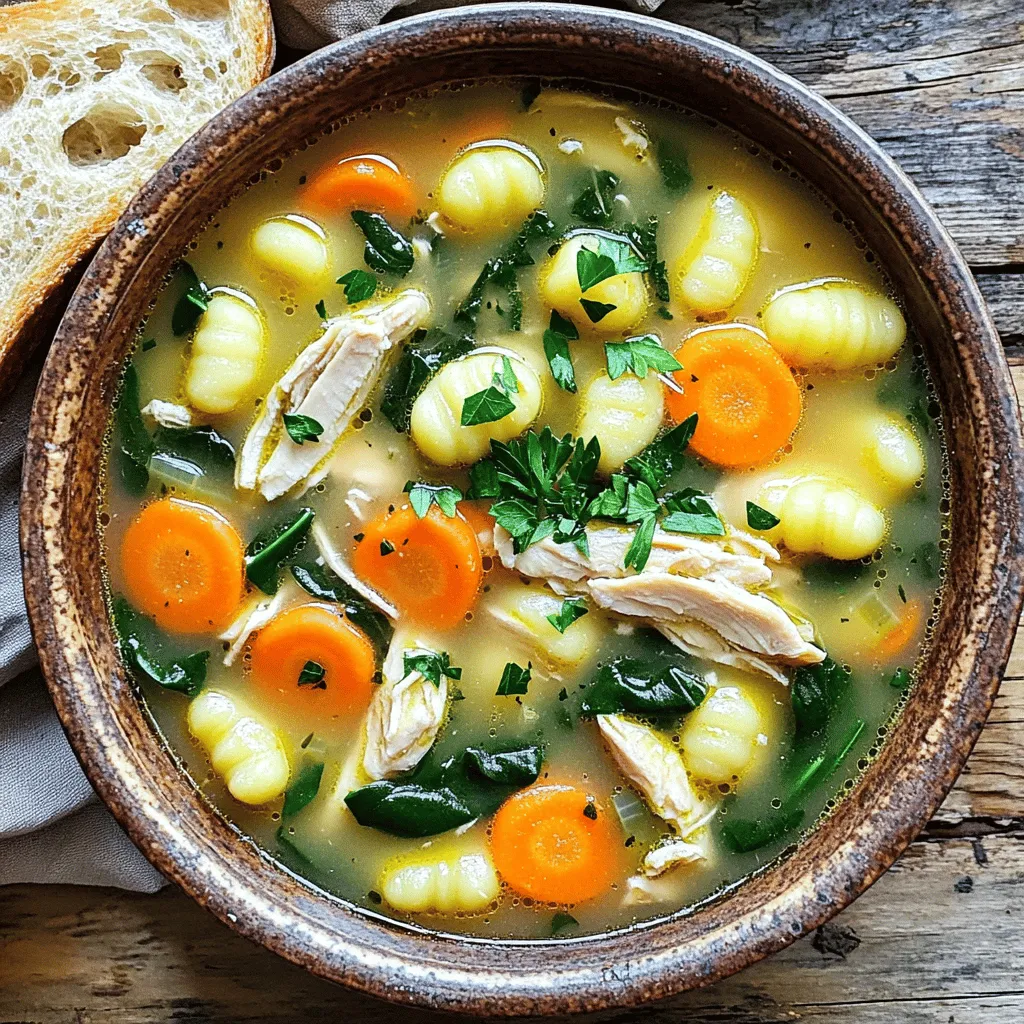
Chicken and Gnocchi Soup Hearty and Comforting Meal

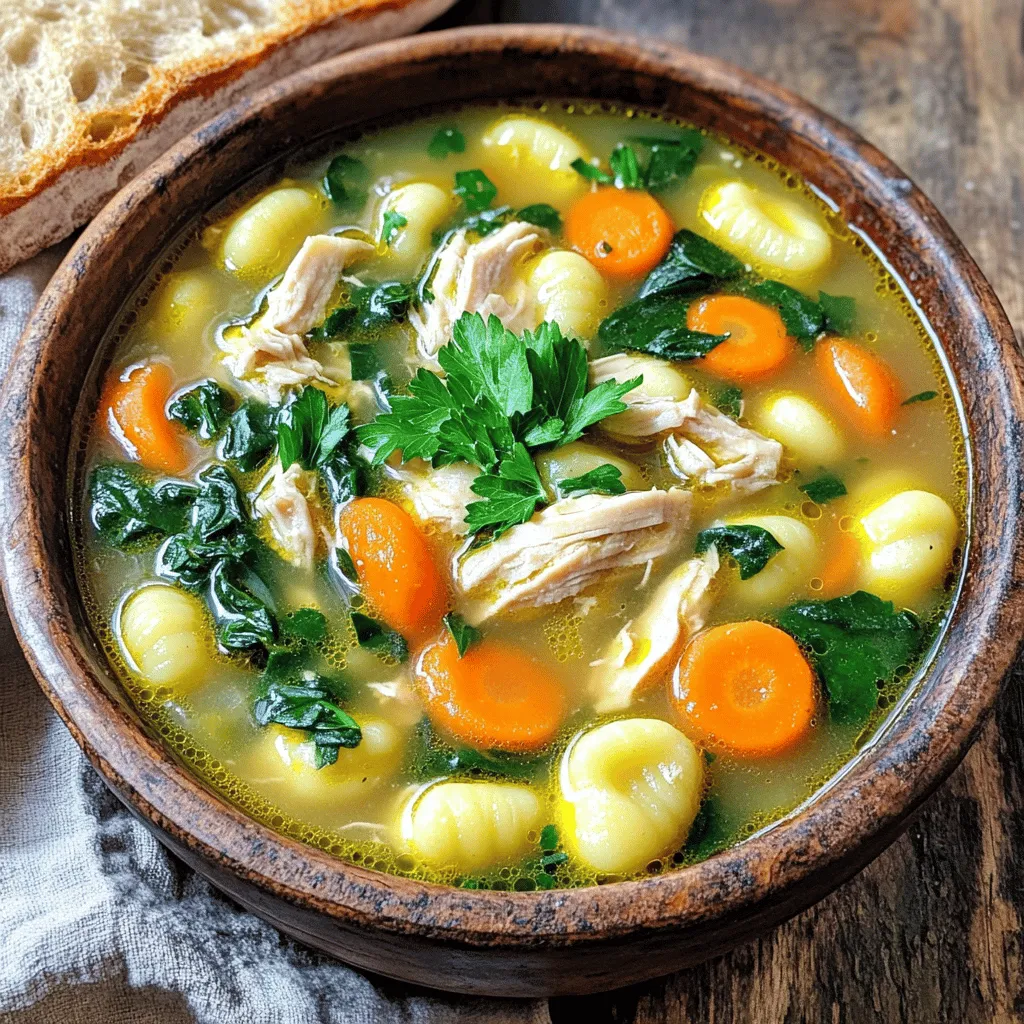
When you crave a warm, hearty meal, Chicken and Gnocchi Soup is the answer. This comforting dish combines tender chicken and fluffy gnocchi in a creamy broth. I’ll guide you through each step to create this delicious soup, share tips for making it even better, and show how to customize it to your taste. Dive in, and let’s make a bowlful of happiness together!
Ingredients
Detailed Ingredients List
To make Chicken and Gnocchi Soup, gather these key ingredients:
– 1 pound boneless, skinless chicken breast, diced into bite-sized pieces
– 1 tablespoon extra virgin olive oil
– 1 medium onion, finely diced
– 2 cloves garlic, minced
– 3 medium carrots, sliced into thin rounds
– 3 stalks celery, sliced into half-moons
– 6 cups chicken broth (preferably low-sodium)
– 1 teaspoon dried thyme
– 1 teaspoon dried oregano
– 1 cup half-and-half (or substitute with heavy cream for a richer texture)
– 1 package (16 oz) gnocchi (store-bought or homemade)
– 2 cups fresh spinach, coarsely chopped
– Salt and freshly ground black pepper to taste
– Fresh parsley, chopped, for garnish
Optional Ingredients for Customization
You can add a personal touch to your soup with these options:
– 1 cup of mushrooms, sliced
– 1 cup of kale or Swiss chard, chopped
– A splash of lemon juice for brightness
– Crushed red pepper flakes for heat
– Grated Parmesan cheese for extra flavor
Recommended Cooking Tools
To create this comforting meal, make sure you have:
– A large pot or Dutch oven
– A sharp knife and cutting board
– A wooden spoon for stirring
– A ladle for serving
– Measuring cups and spoons for accuracy
This list keeps your cooking simple and enjoyable.
Step-by-Step Instructions
Preparation Steps
1. Start by gathering all your ingredients. This makes cooking smooth and easy.
2. Dice the chicken breast into bite-sized pieces. Make sure they are uniform for even cooking.
3. Finely dice the onion and mince the garlic. Slice the carrots into thin rounds. Cut the celery into half-moons.
4. Measure out the chicken broth, herbs, and half-and-half. Have everything ready before you start cooking.
Cooking Process
1. Heat the olive oil in a large pot over medium heat until it shimmers.
2. Add the diced chicken and season lightly with salt and pepper. Cook for 5-7 minutes. Stir occasionally until the chicken is browned.
3. Remove the chicken from the pot and set it aside on a plate.
4. In the same pot, add the diced onion, minced garlic, sliced carrots, and sliced celery. Sauté for about 5 minutes. Cook until the onion is translucent and the veggies start to soften.
5. Carefully pour in the chicken broth. Bring the mix to a rolling boil.
6. Add dried thyme, dried oregano, and extra seasoning. Lower the heat and let it simmer for about 10 minutes. This helps the flavors blend.
7. Stir in the gnocchi. Cook according to the package instructions, usually 3-5 minutes, until they float to the top.
8. Once the gnocchi are tender, reduce the heat to low. Slowly stir in the half-and-half and chopped spinach. Cook for 2-3 minutes until the spinach is vibrant.
Final Touches
1. Return the cooked chicken to the pot. Stir well to combine all the ingredients.
2. Heat through for another minute. Taste the soup and adjust seasoning if needed.
3. Ladle the warm soup into bowls. Garnish with freshly chopped parsley.
This hearty Chicken and Gnocchi Soup is ready to enjoy!
Tips & Tricks
Common Mistakes to Avoid
When making chicken and gnocchi soup, a few mistakes can ruin your dish. First, do not overcrowd the pot with chicken. This can lead to uneven cooking. Cook in batches if needed. Second, avoid adding the gnocchi too early. If you do, they may become mushy. Always wait until the soup is almost done. Lastly, do not skip seasoning. A pinch of salt and fresh pepper is key to flavor.
Best Practices for Flavor Enhancement
To boost flavor, consider using homemade chicken broth. Store-bought broth works, but homemade broth adds depth. Fresh herbs can elevate the dish even more. Try adding a bay leaf while it simmers for added aroma. You can also squeeze a bit of lemon juice before serving. This brightens the flavors and adds a nice touch.
Time-Saving Tips
If you’re short on time, use pre-cooked chicken. Shredded rotisserie chicken works great. You can also use frozen gnocchi. They cook quickly and save you prep time. For faster chopping, use a food processor for the veggies. Lastly, prep your ingredients the night before. This way, you can make the soup in about 20 minutes!

Variations
Vegetable Substitutes
You can change the veggies in this soup for more flavor. Try using green beans or zucchini instead of carrots and celery. These swaps add a fresh taste and keep the soup colorful. You can also add mushrooms for an earthy flavor. If you like it spicy, add some diced bell peppers or even a few jalapeños. Just remember to keep the balance of flavors.
Protein Options
If you want a twist, you can switch the chicken. Turkey works well and gives a nice flavor, too. For a vegetarian option, use chickpeas or white beans. They add protein and make the soup filling. If you enjoy seafood, shrimp can be a fun choice. Just add them at the end so they stay tender.
Creaminess Alternatives
To change the creaminess, you can use different ingredients. Instead of half-and-half, try coconut milk for a dairy-free option. It gives a unique flavor and still keeps the soup rich. For a lighter version, you can use low-fat milk or even vegetable broth. This will keep your soup tasty but a bit less heavy. Each option brings its own twist to this hearty dish.
Storage Info
Proper Storage Methods
Store leftover chicken and gnocchi soup in an airtight container. Let the soup cool first. It stays fresh in the fridge for up to three days. For best taste, eat it within this time.
Reheating Instructions
To reheat, pour the soup into a pot over medium heat. Stir it often to avoid sticking. Heat until it is warm, about 5 to 7 minutes. You can also use a microwave. Place it in a microwave-safe bowl and heat for 1-2 minutes. Stir halfway through.
Freezing Tips
You can freeze chicken and gnocchi soup for up to three months. Use freezer-safe containers or bags. Leave some space at the top, as the soup will expand when frozen. When ready to eat, thaw it in the fridge overnight before reheating. The texture may change a bit, but it will still taste great.
FAQs
What is Chicken and Gnocchi Soup?
Chicken and gnocchi soup is a warm, creamy dish. It combines tender chicken, soft gnocchi, and fresh veggies. The broth is rich with flavor from herbs like thyme and oregano. This soup is perfect for chilly days. It offers comfort and satisfaction in every bite.
Can I make this soup ahead of time?
Yes, you can make this soup ahead of time. It stores well in the fridge for up to three days. Just let it cool first, then place it in an airtight container. When you’re ready to eat, heat it on the stove over low heat. Add a splash of broth or water if it’s too thick.
What are some side dishes to serve with Chicken and Gnocchi Soup?
You can serve this soup with several tasty side dishes. Here are a few ideas:
– Warm, crusty bread for dipping
– A simple green salad with vinaigrette
– Garlic bread for added flavor
– Steamed vegetables for extra nutrition
These sides complement the soup well and add variety to your meal.
Is Chicken and Gnocchi Soup gluten-free?
Chicken and gnocchi soup is not usually gluten-free. Most store-bought gnocchi contains wheat flour. However, you can find gluten-free gnocchi made from potatoes or rice. Check the package label to be sure. If you use gluten-free gnocchi, your soup can be gluten-free, making it suitable for those with dietary needs.
In this blog post, we explored the key ingredients for Chicken and Gnocchi Soup, including options for customization. I provided clear, step-by-step instructions for prepping, cooking, and adding final touches. We also examined tips for avoiding common mistakes and enhancing flavor. Variations allowed you to swap in different vegetables, proteins, or creaminess options. Lastly, I shared proper storage methods and answered common questions.
This soup is not just a meal; it’s a cozy experience. Enjoy making it and sharing with others.


![To make this tasty dish, gather these main items: - 1 large head of cauliflower, cut into bite-sized florets - 5 cloves of garlic, skins left on - 3 tablespoons extra virgin olive oil, divided - 1/4 cup unsweetened almond milk (or your preferred milk) - 2 tablespoons butter (or a vegan alternative) - Salt and freshly ground black pepper, to taste These ingredients form the base of the mash. The cauliflower gives the dish its creamy texture. Roasting the garlic adds a rich flavor. You can change the recipe to suit your taste. Here are some ideas: - Swap almond milk for regular milk or cream for a richer flavor. - Use ghee instead of butter for a unique twist. - Add a pinch of nutmeg for warmth. - Incorporate herbs like thyme or rosemary for added depth. These options let you make the dish your own. Feel free to get creative! Garnishing makes the dish look appealing. Here are some great choices: - Fresh chives, finely chopped, for a pop of color - A drizzle of extra virgin olive oil for richness - A sprinkle of smoked paprika for a touch of spice These garnishes enhance the flavor and presentation. They make your Roasted Garlic Cauliflower Mash shine on the table. For the full recipe, check the earlier section. To start, I preheat my oven to 400°F (200°C). This temperature works best for roasting. Next, I take one large head of cauliflower and cut it into bite-sized florets. I love using fresh cauliflower for the best flavor. On a baking sheet, I place the florets and five unpeeled cloves of garlic. Then, I drizzle two tablespoons of extra virgin olive oil over them. I sprinkle salt and black pepper generously, then toss everything together. It helps the veggies get well-coated. I spread the cauliflower and garlic in a single layer. Now, I roast them for 25 to 30 minutes. Halfway through, I gently toss them to ensure they cook evenly. I look for a nice golden brown color and tender texture when they are done. Once roasted, I let the garlic cool for a few minutes before handling it. After cooling, I squeeze the softened garlic out of its skin. I put it into a large mixing bowl with the roasted cauliflower. Then, I add a quarter cup of unsweetened almond milk, two tablespoons of butter, and the last tablespoon of olive oil. I grab a hand mixer or an immersion blender to blend the mix. I blend until it turns smooth and creamy. If I want a chunkier mash, I blend just until combined. I make sure not to overmix, as it can change the texture. Once blended, I taste the mash. If it needs more flavor, I adjust with extra salt and pepper. I love a well-seasoned mash! Now, I transfer the cauliflower mash to a serving bowl. For a fun finishing touch, I sprinkle freshly chopped chives on top. This adds color and a nice flavor. To make it look fancy, I might drizzle a bit of olive oil on top. This mash is now ready to impress! Enjoy this easy and tasty dish from the [Full Recipe]. To make the best roasted garlic cauliflower mash, follow these tips. First, use a large head of cauliflower. This gives you enough to work with. Cut the florets into even sizes. This helps them cook at the same rate. Roasting adds flavor, so don’t rush it. Allow the cauliflower to become tender and golden. When blending, don’t overmix. A few pulses will give you a nice texture. If you want it creamier, add a splash more milk. Always taste as you go. Adjust salt and pepper to your liking for the best flavor. Having the right tools makes cooking easier. Here’s what I recommend: - Baking sheet for roasting - Large mixing bowl for combining ingredients - Immersion blender or hand mixer for smoothness - Measuring cups and spoons for precise amounts - Knife and cutting board for prep These tools help you work efficiently and make the process enjoyable. Watch out for these common mistakes. First, don’t skip the roasting step. Raw cauliflower will not have the same rich taste. Second, avoid using too much liquid. It can make your mash watery. If you prefer a thicker mash, add less almond milk. Finally, remember to season well. Under-seasoning can leave your mash bland. Always taste your dish before serving. This way, you ensure it is full of flavor. For the full recipe, check the details above. Enjoy making your roasted garlic cauliflower mash! {{image_4}} You can easily make this dish dairy-free. Use almond milk or coconut milk instead of regular milk. For a buttery flavor, swap butter for vegan butter or olive oil. This keeps the mash creamy and rich without dairy. Adding flavors can elevate your mash. Fresh herbs like thyme or rosemary add a lovely touch. You can also sprinkle in garlic powder for extra garlic flavor. If you enjoy cheese, mix in some grated Parmesan for a savory kick. Get creative with how you serve this mash! Use it as a base for grilled chicken or fish. You can also serve it as a side dish with roasted vegetables. Try topping it with sautéed mushrooms or crispy bacon bits for added flavor and texture. After enjoying your roasted garlic cauliflower mash, let it cool. Place it in an airtight container. Store it in the fridge for up to 4 days. This keeps the flavor fresh and the texture nice. If you have more leftovers, freezing is a great option. Put the mash in a freezer-safe bag or container. Make sure to remove excess air. It will last for about 3 months. Label the container with the date so you can keep track. When you're ready to enjoy the mash again, reheat it gently. You can use the microwave or a stovetop. If it seems dry, add a splash of almond milk or butter. Stir it well as you heat it. This keeps it creamy and delicious. Yes, you can make Roasted Garlic Cauliflower Mash ahead of time. Prepare the mash, then let it cool. Store it in an airtight container in the fridge for up to three days. When you’re ready to eat, simply reheat it on the stove or in the microwave. You may need to add a splash of milk to bring back the creamy texture. Yes, cauliflower mash is a low-carb alternative to mashed potatoes. A cup of cooked cauliflower has about 5 grams of carbs, while a cup of mashed potatoes has around 35 grams. This makes cauliflower mash a great choice if you want to cut carbs but still enjoy a creamy side dish. Roasted Garlic Cauliflower Mash pairs well with many dishes. You can serve it with roasted chicken, grilled steak, or pan-seared fish. It also complements sautéed vegetables or a fresh salad. For a hearty meal, try it with a rich mushroom gravy or a savory sauce. The mash's creamy texture and garlic flavor enhance any main dish beautifully. Roasted Garlic Cauliflower Mash is simple and tasty. We covered its key ingredients, from cauliflower to garlic. You can customize it with optional ingredients and garnishes for more flavor. The step-by-step instructions ensure a smooth texture every time. You now have tips to avoid common mistakes. Variations allow for dairy-free or unique flavors. Storing is easy, and leftovers can even be frozen. This mash is a great low-carb option. Try it with your favorite dishes for a perfect side.](https://goldendishy.com/wp-content/uploads/2025/07/e8f9d6da-9905-472e-90b5-76f2ba9b0789-768x768.webp)


![- Bell Peppers: I like using large bell peppers. You can choose any color you like: red, yellow, or green. They all taste great! Make sure they are firm and fresh. Each pepper should hold the stuffing well. - Ground Chicken and Dairy: Ground chicken adds a light flavor. It cooks quickly and blends well with other ingredients. Pair it with shredded cheddar cheese for a creamy touch. The cheese melts beautifully, making the dish extra yummy. - Enhancing Ingredients: I always add cooked rice to the mix. It gives the dish a nice texture. Black beans are great too; they add protein and fiber. Corn brings sweetness and color. Together, these ingredients create a hearty filling. - Essential Spices: Be sure to use chili powder, ground cumin, garlic powder, and onion powder. These spices pack flavor into the filling. A sprinkle of salt and pepper brings everything together. - Optional Garnishes: Fresh cilantro adds a burst of flavor. It makes the dish look more vibrant. You can also use a dollop of sour cream for creaminess. - Recommended Sides: Serve the stuffed peppers with a simple salad. A side of rice or quinoa pairs well too. You can also add some tortilla chips for crunch. - Display Ideas: For a beautiful presentation, place each stuffed pepper on a plate. Drizzle a bit of olive oil on top for shine. Add some chopped cilantro for color. This makes the meal look as good as it tastes! For the complete recipe, check out the Full Recipe. 1. Preheat your oven to 375°F (190°C). This step is key for even cooking. 2. Grab four large bell peppers. Cut off the tops and remove the seeds. Rinse the insides to clean them well. 3. Lightly coat the outside of each pepper with olive oil. Stand them upright in a 9x13 inch baking dish. 1. Heat a skillet over medium heat. Add 1 pound of ground chicken to the pan. 2. Cook the chicken for 5-7 minutes. Stir and break it apart until it turns brown. 3. Once cooked, mix in 1 cup of cooked rice, 1 cup of rinsed black beans, and 1 cup of corn. 4. Add 3/4 cup of shredded cheddar cheese, 1 teaspoon of chili powder, 1 teaspoon of cumin, 1 teaspoon of garlic powder, and 1/2 teaspoon of onion powder. Season with salt and pepper to taste. Stir for 2-3 minutes. 1. Generously fill each bell pepper with the chicken and cheese mixture. Pack it well. 2. Sprinkle the remaining 1/4 cup of cheese on top of the stuffed peppers. 3. Cover the dish with aluminum foil to trap steam. Bake in the preheated oven for 30 minutes. 4. After 30 minutes, remove the foil. Continue baking for 10-15 minutes, until the cheese is bubbly and golden. 5. Check if the peppers are tender by piercing them with a fork. 6. Allow them to cool for a few minutes after baking. Optionally, garnish with fresh cilantro for extra flavor. For the complete recipe, check out the [Full Recipe]. What are common mistakes to avoid? One mistake is overcooking the chicken. Cook it just until it's brown. If you use too much salt, it can ruin the flavor. Taste your mixture before stuffing the peppers. How can you ensure even cooking? Make sure all your peppers are the same size. This will help them cook at the same rate. Cover them with foil for part of the baking time. This keeps the heat in and helps them cook through. What are some suggestions for adding extra flavor? Try adding diced tomatoes or jalapeños for a kick. You can also mix in some spices like paprika or cayenne pepper. Fresh herbs like parsley or basil can brighten the dish. What are some ingredient swaps for dietary preferences? For a lower-carb option, replace rice with cauliflower rice. Use ground turkey or tofu for a different protein. You can also swap cheddar cheese for a dairy-free cheese for a vegan option. What cooking methods can you use? You can air fry the stuffed peppers for a crispy texture. Just set the air fryer to 375°F and cook them for about 15-20 minutes. Grilling is another fun method. Just wrap the peppers in foil and place them on the grill. How do you maintain moisture in stuffed peppers? Add a splash of chicken broth to the bottom of the baking dish. This creates steam as they cook. Avoid overstuffing the peppers; too much filling can lead to dryness. For the full recipe, check out the recipe section above. {{image_4}} You can change the ground chicken in your stuffed peppers. Use ground turkey or beef instead. These meats add different flavors and textures. If you want a vegetarian option, try using quinoa or lentils. These ingredients pack a protein punch and keep the dish hearty. For a vegan twist, use a mix of beans and mushrooms. They add a nice texture and flavor. You can also use tofu crumbles, which absorb spices well. This makes your meal rich and filling while keeping it plant-based. You can spice up your stuffed peppers with different flavors. Why not try a Mexican twist? Add taco seasoning or jalapeños for heat. A dash of lime juice brightens the dish. If you love Italian flavors, mix in some Italian herbs like oregano or basil. You could also add marinara sauce to the filling. This creates a rich and comforting taste. Want a twist? Try adding olives, capers, or feta cheese. These ingredients bring unique textures and flavors. They turn a simple meal into something exciting. For those needing gluten-free meals, this recipe is easy to adapt. Use rice instead of breadcrumbs for filling. Always check labels on canned items like beans and corn. They should be gluten-free. If you follow a low-carb diet, you can swap rice for cauliflower rice. This keeps the dish light and low in carbs. You can also skip the beans to reduce carbs even more. These variations help everyone enjoy this tasty meal. No matter your diet, you can find a way to enjoy chicken and cheese stuffed peppers. After you make your chicken and cheese stuffed peppers, let them cool down. This helps keep them fresh. Store them in an airtight container. They will stay good in the fridge for about 3 to 4 days. If you have leftovers, try to eat them within this time. To reheat, place them in the oven or microwave until warm. If you want to keep your stuffed peppers for a longer time, freezing is a great option. First, let them cool completely. Wrap each pepper tightly with plastic wrap. Then, put them in a freezer bag or container. This helps avoid freezer burn. They can last up to 3 months in the freezer. When you're ready to eat, take them out and thaw in the fridge overnight. Reheat them in the oven at 375°F until hot. This will keep the flavors and textures intact. Meal prepping can save time on busy weeknights. You can prepare the filling ahead of time. Cook the chicken and mix in the rice, beans, and spices. Store this mixture in the fridge for 2 to 3 days. When you're ready, stuff the peppers and bake them. For batch cooking, consider making a double recipe. Freeze half for later. This way, you have a tasty meal ready whenever you need it. How do you know when stuffed peppers are done? You can tell when stuffed peppers are done by checking the peppers and cheese. The peppers should be tender and the cheese melted and bubbly. If you pierce a pepper with a fork, it should feel soft but not mushy. Can you prepare them in advance? Yes, you can prepare stuffed peppers in advance. Just stuff them and store them in the fridge. Bake them when you're ready to eat. This makes for a quick and easy family meal. Can I use frozen peppers? Yes, you can use frozen peppers. Just thaw them before stuffing. They may cook faster, so keep an eye on them while baking. What to do if I don't have certain ingredients? If you lack certain ingredients, feel free to swap them out. For example, use quinoa instead of rice or a different type of cheese. Get creative based on what you have! Can stuffed peppers be made on the stovetop? Yes, you can make stuffed peppers on the stovetop. Just steam them in a skillet with a little water. Cover with a lid and cook until tender. How to adjust heating times for different ovens? Oven temperatures can vary. If your oven runs hot, check the peppers a few minutes early. If it runs cool, you may need to add a few extra minutes. Always trust your instincts! We covered the best way to make stuffed peppers. You learned about key ingredients like bell peppers, ground chicken, and spices. You also discovered tips for cooking and storing them. There are many ways to adjust the recipe for different diets and tastes. Incorporating these ideas will make your dish delicious. Get creative with flavors and toppings. With practice, you'll master this easy meal for any occasion. Enjoy your cooking journey!](https://goldendishy.com/wp-content/uploads/2025/06/69b5c483-258e-4498-8701-d043fb5fc497-768x768.webp)
