
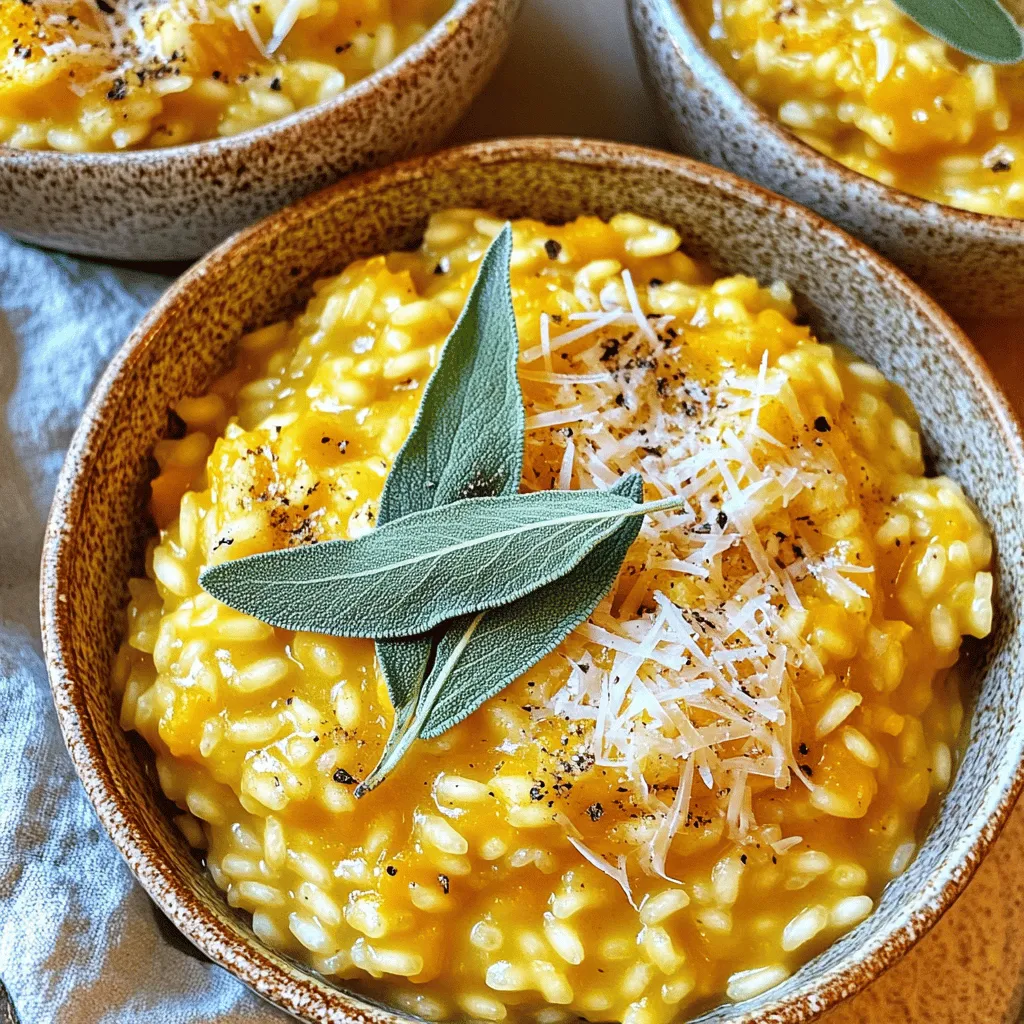
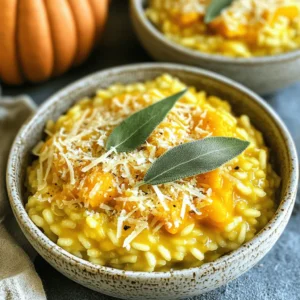
Savory Pumpkin Risotto Creamy and Comforting Recipe

Cozy up to fall flavors with my savory pumpkin risotto! This creamy dish is perfect for chilly nights and packed with warmth. I’ll guide you through simple steps to make it rich and satisfying. Whether you want to impress guests or treat yourself, this recipe has you covered. Let’s dive into the tasty world of risotto and make your kitchen the heart of comfort!
Ingredients
Essential Ingredients
– 1 cup Arborio rice
– 2 cups pumpkin puree (homemade or canned)
– 4 cups vegetable broth
– 1 medium onion, finely chopped
– 2 cloves garlic, minced
– 1/2 teaspoon ground nutmeg
– 1/2 teaspoon ground cinnamon
– 1 cup freshly grated Parmesan cheese
– 2 tablespoons olive oil
– Salt and freshly ground black pepper to taste
– Fresh sage leaves for garnish
The main base of our risotto is Arborio rice. This rice has a high starch content. It makes the risotto creamy. Pumpkin puree adds a rich flavor and a beautiful color. The vegetable broth acts as the cooking liquid, adding depth to every bite. Onion and garlic provide great aromatics. Nutmeg and cinnamon give warmth to the dish. Parmesan cheese adds a nutty flavor and creaminess. Olive oil helps with cooking the aromatics and adds richness.
Optional Ingredients
– White wine
– Crumbled feta cheese
– Chopped nuts (like walnuts or pecans)
– Extra herbs (like thyme or rosemary)
You can add white wine for a touch of acidity. It enhances the flavor profile. Crumbled feta cheese gives a salty contrast to the sweet pumpkin. Chopped nuts add texture and a nice crunch. Extra herbs can elevate the taste and freshness of the risotto.
Nutritional Information
One serving of savory pumpkin risotto has about:
– Calories: 350
– Protein: 12g
– Carbohydrates: 50g
– Fat: 12g
– Fiber: 4g
This dish is rich in carbs, making it a perfect comfort food. The protein content helps keep you full. Pumpkin offers a good source of fiber and vitamins. This meal is balanced, satisfying, and great for sharing.
Step-by-Step Instructions
Preparation of Broth
Start by warming the vegetable broth. Use a medium saucepan over medium heat. Keep the broth warm during cooking. This helps the rice cook evenly and stay creamy.
Sautéing the Aromatics
In a large skillet, heat 2 tablespoons of olive oil. Add 1 medium onion, finely chopped, and 2 cloves of minced garlic. Sauté for about 5 minutes. Stir often to prevent burning. The onion should become soft and clear.
Cooking the Risotto
Next, add 1 cup of Arborio rice to the skillet. Stir to coat the grains in the oil. Toast the rice for about 2 minutes. It will look slightly clear. Carefully pour in a ladle of warm broth. Stir constantly until the broth is almost gone. Repeat this until the rice is creamy and cooked al dente, which takes around 18-20 minutes.
Now, stir in 2 cups of pumpkin puree, 1/2 teaspoon of ground nutmeg, and 1/2 teaspoon of ground cinnamon. Cook for an extra 2-3 minutes. This will blend the flavors nicely. Finally, remove the skillet from the heat and fold in 1 cup of freshly grated Parmesan cheese. Taste and add salt and black pepper as needed. Let it rest for a minute for the flavors to settle.Enjoy this cozy dish!
Tips & Tricks
Achieving Creamy Consistency
To get that creamy look, you must use Arborio rice. This rice has more starch, which helps create the desired texture. Cook slowly and add broth bit by bit. Stir often for the best result. Avoid rushing. If the risotto looks too thick, add a little more broth. This keeps it smooth and creamy.
Best Practices for Seasoning
Seasoning is key to a great risotto. Start with salt and black pepper. Add ground nutmeg and cinnamon for warmth. Taste your dish as you cook. Adjust the flavors to your liking. Fresh herbs, like sage, also add bright notes. Always remember, simple seasonings can make a big difference.
Time-Saving Cooking Methods
Want to save time? Use a pressure cooker for faster cooking. You can also prepare the broth ahead of time. Keep it warm to save steps. Another tip is to make a larger batch. Leftovers are great for quick meals later in the week. This way, you enjoy risotto without the wait.
Variations
Adding Protein Options
You can easily add protein to your pumpkin risotto. Cooked chicken or turkey pairs well. Simply shred the meat and stir it in at the end. If you prefer seafood, shrimp or scallops add a nice touch. For a simple twist, try adding cooked sausage or bacon. These options not only enhance flavor but also make the dish heartier.
Vegan Substitutions
To make this risotto vegan, swap the Parmesan cheese with a vegan alternative. Nutritional yeast can give a cheesy flavor. Use vegetable broth, as stated in the recipe. For creaminess, add a splash of coconut milk or cashew cream. These changes keep the dish rich and satisfying without dairy.
Seasonal Ingredient Swaps
Switching ingredients with the seasons can make your risotto exciting. In fall, add roasted butternut squash or sweet potatoes. In spring, fresh peas or asparagus brighten the dish. You can also toss in sautéed mushrooms for an earthy flavor. These swaps keep the dish fresh and fun while celebrating seasonal produce.
Storage Info
How to Store Leftovers
To store leftovers, let the risotto cool first. Place it in an airtight container. Make sure to keep it in the fridge. It will stay fresh for about three days. If you want to enjoy it later, freezing is a good option.
Reheating Instructions
When you’re ready to eat, reheat the risotto gently. You can use a saucepan or microwave. If using a pan, add a splash of broth or water. This helps bring back the creamy texture. Heat slowly, stirring often, until hot. If microwaving, cover the dish to keep moisture in. Heat in short bursts, stirring in between, until warm.
Freezing Risotto
Freezing risotto is simple but has some tricks. Let it cool completely before freezing. Portion it into containers or freezer bags. Remove as much air as you can. This prevents freezer burn. It can last up to three months in the freezer. When you’re ready to eat, thaw it in the fridge overnight before reheating. This way, it keeps its flavor and texture well.
FAQs
How long does it take to make savory pumpkin risotto?
It takes about 30 minutes to make savory pumpkin risotto. You need 10 minutes for prep and 20 minutes for cooking. Timing is key, as you want the rice to absorb the broth slowly. This helps create a creamy texture. The risotto should be stirred often during cooking. This ensures even cooking and prevents sticking.
Can I use brown rice instead of Arborio rice?
I don’t recommend using brown rice for this recipe. Arborio rice is best for risotto. It has a high starch content, which gives risotto its creamy texture. Brown rice takes longer to cook and won’t yield the same results. If you want to try brown rice, be ready for a different dish. The flavor and texture will change.
What can I serve with pumpkin risotto?
You can serve savory pumpkin risotto with several tasty sides. Here are a few ideas:
– Grilled chicken or turkey for added protein
– Roasted vegetables for a colorful plate
– A fresh green salad for a light touch
– Crusty bread to soak up the risotto
These pairings will enhance your meal and add variety. Enjoy your cooking adventure with this savory dish!
This post explored how to make a perfect risotto. We discussed essential and optional ingredients, along with their nutritional info. I provided clear steps for preparing the broth, sautéing aromatics, and cooking the risotto. You learned tips for creaminess, seasoning, and time-saving methods. We covered variations for protein and vegan options, plus storage tips for leftovers.
Remember, risotto is fun to make and easy to adapt. Enjoy creating your own unique version!
![- 8 ounces fettuccine or spaghetti - 1 pound boneless, skinless chicken breast - 2 cups cremini or button mushrooms - 3 cloves garlic - 1 medium onion - 1 cup heavy cream - 1 tablespoon extra virgin olive oil - 1 teaspoon dried thyme - 1/2 cup freshly grated Parmesan cheese When you gather these ingredients, you're on your way to a delicious meal. The fettuccine or spaghetti forms the base of the dish. I love using fresh chicken breast; it cooks quickly and stays juicy. The mushrooms add a rich flavor that pairs perfectly with the cream sauce. For the additional ingredients, garlic and onion bring depth. They form the aromatic base of your sauce. The heavy cream is key for that creamy finish that makes this dish so comforting. Don't forget the seasonings! Extra virgin olive oil helps cook the chicken and gives a lovely flavor. Dried thyme adds a nice herbal note, while the Parmesan cheese makes everything taste even better. This dish is not just tasty; it’s simple and quick. You can find the full recipe to guide you step by step. Enjoy the process of cooking and savor your savory chicken and mushroom pasta! To start, bring a large pot of salted water to a rolling boil. Add 8 ounces of fettuccine or spaghetti. Cook the pasta according to the package directions until it is al dente. This usually takes about 8-10 minutes. When the pasta is ready, drain it but save about 1 cup of the pasta water. This water is important for later. It helps make the sauce creamy and smooth. While the pasta cooks, heat 1 tablespoon of extra virgin olive oil in a large skillet over medium heat. Add 1 pound of diced boneless, skinless chicken breast to the skillet. Cook the chicken for about 6-8 minutes, stirring occasionally. You want it golden brown and fully cooked. Season the chicken with salt and freshly ground black pepper. This will boost the flavor. Once done, take the chicken out and set it aside on a plate. In the same skillet, add 1 medium onion, finely chopped, and 3 cloves of minced garlic. Sauté these for about 3 minutes. You want the onion to turn translucent and fragrant. Next, add 2 cups of sliced cremini or button mushrooms to the skillet. Cook the mushrooms for about 5 minutes, stirring now and then. They should soften and release their moisture. Now, sprinkle 1 teaspoon of dried thyme and 1 teaspoon of Italian seasoning blend over the mushrooms. Stir to mix it well. Pour in 1 cup of heavy cream and bring the mixture to a gentle simmer. Let it thicken for about 3-5 minutes, stirring often. Finally, return the cooked chicken to the skillet. Mix it well with the sauce. If the sauce is too thick, gradually add some reserved pasta water until you reach your desired consistency. Now, add the drained pasta to the skillet. Toss everything together until the pasta is well coated with the sauce. Stir in 1/2 cup of freshly grated Parmesan cheese until it melts and creates a rich, creamy texture. Taste and adjust the seasoning with more salt or pepper if needed. For more detail, check the [Full Recipe]. Enjoy creating this delightful dish! To make your chicken and mushroom pasta really shine, consider adding a dash of lemon juice or zest. It brightens up the dish. Fresh herbs like basil or oregano also add great flavor. You can use a splash of white wine while cooking the chicken. This adds depth and richness. For cooking techniques, try searing the chicken on high heat. This gives it a nice golden crust. When cooking mushrooms, don't crowd the pan. This helps them brown nicely. To thicken your sauce, let it simmer longer. Stir it often to avoid burning. You can also add a bit of grated cheese. This helps create a creamy texture. If your sauce is too thick, use reserved pasta water. Slowly add it in, mixing well. This water has starch that helps the sauce stick to the pasta. For plating, use a large bowl or individual plates. Twirl the pasta with a fork for a neat look. Top each serving with a sprinkle of fresh parsley. This adds color and a fresh taste. To elevate your dish, add more grated Parmesan on top. A light sprinkle of cracked black pepper adds a nice touch. Enjoy your beautiful and tasty meal! {{image_4}} You can change the protein in this dish to fit your taste. If you want to try other meats, consider using shrimp or turkey. Both blend well with the creamy sauce and mushrooms. If you're looking for vegetarian options, tofu or chickpeas work great. They add protein and soak up the flavors. If you have dietary restrictions, you can swap the chicken for plant-based alternatives. Many brands offer delicious meatless chicken that mimics the texture and taste. This makes it easy for everyone to enjoy this dish. Switching up the type of pasta can give your meal a fresh twist. You can use penne, rigatoni, or even whole wheat pasta. Each choice brings its own flavor and texture. If you need gluten-free options, look for pasta made from rice, corn, or lentils. These options are tasty and keep the dish light. If you're looking for dairy-free options, substitute heavy cream with coconut milk or cashew cream. Both will provide a rich and creamy texture. You can also add veggies to boost flavor. Spinach, broccoli, or bell peppers can enhance the dish. Just sauté them with the onions and garlic for added taste. For the full recipe, check out Heavenly Chicken & Mushroom Fettuccine. To keep chicken and mushroom pasta fresh, store it in an airtight container. Always let it cool first before sealing. Place the container in the fridge. It should last for 3 to 4 days. Use glass or BPA-free plastic containers for the best results. To freeze chicken and mushroom pasta, follow these steps: 1. Allow the dish to cool completely. 2. Place it in a freezer-safe container or heavy-duty freezer bag. 3. Remove as much air as possible before sealing. 4. Label the container with the date. It can stay frozen for up to 2 months. When ready to eat, thaw it in the fridge overnight. To reheat your pasta, use these methods: - Stovetop: Heat in a skillet over medium heat. Add a splash of water or broth to prevent sticking. - Microwave: Place in a microwave-safe bowl. Cover with a damp paper towel and heat in 1-minute intervals. Avoid overcooking by checking often. Stir to ensure even heating. Enjoy your meal! For the full recipe, check out Heavenly Chicken & Mushroom Fettuccine. Chicken and mushroom pasta lasts about 3 to 4 days in the fridge. Store it in an airtight container. This keeps the pasta fresh and safe to eat. Make sure to cool it to room temperature before putting it in the fridge. This helps prevent bacteria growth. Yes, you can make chicken and mushroom pasta ahead of time. Cook the dish and let it cool completely. Then, store it in the fridge. When you are ready to eat, reheat it on low heat. Add a splash of cream or pasta water to keep it creamy. Side dishes that pair well include: - Garlic bread - A fresh green salad - Steamed vegetables - Roasted asparagus These options add variety and color to your meal. Yes, chicken and mushroom pasta is great for meal prep. You can store individual portions in containers. This makes it easy to grab a meal on busy days. Just remember to keep the pasta sauce separate if you want to avoid soggy noodles. You can use dried mushrooms if fresh ones are not available. Just soak them in warm water for about 20 to 30 minutes. Drain and chop them before adding to the dish. This way, you still get rich mushroom flavor in your pasta. For the best results, use a mix of dried and fresh mushrooms if you can. In this post, we covered how to make a tasty Chicken and Mushroom Pasta. You learned about key ingredients like chicken, mushrooms, and pasta. We walked through each step, from cooking the pasta to making a creamy sauce. You now have tips to boost flavor and present your dish well. Remember, you can adapt this recipe with different proteins or sauces. Keep it fresh by following our storage tips. Enjoy cooking and sharing this delicious meal!](https://goldendishy.com/wp-content/uploads/2025/06/be10f885-e993-4582-ae05-a82ade9d612d-768x768.webp)
![To make this tasty dish, gather these main items: - 1 large head of cauliflower, cut into bite-sized florets - 5 cloves of garlic, skins left on - 3 tablespoons extra virgin olive oil, divided - 1/4 cup unsweetened almond milk (or your preferred milk) - 2 tablespoons butter (or a vegan alternative) - Salt and freshly ground black pepper, to taste These ingredients form the base of the mash. The cauliflower gives the dish its creamy texture. Roasting the garlic adds a rich flavor. You can change the recipe to suit your taste. Here are some ideas: - Swap almond milk for regular milk or cream for a richer flavor. - Use ghee instead of butter for a unique twist. - Add a pinch of nutmeg for warmth. - Incorporate herbs like thyme or rosemary for added depth. These options let you make the dish your own. Feel free to get creative! Garnishing makes the dish look appealing. Here are some great choices: - Fresh chives, finely chopped, for a pop of color - A drizzle of extra virgin olive oil for richness - A sprinkle of smoked paprika for a touch of spice These garnishes enhance the flavor and presentation. They make your Roasted Garlic Cauliflower Mash shine on the table. For the full recipe, check the earlier section. To start, I preheat my oven to 400°F (200°C). This temperature works best for roasting. Next, I take one large head of cauliflower and cut it into bite-sized florets. I love using fresh cauliflower for the best flavor. On a baking sheet, I place the florets and five unpeeled cloves of garlic. Then, I drizzle two tablespoons of extra virgin olive oil over them. I sprinkle salt and black pepper generously, then toss everything together. It helps the veggies get well-coated. I spread the cauliflower and garlic in a single layer. Now, I roast them for 25 to 30 minutes. Halfway through, I gently toss them to ensure they cook evenly. I look for a nice golden brown color and tender texture when they are done. Once roasted, I let the garlic cool for a few minutes before handling it. After cooling, I squeeze the softened garlic out of its skin. I put it into a large mixing bowl with the roasted cauliflower. Then, I add a quarter cup of unsweetened almond milk, two tablespoons of butter, and the last tablespoon of olive oil. I grab a hand mixer or an immersion blender to blend the mix. I blend until it turns smooth and creamy. If I want a chunkier mash, I blend just until combined. I make sure not to overmix, as it can change the texture. Once blended, I taste the mash. If it needs more flavor, I adjust with extra salt and pepper. I love a well-seasoned mash! Now, I transfer the cauliflower mash to a serving bowl. For a fun finishing touch, I sprinkle freshly chopped chives on top. This adds color and a nice flavor. To make it look fancy, I might drizzle a bit of olive oil on top. This mash is now ready to impress! Enjoy this easy and tasty dish from the [Full Recipe]. To make the best roasted garlic cauliflower mash, follow these tips. First, use a large head of cauliflower. This gives you enough to work with. Cut the florets into even sizes. This helps them cook at the same rate. Roasting adds flavor, so don’t rush it. Allow the cauliflower to become tender and golden. When blending, don’t overmix. A few pulses will give you a nice texture. If you want it creamier, add a splash more milk. Always taste as you go. Adjust salt and pepper to your liking for the best flavor. Having the right tools makes cooking easier. Here’s what I recommend: - Baking sheet for roasting - Large mixing bowl for combining ingredients - Immersion blender or hand mixer for smoothness - Measuring cups and spoons for precise amounts - Knife and cutting board for prep These tools help you work efficiently and make the process enjoyable. Watch out for these common mistakes. First, don’t skip the roasting step. Raw cauliflower will not have the same rich taste. Second, avoid using too much liquid. It can make your mash watery. If you prefer a thicker mash, add less almond milk. Finally, remember to season well. Under-seasoning can leave your mash bland. Always taste your dish before serving. This way, you ensure it is full of flavor. For the full recipe, check the details above. Enjoy making your roasted garlic cauliflower mash! {{image_4}} You can easily make this dish dairy-free. Use almond milk or coconut milk instead of regular milk. For a buttery flavor, swap butter for vegan butter or olive oil. This keeps the mash creamy and rich without dairy. Adding flavors can elevate your mash. Fresh herbs like thyme or rosemary add a lovely touch. You can also sprinkle in garlic powder for extra garlic flavor. If you enjoy cheese, mix in some grated Parmesan for a savory kick. Get creative with how you serve this mash! Use it as a base for grilled chicken or fish. You can also serve it as a side dish with roasted vegetables. Try topping it with sautéed mushrooms or crispy bacon bits for added flavor and texture. After enjoying your roasted garlic cauliflower mash, let it cool. Place it in an airtight container. Store it in the fridge for up to 4 days. This keeps the flavor fresh and the texture nice. If you have more leftovers, freezing is a great option. Put the mash in a freezer-safe bag or container. Make sure to remove excess air. It will last for about 3 months. Label the container with the date so you can keep track. When you're ready to enjoy the mash again, reheat it gently. You can use the microwave or a stovetop. If it seems dry, add a splash of almond milk or butter. Stir it well as you heat it. This keeps it creamy and delicious. Yes, you can make Roasted Garlic Cauliflower Mash ahead of time. Prepare the mash, then let it cool. Store it in an airtight container in the fridge for up to three days. When you’re ready to eat, simply reheat it on the stove or in the microwave. You may need to add a splash of milk to bring back the creamy texture. Yes, cauliflower mash is a low-carb alternative to mashed potatoes. A cup of cooked cauliflower has about 5 grams of carbs, while a cup of mashed potatoes has around 35 grams. This makes cauliflower mash a great choice if you want to cut carbs but still enjoy a creamy side dish. Roasted Garlic Cauliflower Mash pairs well with many dishes. You can serve it with roasted chicken, grilled steak, or pan-seared fish. It also complements sautéed vegetables or a fresh salad. For a hearty meal, try it with a rich mushroom gravy or a savory sauce. The mash's creamy texture and garlic flavor enhance any main dish beautifully. Roasted Garlic Cauliflower Mash is simple and tasty. We covered its key ingredients, from cauliflower to garlic. You can customize it with optional ingredients and garnishes for more flavor. The step-by-step instructions ensure a smooth texture every time. You now have tips to avoid common mistakes. Variations allow for dairy-free or unique flavors. Storing is easy, and leftovers can even be frozen. This mash is a great low-carb option. Try it with your favorite dishes for a perfect side.](https://goldendishy.com/wp-content/uploads/2025/07/e8f9d6da-9905-472e-90b5-76f2ba9b0789-768x768.webp)
![- 2 boneless, skinless chicken breasts - 1 cup buttermilk - 1 cup all-purpose flour - 1 teaspoon baking powder - 1 teaspoon smoked paprika - 1/2 teaspoon garlic powder - 1/2 teaspoon cayenne pepper - Salt and freshly ground black pepper, to taste - 4 ready-made waffles (or homemade) - 2 tablespoons honey - Maple syrup, for drizzling - Fresh parsley, chopped, for garnish In this easy chicken and waffles recipe, you start with two boneless, skinless chicken breasts. Soak them in one cup of buttermilk. This step makes the chicken juicy and tender. Next, prepare the breading mix. You need one cup of all-purpose flour, one teaspoon of baking powder, one teaspoon of smoked paprika, half a teaspoon of garlic powder, and half a teaspoon of cayenne pepper. Don’t forget to add salt and pepper to taste. For the waffles, you can use four ready-made waffles or make your own. To finish, you will need two tablespoons of honey and maple syrup for drizzling. Chop some fresh parsley for garnish. This dish combines sweet and savory flavors, making it a favorite for many. Check out the Full Recipe to see how to put it all together. - Immerse chicken in buttermilk. - Cover and refrigerate. Start by taking two boneless, skinless chicken breasts. Place them in a bowl and pour in one cup of buttermilk. Make sure the chicken is fully coated. Cover the bowl with plastic wrap and set it in the fridge. Let it sit for at least one hour, or overnight for the best flavor. The buttermilk helps tenderize the chicken and adds a nice tang. - Combine flour and spices. - Mix to create a uniform dry mixture. Next, grab a shallow dish. In it, combine one cup of all-purpose flour with one teaspoon of baking powder, one teaspoon of smoked paprika, half a teaspoon of garlic powder, and half a teaspoon of cayenne pepper. Add salt and black pepper to taste. Mix well until everything is even. This blend will give your chicken a delicious crust. - Dredge marinated chicken in flour mixture. - Shake off excess flour. After marinating, take the chicken out of the fridge. Let the extra buttermilk drip off. Now, dredge each piece in the flour mixture. Make sure to coat both sides well. Once coated, shake off any excess flour. This step is key for achieving a crispy texture. - Heat oil in a skillet. - Fry chicken until golden-brown. In a large skillet, heat about half an inch of oil over medium-high heat. Wait until the oil is shimmering. Carefully place the coated chicken breasts into the skillet. Fry each piece for about 5-7 minutes on each side. They should turn a beautiful golden-brown color. Check the internal temperature; it should reach 165°F. Once cooked, transfer the chicken to a plate lined with paper towels to soak up excess oil. - Toast waffles according to instructions. While the chicken fries, it’s time to warm the waffles. You can use ready-made waffles or make your own if you prefer. Just toast them according to the package instructions until they are crispy and heated through. This will balance the hot chicken nicely. - Layer waffle and chicken. - Drizzle with honey and maple syrup. To assemble, take a warm waffle and place it on a serving plate. Top it with a piece of the golden fried chicken. Now, for the fun part! Drizzle honey generously over the chicken. Then, add a touch of maple syrup according to your taste. This sweet and savory combo makes every bite a delight. - Ensure oil is hot before frying. Hot oil makes the chicken crispy. - Don’t overcrowd the skillet. This helps keep the oil hot and even. - Stack chicken slightly off-center. This adds height and looks appealing. - Garnish with parsley and drizzle syrup. It gives color and extra flavor. - Consider brining chicken overnight. This makes it juicier and more flavorful. - Experiment with different spices. Try herbs or blends for new tastes. For a detailed guide, check out the Full Recipe. {{image_4}} You can switch things up with grilled chicken instead of fried. Grilled chicken has a nice smoky flavor. Plus, it's a lighter option. I love using chicken thighs for this dish. They are more juicy and tender than breasts. Thighs also add great flavor to the meal. For the waffles, try adding flavors like cinnamon or vanilla. These will give your dish a fun twist. You can also make mini waffles. They are perfect for a bite-sized treat. Kids love them, and they are easy to share. If you want to change the sweet element, try agave syrup instead of honey. It’s a nice alternative for a sweeter touch. You can also use a fruit compote. Fresh berries or peaches work great and add a fruity burst. These options make your chicken and waffles even more special. For the full recipe, check out the ingredients and steps above! After you savor your chicken and waffles, store any leftovers in an airtight container. This keeps the food fresh and safe. The dish is best consumed within 2 days. If you wait too long, the taste and texture will suffer. You can freeze the cooked chicken and waffles for later. Be sure to store them separately. This way, the waffles do not get soggy. When you are ready to eat, reheat the chicken and waffles in the oven for best results. This helps keep everything crispy and tasty. When it's time to enjoy leftovers, use an oven or air fryer to reheat the chicken. This method preserves the crispy coating. Avoid using a microwave, as it can make the chicken chewy and wet. Keeping the texture nice is key to enjoying your meal again. To make homemade waffles, start with a simple batter. Mix together: - 1 cup all-purpose flour - 1 tablespoon sugar - 1 teaspoon baking powder - 1/2 teaspoon salt - 1 cup milk - 1 large egg - 2 tablespoons melted butter Combine all the dry ingredients in one bowl. In another bowl, whisk the wet ingredients. Mix them together until just combined. Cook in a preheated waffle maker for about 5 minutes until golden brown. You can also use my [Full Recipe] for a quick option with ready-made waffles. Yes! You can explore using turkey or even tofu for a vegetarian option. Turkey breast works well as a leaner choice. For tofu, press it to remove excess moisture, then marinate like the chicken. This adds great flavor and keeps it moist. To get crispy chicken, keep the oil hot. Heat it to about 350°F before frying. This helps form a crust. Don't overcrowd the skillet; fry in batches if needed. Cook until golden brown, about 5-7 minutes per side. Yes, meal prepping is easy! You can marinate the chicken in advance. Also, cook and freeze the chicken separately from the waffles. Store in airtight containers. This meal stays tasty for up to two days in the fridge. You can spice up your chicken with different seasonings. Try adding more cayenne pepper or smoked paprika for heat. Top your waffles with fresh fruit or whipped cream. Maple syrup adds sweetness, but feel free to experiment! For sides, think about fresh fruit or a light salad. Sliced strawberries or mixed berries add a nice touch. A simple green salad can balance the dish’s richness. You can also serve it with sweet potato fries for a fun twist. You learned how to make a tasty chicken and waffles dish. We covered marinating chicken, preparing breading, and frying until golden-brown. You also saw tips for storage and variations. Don't be afraid to try different spices or use grilled chicken. This dish is fun and delicious. Enjoy making it and sharing with friends!](https://goldendishy.com/wp-content/uploads/2025/06/c6fcab88-53c4-4cda-8439-7edbb7c77c72-768x768.webp)