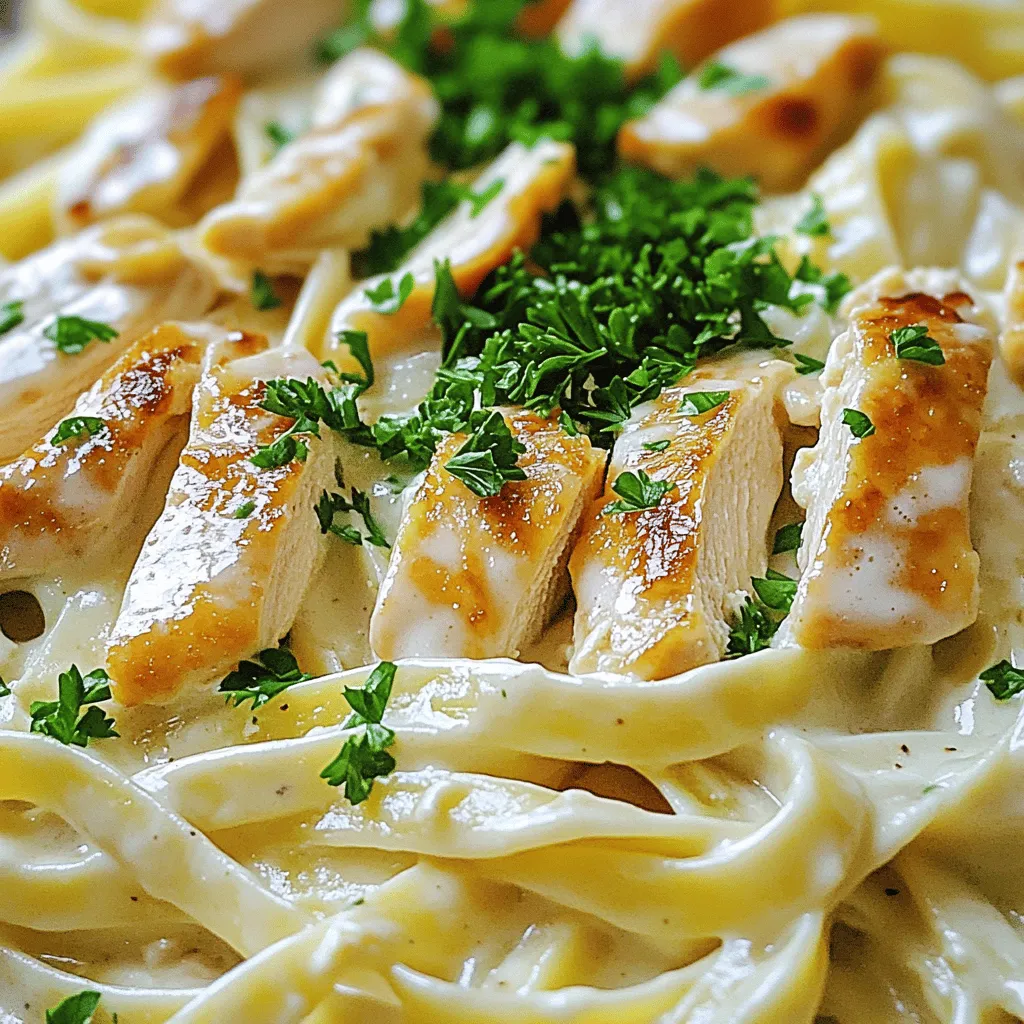
Creamy Chicken Alfredo Easy Dinner Recipe Tonight
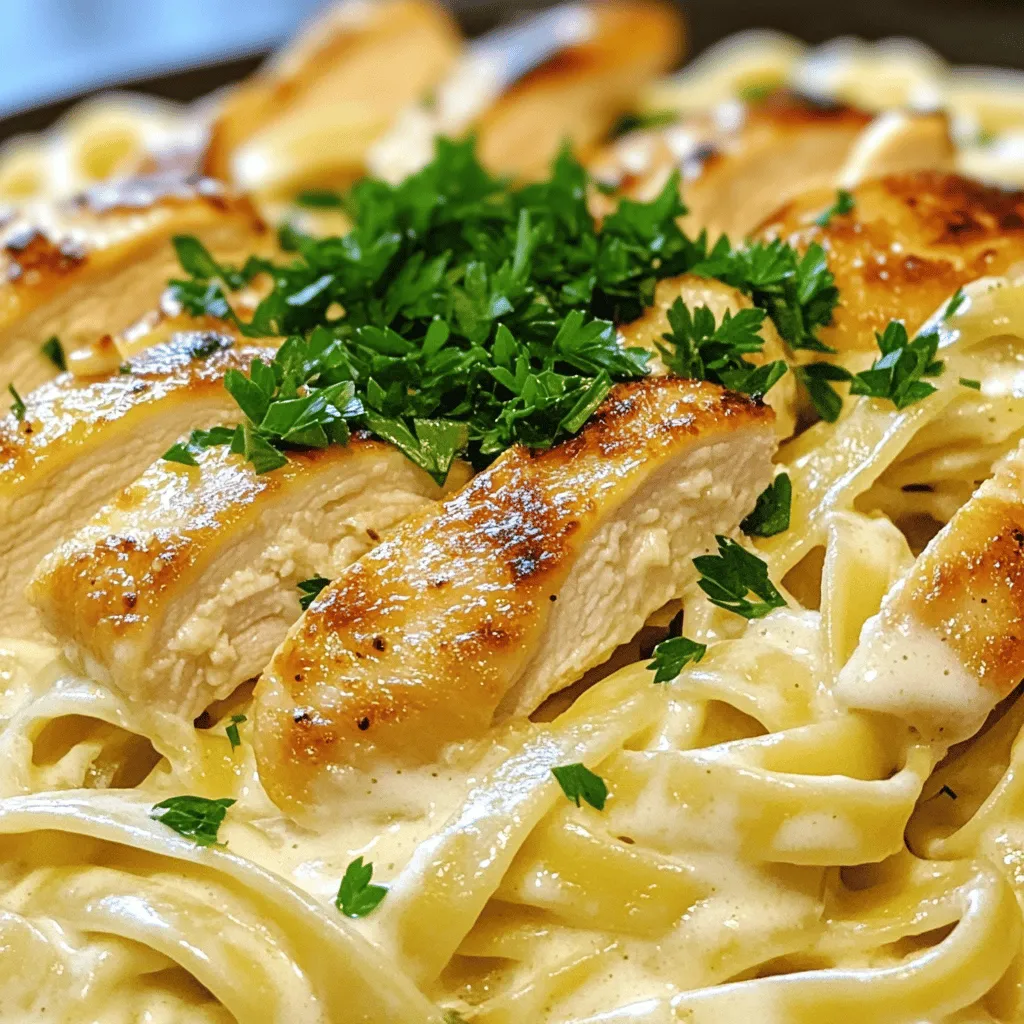
Ready to make dinner simple and delicious? This Creamy Chicken Alfredo recipe brings rich flavors to your table in no time. With just a few easy steps, you’ll whip up a meal that impresses everyone. I’ll guide you through the ingredients, cooking tips, and fun variations. Whether you’re a busy parent or a cooking newbie, this dish is your ticket to an easy, tasty supper. Let’s dive in!
Ingredients
Complete List of Ingredients
To make creamy chicken Alfredo, you will need:
– 2 boneless, skinless chicken breasts
– 8 oz fettuccine pasta
– 1 tablespoon extra virgin olive oil
– 3 cloves garlic, minced
– 1 cup heavy cream
– 1 cup freshly grated Parmesan cheese
– 1 teaspoon garlic powder
– 1 teaspoon onion powder
– Salt and black pepper, to taste
– Fresh parsley, finely chopped (for garnish)
These ingredients work together to create a rich and creamy dish. The chicken adds protein, while the pasta serves as a perfect base.
Substitutions and Alternatives
You can make some easy swaps if needed. Here are a few ideas:
– Use chicken thighs instead of breasts for more flavor.
– Swap fettuccine with penne or spaghetti if you prefer.
– Replace heavy cream with half-and-half for a lighter sauce.
– Use nutritional yeast instead of Parmesan for a dairy-free option.
– Fresh garlic can be swapped with garlic powder if you’re in a hurry.
These alternatives can help you adjust the recipe based on your taste or dietary needs.
Suggested Pairings
Creamy chicken Alfredo pairs well with many sides. Here are my top choices:
– Garlic bread for a crunchy complement.
– A simple green salad for freshness.
– Steamed broccoli adds color and nutrients.
– Roasted asparagus brings a nice crunch.
– A glass of white wine enhances the meal.
These pairings can elevate your dinner experience, making it even more enjoyable.
Step-by-Step Instructions
Cooking the Fettuccine
First, fill a large pot with water. Bring it to a rolling boil. Add plenty of salt for flavor. Next, add the fettuccine. Cook it for about 8 to 10 minutes until it is al dente. This means it should still have a little bite. Once cooked, drain the pasta. Save 1/2 cup of the starchy water. Set the drained pasta aside while you cook the chicken.
Preparing the Chicken
While the pasta cooks, take the chicken breasts. Season both sides with salt, black pepper, garlic powder, and onion powder. This adds great flavor. Make sure to coat them evenly. This simple step makes a big difference in taste.
Making the Alfredo Sauce
Now, it’s time to make the sauce. In the same skillet you will use for the chicken, heat the olive oil over medium heat. Once hot, add the minced garlic. Sauté it for about 1 minute. You want it fragrant, not brown. Slowly pour in the heavy cream while stirring. Then, whisk in the grated Parmesan cheese. Keep stirring until the sauce is smooth and creamy. If it’s too thick, add some of the reserved pasta water until it reaches the right consistency.
Combining Pasta and Chicken
Add the cooked fettuccine to the Alfredo sauce. Toss gently to coat the pasta well. You can mix in the sliced chicken as you combine them. Alternatively, you can place the chicken on top of the pasta for a nice look. Taste the dish and add more salt or pepper if needed. Finally, garnish with chopped parsley for a fresh touch.
Tips & Tricks
Achieving the Perfect Alfredo Sauce
To make a rich, creamy Alfredo sauce, use heavy cream. It gives the sauce a nice thickness. Add freshly grated Parmesan cheese for a great flavor. Make sure to stir the sauce constantly. This helps it blend well and prevents burning. If your sauce gets too thick, use the reserved pasta water to thin it out. Just add a little at a time until you reach the right consistency.
Avoiding Common Mistakes
One common mistake is overcooking the chicken. Cook it until it’s golden brown and reaches 165°F (75°C). Another mistake is adding the cheese too fast. Gradually whisk it in for a smooth sauce. Be careful not to let the garlic burn when you sauté it. It can turn bitter and ruin the sauce. Lastly, don’t skip tasting the sauce. Adjust the salt and pepper to your liking.
Serving and Presentation Tips
For a beautiful presentation, serve your creamy chicken Alfredo in wide bowls. Add extra Parmesan cheese on top for a nice touch. Finely chopped parsley makes a great garnish. It adds color and freshness to the dish. You can also place the sliced chicken on top of the pasta. This makes it look more inviting. Enjoy your meal and share it with friends and family!
Variations
Adding Vegetables for Extra Flavor
You can make creamy chicken Alfredo even better with veggies. Try adding broccoli, spinach, or bell peppers. These add color and nutrients to your dish. Steam or sauté the veggies before mixing them in. This way, they stay bright and crunchy. Toss them in right before you combine the pasta and sauce. You’ll enjoy a tasty and healthy twist.
Different Protein Options
Chicken is great, but you can switch it up! Use shrimp or scallops for a seafood flair. They cook quickly and pair well with the creamy sauce. If you prefer something plant-based, try tofu or chickpeas. These options give you protein without meat. Just season them well to match the Alfredo sauce’s flavors. You can also use cooked sausage for a heartier meal.
Gluten-Free and Dairy-Free Substitutes
You can still enjoy creamy chicken Alfredo if you have dietary needs. Use gluten-free pasta made from rice or chickpeas. For a dairy-free option, swap heavy cream with coconut milk or cashew cream. Nutritional yeast can replace Parmesan cheese for a cheesy flavor. These swaps keep the dish creamy and delicious. Experiment with these options for a meal everyone can enjoy.
Storage Info
How to Store Leftovers
After your meal, let the creamy chicken Alfredo cool down. Place it in an airtight container. This helps keep the dish fresh. Store it in the fridge for up to 3 days. Make sure to label the container with the date. This way, you will know when to eat it.
Reheating the Dish
To reheat, you can use the microwave or the stove. If using a microwave, put it in a safe bowl. Heat it in short bursts, mixing it every minute. This prevents hot spots. If you prefer the stove, heat a pan over low heat. Add a splash of milk or cream to keep it creamy. Stir often until it is hot.
Freezing Guidelines
You can freeze creamy chicken Alfredo for later. Use a freezer-safe container and leave some space. The sauce may thicken when frozen. When you’re ready to eat, thaw it in the fridge overnight. Reheat as mentioned before. Enjoy your creamy chicken Alfredo just like the first time!
FAQs
How to make creamy chicken Alfredo from scratch?
To make creamy chicken Alfredo from scratch, start by cooking fettuccine pasta. Boil water in a large pot and add salt. Cook the pasta until al dente, then drain, saving a bit of water. Next, season chicken breasts with salt, pepper, garlic powder, and onion powder. In a skillet, heat olive oil and cook the chicken until golden brown. Remove it and slice. In the same skillet, add minced garlic and heavy cream, stirring well. Slowly add grated Parmesan cheese until creamy. Toss in the pasta and chicken, and serve.
Can I use another type of pasta?
Yes, you can use other pasta types! Penne, bowtie, or spaghetti work well too. Just remember to adjust the cooking time based on the pasta you choose. The key is to cook it until al dente for the best texture.
What can I serve with creamy chicken Alfredo?
Creamy chicken Alfredo pairs great with a simple salad or garlic bread. You can also add steamed broccoli or green beans for color and nutrition. For a special touch, serve a glass of white wine alongside your meal.Enjoy making this classic dish!
We covered the key steps to make creamy chicken Alfredo. You learned about essential ingredients, cooking methods, and tips. I shared ways to customize your dish with veggies or different proteins. Storage tips help you keep leftovers fresh and tasty.
Remember, practice makes perfect. Don’t fear trial and error. Enjoy making this dish your own and share it with friends. You’ll impress them with your skills and creativity. Happy cooking!


. Enjoy your cooking! Choosing the right chickpeas You can use canned chickpeas for ease. Just make sure to drain and rinse them well. This removes extra salt and makes them taste fresher. If you prefer, soak dried chickpeas overnight. This gives a firmer texture. Cook them until soft before adding to your stew. Spice adjustments and substitutions Spices are key to Moroccan flavors. If you want more kick, add cayenne pepper. For a different taste, swap smoked paprika for regular paprika. You can also try turmeric for a vibrant color and health boost. Feel free to adjust the salt and pepper to your liking. Cooking time adjustments for texture Cooking time affects the stew's texture. For softer vegetables, simmer longer. If you like a crunch, reduce the cooking time. Always check the stew as it cooks. This way, you can get the perfect blend of soft chickpeas and tender veggies. For the full recipe, check the details above. {{image_4}} To make Moroccan chickpea stew your own, you can swap some ingredients. Here are a few ideas: - Adding other vegetables: Sweet potatoes lend a nice sweetness. You can also try adding kale for a nutritious boost. - Using different beans or legumes: Kidney beans or lentils can replace chickpeas if you want a change. - Modifying spices to suit taste preferences: If you love heat, consider adding cayenne pepper. Or, reduce spice for a milder flavor. These swaps keep the stew fresh and exciting while fitting your taste. Pairing this warm stew with the right sides enhances the meal. Here are some great options: - Recommended sides: Crusty bread or warm pita is perfect for scooping. You can also serve it with fluffy rice for a hearty meal. - Pairing with beverages: A light-bodied red wine or herbal tea complements the flavors well. For a refreshing choice, try mint lemonade. These suggestions add to the experience, making each bite even more enjoyable. To keep your Moroccan Chickpea Stew fresh, follow these steps: - Refrigeration tips: Place the stew in an airtight container. It will last in the fridge for up to 4 days. Ensure it cools down before sealing the container to avoid condensation. - Freezing instructions: If you want to freeze it, use freezer-safe containers. The stew can stay good for 3 months in the freezer. Just leave some space at the top, as it may expand when frozen. When it's time to enjoy your stew again, reheating is key. - Best methods for reheating the stew: The best way is on the stove. Pour the stew into a pot and heat it over medium heat. Stir it often to ensure even heating. You can also use the microwave. Heat in a microwave-safe bowl, covering it loosely. Heat in short bursts and stir between to prevent hot spots. - Avoiding loss of texture and flavor: To keep the stew's texture, add a splash of vegetable broth or water during reheating. This helps maintain moisture. Always taste and adjust seasoning after reheating, as flavors can mellow. For the full recipe, you can refer to the earlier section. Can I make this stew in a slow cooker? Yes, you can! Start by sautéing the onion and garlic in a pan. Then, transfer them to your slow cooker. Add all the other ingredients, except the spinach and lemon. Cook on low for about 6-8 hours or high for 3-4 hours. Add spinach before serving. How can I make it spicier? To add heat, use fresh chili peppers or red pepper flakes. You can also add a dash of cayenne pepper. Start with a small amount and adjust to your taste. Is it possible to make this stew ahead of time? Absolutely! This stew tastes even better the next day. Make it ahead and store it in the fridge for up to three days. Reheat before serving to enjoy the rich flavors. Can I substitute fresh herbs for dried? Yes, you can! Use three times more fresh herbs than dried. So, if a recipe calls for one teaspoon of dried, use three teaspoons of fresh. Fresh herbs will add a vibrant flavor. What is the nutritional information for Moroccan Chickpea Stew? This stew is packed with nutrients! A serving typically contains about 250 calories, 10 grams of protein, and 8 grams of fiber. It’s a great source of vitamins from the veggies and chickpeas. For the full recipe, check out the detailed steps above. This article covered a tasty Moroccan Chickpea Stew. I shared the main ingredients, cooking steps, and helpful tips to perfect your dish. You can swap ingredients or adjust spices for your liking. Remember to store and reheat leftovers properly. This stew is not just healthy; it’s also fun to make. Enjoy sharing it with family and friends. Embrace exploring flavors and making this dish your own. Cooking can be easy and enjoyable.](https://goldendishy.com/wp-content/uploads/2025/06/4667d82b-b7b2-4094-8ffc-7c6a096b6e6d-768x768.webp)