
7. Classic Beef Stroganoff Delicious Comfort Food Recipe
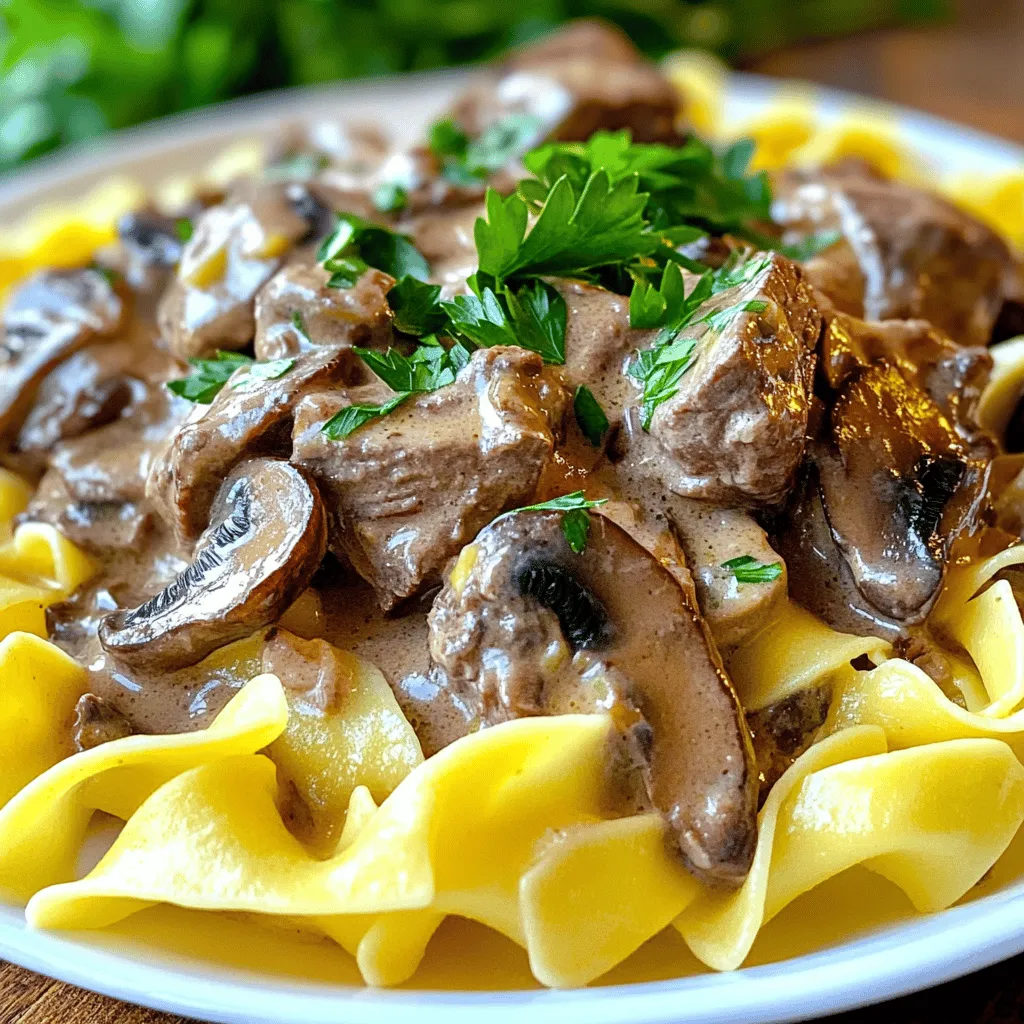
Looking for a taste of comfort? You’re in the right place! This classic beef stroganoff recipe brings rich flavors and warm memories to your table. With tender beef, savory mushrooms, and creamy sauce, it’s a dish that never fails to impress. Whether you’re a beginner or a seasoned cook, I’ll guide you step-by-step to create a comforting meal that your family will love. Let’s get cooking!
Ingredients
Main Ingredients for Beef Stroganoff
– 1 lb beef sirloin, thinly sliced
– 2 tablespoons olive oil
– 1 medium onion, finely chopped
– 2 cloves garlic, minced
– 8 oz mushrooms, sliced (cremini or button)
– 2 tablespoons all-purpose flour
– 2 cups low-sodium beef broth
The main ingredients are all about balance. The beef sirloin gives the dish its rich flavor. The olive oil adds a nice sheen and depth to the meat. Onions and garlic bring sweetness and warmth. Mushrooms add a savory touch and texture. Flour thickens the sauce to a creamy finish, while beef broth forms the base.
Additional Ingredients
– 1 tablespoon Worcestershire sauce
– 1 teaspoon Dijon mustard
– 1 cup sour cream
– Salt and pepper to taste
– Fresh parsley, chopped (for garnish)
These extra ingredients elevate the dish. Worcestershire sauce gives a hint of umami. Dijon mustard adds a subtle kick. Sour cream finishes the sauce with creaminess. Salt and pepper enhance all the flavors, while parsley brightens the plate.
Serving Suggestions
– Cooked egg noodles or rice (for serving)
– Store leftovers in an airtight container
Egg noodles or rice are classic choices to serve with Beef Stroganoff. They soak up the sauce well. For leftovers, store them in an airtight container in the fridge. This way, you keep the flavors intact for another meal.
Step-by-Step Instructions
Step 1: Brown the Beef
First, heat 2 tablespoons of olive oil in a large skillet. Make sure the oil is hot before adding the beef. Add 1 pound of thinly sliced beef sirloin. Season it well with salt and pepper. Cook the beef for about 3-4 minutes. You want it to be a nice brown color. This step adds flavor. Once browned, transfer the beef to a plate and set it aside.
Step 2: Sauté the Aromatics
In the same skillet, add 1 medium finely chopped onion. Cook it for about 2-3 minutes until it turns translucent. Then, add 2 cloves of minced garlic. Stir it for a minute. Next, add 8 ounces of sliced mushrooms. Cook them for about 5 minutes. The mushrooms should be tender and have released their juices. This will enhance the dish’s flavor.
Steps 3-7: Creating the Sauce and Serving
Now, sprinkle 2 tablespoons of all-purpose flour over the mushroom mixture. Stir well to coat everything. This helps cook off the raw taste of flour. Gradually pour in 2 cups of low-sodium beef broth while stirring. Add 1 tablespoon of Worcestershire sauce and 1 teaspoon of Dijon mustard. Mix until everything is combined. Let it simmer gently to thicken.
Next, reduce the heat to medium. Return the browned beef to the skillet. Let it simmer in the sauce for about 5 minutes. Then, stir in 1 cup of sour cream. Mix until the sauce is creamy. Taste it and adjust salt and pepper as needed.
For the side, cook egg noodles or rice according to package directions. Drain and keep warm.
To serve, place egg noodles or rice on each plate. Spoon the beef stroganoff mixture over the top. Garnish with fresh chopped parsley for a nice finish. This makes the dish look great and taste even better.
Tips & Tricks
Perfecting Your Beef Stroganoff
To make your beef stroganoff shine, avoid overcooking the beef. Cook it just until it’s browned. This keeps the meat tender. Next, to achieve that creamy sauce, add sour cream off the heat. This prevents it from curdling. Stir it in gently for a smooth finish.
Enhancements to the Recipe
You can add some spices for extra flavor. Try a pinch of paprika or a dash of nutmeg. For a twist, add some fresh thyme or dill. They bring a nice aroma. As for garnishes, consider using fresh parsley or chives. They add color and freshness to your dish.
Cooking Tools & Equipment
Use a heavy skillet for even cooking. A non-stick pan can help prevent sticking. Make sure to have a good wooden spoon for mixing. It helps combine all the ingredients well. Accurate measuring cups and spoons are key too. They ensure you get the right amounts for each ingredient.
This information should help you create the best beef stroganoff.Enjoy your cooking!

Variations
Alternative Proteins
You can use chicken or pork instead of beef for Beef Stroganoff. Thinly slice chicken breast or pork tenderloin for a tasty twist. Cook them the same way as the beef, and you’ll enjoy a new flavor. If you want a vegetarian option, try using mushrooms, tofu, or lentils. These ingredients can create a rich, hearty dish without meat.
Gluten-Free Adaptations
If you need a gluten-free recipe, there are easy flour substitutes. Use cornstarch, rice flour, or almond flour instead of regular flour. Just mix the substitute with a little water before adding it to your sauce. This will help keep the sauce smooth. You can also check your beef broth for gluten-free options. Cook the dish with the same steps, and you’ll get a great meal.
Flavor Variations
You can add different vegetables to your Beef Stroganoff for extra taste. Try bell peppers, spinach, or peas to brighten the dish. You can also experiment with unique ingredients like mustard, soy sauce, or even a splash of white wine. These can change the flavor profile and make your dish stand out. Don’t be afraid to explore different sauces to find your perfect mix.
Storage Info
Storing Leftovers
To store leftover Beef Stroganoff, let it cool first. Place it in an airtight container. You can keep it in the fridge for up to three days. For longer storage, freeze it in a freezer-safe container. It can last up to three months in the freezer.
Reheating Tips
When you’re ready to eat your leftovers, reheat them gently. Use a skillet over low heat. Stir often to prevent sticking. If the sauce gets too thick, add a splash of beef broth or water to adjust the consistency. This keeps it creamy and delicious.
Meal Prep Suggestions
To make busy days easier, you can prepare Beef Stroganoff in advance. Cook a big batch and store it in portions. Freeze these portions for quick meals later. Just thaw in the fridge overnight before reheating. This saves time and effort while still giving you great comfort food.
FAQs
What is the best beef to use for Beef Stroganoff?
For a tasty Beef Stroganoff, I recommend using beef sirloin or tenderloin. These cuts are soft and cook quickly. Flank steak is another option, but it can be chewier. Always slice the beef thinly against the grain for the best results. This helps it stay tender when cooked.
Can I make Beef Stroganoff ahead of time?
Yes, you can prepare Beef Stroganoff ahead of time. Cook the dish completely, then let it cool. Store it in an airtight container in the fridge for up to three days. When ready to eat, simply reheat on the stove over low heat. You may need to add a splash of broth to keep it moist.
How do I make Beef Stroganoff less rich?
To lighten Beef Stroganoff, you can use low-fat sour cream instead of regular sour cream. You can also reduce the amount of beef broth or use plain Greek yogurt. This keeps the flavor while cutting some fat. Lastly, skip the butter or oil when cooking.
Is Beef Stroganoff suitable for freezing?
Yes, Beef Stroganoff freezes well. Let it cool completely, then place it in a freezer-safe container. It can stay in the freezer for up to three months. To thaw, move it to the fridge overnight. Reheat gently on the stove when ready to serve.
Can I add vegetables to Beef Stroganoff?
Absolutely! You can add vegetables like peas, bell peppers, or spinach for extra flavor and nutrition. Just sauté them with the onions and mushrooms. This will add color and make the dish more balanced. Feel free to mix and match your favorite veggies!
Beef Stroganoff is a hearty dish with rich flavors. We covered key ingredients, from beef sirloin to sour cream. I shared step-by-step cooking tips for a creamy sauce and serving ideas. You learned how to avoid common mistakes and enhance the meal with different flavors. For storage, you now know how to keep leftovers fresh and reheat properly. This recipe is adaptable, allowing for many variations to suit your taste. Enjoy preparing and sharing this comforting meal with others!


![To make Easy Chicken Tortilla Soup, gather these key ingredients: - 2 tablespoons olive oil - 1 medium onion, finely diced - 2 cloves garlic, minced - 1 bell pepper (any color), finely diced - 2 medium tomatoes, diced - 4 cups low-sodium chicken broth - 1 teaspoon ground cumin - 1 teaspoon chili powder - 1 teaspoon smoked paprika - 1 pound cooked chicken breast, shredded - 1 can (15 oz) black beans, thoroughly rinsed and drained - 1 cup corn (fresh or frozen) - Salt and freshly ground black pepper, to taste These ingredients create a rich flavor base for your soup. The spices, like cumin and chili powder, add warmth. Using low-sodium broth helps control salt levels. For a delightful finish, consider adding these garnishes: - Tortilla chips, for garnish and added crunch - Fresh cilantro, roughly chopped, for garnish - 1 ripe avocado, diced, for garnish - Lime wedges, for serving These garnishes enhance the soup's look and taste. The crunch of tortilla chips contrasts nicely with the tender soup. A squeeze of lime adds a zesty touch. To prepare this soup, have these tools on hand: - A large pot - A sharp knife - A cutting board - A measuring spoon - A ladle for serving Having the right tools makes cooking easier. A large pot holds all the ingredients while they cook together. A sharp knife and cutting board help you chop veggies quickly. For the full recipe, check out the [Full Recipe]. Gather your ingredients before you start. This makes cooking easier and faster. You will need: - 2 tablespoons olive oil - 1 medium onion, finely diced - 2 cloves garlic, minced - 1 bell pepper (any color), finely diced - 2 medium tomatoes, diced - 4 cups low-sodium chicken broth - 1 teaspoon ground cumin - 1 teaspoon chili powder - 1 teaspoon smoked paprika - 1 pound cooked chicken breast, shredded - 1 can (15 oz) black beans, thoroughly rinsed and drained - 1 cup corn (fresh or frozen) - Salt and freshly ground black pepper, to taste - Tortilla chips, for garnish and added crunch - Fresh cilantro, roughly chopped, for garnish - 1 ripe avocado, diced, for garnish - Lime wedges, for serving 1. Heat the olive oil in a large pot over medium heat. 2. Add the diced onion and sauté for about 3-4 minutes until it turns soft. 3. Stir in the minced garlic and diced bell pepper. Cook these for 2 more minutes. 4. Now, add diced tomatoes, chicken broth, cumin, chili powder, smoked paprika, and shredded chicken. Mix well. 5. Raise the heat until it boils, then reduce it and let it simmer for 15 minutes. 6. After simmering, stir in the black beans and corn. Heat for another 5-7 minutes. 7. Taste and season with salt and pepper as needed. Adjust spices if you want more heat. Ladle the hot soup into bowls. Top with crumbled tortilla chips for crunch. Add diced avocado and fresh cilantro for color and flavor. Serve with lime wedges on the side. Squeeze lime juice over the soup before eating for a zesty kick! For the full recipe, check the section above. Enjoy your tasty chicken tortilla soup! To make your chicken tortilla soup taste amazing, focus on fresh ingredients. Use ripe tomatoes and fresh herbs. They add a burst of flavor. Toast your spices in the olive oil to release their aromas. This small step can boost the taste of your soup. Consider adding a splash of lime juice for brightness. It really makes a difference! If you like heat, add more chili powder or a diced jalapeño. For milder soup, use less spice. Remember to taste as you cook. You can add more spice later if needed. Also, consider serving hot sauce on the side. This way, everyone can adjust the heat to their liking. To speed up cooking, use pre-cooked chicken. Shredded rotisserie chicken works well. It saves time and adds flavor. Chop your veggies small for quicker cooking. Use a sharp knife for safety and ease. Lastly, keep your broth warm before adding it to the pot. This helps your soup come together faster. For the full recipe, check out the earlier section. {{image_4}} You can easily make a vegetarian version of chicken tortilla soup. Swap out the chicken for hearty vegetables. Use black beans for protein and fiber. Sweet corn adds a nice crunch. You can also add diced zucchini or bell peppers for more flavor. Use vegetable broth instead of chicken broth. This keeps the soup light yet filling. Top it with tortilla chips, avocado, and cilantro for the best taste. This version is perfect for a healthy meal. If you love heat, then spicy chicken tortilla soup is for you. Start with the original recipe and add more spices. Include diced jalapeños or serrano peppers for a kick. You can also add some cayenne pepper or hot sauce to the pot. Adjust the spice level to your liking. Serve it with sour cream to cool down the heat. This soup is sure to warm you up on a chilly night. For a creamy twist, turn your chicken tortilla soup into a creamy delight. After cooking the soup, stir in some heavy cream or sour cream. This gives the soup a rich and smooth texture. You can also blend a portion of the soup for extra creaminess. Just blend it in a blender and stir it back in. This version is comforting and perfect for those who enjoy a velvety finish. Don't forget to garnish with tortilla chips and avocado for a crunchy contrast. For the full recipe, check out the details above! After making Easy Chicken Tortilla Soup, allow it to cool. Use an airtight container. Store the soup in the fridge for up to three days. Make sure to keep it covered to preserve flavor. When you're ready to enjoy leftovers, pour the soup into a pot. Heat it over medium heat until warm. Stir it often to prevent sticking. You can also use the microwave. Place the soup in a bowl and cover it loosely. Heat for about 2-3 minutes, stirring halfway. Always check the temperature before eating. If you want to save some soup for later, freezing is perfect. Let the soup cool completely. Pour it into freezer-safe bags or containers. Leave some space for the soup to expand. Seal tightly and label with the date. You can freeze it for up to three months. When you want to eat it, thaw it overnight in the fridge before reheating. This method helps keep all the flavors intact. Enjoy the full recipe and indulge in this delightful dish! I recommend using cooked chicken breast for this soup. It stays tender and juicy. You can use leftover rotisserie chicken or poach chicken breasts to save time. Shredded chicken blends well with the soup flavors. Yes, you can make this soup in a slow cooker. Start by sautéing the onion and garlic in a pan. Then add all the ingredients to the slow cooker. Set it on low for 6-8 hours or high for 3-4 hours. This method lets the flavors meld nicely. Chicken Tortilla Soup stays fresh for about 3-4 days in the refrigerator. Store it in an airtight container. Make sure it cools before you put it in the fridge. If you want it to last longer, consider freezing it. You can find the Full Recipe for more details on storage. This blog post covered everything you need for easy chicken tortilla soup. We explored essential ingredients, tools, and garnishes. You learned the clear steps for prep and cooking, plus tips for flavor and spice. Variations let you customize the soup to your taste. Lastly, we discussed how to store and reheat leftovers. Now, you can enjoy this tasty meal any time. Get creative with flavors and make it your own!](https://goldendishy.com/wp-content/uploads/2025/06/e0a7fe5b-d8f8-4d99-83cb-06f3f9771105-768x768.webp)

![- 2 cups elbow macaroni - 4 cups water - 1 teaspoon salt - 2 tablespoons unsalted butter - 1 cup sharp cheddar cheese, shredded - 1 cup Monterey Jack cheese, shredded - 1/2 cup cream cheese, softened - 1 teaspoon garlic powder - 1 teaspoon onion powder - 1/4 teaspoon black pepper - 1/4 teaspoon smoked paprika - Fresh parsley, chopped - Chives, chopped To make delicious Instant Pot mac and cheese, you need a few key ingredients. First, the elbow macaroni is your base. It holds the sauce well and cooks up perfectly. Water helps cook the pasta and creates steam. The salt adds flavor to the mix. Unsalted butter enriches the dish, making it creamy. Next, the cheese! Cheddar cheese gives that classic flavor, while Monterey Jack adds creaminess. Cream cheese helps bind everything together. For seasonings, garlic powder and onion powder bring depth. Black pepper adds a bit of heat. Smoked paprika gives a nice smoky touch. Finally, if you want to garnish, fresh parsley and chives add color and flavor. These ingredients come together to create a comforting dish that feels like a hug in a bowl. You can find the full recipe [here]. Start by adding the elbow macaroni into the Instant Pot. Next, pour in 4 cups of water. Sprinkle in 1 teaspoon of salt for flavor. Make sure all the macaroni is covered in water. Secure the lid tightly on the Instant Pot. Set the pressure release valve to the sealing position. Select the manual high-pressure setting. Adjust the timer to cook for 4 minutes. When the cooking cycle ends, do a quick pressure release. Carefully turn the valve to venting. Wait until the pressure is fully released. Open the lid slowly, being cautious of steam. Stir the noodles gently to separate any that are stuck together. Add 2 tablespoons of butter right away. Then, mix in 1 cup of sharp cheddar cheese, 1 cup of Monterey Jack cheese, and 1/2 cup of softened cream cheese. Next, add 1 teaspoon of garlic powder, 1 teaspoon of onion powder, 1/4 teaspoon of black pepper, and 1/4 teaspoon of smoked paprika. Stir well until the cheese melts into a creamy sauce. If your mac and cheese is too thick, add a splash of water or milk. Stir until it reaches your desired creamy consistency. Taste your mac and cheese and adjust the seasoning as needed. You can add a pinch more salt or pepper if you want. Serve your dish hot and enjoy the creamy comfort of this Instant Pot mac and cheese. For the full recipe, check the details above. To make your mac and cheese shine, choose a mix of cheeses. I love sharp cheddar for its bold taste and Monterey Jack for creaminess. Together, they create a rich flavor that sings. For a twist, add a bit of gouda or parmesan for depth. Preventing sticking is key. Make sure to stir the pasta before cooking. Adding a touch of oil helps too. This keeps the macaroni from clumping together in the pot. Cook in larger batches to save time. The Instant Pot can handle it! You can double the recipe easily. This way, you have leftovers for quick meals later. Just store them in the fridge. Clean-up can be quick if you act fast. Rinse the pot right after use. Soaking it for a few minutes also helps. Use a soft sponge to keep it scratch-free. For a stunning display, serve your mac and cheese in a beautiful bowl. Top it with extra cheese or crispy breadcrumbs for texture. Fresh herbs like parsley or chives add color and flavor too. Pair your dish with a simple salad or garlic bread. This makes a balanced meal that everyone will enjoy. {{image_4}} You can switch up the cheese for fun. Try using Gouda for a rich taste. It melts well and adds creaminess. Parmesan also works great. It gives a salty, nutty kick. If you're dairy-free, nut cheese is a good choice. It can make your dish creamy while keeping it plant-based. Want to make your mac and cheese more exciting? Add veggies! Broccoli or spinach mixes in nicely. They boost both flavor and nutrition. You can also throw in proteins like chicken or bacon. These ingredients add heartiness and make the dish more filling. If you like heat, spice it up! Add jalapeños for a fresh kick. Hot sauce can also bring the heat. Another fun idea is using smoky chipotle. It gives a deep, smoky flavor that pairs well with cheese. These spicy twists can take your mac and cheese to the next level. For the full recipe, check out the instructions above. Enjoy creating your perfect bowl of mac and cheese! After you make your Instant Pot mac and cheese, let it cool down first. This helps keep the creamy texture. Once cooled, place it in an airtight container. I like to use glass containers for easy reheating. Store it in the fridge for up to three days for the best taste. When it’s time to enjoy those leftovers, you can reheat them in two ways. The microwave is quick and easy. Just place a portion in a bowl and cover it. Heat for one minute, stir, and heat again if needed. The stovetop method keeps the texture nice. Add a splash of milk to a pan, stir in the mac and cheese, and heat on medium until hot. You can freeze mac and cheese for later! Let it cool completely, then spoon it into freezer-safe bags. Press out as much air as possible before sealing. It can stay fresh for about three months. To thaw, move it to the fridge overnight. After thawing, reheat it using the stovetop method for a creamy finish. To make Instant Pot Mac and Cheese, you start by adding elbow macaroni to the pot. Pour in water and add salt. Then, secure the lid and cook on high pressure for 4 minutes. After that, release the pressure quickly. Open the lid and stir the pasta. Add butter and mix in your cheeses. Finally, stir in the seasonings until smooth. You can find the full recipe for more details. Yes, you can use gluten-free macaroni. Just substitute regular pasta with gluten-free options. The cooking time may stay the same, but check the package for specific instructions. Some gluten-free pasta might need a little less time, so watch closely. This way, you can enjoy a creamy dish without gluten. If your mac and cheese is too thick, don’t worry! You can fix it easily. Add a splash of water or milk to the pot. Stir well until it reaches your desired creaminess. If it still seems thick, add a bit more liquid. This will help create that perfect velvety texture. You learned how to make Instant Pot mac and cheese with ease. We covered ingredients, cooking steps, and tips for perfect flavor. You can customize your dish with different cheeses and add-ins. Remember to store leftovers properly to enjoy later. Now it’s your turn to create a creamy, cheesy delight. Experiment with flavors and share your results! Enjoy your cooking journey.](https://goldendishy.com/wp-content/uploads/2025/07/fbbf4859-6ee8-4460-a645-018ee95cc89f-768x768.webp)