Creamy Mushroom Risotto Simple and Savory Delight
![- 1 cup Arborio rice - 1 cup mixed mushrooms (button and shiitake, thinly sliced) - 1/2 cup heavy cream - 1/2 cup grated Parmesan cheese Arborio rice is the star here. It’s starchy and creamy as it cooks. Mixed mushrooms bring rich flavors. I love using both button and shiitake for the best taste. Heavy cream makes the risotto smooth and rich. The Parmesan cheese adds a salty kick that elevates the dish. - 1 small onion, finely chopped - 2 cloves garlic, minced - 2 tablespoons extra-virgin olive oil - 1 tablespoon unsalted butter Onion and garlic are key for flavor. They create a lovely base when sautéed. Olive oil and butter work together to add depth. The oil keeps the butter from burning, making the perfect blend. - Salt and freshly ground black pepper to taste - Fresh parsley, chopped for garnish Salt and pepper are must-haves for seasoning. They bring out all the flavors in the dish. Fresh parsley adds color and a hint of freshness on top. It makes the risotto look beautiful and bright. For the full recipe, check out our Mushroom Medley Creamy Risotto. Each ingredient plays a role in making this dish a creamy delight. Start by heating the vegetable broth in a medium saucepan. Warm it over medium heat until it’s hot but not boiling. This is key! Keeping the broth warm helps the rice cook evenly. If the broth is cold, it can shock the rice and ruin the dish. In a large skillet, add the olive oil and butter. Heat this over medium heat. Once hot, add the finely chopped onion. Sauté for about 3 to 4 minutes. You want the onion to soften and turn translucent. Next, add the minced garlic and sliced mushrooms. Cook for 5 to 6 minutes. Stir occasionally until the mushrooms are golden brown. They should be soft and have released some moisture. This step builds a rich flavor base. Now, it’s time to toast the rice. Add the Arborio rice to the skillet. Stir well to coat the grains with the mushroom mix. Cook for an additional 2 to 3 minutes. You’ll see the rice edges becoming slightly translucent. This toasting enhances the flavor. Next, start adding the warm broth one ladleful at a time. Stir constantly. Let the rice absorb the liquid before adding more. This gradual addition is crucial. It helps the rice become creamy. Continue this process for about 18 to 20 minutes. The rice should be tender but still al dente. Once it reaches this creamy state, stir in the heavy cream and grated Parmesan cheese. Mix well to combine. Season with salt and black pepper to taste. For the full recipe, you can refer to the detailed steps above. Enjoy your creamy mushroom risotto! To make your risotto creamy, you must stir constantly. This action helps release starch from the rice. The starch is what gives risotto its rich texture. If you stop stirring, the rice can clump, and the dish won’t be as smooth. Choose the right type of broth for the best flavor. Vegetable broth works well, but chicken broth adds depth. Always keep your broth warm while you cook. Cold broth can shock the rice and slow down cooking. Adding white wine brings a nice depth to the dish. Use a dry white wine like Sauvignon Blanc. This adds acidity and balances the richness of the cream. For mushrooms, mix button and shiitake. Button mushrooms are mild and creamy, while shiitake adds an earthy taste. You can also try portobello or cremini for a bolder flavor. When plating, use shallow bowls for a nice look. Pile the risotto high and use a spoon to create a small well in the center. This makes it feel gourmet. Pair your risotto with a crisp green salad or some roasted vegetables. A glass of white wine, like Chardonnay, complements the flavors well. For an extra touch, garnish with more Parmesan and a drizzle of olive oil. This will enhance both the taste and the appearance of your dish. {{image_4}} You can change the type of mushrooms in your risotto. Each type adds its own taste. Try using portobello or oyster mushrooms for a different flavor. Seasonal vegetables also work well. Asparagus or peas can add freshness and color to your dish. If you want a vegan risotto, skip the heavy cream and cheese. Use coconut cream and nutritional yeast for a rich flavor. For lactose-free options, choose lactose-free cheese and cream. These swaps keep the dish creamy and delicious. You can also make this risotto gluten-free. Arborio rice is naturally gluten-free, so you’re already set. Just ensure your broth is gluten-free, too. Adding protein can make your risotto heartier. You can mix in chicken, shrimp, or tofu. Cook the protein separately and stir it in near the end. This keeps flavors balanced and ensures everything is cooked perfectly. Chicken adds a savory touch, while shrimp gives a nice seafood flair. Tofu is a great choice for a plant-based meal. Each option enhances your creamy mushroom risotto and makes it more filling. For more details on the recipe, check the Full Recipe link. To keep creamy mushroom risotto fresh, store it in a proper container. Use an airtight container to prevent moisture loss. Make sure the risotto cools to room temperature before sealing. Creamy mushroom risotto lasts up to three days in the fridge if stored correctly. When reheating risotto, the best methods are on the stovetop or in the microwave. For stovetop reheating, add a splash of broth to help revive the creaminess. Stir gently over low heat until warm. In the microwave, cover the dish with a damp paper towel. Heat in short bursts, stirring in between to keep it creamy. To freeze risotto, let it cool completely first. Then, place it in a freezer-safe container or bag. Remove as much air as possible to prevent freezer burn. Creamy mushroom risotto can stay frozen for up to two months. When ready to eat, thaw it overnight in the fridge. Reheat as mentioned above, ensuring it stays creamy and delicious. Cooking creamy mushroom risotto takes about 30 minutes. You will spend 10 minutes prepping and 20 minutes cooking. Keep the broth warm while you cook. Stir the rice often and add broth slowly. This method helps the rice absorb the liquid and become creamy. Yes, you can make mushroom risotto ahead of time. Cook it as usual, but stop before adding cream and cheese. Cool it down quickly and store it in the fridge. When you're ready to serve, reheat it on low heat. Add cream and cheese while stirring to restore creaminess. Creamy mushroom risotto pairs well with many sides. You can serve it with a simple green salad. Grilled vegetables also make a good match. For a special touch, enjoy it with a glass of white wine. A crisp Sauvignon Blanc complements the flavors nicely. For the full recipe, check out the Mushroom Medley Creamy Risotto [Full Recipe]. Creamy mushroom risotto blends rich ingredients like Arborio rice and mushrooms. We explored cooking techniques, from sautéing aromatics to achieving the perfect creaminess. You can impress with various flavor adjustments, dietary options, and easy storage tips. In summary, this dish can fit any taste. Try it out and make it your own! Enjoy the satisfaction of mastering risotto. You’ll impress your family and friends with this delicious meal.](https://goldendishy.com/wp-content/uploads/2025/06/13e7d433-e608-428e-b029-b03d5bef7a63.webp)
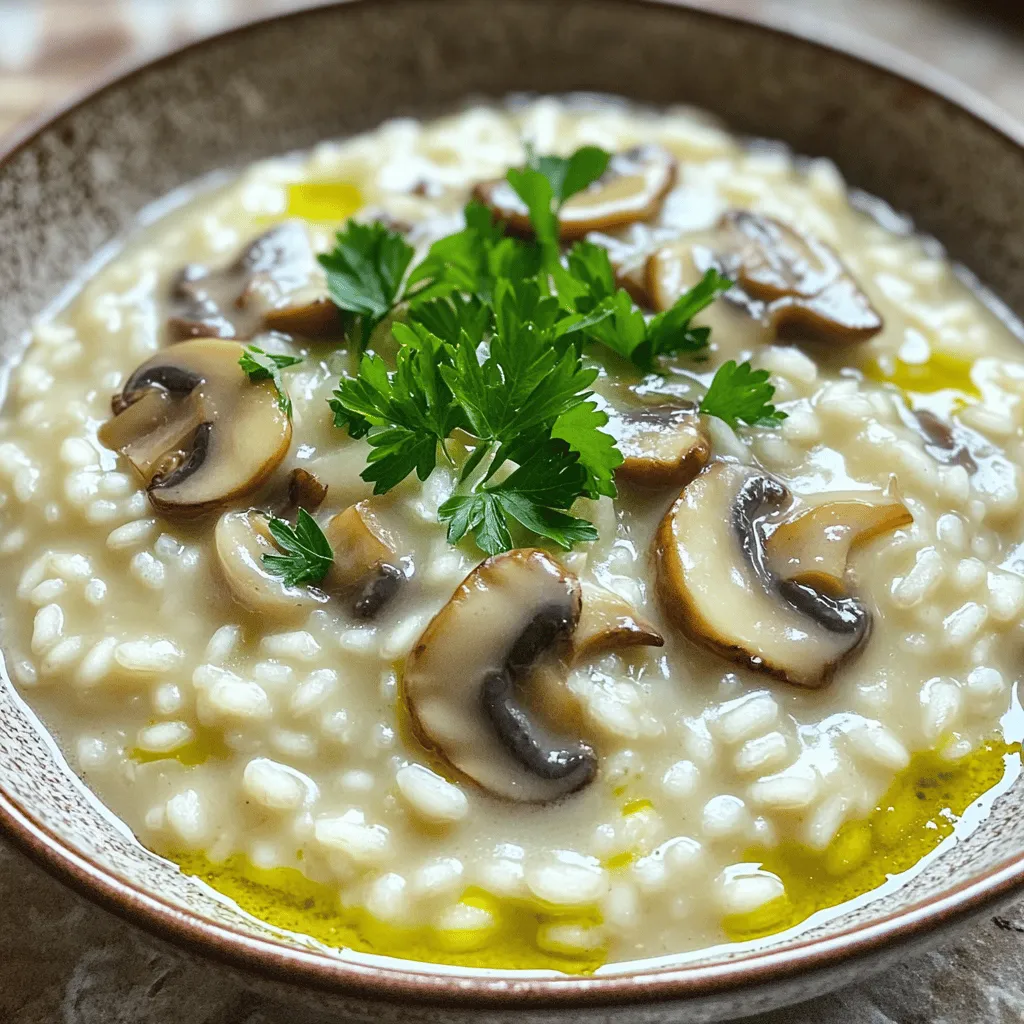
Welcome to the world of creamy mushroom risotto, where each bite is a savory delight! If you crave comfort food that’s simple yet impressive, this dish is for you. I’ll guide you step-by-step, sharing tips on the best ingredients and techniques. Let’s turn Arborio rice and fresh mushrooms into a rich, luxurious meal. Get ready to impress your family and friends with this easy recipe!
Ingredients
Main Ingredients for Creamy Mushroom Risotto
– 1 cup Arborio rice
– 1 cup mixed mushrooms (button and shiitake, thinly sliced)
– 1/2 cup heavy cream
– 1/2 cup grated Parmesan cheese
Arborio rice is the star here. It’s starchy and creamy as it cooks. Mixed mushrooms bring rich flavors. I love using both button and shiitake for the best taste. Heavy cream makes the risotto smooth and rich. The Parmesan cheese adds a salty kick that elevates the dish.
Aromatics and Flavor Enhancers
– 1 small onion, finely chopped
– 2 cloves garlic, minced
– 2 tablespoons extra-virgin olive oil
– 1 tablespoon unsalted butter
Onion and garlic are key for flavor. They create a lovely base when sautéed. Olive oil and butter work together to add depth. The oil keeps the butter from burning, making the perfect blend.
Seasoning Essentials
– Salt and freshly ground black pepper to taste
– Fresh parsley, chopped for garnish
Salt and pepper are must-haves for seasoning. They bring out all the flavors in the dish. Fresh parsley adds color and a hint of freshness on top. It makes the risotto look beautiful and bright.Each ingredient plays a role in making this dish a creamy delight.
Step-by-Step Instructions
Preparing the Broth
Start by heating the vegetable broth in a medium saucepan. Warm it over medium heat until it’s hot but not boiling. This is key! Keeping the broth warm helps the rice cook evenly. If the broth is cold, it can shock the rice and ruin the dish.
Sautéing the Aromatics
In a large skillet, add the olive oil and butter. Heat this over medium heat. Once hot, add the finely chopped onion. Sauté for about 3 to 4 minutes. You want the onion to soften and turn translucent. Next, add the minced garlic and sliced mushrooms. Cook for 5 to 6 minutes. Stir occasionally until the mushrooms are golden brown. They should be soft and have released some moisture. This step builds a rich flavor base.
Cooking the Risotto
Now, it’s time to toast the rice. Add the Arborio rice to the skillet. Stir well to coat the grains with the mushroom mix. Cook for an additional 2 to 3 minutes. You’ll see the rice edges becoming slightly translucent. This toasting enhances the flavor.
Next, start adding the warm broth one ladleful at a time. Stir constantly. Let the rice absorb the liquid before adding more. This gradual addition is crucial. It helps the rice become creamy. Continue this process for about 18 to 20 minutes. The rice should be tender but still al dente.
Once it reaches this creamy state, stir in the heavy cream and grated Parmesan cheese. Mix well to combine. Season with salt and black pepper to taste.Enjoy your creamy mushroom risotto!
Tips & Tricks
Achieving Creaminess
To make your risotto creamy, you must stir constantly. This action helps release starch from the rice. The starch is what gives risotto its rich texture. If you stop stirring, the rice can clump, and the dish won’t be as smooth.
Choose the right type of broth for the best flavor. Vegetable broth works well, but chicken broth adds depth. Always keep your broth warm while you cook. Cold broth can shock the rice and slow down cooking.
Enhancing Flavor
Adding white wine brings a nice depth to the dish. Use a dry white wine like Sauvignon Blanc. This adds acidity and balances the richness of the cream.
For mushrooms, mix button and shiitake. Button mushrooms are mild and creamy, while shiitake adds an earthy taste. You can also try portobello or cremini for a bolder flavor.
Presentation and Serving Suggestions
When plating, use shallow bowls for a nice look. Pile the risotto high and use a spoon to create a small well in the center. This makes it feel gourmet.
Pair your risotto with a crisp green salad or some roasted vegetables. A glass of white wine, like Chardonnay, complements the flavors well. For an extra touch, garnish with more Parmesan and a drizzle of olive oil. This will enhance both the taste and the appearance of your dish.
Variations
Mushroom Risotto Alternatives
You can change the type of mushrooms in your risotto. Each type adds its own taste. Try using portobello or oyster mushrooms for a different flavor. Seasonal vegetables also work well. Asparagus or peas can add freshness and color to your dish.
Dietary Adjustments
If you want a vegan risotto, skip the heavy cream and cheese. Use coconut cream and nutritional yeast for a rich flavor. For lactose-free options, choose lactose-free cheese and cream. These swaps keep the dish creamy and delicious.
You can also make this risotto gluten-free. Arborio rice is naturally gluten-free, so you’re already set. Just ensure your broth is gluten-free, too.
Adding Protein
Adding protein can make your risotto heartier. You can mix in chicken, shrimp, or tofu. Cook the protein separately and stir it in near the end. This keeps flavors balanced and ensures everything is cooked perfectly.
Chicken adds a savory touch, while shrimp gives a nice seafood flair. Tofu is a great choice for a plant-based meal. Each option enhances your creamy mushroom risotto and makes it more filling.
Storage Info
Refrigerating Leftovers
To keep creamy mushroom risotto fresh, store it in a proper container. Use an airtight container to prevent moisture loss. Make sure the risotto cools to room temperature before sealing. Creamy mushroom risotto lasts up to three days in the fridge if stored correctly.
Reheating Tips
When reheating risotto, the best methods are on the stovetop or in the microwave. For stovetop reheating, add a splash of broth to help revive the creaminess. Stir gently over low heat until warm. In the microwave, cover the dish with a damp paper towel. Heat in short bursts, stirring in between to keep it creamy.
Freezing Instructions
To freeze risotto, let it cool completely first. Then, place it in a freezer-safe container or bag. Remove as much air as possible to prevent freezer burn. Creamy mushroom risotto can stay frozen for up to two months. When ready to eat, thaw it overnight in the fridge. Reheat as mentioned above, ensuring it stays creamy and delicious.
FAQs
How long does it take to cook mushroom risotto?
Cooking creamy mushroom risotto takes about 30 minutes. You will spend 10 minutes prepping and 20 minutes cooking. Keep the broth warm while you cook. Stir the rice often and add broth slowly. This method helps the rice absorb the liquid and become creamy.
Can I prepare mushroom risotto in advance?
Yes, you can make mushroom risotto ahead of time. Cook it as usual, but stop before adding cream and cheese. Cool it down quickly and store it in the fridge. When you’re ready to serve, reheat it on low heat. Add cream and cheese while stirring to restore creaminess.
What can I serve with creamy mushroom risotto?
Creamy mushroom risotto pairs well with many sides. You can serve it with a simple green salad. Grilled vegetables also make a good match. For a special touch, enjoy it with a glass of white wine. A crisp Sauvignon Blanc complements the flavors nicely.
Creamy mushroom risotto blends rich ingredients like Arborio rice and mushrooms. We explored cooking techniques, from sautéing aromatics to achieving the perfect creaminess. You can impress with various flavor adjustments, dietary options, and easy storage tips.
In summary, this dish can fit any taste. Try it out and make it your own! Enjoy the satisfaction of mastering risotto. You’ll impress your family and friends with this delicious meal.
![- 1 cup Arborio rice - 1 cup mixed mushrooms (button and shiitake, thinly sliced) - 1/2 cup heavy cream - 1/2 cup grated Parmesan cheese Arborio rice is the star here. It’s starchy and creamy as it cooks. Mixed mushrooms bring rich flavors. I love using both button and shiitake for the best taste. Heavy cream makes the risotto smooth and rich. The Parmesan cheese adds a salty kick that elevates the dish. - 1 small onion, finely chopped - 2 cloves garlic, minced - 2 tablespoons extra-virgin olive oil - 1 tablespoon unsalted butter Onion and garlic are key for flavor. They create a lovely base when sautéed. Olive oil and butter work together to add depth. The oil keeps the butter from burning, making the perfect blend. - Salt and freshly ground black pepper to taste - Fresh parsley, chopped for garnish Salt and pepper are must-haves for seasoning. They bring out all the flavors in the dish. Fresh parsley adds color and a hint of freshness on top. It makes the risotto look beautiful and bright. For the full recipe, check out our Mushroom Medley Creamy Risotto. Each ingredient plays a role in making this dish a creamy delight. Start by heating the vegetable broth in a medium saucepan. Warm it over medium heat until it’s hot but not boiling. This is key! Keeping the broth warm helps the rice cook evenly. If the broth is cold, it can shock the rice and ruin the dish. In a large skillet, add the olive oil and butter. Heat this over medium heat. Once hot, add the finely chopped onion. Sauté for about 3 to 4 minutes. You want the onion to soften and turn translucent. Next, add the minced garlic and sliced mushrooms. Cook for 5 to 6 minutes. Stir occasionally until the mushrooms are golden brown. They should be soft and have released some moisture. This step builds a rich flavor base. Now, it’s time to toast the rice. Add the Arborio rice to the skillet. Stir well to coat the grains with the mushroom mix. Cook for an additional 2 to 3 minutes. You’ll see the rice edges becoming slightly translucent. This toasting enhances the flavor. Next, start adding the warm broth one ladleful at a time. Stir constantly. Let the rice absorb the liquid before adding more. This gradual addition is crucial. It helps the rice become creamy. Continue this process for about 18 to 20 minutes. The rice should be tender but still al dente. Once it reaches this creamy state, stir in the heavy cream and grated Parmesan cheese. Mix well to combine. Season with salt and black pepper to taste. For the full recipe, you can refer to the detailed steps above. Enjoy your creamy mushroom risotto! To make your risotto creamy, you must stir constantly. This action helps release starch from the rice. The starch is what gives risotto its rich texture. If you stop stirring, the rice can clump, and the dish won’t be as smooth. Choose the right type of broth for the best flavor. Vegetable broth works well, but chicken broth adds depth. Always keep your broth warm while you cook. Cold broth can shock the rice and slow down cooking. Adding white wine brings a nice depth to the dish. Use a dry white wine like Sauvignon Blanc. This adds acidity and balances the richness of the cream. For mushrooms, mix button and shiitake. Button mushrooms are mild and creamy, while shiitake adds an earthy taste. You can also try portobello or cremini for a bolder flavor. When plating, use shallow bowls for a nice look. Pile the risotto high and use a spoon to create a small well in the center. This makes it feel gourmet. Pair your risotto with a crisp green salad or some roasted vegetables. A glass of white wine, like Chardonnay, complements the flavors well. For an extra touch, garnish with more Parmesan and a drizzle of olive oil. This will enhance both the taste and the appearance of your dish. {{image_4}} You can change the type of mushrooms in your risotto. Each type adds its own taste. Try using portobello or oyster mushrooms for a different flavor. Seasonal vegetables also work well. Asparagus or peas can add freshness and color to your dish. If you want a vegan risotto, skip the heavy cream and cheese. Use coconut cream and nutritional yeast for a rich flavor. For lactose-free options, choose lactose-free cheese and cream. These swaps keep the dish creamy and delicious. You can also make this risotto gluten-free. Arborio rice is naturally gluten-free, so you’re already set. Just ensure your broth is gluten-free, too. Adding protein can make your risotto heartier. You can mix in chicken, shrimp, or tofu. Cook the protein separately and stir it in near the end. This keeps flavors balanced and ensures everything is cooked perfectly. Chicken adds a savory touch, while shrimp gives a nice seafood flair. Tofu is a great choice for a plant-based meal. Each option enhances your creamy mushroom risotto and makes it more filling. For more details on the recipe, check the Full Recipe link. To keep creamy mushroom risotto fresh, store it in a proper container. Use an airtight container to prevent moisture loss. Make sure the risotto cools to room temperature before sealing. Creamy mushroom risotto lasts up to three days in the fridge if stored correctly. When reheating risotto, the best methods are on the stovetop or in the microwave. For stovetop reheating, add a splash of broth to help revive the creaminess. Stir gently over low heat until warm. In the microwave, cover the dish with a damp paper towel. Heat in short bursts, stirring in between to keep it creamy. To freeze risotto, let it cool completely first. Then, place it in a freezer-safe container or bag. Remove as much air as possible to prevent freezer burn. Creamy mushroom risotto can stay frozen for up to two months. When ready to eat, thaw it overnight in the fridge. Reheat as mentioned above, ensuring it stays creamy and delicious. Cooking creamy mushroom risotto takes about 30 minutes. You will spend 10 minutes prepping and 20 minutes cooking. Keep the broth warm while you cook. Stir the rice often and add broth slowly. This method helps the rice absorb the liquid and become creamy. Yes, you can make mushroom risotto ahead of time. Cook it as usual, but stop before adding cream and cheese. Cool it down quickly and store it in the fridge. When you're ready to serve, reheat it on low heat. Add cream and cheese while stirring to restore creaminess. Creamy mushroom risotto pairs well with many sides. You can serve it with a simple green salad. Grilled vegetables also make a good match. For a special touch, enjoy it with a glass of white wine. A crisp Sauvignon Blanc complements the flavors nicely. For the full recipe, check out the Mushroom Medley Creamy Risotto [Full Recipe]. Creamy mushroom risotto blends rich ingredients like Arborio rice and mushrooms. We explored cooking techniques, from sautéing aromatics to achieving the perfect creaminess. You can impress with various flavor adjustments, dietary options, and easy storage tips. In summary, this dish can fit any taste. Try it out and make it your own! Enjoy the satisfaction of mastering risotto. You’ll impress your family and friends with this delicious meal.](https://goldendishy.com/wp-content/uploads/2025/06/13e7d433-e608-428e-b029-b03d5bef7a63-300x300.webp)

![To make vegan creamy pesto pasta, gather these fresh and simple ingredients. - 12 oz pasta (penne, spaghetti, or your favorite variety) - 2 cups fresh basil leaves, tightly packed - 1/2 cup raw cashews (soaked in water for at least 2 hours) - 1/4 cup nutritional yeast (for a cheesy flavor) - 3 cloves garlic, minced - 1/4 cup extra virgin olive oil - 1 tablespoon fresh lemon juice - Sea salt and freshly ground black pepper, to taste - 1 cup cherry tomatoes, halved (for topping) - Extra fresh basil leaves (for garnish) Each ingredient plays a vital role. The pasta is the base, while basil brings freshness. Cashews create a rich, creamy texture. Nutritional yeast adds a cheesy taste, perfect for vegan dishes. Garlic gives depth, while olive oil provides smoothness. Lemon juice brightens the flavors. Salt and pepper enhance everything. Cherry tomatoes add color and sweetness. Extra basil leaves make the dish look beautiful. For the full recipe, check out the link to ensure a delicious meal! First, fill a large pot with water and add a generous amount of salt. Bring the water to a rapid boil. This step is key; the salt helps flavor the pasta. Once boiling, add 12 ounces of your favorite pasta, like penne or spaghetti. Cook according to the package instructions. You want the pasta to be al dente, which means it should be tender but still firm to bite. Usually, this takes about 8 to 12 minutes. When the pasta is ready, drain it well and set it aside. Next, it’s time to make the vegan pesto. Grab your blender or food processor. Add 2 cups of fresh basil leaves, 1/2 cup of soaked raw cashews, and 1/4 cup of nutritional yeast. Also, include 3 cloves of minced garlic and 1 tablespoon of fresh lemon juice. Season with a pinch of sea salt and freshly ground black pepper. Blend this mixture until it becomes smooth and creamy. If it doesn't blend well, scrape down the sides of the blender and blend again until you get a silky texture. Now, combine the drained pasta with the creamy pesto sauce. Use a large mixing bowl for this. Pour the pesto over the pasta. With a pair of tongs or a spatula, toss everything together. Ensure that each piece of pasta gets coated with the vibrant pesto. If the sauce looks too thick, add a little water, one teaspoon at a time, until it reaches the desired consistency. Don't forget to taste! Adjust the seasoning with more salt, pepper, or lemon juice if needed. Finally, gently fold in 1 cup of halved cherry tomatoes for a fresh burst of flavor. Serve this delicious dish warm, garnished with extra basil leaves. Enjoy your vegan creamy pesto pasta! For the complete recipe, check the [Full Recipe]. Soaked cashews are the secret to a smooth and creamy sauce. They soften and blend well, making the pesto rich. Soak them in water for at least two hours before use. This step is key for a silky texture. If your pesto is too thick, don’t worry. Just add water! Start with a teaspoon at a time. Blend until you reach your desired creaminess. This helps the sauce hug the pasta perfectly. Don’t stop at just basil! You can spice it up with some red pepper flakes for heat. A pinch of black pepper adds depth. Try adding a bit of garlic powder for more flavor. Lemon juice adds freshness, but balance is key. If it’s too tangy, add a pinch of sugar or more cashews. This helps round out the flavors and brings the dish to life. Pair this pasta with roasted vegetables for a colorful plate. A side salad adds crunch and freshness. For a drink, consider a light white wine, like Sauvignon Blanc. As for portion sizes, aim for about one and a half cups per person. This ensures everyone leaves satisfied. Enjoy this dish warm for the best flavor experience! {{image_4}} You can change nuts or seeds in your pesto. Try using almonds or sunflower seeds. Each option brings a unique taste. For those avoiding gluten, select gluten-free pasta. Options like brown rice or chickpea pasta work well. Both choices give a nice texture and flavor. To mix up the flavor, add different herbs like parsley or spinach. These herbs bring extra freshness to your dish. You can also incorporate various vegan cheeses. Options like cashew cheese or nutritional yeast can enhance the creamy taste. This helps create layers of flavor in your pesto. Make your dish fresh by using seasonal veggies. For example, zucchini or asparagus can add crunch and color. You can also try different tomatoes. Roasted tomatoes can bring a sweet touch, while cherry tomatoes add a pop of freshness. Finish with garnishes like pine nuts or extra basil for a lovely look. For the complete recipe, check the Full Recipe. After enjoying your vegan creamy pesto pasta, store any leftovers in an airtight container. This keeps the pasta fresh and tasty. Place it in the fridge right away. The best storage time is up to 3 days. Beyond that, the pasta may lose its flavor and texture. To reheat your pasta, the best method is using a stovetop. Heat a pan over medium heat. Add a splash of water or olive oil to keep it moist. Stir gently to warm it up. When reheating, avoid high heat, as this can dry out the sauce. You want to keep that creamy goodness intact. Enjoy your delicious meal again! To make vegan creamy pesto pasta, follow these simple steps: 1. Cook the Pasta: Bring salted water to a boil. Add 12 oz of your pasta and cook until tender. This usually takes about 8-12 minutes. Drain and set aside. 2. Prepare the Pesto: In a blender, add 2 cups of fresh basil leaves, 1/2 cup of soaked raw cashews, and 3 minced garlic cloves. Pour in 1/4 cup of nutritional yeast and 1 tablespoon of lemon juice. Add a pinch of sea salt and black pepper. Blend until smooth. 3. Emulsify with Olive Oil: While blending, slowly add 1/4 cup of extra virgin olive oil. Keep blending until creamy. If it’s too thick, add water, one teaspoon at a time. 4. Combine Pasta and Pesto: In a large bowl, mix the drained pasta with your creamy pesto. Toss gently to coat the pasta well. 5. Final Touches: Taste the mix and adjust the seasoning. Fold in 1 cup of halved cherry tomatoes for a fresh touch. 6. Serve: Serve warm with extra basil leaves on top. Enjoy your delicious vegan creamy pesto pasta! Yes, you can freeze vegan creamy pesto pasta. Here are some tips to keep it tasty: - Cool Before Freezing: Let the pasta cool down before packing it. - Use Airtight Containers: Store the pasta in airtight containers or freezer bags. - Leave Space: Leave some room in the container for the pasta to expand. - Label and Date: Always label your containers with the date. Use within 2-3 months for best quality. When ready to eat, thaw in the fridge overnight. Reheat gently on the stove or in the microwave. Add a splash of water if it seems dry. If you don’t have nutritional yeast, try these alternatives: - Grated Vegan Cheese: Use a dairy-free cheese for a similar flavor. - Ground Flaxseed: This can add a nutty taste, though it won't mimic the cheese flavor. - T nutritional yeast: You can use this if you want a similar profile. - Parmesan Substitute: Some brands offer vegan parmesan that works well in pesto. Each substitute will change the flavor a bit, so adjust to your taste! This blog post covered how to make vegan creamy pesto pasta. You learned about ingredients, cooking pasta, and blending the pesto. We explored tips for smooth texture and flavor. I shared variations to keep things fresh, plus storage and reheating advice. In the end, making this dish is quick and fun. Enjoy experimenting with flavors and textures. This pasta will please vegans and non-vegans alike!](https://goldendishy.com/wp-content/uploads/2025/07/928f57b2-1357-48f3-b20e-4d7b01e4c937-768x768.webp)
![- 9 lasagna noodles - 2 cups cooked chicken, shredded - 2 cups Alfredo sauce (store-bought or homemade) - 2 cups ricotta cheese - 2 cups shredded mozzarella cheese - 1 cup grated Parmesan cheese - 1 cup fresh spinach, chopped - 1 teaspoon garlic powder - 1 teaspoon onion powder - Salt and pepper to taste - Fresh basil leaves for garnish Each ingredient plays a big role in flavor and texture. - Lasagna noodles form the base, holding all the layers together. - Cooked chicken adds protein and heartiness. Use rotisserie chicken for ease. - Alfredo sauce gives creaminess and rich flavor. Store-bought saves time, or you can make your own. - Ricotta cheese provides a creamy filling. It’s soft and mild, blending well with other flavors. - Shredded mozzarella cheese melts beautifully, adding gooey texture. - Grated Parmesan cheese gives a salty, nutty kick on top. - Fresh spinach brings a pop of color and nutrients. - Garlic and onion powder enhance the flavor without overpowering the dish. - Salt and pepper are essential for seasoning, balancing the taste. - Fresh basil adds brightness when you serve the dish. You can change some ingredients to suit your taste. - Swap chicken for turkey or keep it meatless with a veggie mix. - Use cottage cheese instead of ricotta for a lighter option. - Try different cheeses like gouda or cheddar for unique flavors. - If you don't have Alfredo sauce, use a white sauce or a creamy tomato sauce. - For a gluten-free version, look for gluten-free lasagna noodles. These adjustments keep the spirit of the dish while catering to your needs. For the complete recipe, check the Full Recipe. To start, bring a large pot of salted water to a boil. This water helps cook the noodles evenly. Add 9 lasagna noodles to the pot. Cook them according to the package instructions. Aim for an al dente texture, which means they should be slightly firm. Once cooked, drain the noodles. Rinse them briefly under cold water to stop the cooking process and prevent sticking. Set them aside on a clean surface or a plate. Now, grab a spacious mixing bowl. In this bowl, combine 2 cups of shredded cooked chicken, 2 cups of ricotta cheese, and 1 cup of chopped fresh spinach. Add 1 teaspoon each of garlic powder and onion powder for flavor. Don’t forget to sprinkle in some salt and pepper to taste. Mix all these ingredients thoroughly. You want a nice, smooth filling that binds together well. This mixture is the heart of your lasagna. Take a 9x13 inch baking dish and spread a thin layer of Alfredo sauce on the bottom. This helps prevent the noodles from sticking. Lay down 3 noodles side by side over the sauce. Next, spread half of your chicken and ricotta mixture over the noodles. Top this layer with a third of the shredded mozzarella cheese. Repeat this layering: add another 3 noodles, the remaining chicken mixture, and another third of mozzarella cheese. For the final layer, place the last 3 noodles on top. Cover these noodles with the rest of the Alfredo sauce. Finish with the remaining mozzarella and all of the grated Parmesan cheese on top. This will create a beautiful, bubbly crust when baked. Now, cover the dish with aluminum foil and place it in your preheated oven at 375°F (190°C). Bake for 25 minutes. After that, remove the foil and bake for another 15 minutes. Keep an eye on it until the cheese is bubbly and golden brown. This step is key for that perfect, cheesy finish. When you layer your lasagna, start with a thin layer of sauce. This helps the noodles not stick. Use three noodles for each layer. Spread half of your filling evenly over the noodles. Sprinkle some cheese on top. Repeat until you have used all ingredients. Finish with noodles, sauce, and lots of cheese on top. Bake your lasagna at 375°F (190°C). Cover it with foil for the first 25 minutes. This keeps it moist. After that, take off the foil and bake for another 15 minutes. This makes the cheese bubbly and golden. Let it cool for 10 minutes before slicing. This helps the layers hold together. Cut the lasagna into squares for serving. Garnish with fresh basil leaves and extra Parmesan cheese. This makes it look great! Pair it with a green salad or garlic bread for a complete meal. Enjoy your cheesy chicken Alfredo lasagna with family or friends for a comforting dinner. For the full recipe, check the earlier section. {{image_4}} You can easily make a vegetarian version of this dish. Just swap the chicken for a mix of veggies. Try using mushrooms, zucchini, or bell peppers instead. For added flavor, sauté the veggies before mixing them with the ricotta. This change keeps the dish creamy and satisfying. Feel free to add more vegetables or proteins. Spinach is great for color and taste. You can also toss in some chopped broccoli or roasted red peppers. If you want more protein, consider adding cooked lentils or chickpeas. These ingredients boost nutrition and make the dish heartier. You can switch up the sauce or cheese for a twist. Use a white sauce or pesto instead of Alfredo for a different flavor. For cheese, try blending mozzarella with gouda or fontina for a richer taste. Mixing cheeses adds depth and makes each bite unique. For the full recipe, check out [Full Recipe]. After enjoying your cheesy chicken Alfredo lasagna, you may have some leftovers. To store them, let the lasagna cool completely. Then, cover it tightly with plastic wrap or aluminum foil. You can also place it in an airtight container. This helps keep it fresh for up to three days in the fridge. Make sure to keep it away from strong-smelling foods to avoid any unwanted flavors. When it's time to enjoy your leftovers, reheating is simple. Preheat your oven to 350°F (175°C). Place the lasagna in a baking dish. If you want, add a splash of Alfredo sauce on top to keep it moist. Cover it with foil to prevent drying out. Bake for about 20-25 minutes, or until heated through. You can also reheat individual slices in the microwave for about 1-2 minutes on high. Just check and stir halfway through for even heating. If you want to save some for later, freezing is a great option. Cut the lasagna into portions for easy serving. Wrap each piece tightly in plastic wrap, then foil. This double wrapping helps prevent freezer burn. You can freeze it for up to three months. When ready to eat, let it thaw in the fridge overnight. Reheat in the oven or microwave as mentioned above. Enjoy your homemade meal anytime! For the full recipe, refer to the earlier section. Yes, you can use different pasta shapes. You might try wide egg noodles or even gluten-free options. Just make sure they fit well in your dish. Cook them according to the package directions. This way, they will blend smoothly with the other layers. To make Alfredo sauce, start with butter and cream. Melt 1/2 cup of butter in a pan. Then stir in 1 cup of heavy cream. Cook for about 5 minutes on low heat. Add 1 cup of grated Parmesan cheese. Mix well until it melts. Season with salt, pepper, and garlic powder for flavor. Homemade sauce tastes fresh and creamy. You can tell your lasagna is done when the cheese on top is golden brown and bubbly. Insert a knife in the center; it should slide in easily. If the layers are hot and firm, your lasagna is ready to enjoy. Let it cool a bit before serving for the best slices. For the full recipe, check out the details above. This blog post covered key ingredients for an amazing lasagna. You learned about substitutions, step-by-step cooking, and tips for a perfect dish. I shared tasty variations and smart storage ideas. When you try this recipe, you’ll enjoy a delicious meal that fits your taste. Remember, cooking is fun. Experiment with different flavors and enjoy the process!](https://goldendishy.com/wp-content/uploads/2025/07/68bc65d6-2565-4554-ba8a-7f3921e48887-768x768.webp)