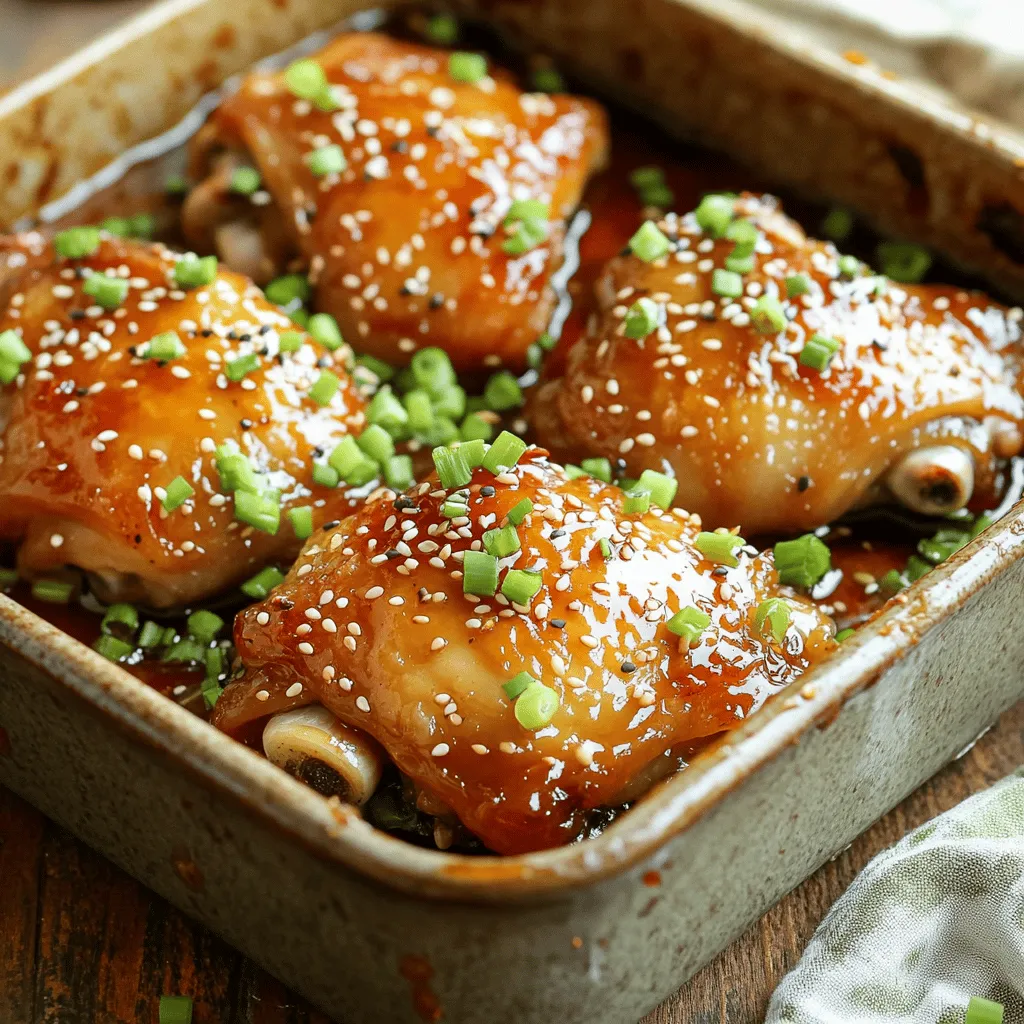
Honey Garlic Chicken Thighs Flavorful and Easy Recipe

Honey Garlic Chicken Thighs combine sweet and savory flavors in every bite. This dish is not only delicious but also super easy to make. If you’re ready to impress your family or friends with a simple and tasty recipe, you’ve come to the right place. I’ll guide you step-by-step through the process, from choosing the right ingredients to perfecting the bake. Let’s dive into this flavorful journey together!
Ingredients
List of Key Ingredients
– 4 chicken thighs, bone-in and skin-on
– 1/4 cup honey
– 4 cloves garlic, minced
– 2 tablespoons soy sauce
– 1 tablespoon apple cider vinegar
– 1 tablespoon fresh ginger, grated
– 1 teaspoon sesame oil
– Salt and pepper to taste
The chicken thighs bring a juicy and tender bite. Honey adds sweetness, while garlic offers a tasty punch. Soy sauce gives depth, and apple cider vinegar adds a hint of tang. Fresh ginger brings warmth, and sesame oil adds a nutty finish. Don’t forget salt and pepper to balance all these flavors.
Optional Ingredients
– 1 tablespoon cornstarch (optional, for thickening)
– 2 green onions, chopped (for garnish)
– Sesame seeds (for garnish)
Cornstarch helps thicken the sauce, making it rich and sticky. Green onions and sesame seeds add a fresh crunch and a pop of color, making your dish look great.
Serving Suggestions
Serve honey garlic chicken thighs with steamed rice or sautéed vegetables. The rice soaks up the sauce, making each bite delightful. For plating, arrange the chicken on a platter and drizzle the sauce over the top. Add the green onions and sesame seeds for a beautiful finish. This makes the meal inviting and ready to impress.
Step-by-Step Instructions
Preheat the Oven
First, set your oven to 400°F (200°C). This temperature helps cook the chicken evenly. Preheating ensures the chicken gets that nice golden color on the outside.
Prepare the Marinade
In a bowl, mix together the honey, minced garlic, soy sauce, apple cider vinegar, and grated ginger. Add a teaspoon of sesame oil, plus a pinch of salt and pepper. Whisk it well until smooth. The honey gives sweetness, while the garlic adds a rich flavor.
Arrange the Chicken for Cooking
Place the chicken thighs in a baking dish in a single layer. Make sure they don’t touch each other. Pour the honey garlic mixture over the chicken. Use a spoon to coat each thigh well. This will help the flavors soak in.
Baking Process
Put the baking dish in the oven and bake for 35-40 minutes. Halfway through, baste the chicken with the sauce. This keeps it moist and boosts the flavor. Check the internal temperature; it should reach 165°F (75°C).
Finishing Touches
After baking, let the chicken rest for 5 minutes. This helps the juices settle. For garnish, sprinkle chopped green onions and sesame seeds on top. This adds a nice look and extra crunch. Serve your chicken hot and enjoy every bite!
Tips & Tricks
Perfecting Flavor
To boost the flavor in your honey garlic chicken thighs, focus on the marinade. Start with a strong base of honey and garlic. Add more soy sauce for saltiness and depth. You can also mix in some fresh herbs like thyme or rosemary. A splash of orange juice brightens the flavor, too. Letting the chicken marinate for at least 30 minutes allows the flavors to soak in well. For a deeper taste, marinate overnight in the fridge.
Cooking Techniques
Achieving crispy skin is key for great chicken thighs. First, pat the chicken dry with paper towels. This removes excess moisture, allowing the skin to crisp up. Place the chicken skin-side up in the baking dish. During baking, baste the chicken with the sauce halfway through. This helps keep the meat juicy while still getting that nice, crispy skin.
Troubleshooting Common Issues
If your chicken is undercooked, check the internal temperature. It should reach 165°F (75°C). If it’s not done, return it to the oven for a few more minutes. If your chicken turns out overcooked, don’t worry. You can shred it and mix it with some sauce for a tasty dish. This way, you still enjoy the flavors.Enjoy your cooking adventure!
Variations
Ingredient Swaps
You can change some ingredients for your taste. If you want a different sweet flavor, try maple syrup or agave. You can also use coconut aminos instead of soy sauce for a gluten-free option. If you like it spicy, add some chili paste to the marinade. This will give your honey garlic chicken thighs a nice kick.
Cooking Methods
You can cook your chicken thighs in two main ways: grilling or baking. Grilling gives a smoky taste and crispy skin. Just marinate the chicken and place it on a hot grill for about 20 minutes, flipping halfway. Baking, on the other hand, keeps the chicken juicy and tender. It cooks evenly and allows the flavors to blend well. Both methods work great, so it depends on your mood!
International Flavors
Feel free to mix in flavors from around the world. For a Thai twist, add some fish sauce and lime juice to the marinade. If you want a Mediterranean vibe, use herbs like oregano and lemon juice. You can also try adding sesame seeds and green onions for an Asian flair. These little changes can transform your honey garlic chicken thighs into a whole new dish. Explore and have fun with it!
Storage Info
Storing Leftovers
To keep your honey garlic chicken thighs fresh, store them in an airtight container. Make sure the chicken has cooled down before sealing it. This helps avoid steam buildup, which can make the chicken soggy. You can refrigerate the leftovers for up to four days. If you want to save them longer, freeze the chicken. Wrap each thigh in plastic wrap before placing them in a freezer-safe bag. They can last for up to three months in the freezer.
Reheating Instructions
When you’re ready to enjoy your leftovers, you want them to taste just as good. The best way to reheat the chicken is in the oven. Preheat your oven to 350°F (175°C). Place the chicken on a baking sheet and cover it with foil to keep it moist. Heat for about 15-20 minutes, or until the chicken is warm throughout. You can also reheat in the microwave, but this may not keep the skin crispy. If you microwave, do it in short bursts to avoid drying it out.
Shelf Life
For the best taste and safety, eat the honey garlic chicken thighs within four days if stored in the fridge. If you freeze the chicken, it will stay safe to eat for about three months, but the flavor may fade over time. To enjoy the best taste, use frozen chicken within one month. Always check for any signs of freezer burn before cooking.
FAQs
Can I use boneless chicken thighs?
Yes, you can use boneless chicken thighs. They will cook faster than bone-in thighs. You should reduce the baking time to about 25-30 minutes. Check the internal temperature to ensure it reaches 165°F (75°C). The flavor will remain rich and delicious.
How can I make this recipe spicier?
To add heat, mix in red pepper flakes or sriracha. You can also use hot sauce in the marinade. Start with a small amount and adjust to your taste. Spicy adds a nice twist to the sweet honey garlic sauce.
What sides pair well with honey garlic chicken thighs?
Honey garlic chicken goes well with many sides. Consider serving it with steamed rice, sautéed green beans, or a fresh salad. Mashed potatoes or roasted vegetables are also great options. These sides help balance the sweet and savory flavors.
Can I marinate the chicken overnight?
Yes, marinating overnight is a great idea. It allows the flavors to soak into the chicken. Use the same honey garlic mixture for marinating. Just remember to cover the chicken and store it in the fridge. This will make your dish even more flavorful.
Is this recipe suitable for meal prep?
Absolutely! This recipe is perfect for meal prep. You can store leftover chicken in airtight containers. It stays fresh in the fridge for up to four days. Reheat it in the oven or microwave. This makes it easy to enjoy later in the week.
The blog post covered how to make honey garlic chicken thighs. We explored key ingredients like chicken, honey, and garlic, along with optional thickening and garnishes. I shared step-by-step instructions, cooking tips, and variations to fit your taste.
Remember, you can always adjust the recipe to your liking. Whether you grill or bake, these chicken thighs will please any crowd. Enjoy your cooking adventure, and savor every bite!

![To make a fresh Mediterranean quinoa salad, gather these key ingredients: - 1 cup quinoa, thoroughly rinsed - 2 cups vegetable broth (preferably low-sodium) - 1 bell pepper (either red or yellow), finely diced - 1 medium cucumber, diced into bite-sized pieces - 1 cup cherry tomatoes, halved - 1/4 of a medium red onion, finely chopped - 1/2 cup Kalamata olives, pitted and sliced - 1/2 cup feta cheese, crumbled - 1/4 cup fresh parsley, finely chopped - 1/4 cup extra virgin olive oil - 2 tablespoons freshly squeezed lemon juice - 1 teaspoon dried oregano - Sea salt and freshly cracked black pepper to taste These ingredients blend well together. Each one adds a unique flavor. The quinoa forms the base, while the vegetables add crunch and color. Kalamata olives give it a salty twist, and feta cheese adds creaminess. You can customize your salad with these optional add-ins: - Avocado for creaminess - Grilled chicken for protein - Chickpeas for extra fiber - Spinach or arugula for leafy greens - Sun-dried tomatoes for a tangy kick These add-ins can enhance the salad's taste and texture. Feel free to experiment with what you love! This salad is a healthy choice. It is packed with nutrients. Here’s a quick look at its benefits: - Quinoa: High in protein and fiber - Vegetables: Rich in vitamins and minerals - Olive oil: A source of healthy fats - Feta cheese: Adds calcium and flavor One serving provides a balanced mix of protein, healthy fats, and carbs. Eating this salad can support your health while satisfying your taste buds. For the full recipe, check out Mediterranean Quinoa Salad Delight! To start, rinse 1 cup of quinoa under cold water. This step removes the bitter coating. Next, combine the rinsed quinoa and 2 cups of vegetable broth in a medium saucepan. Bring this mixture to a rolling boil over medium-high heat. Once boiling, reduce the heat to a gentle simmer. Cover the saucepan and let it cook for about 15 minutes. The quinoa is ready when it absorbs all the liquid and becomes fluffy. After cooking, fluff it with a fork and transfer it to a large mixing bowl. Let it cool for a few minutes. While the quinoa cools, prepare the vegetables. Dice 1 bell pepper and 1 medium cucumber. Halve 1 cup of cherry tomatoes. Finely chop 1/4 of a medium red onion, and slice 1/2 cup of Kalamata olives. In the same large bowl with the quinoa, add all these diced vegetables along with 1/2 cup of crumbled feta cheese. Gently stir to mix everything together. For the dressing, take a separate small bowl. Whisk together 1/4 cup of extra virgin olive oil, 2 tablespoons of freshly squeezed lemon juice, and 1 teaspoon of dried oregano. Add sea salt and freshly cracked black pepper to taste. Whisk until the dressing is well combined and emulsified. Pour the dressing over the quinoa and vegetable mixture. Toss everything together until the quinoa and veggies are well coated with the dressing. Finally, fold in 1/4 cup of finely chopped fresh parsley. Be careful not to break the feta or overcrowd the grains. Cover the bowl and let the salad sit at room temperature for at least 30 minutes. This time helps the flavors blend beautifully. For the full recipe, check out the Mediterranean Quinoa Salad Delight. To cook quinoa, rinse it well in cold water. This removes bitterness. Use a ratio of 1 part quinoa to 2 parts vegetable broth. Boil the mixture, then reduce the heat to simmer. Cover and cook for about 15 minutes. When done, fluff it gently with a fork. Let it cool before mixing it with other ingredients. To boost flavors, add fresh herbs like basil or mint. You can also toss in some garlic or lemon zest for a zing. Experiment with different olives or cheese types. Each will give a unique twist. Don't forget to season with salt and pepper to taste. Serve the salad in a large bowl for sharing. For individual servings, use small plates. Garnish with lemon wedges and extra parsley for color. A drizzle of olive oil on top adds shine and flavor. You can also pair it with grilled chicken or fish for a complete meal. Find the full recipe in the article to enjoy a fresh and tasty meal. {{image_4}} You can easily boost the protein in your Mediterranean quinoa salad. Adding cooked chicken gives a hearty touch. Simply grill or roast chicken breasts, then slice them up and mix them in. If you prefer a meatless option, chickpeas work great. Use canned chickpeas for quick prep. Rinse and drain them before adding. While the olive oil and lemon dressing is tasty, you can try other dressings too. A balsamic vinaigrette adds a sweet tang. For a creamy twist, mix Greek yogurt with lemon juice and herbs. This will make the salad richer and even more satisfying. Swap in seasonal veggies for fresh flavor. In the spring, add sweet peas or asparagus. In summer, try zucchini or fresh corn. Autumn brings squash or roasted root vegetables. Winter is great for kale or Brussels sprouts. These swaps keep your salad exciting and varied all year round. Feel free to check the Full Recipe for more details! After enjoying your Mediterranean quinoa salad, store leftovers in the fridge. Place the salad in a bowl and cover it tightly with plastic wrap or a lid. This helps keep the salad fresh and tasty. If you want to save some for later, portion it out into meal prep containers. When storing your salad, use airtight containers. Glass containers work great because they don't stain or retain odors. If you prefer plastic, choose BPA-free containers. Ensure they are deep enough to hold the salad without squishing it. If you have a dressing, keep it separate until you are ready to eat to avoid sogginess. Your Mediterranean quinoa salad will last in the fridge for about 3 to 5 days. If you notice any change in smell or color, it’s best to toss it out. Reheating is not recommended for salads with fresh veggies. Instead, enjoy the salad cold or at room temperature. If you want to warm it up, heat the quinoa-only portion in a microwave for about 30 seconds, but avoid reheating the veggies and feta. For the full recipe, check [Full Recipe]. Quinoa is a tiny seed rich in protein, fiber, and vitamins. It is gluten-free and very nutritious. It helps in building muscles and keeps you full longer. Quinoa contains all nine essential amino acids, making it a complete protein. This is great for vegans and vegetarians. It also has antioxidants that help fight inflammation. Eating quinoa may support heart health and improve digestion. Yes, you can make this salad ahead of time. It tastes even better after sitting for a few hours. Just keep it in the fridge for up to three days. The flavors meld together nicely. If you add the dressing later, it stays fresh longer. Just remember to mix it before serving to spread the flavors. To make this salad vegan, skip the feta cheese. You can use avocado instead for creaminess. You can also add extra olives or nuts for texture. The dressing is already vegan with olive oil and lemon juice. This way, you keep it tasty without any animal products. This salad pairs well with many dishes. You can serve it with grilled chicken or fish for protein. It also goes nicely with roasted vegetables or hummus. For a lighter meal, enjoy it with pita bread. This salad is great as a side or a main dish. The Mediterranean quinoa salad is a tasty and healthy dish. We covered key ingredients, from quinoa and fresh veggies to possible add-ins. I shared easy steps for preparing the salad and tips for cooking quinoa just right. You learned about variations and how to store leftovers properly. Remember, this salad is very flexible; you can change the protein and dressing as you like. Enjoy this dish for its flavor and nutrition. It’s simple, refreshing, and great for any meal!](https://goldendishy.com/wp-content/uploads/2025/06/0bb42d2e-6f0a-4b63-945d-06b8684c6b2f-768x768.webp)

. First, preheat your oven to 400°F (200°C). This step is key for even roasting. Gather your ingredients. You should have baby carrots, honey, olive oil, garlic, thyme, and lemon juice ready. In a large bowl, combine the honey, olive oil, minced garlic, and thyme. Add a good pinch of salt and pepper. Next, squeeze in the lemon juice. Whisk the mixture well until it is smooth. This glaze will give your carrots a sweet and savory flavor. Now, it's time to coat the carrots. Add them to your bowl with the glaze. Toss them gently until they are well coated. Line a baking sheet with parchment paper for easy cleanup. Spread the carrots out in a single layer, avoiding crowding. Place the baking sheet in the preheated oven. Roast the carrots for 25-30 minutes. Halfway through, toss the carrots again for even cooking. They should become tender and caramelized. Once done, let them cool for a few minutes. If you like, drizzle some extra glaze over the top for added flavor. Finally, garnish with fresh parsley before serving. This adds a pop of color and freshness. If you want the full recipe, check it out [Full Recipe]. To ensure your carrots roast perfectly, choose fresh carrots. Baby carrots work well, but regular ones are great too. If using regular carrots, slice them into sticks for even cooking. Spread the carrots out in a single layer on the baking sheet. This step keeps them from steaming and helps them caramelize nicely. Toss them halfway through cooking for even browning. For a great glaze, mix the honey, olive oil, garlic, and thyme well. The oil helps the honey coat the carrots. If your glaze feels too thick, add a splash of water or lemon juice. This can help thin it out and ensure it coats the carrots evenly. Remember, a smooth glaze means more flavor in every bite! To make your dish pop, use a nice platter. Once the carrots are roasted, transfer them carefully. Drizzle with extra honey for shine. Sprinkle fresh parsley or thyme over the top for color. This simple touch makes your dish look gourmet. Enjoy serving them at your next meal! For the full recipe, check out the details above. {{image_4}} You can easily change this dish by adding other vegetables. Try sweet potatoes or parsnips. They roast well and add new flavors. Just cut them to a similar size as the carrots. This helps them cook evenly. If you want to switch up the sweet taste, use maple syrup or agave. Both give a nice flavor and work well with the garlic. You can use the same amount as honey. Just mix it well with the other ingredients. Adding spices can boost the taste of your honey garlic roasted carrots. You might try a pinch of cumin or chili powder for warmth. Fresh herbs like rosemary or dill can also add a bright note. Experiment with what you love! Each change can make this dish new and exciting. You can find the full recipe to guide you through these variations. To store leftover honey garlic roasted carrots, first let them cool down. Use an airtight container to keep them fresh. If you have a lot, divide them into smaller portions. Place the container in the fridge. They will stay good for about 3 to 5 days. Keeping them sealed helps avoid drying out. When you're ready to enjoy the leftovers, preheat your oven to 350°F (175°C). Spread the carrots on a baking sheet. You can drizzle a little olive oil for extra moisture. Heat them for about 10 to 15 minutes, or until they feel warm. You can also use a microwave if you're in a hurry. Just cover them with a damp paper towel and heat in 30-second bursts. If you want to keep the carrots longer, freezing is a great option. First, let the carrots cool completely. Spread them in a single layer on a baking sheet. Freeze them for about 1 hour. This step prevents them from sticking together. After that, transfer the carrots to freezer bags. Remove as much air as possible before sealing. They can last for up to 3 months in the freezer. To eat, thaw them in the fridge overnight before reheating. For more details, check the Full Recipe. Yes, you can use frozen carrots. However, fresh carrots will taste better. Frozen carrots may lose some crunch. If you use them, roast them longer to ensure they cook fully. Just remember to thaw them before roasting for the best results. Honey garlic roasted carrots pair well with many dishes. You can serve them with grilled chicken, beef, or fish. They also taste great with rice or quinoa. Try them with a fresh salad for a balanced meal. Their sweet and savory flavor adds depth to any plate. You can make this dish ahead of time. Prepare the honey garlic glaze and coat the carrots. Store them in the fridge for up to 24 hours. When ready to serve, just roast them in the oven. This saves time and still gives you that amazing flavor. For the full recipe, check out the complete instructions above. We explored the key ingredients and steps to make honey garlic roasted carrots. You learned how to mix the glaze, roast the carrots, and personalize the dish. We also discussed useful tips for perfect roasting and presentation. Lastly, we covered variations and storage tips to keep your dish fresh. Use this guide to make a tasty meal. Enjoy these carrots with your loved ones for a delightful experience.](https://goldendishy.com/wp-content/uploads/2025/06/04a56f10-aefe-4807-b100-2b1e29675843-768x768.webp)