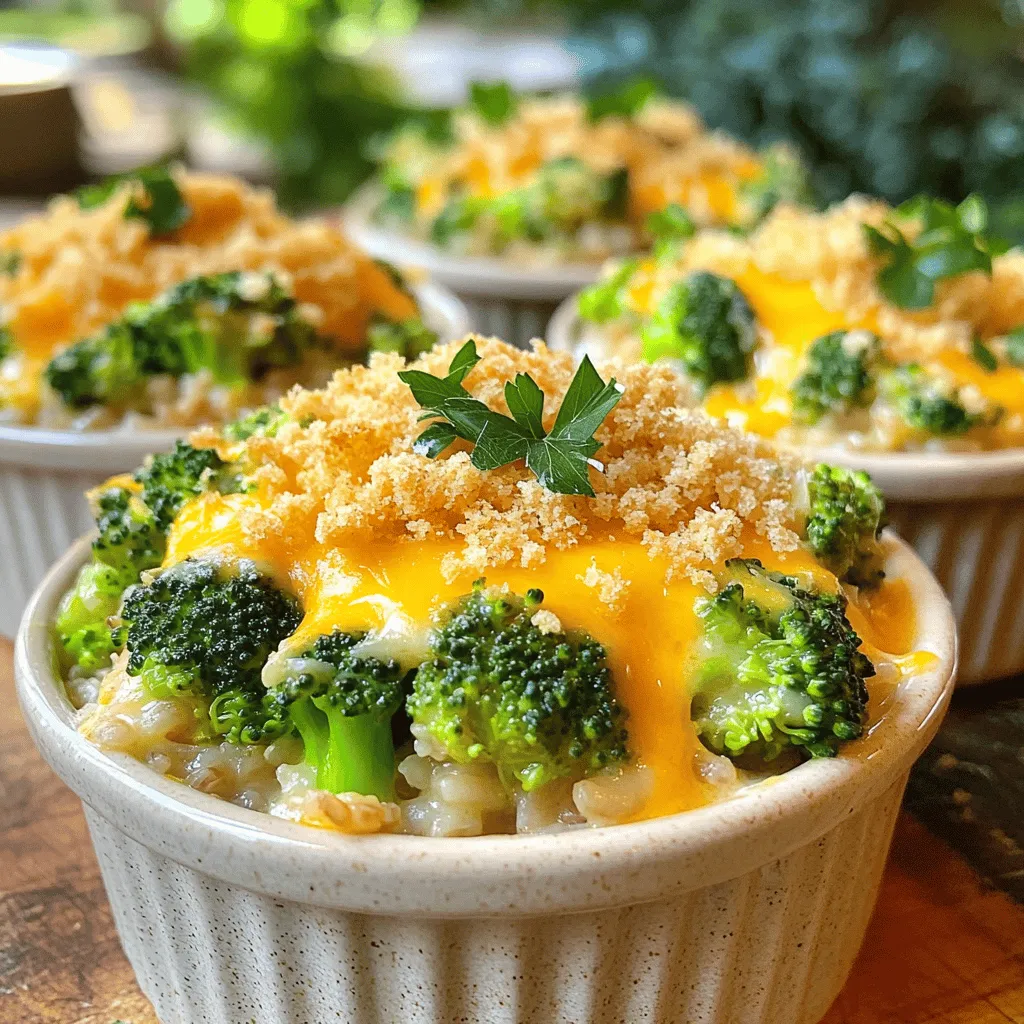
37. Cheesy Broccoli and Rice Casserole Delightful Dish

Ready to elevate your dinner game? This Cheesy Broccoli and Rice Casserole is packed with flavor and comfort. Made with simple ingredients like brown rice, broccoli, and cheddar cheese, it’s perfect for busy nights or family gatherings. Let me show you how easy it is to whip up this delightful dish. Trust me, your taste buds will thank you!
Ingredients
Main Ingredients
– 2 cups cooked brown rice
– 2 cups broccoli florets
– 1 cup sharp cheddar cheese, grated
– 1 cup cream of mushroom soup
Additional Ingredients
– 1/2 cup milk
– Spices: garlic powder, onion powder, black pepper, salt
– Topping: breadcrumbs, olive oil, grated Parmesan cheese
This recipe for Cheesy Broccoli and Rice Casserole is simple and fun! You have your main ingredients like brown rice and broccoli. These two combine to give a nice base. The sharp cheddar cheese adds a rich flavor. Cream of mushroom soup ties everything together, making each bite creamy and delicious.
For the additional ingredients, don’t forget the milk. It helps keep the casserole moist. The spices like garlic and onion powder bring out the flavors. A little black pepper and salt balance everything perfectly.
Then, you get to add a crunchy topping. Mix breadcrumbs with olive oil and Parmesan cheese. This gives a lovely crunch on top.
I love how this dish is comforting and easy to make.Enjoy crafting this delightful dish!
Step-by-Step Instructions
Preparation Steps
– Preheat oven to 350°F (175°C).
– Grease the baking dish with olive oil.
Mixing Ingredients
– Combine cooked rice, broccoli, cheese, soup, and milk in a bowl.
– Season the mixture with spices and mix well.
Assembling the Casserole
– Pour the mixture into the greased dish.
– Prepare the breadcrumb topping and spread it evenly on top.
Baking Instructions
– Bake for 25-30 minutes until bubbly and golden.
– Allow to cool for 5 minutes before serving.
This recipe is simple and rewarding. You can follow these steps easily and enjoy a tasty dish. The Cheesy Broccoli and Rice Casserole stands out as a comforting meal.
Tips & Tricks
Perfecting the Texture
– Use freshly cooked brown rice for best results.
– Experiment with varying cheese types for different flavors.
When I make Cheesy Broccoli and Rice Casserole, I always start with fresh brown rice. It makes a big difference in texture. Soft, fluffy rice blends well with the cheese and broccoli. If you want a twist, try mixing cheeses. Cheddar gives a sharp taste, but mozzarella or gouda can add creaminess. Each cheese brings its own flair.
Flavor Enhancements
– Add sautéed onions or bell peppers to the mixture.
– Consider adding a pinch of cayenne pepper for heat.
For added flavor, I love to sauté some onions or bell peppers before adding them to the mix. This simple step brings out their sweetness and adds depth. If you like some heat, try a pinch of cayenne pepper. It gives a nice kick without being too spicy. Experimenting with these flavors can elevate your casserole to new heights.
Presentation Tips
– Serve in individual ramekins for elegance.
– Garnish with fresh parsley before serving.
Presentation matters! I often serve this dish in individual ramekins. It looks fancy and makes serving easy. For a pop of color, sprinkle fresh parsley on top before serving. This not only adds visual appeal but also a fresh taste. Your guests will love the effort you put into both flavor and presentation.
Variations
Protein Add-Ins
You can amp up the protein in your casserole. Simply add cooked chicken or turkey. This makes the dish heartier. You can also add crispy bacon bits. The smoky flavor of bacon really brings it to life.
Vegetarian Alternatives
If you want a vegetarian twist, swap out the cream of mushroom soup. You can make a homemade version with simple ingredients. Also, feel free to mix in different veggies like spinach or peas. These choices add color and nutrients to your meal.
Gluten-Free Options
For a gluten-free dish, use gluten-free breadcrumbs. This keeps the crunch without the gluten. You can also replace the cream of mushroom soup with a gluten-free kind. This way, everyone can enjoy this tasty casserole.
Storage Info
Refrigeration
Store leftovers in an airtight container for up to 3 days. This keeps the dish fresh. When you are ready to enjoy it again, reheat in the oven for best texture results. The oven makes it warm and crispy, just like when you first baked it.
Freezing Instructions
You can freeze this casserole in portions for up to 2 months. Make sure to wrap it well to avoid freezer burn. When you’re ready to eat, thaw overnight in the refrigerator. This way, it will be ready to reheat and enjoy without losing its great flavor.
FAQs
Can I use brown rice instead of white rice?
Yes, brown rice adds a nutty flavor and additional nutrients. Brown rice takes longer to cook, but it gives a nice texture. You can use it in this casserole for a healthy twist.
How can I make this dish vegan?
Substitute dairy cheese with a vegan cheese alternative and use plant-based milk. Many brands offer great vegan cheese that melts well. Use coconut or almond milk for a creamy base.
Is the casserole suitable for meal prep?
Absolutely! This casserole holds up well and can be easily portioned for meal prep. You can make it ahead and store it in the fridge. Just heat it up when you are ready to eat.
How do I know when the casserole is done baking?
The edges should be bubbling and the top should be golden brown. If it looks crispy on top, it’s ready! You can also insert a knife in the center. It should come out clean.
What is the best way to reheat leftovers?
Reheat in the oven at 350°F until warm, for optimal texture. This keeps the top crunchy. If you’re short on time, you can use the microwave but the texture may change.
What variations can I try with the cheese?
Experiment with mozzarella, gouda, or a blend of your favorites for different flavor profiles. Mixing cheeses can create a richer taste. Don’t be afraid to get creative with your cheese choices!
This casserole offers delicious layers of flavor and texture. We combined brown rice, broccoli, and cheese for a hearty dish. Baking it creates a bubbly texture that’s hard to resist. You can add protein or veggies for more twists. Plus, it’s great for meal prep and leftovers. Enjoy this easy recipe, knowing you can customize it endlessly. Satisfy your cravings today!

![- 2 boneless, skinless chicken breasts - 1 cup buttermilk - 1 cup all-purpose flour - 1 teaspoon baking powder - 1 teaspoon smoked paprika - 1/2 teaspoon garlic powder - 1/2 teaspoon cayenne pepper - Salt and freshly ground black pepper, to taste - 4 ready-made waffles (or homemade) - 2 tablespoons honey - Maple syrup, for drizzling - Fresh parsley, chopped, for garnish In this easy chicken and waffles recipe, you start with two boneless, skinless chicken breasts. Soak them in one cup of buttermilk. This step makes the chicken juicy and tender. Next, prepare the breading mix. You need one cup of all-purpose flour, one teaspoon of baking powder, one teaspoon of smoked paprika, half a teaspoon of garlic powder, and half a teaspoon of cayenne pepper. Don’t forget to add salt and pepper to taste. For the waffles, you can use four ready-made waffles or make your own. To finish, you will need two tablespoons of honey and maple syrup for drizzling. Chop some fresh parsley for garnish. This dish combines sweet and savory flavors, making it a favorite for many. Check out the Full Recipe to see how to put it all together. - Immerse chicken in buttermilk. - Cover and refrigerate. Start by taking two boneless, skinless chicken breasts. Place them in a bowl and pour in one cup of buttermilk. Make sure the chicken is fully coated. Cover the bowl with plastic wrap and set it in the fridge. Let it sit for at least one hour, or overnight for the best flavor. The buttermilk helps tenderize the chicken and adds a nice tang. - Combine flour and spices. - Mix to create a uniform dry mixture. Next, grab a shallow dish. In it, combine one cup of all-purpose flour with one teaspoon of baking powder, one teaspoon of smoked paprika, half a teaspoon of garlic powder, and half a teaspoon of cayenne pepper. Add salt and black pepper to taste. Mix well until everything is even. This blend will give your chicken a delicious crust. - Dredge marinated chicken in flour mixture. - Shake off excess flour. After marinating, take the chicken out of the fridge. Let the extra buttermilk drip off. Now, dredge each piece in the flour mixture. Make sure to coat both sides well. Once coated, shake off any excess flour. This step is key for achieving a crispy texture. - Heat oil in a skillet. - Fry chicken until golden-brown. In a large skillet, heat about half an inch of oil over medium-high heat. Wait until the oil is shimmering. Carefully place the coated chicken breasts into the skillet. Fry each piece for about 5-7 minutes on each side. They should turn a beautiful golden-brown color. Check the internal temperature; it should reach 165°F. Once cooked, transfer the chicken to a plate lined with paper towels to soak up excess oil. - Toast waffles according to instructions. While the chicken fries, it’s time to warm the waffles. You can use ready-made waffles or make your own if you prefer. Just toast them according to the package instructions until they are crispy and heated through. This will balance the hot chicken nicely. - Layer waffle and chicken. - Drizzle with honey and maple syrup. To assemble, take a warm waffle and place it on a serving plate. Top it with a piece of the golden fried chicken. Now, for the fun part! Drizzle honey generously over the chicken. Then, add a touch of maple syrup according to your taste. This sweet and savory combo makes every bite a delight. - Ensure oil is hot before frying. Hot oil makes the chicken crispy. - Don’t overcrowd the skillet. This helps keep the oil hot and even. - Stack chicken slightly off-center. This adds height and looks appealing. - Garnish with parsley and drizzle syrup. It gives color and extra flavor. - Consider brining chicken overnight. This makes it juicier and more flavorful. - Experiment with different spices. Try herbs or blends for new tastes. For a detailed guide, check out the Full Recipe. {{image_4}} You can switch things up with grilled chicken instead of fried. Grilled chicken has a nice smoky flavor. Plus, it's a lighter option. I love using chicken thighs for this dish. They are more juicy and tender than breasts. Thighs also add great flavor to the meal. For the waffles, try adding flavors like cinnamon or vanilla. These will give your dish a fun twist. You can also make mini waffles. They are perfect for a bite-sized treat. Kids love them, and they are easy to share. If you want to change the sweet element, try agave syrup instead of honey. It’s a nice alternative for a sweeter touch. You can also use a fruit compote. Fresh berries or peaches work great and add a fruity burst. These options make your chicken and waffles even more special. For the full recipe, check out the ingredients and steps above! After you savor your chicken and waffles, store any leftovers in an airtight container. This keeps the food fresh and safe. The dish is best consumed within 2 days. If you wait too long, the taste and texture will suffer. You can freeze the cooked chicken and waffles for later. Be sure to store them separately. This way, the waffles do not get soggy. When you are ready to eat, reheat the chicken and waffles in the oven for best results. This helps keep everything crispy and tasty. When it's time to enjoy leftovers, use an oven or air fryer to reheat the chicken. This method preserves the crispy coating. Avoid using a microwave, as it can make the chicken chewy and wet. Keeping the texture nice is key to enjoying your meal again. To make homemade waffles, start with a simple batter. Mix together: - 1 cup all-purpose flour - 1 tablespoon sugar - 1 teaspoon baking powder - 1/2 teaspoon salt - 1 cup milk - 1 large egg - 2 tablespoons melted butter Combine all the dry ingredients in one bowl. In another bowl, whisk the wet ingredients. Mix them together until just combined. Cook in a preheated waffle maker for about 5 minutes until golden brown. You can also use my [Full Recipe] for a quick option with ready-made waffles. Yes! You can explore using turkey or even tofu for a vegetarian option. Turkey breast works well as a leaner choice. For tofu, press it to remove excess moisture, then marinate like the chicken. This adds great flavor and keeps it moist. To get crispy chicken, keep the oil hot. Heat it to about 350°F before frying. This helps form a crust. Don't overcrowd the skillet; fry in batches if needed. Cook until golden brown, about 5-7 minutes per side. Yes, meal prepping is easy! You can marinate the chicken in advance. Also, cook and freeze the chicken separately from the waffles. Store in airtight containers. This meal stays tasty for up to two days in the fridge. You can spice up your chicken with different seasonings. Try adding more cayenne pepper or smoked paprika for heat. Top your waffles with fresh fruit or whipped cream. Maple syrup adds sweetness, but feel free to experiment! For sides, think about fresh fruit or a light salad. Sliced strawberries or mixed berries add a nice touch. A simple green salad can balance the dish’s richness. You can also serve it with sweet potato fries for a fun twist. You learned how to make a tasty chicken and waffles dish. We covered marinating chicken, preparing breading, and frying until golden-brown. You also saw tips for storage and variations. Don't be afraid to try different spices or use grilled chicken. This dish is fun and delicious. Enjoy making it and sharing with friends!](https://goldendishy.com/wp-content/uploads/2025/06/c6fcab88-53c4-4cda-8439-7edbb7c77c72-768x768.webp)