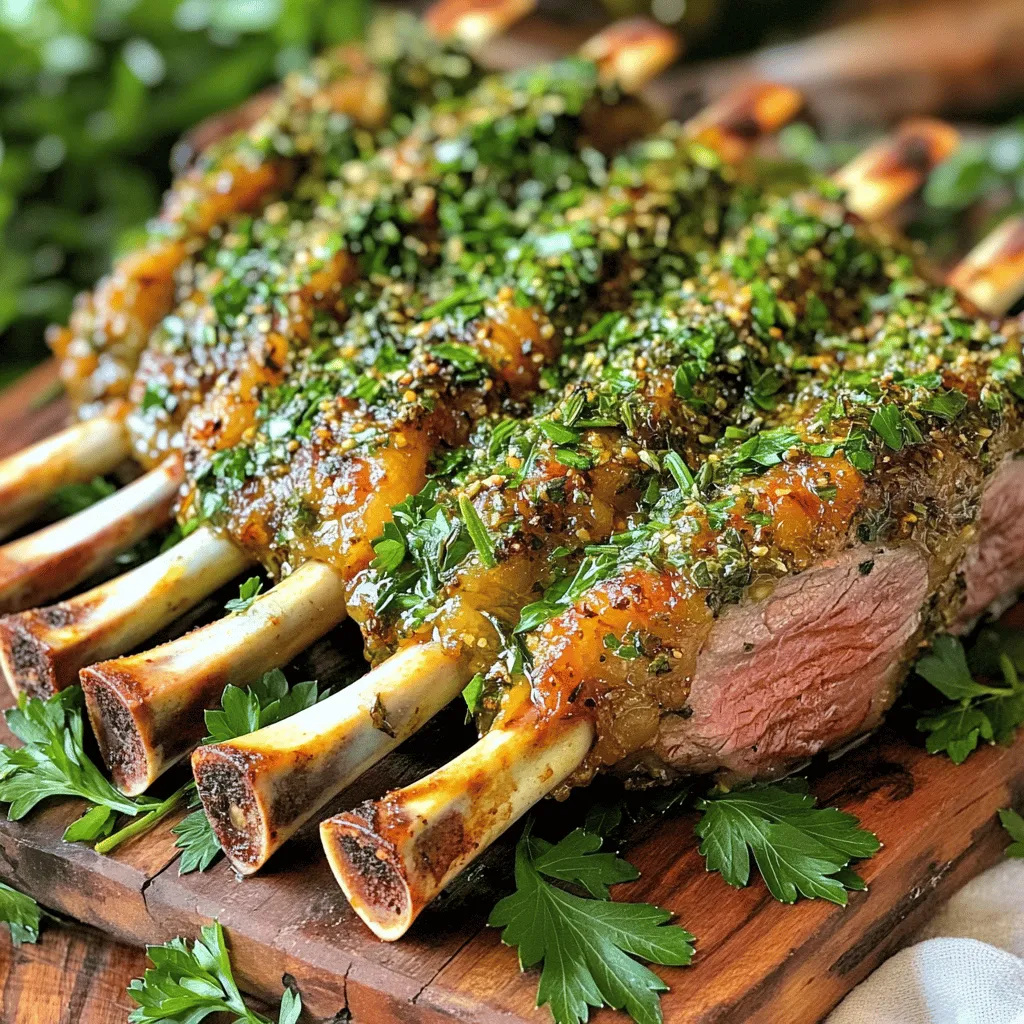
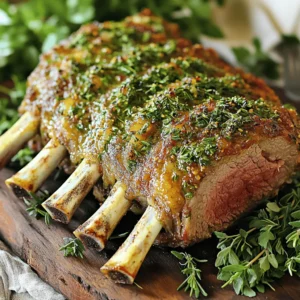
Herb-Crusted Rack of Lamb Delightful Flavor Recipe

If you’re craving a dish that impresses with bold flavors and a stunning presentation, look no further! My Herb-Crusted Rack of Lamb recipe brings together fresh herbs, garlic, and a crispy topping for a meal that will wow your guests. This step-by-step guide will ensure your lamb comes out perfect every time. Let’s dive into the delightful world of flavors and make this dish a star on your table!
Ingredients
Main Ingredients
– Rack of lamb
– Fresh herbs (parsley, thyme, rosemary)
– Garlic and Dijon mustard
Additional Ingredients
– Panko breadcrumbs
– Olive oil
– Salt and black pepper
For this herb-crusted rack of lamb, you’ll need some key ingredients that make the dish shine. First, choose a rack of lamb, which is tender and flavorful. Fresh herbs like parsley, thyme, and rosemary add brightness and depth. Garlic brings a bold taste, while Dijon mustard helps the herbs stick to the meat.
Now, for the additional ingredients! Panko breadcrumbs give a lovely crunch. Olive oil keeps everything moist. Finally, a good pinch of salt and freshly ground black pepper enhances all the flavors.
Step-by-Step Instructions
Preparation
1. Preheat your oven to 400°F (200°C). This helps the rack of lamb cook evenly.
2. Season the rack of lamb with salt and freshly ground black pepper. Cover both sides well.
Herb Mixture
1. In a medium bowl, combine the chopped parsley, thyme, rosemary, and minced garlic.
2. Add a bit more salt and pepper to this herb mix. Make sure it tastes great!
3. Coat the meat side of the lamb with Dijon mustard using a pastry brush. This helps the herbs stick.
Breadcrumb Coating
1. In another bowl, mix panko breadcrumbs with olive oil. Stir until the breadcrumbs are coated.
2. Press the breadcrumb mixture onto the herb-covered lamb. Make sure it sticks well for extra crunch.
Roasting the Lamb
1. Place the rack of lamb bone-side down in a roasting pan. Give it space for even cooking.
2. Roast the lamb in the oven for 25-30 minutes. Use a meat thermometer to check. It should read 130°F (54°C) for medium-rare.
Resting and Slicing
1. After roasting, let the lamb rest for about 10 minutes. This keeps it juicy.
2. Slice between the bones to create individual chops. Enjoy your delicious meal!
Tips & Tricks
Cooking Techniques
– Use a meat thermometer to check doneness. Aim for 130°F (54°C) for medium-rare.
– To get a crispy crust, press the breadcrumb mixture firmly onto the lamb.
Cooking lamb can be tricky, but these tips help ensure you get the best results. A meat thermometer is your best friend. It takes away the guesswork. You want to hit that sweet spot of 130°F for juicy meat. If you don’t have a thermometer, check if the meat feels firm yet slightly springy.
For that perfect crust, packing on the breadcrumbs is key. Press them down hard. This helps them stick and gives that delightful crunch.
Serving Suggestions
– Pair the lamb with seasonal roasted vegetables or a light salad.
– A full-bodied red wine, like Cabernet Sauvignon, complements the dish well.
When it comes to sides, think bright and fresh. Seasonal veggies bring color and taste. A light salad adds a crisp touch. The lamb is rich, so balance it with lighter fare.
Wine choice is just as important. A bold Cabernet Sauvignon stands up to the strong flavors of the lamb. It enhances every bite and sip.
Presentation Ideas
– Arrange the lamb on a large platter for a show-stopping look.
– Drizzle with olive oil and sprinkle fresh herbs for a nice finish.
Presentation makes a big difference. Place the lamb chops neatly on a platter. It looks more inviting. A drizzle of olive oil adds a touch of shine. Fresh herbs not only look good but also boost flavor.
For a complete meal, think about colors and textures. Mixing bright greens with the rich brown of the lamb makes your plate pop.
Variations
Flavor Enhancements
You can change the flavor of your herb-crusted rack of lamb easily. Try adding different herbs like mint or oregano. These can give your dish a fresh twist. You can also use spices like cumin or paprika for extra warmth.
Marinades can boost flavor too. A simple marinade of olive oil, garlic, and lemon juice works wonders. Let the lamb soak in it for a few hours or overnight. This tenderizes the meat and adds zest.
Cooking Methods
You can cook your rack of lamb in various ways. Grilling gives it a smoky taste and beautiful grill marks. Just make sure to monitor the heat to avoid burning.
Roasting is another great method. It allows the lamb to cook evenly and stay juicy. You can also try sous vide. This method cooks the lamb in a water bath at a low temperature. It gives you precise control over doneness and keeps the meat tender.
Dietary Considerations
If you need a gluten-free option, use crushed nuts instead of breadcrumbs. Almonds or pecans work well. They add a nice crunch and flavor.
For a dairy-free version, skip the Dijon mustard. Instead, use a mix of olive oil and balsamic vinegar. This substitution keeps your dish tasty and creamy without dairy.
Storage Info
Leftover Storage
To keep your herb-crusted rack of lamb fresh, refrigerate it right away. Wrap the lamb tightly in plastic wrap or foil. This helps prevent air exposure. Store it in an airtight container for best results. Your leftover lamb will last for about 3 to 4 days in the fridge. After that, the flavors may fade, and the meat can dry out.
Reheating Tips
When you want to enjoy your leftovers, reheating properly is key. Use an oven or skillet for the best results. If using the oven, preheat it to 350°F (175°C). Place the lamb on a baking sheet and cover it with foil. This keeps moisture in and prevents drying out. Heat for about 15 to 20 minutes or until warmed through.
You can also use a skillet. Heat it over medium heat, then add a splash of broth or water. Place the lamb in the skillet, cover it, and warm for about 5 to 10 minutes.
For long-term storage, you can freeze the leftover lamb. Wrap it well in plastic wrap, then in foil. It can last up to 3 months in the freezer. When you’re ready to enjoy it, thaw it in the fridge overnight before reheating.
FAQs
How long should I cook rack of lamb?
You should cook the rack of lamb for about 25 to 30 minutes. This timing gives you a medium-rare finish. Always use an instant-read thermometer. It should read 130°F (54°C) when done. This method ensures your lamb stays juicy and tender.
What is the best temperature for cooking lamb?
The best temperature for cooking lamb is 400°F (200°C). This high heat allows the outside to brown nicely while keeping the inside moist. Cooking at this temperature helps develop a crisp herb crust, adding to the dish’s flavor.
Can I use dried herbs in this recipe?
Yes, you can use dried herbs, but fresh herbs are better. Dried herbs have a more concentrated flavor. If you use dried, reduce the amount by half. Fresh herbs bring out bright flavors and add a lovely scent to the dish.
Is herb-crusted rack of lamb suitable for a special occasion?
Absolutely! Herb-crusted rack of lamb is perfect for special occasions. Its elegant presentation and rich flavors impress guests. This dish makes any dinner feel fancy. Pair it with seasonal sides for a complete experience.
What sides pair best with herb-crusted rack of lamb?
Great sides include roasted vegetables, creamy mashed potatoes, or a fresh salad. Seasonal greens enhance the meal’s freshness. You can also add a light sauce or a drizzle of olive oil for extra flavor. For a special touch, consider a glass of red wine.
This blog post guides you through making a delicious herb-crusted rack of lamb. You learned about the key ingredients and how to prepare the dish step by step. I shared tips for perfect cooking and creative serving ideas to impress your guests. You also discovered variations to suit different tastes and dietary needs. Finally, I covered storage and reheating tips for leftovers. Enjoy this flavorful dish at your next meal, and experiment until you find your perfect version.
![- 1 large head of cauliflower, cut into bite-sized florets - 1 cup shredded sharp cheddar cheese - 1/2 cup grated Parmesan cheese, divided - 1 cup heavy cream - 2 cloves garlic, finely minced - 1/2 teaspoon smoked paprika - 1/2 teaspoon freshly ground black pepper - 1 teaspoon salt, or to taste - 1/2 teaspoon onion powder - 1/4 cup seasoned breadcrumbs (optional, for added crunch) - Fresh parsley, chopped, for garnish The key to a great cheesy cauliflower bake lies in its simple yet flavorful ingredients. First, you need a large head of cauliflower. Cut it into bite-sized florets. This helps it cook evenly. Next, gather your cheeses. I love using sharp cheddar for its strong taste and Parmesan for a hint of nutty flavor. Heavy cream is a must for that rich, creamy texture. Don't forget the garlic! Mince two cloves finely for a burst of flavor. Seasoning is important, too. Smoked paprika adds warmth, while black pepper and onion powder enhance the dish. If you want a crunchy topping, use seasoned breadcrumbs. They give the bake a nice texture. Finally, finish with fresh parsley. It brings color and freshness. These ingredients come together to create a comforting dish that everyone will enjoy. Check out the Full Recipe for more details! - Preheat the oven to 375°F (190°C). - Boil the cauliflower florets. Start by preheating your oven. This step is key to getting that nice, golden top. While the oven heats, take a pot and fill it with water. Add a pinch of salt. Bring the water to a boil. Once boiling, add the cauliflower florets. Cook them for about 5 to 7 minutes. You want them tender but still a bit firm. Drain the cauliflower and set it aside. - Combine heavy cream, garlic, and spices in a saucepan. - Stir in shredded cheddar and Parmesan cheese until smooth. Now, let’s make the cheese sauce. In a medium saucepan, pour in the heavy cream. Add the minced garlic, salt, black pepper, smoked paprika, and onion powder. Heat it on medium. Stir this mix gently, keeping it warm but don’t let it boil. Once warm, slowly add the shredded cheddar and half of the grated Parmesan cheese. Stir until the cheese melts and the sauce is smooth and creamy. - Mix the cauliflower with the cheese sauce. - Transfer to a baking dish and top with breadcrumbs. In a large bowl, mix the cooked cauliflower with your cheese sauce. Make sure every floret gets coated with that cheesy goodness. Next, take a baking dish and lightly grease it. Pour the cauliflower mixture into the dish. Spread it evenly. If you want a crunchy topping, sprinkle the remaining grated Parmesan cheese and breadcrumbs on top. - Bake until golden brown and bubbly. - Garnish and serve. Place the baking dish in the preheated oven. Bake it for about 20 to 25 minutes. You want the top to be golden brown and bubbly. When it's done, take it out and let it cool for a few minutes. For a nice touch, sprinkle some freshly chopped parsley on top before serving. Enjoy your cheesy cauliflower bake! For the full recipe, refer to the earlier sections. To make the best cheesy cauliflower bake, cook the cauliflower just right. Boil it for about 5-7 minutes. You want it tender but still slightly firm. This helps keep the florets intact when you mix them with the cheese sauce. For the cheese sauce, ensure it is smooth. Stir the heavy cream and garlic over medium heat. Add the cheese slowly while stirring. This will help you avoid lumps. A smooth sauce coats the cauliflower evenly, giving it that creamy goodness. Don't be afraid to experiment with flavors. A little smoked paprika adds a nice touch. You can also try different cheeses. A mix of cheddar and Gruyère can elevate your dish. Using fresh herbs for garnish makes a big difference. Chopped parsley adds color and freshness. You can also use chives for an onion flavor boost. These small touches can turn a great dish into a memorable one. Think about what pairs well with cheesy cauliflower bake. It goes great with roasted chicken or grilled fish. You can also serve it with a crisp salad for added crunch. This dish is perfect for gatherings. Serve it at family dinners or potlucks. It is a great side dish for holidays too. Everyone loves a warm, cheesy treat! For the full recipe, check the instructions above. {{image_4}} You can make this dish lighter with a few easy swaps. - Low-fat cheese options: Try using part-skim mozzarella or low-fat cheddar. - Alternative non-dairy cream substitutes: Use almond milk or coconut cream for a dairy-free choice. These swaps keep the taste rich while cutting calories and fat. Want to spice it up? There are plenty of ways to add flavor. - Adding cooked bacon or sausage for extra protein: Crumbled crispy bacon brings a smoky touch. - Introducing vegetables like spinach or bell peppers: These add color and nutrients to your bake. Feel free to mix and match your favorite proteins and veggies for a unique dish. How you serve this dish can change the experience. - Individual ramekins for portion control: They make for a fun and fancy presentation. - Making it a main dish with protein additions: Pair it with chicken or fish for a complete meal. These options help you customize your cheesy cauliflower bake for any occasion. After enjoying your cheesy cauliflower bake, you might have some leftovers. To keep them fresh, place them in an airtight container. This helps lock in moisture and flavor. You can store the leftovers in the fridge for up to three days. When you’re ready to eat again, just scoop out what you need. Want to save some for later? Freezing is a great option. Cool the dish completely first. Then, transfer it to a freezer-safe container. Make sure to label it with the date. You can freeze it for up to three months. When you’re ready to enjoy it again, thaw it in the fridge overnight. For reheating, you can use the oven. Preheat it to 350°F (175°C). Cover the dish with foil to keep it moist. Bake for about 25-30 minutes, or until heated through. If you want a crispy top, remove the foil for the last 10 minutes. Enjoy your cheesy goodness! For the full recipe, click here [Full Recipe]. Yes, you can prepare cheesy cauliflower bake ahead of time. Start by cooking the cauliflower and making the cheese sauce. After mixing them together, place the dish in the fridge. Cover it tightly with plastic wrap or foil to keep it fresh. When ready to bake, remove it from the fridge. Bake it straight from the cold for about 10 minutes longer than the usual time. This way, you enjoy a warm, cheesy treat without a lot of last-minute work. Cheesy cauliflower bake pairs well with many dishes. Here are some great options: - Grilled chicken: The savory chicken complements the creamy bake. - Steak: A juicy steak adds richness to the meal. - Salad: A fresh garden salad balances the heaviness of the bake. - Roasted vegetables: Crisp, roasted veggies add color and flavor. These side dishes can make your meal feel complete and delicious. Yes! Cheesy cauliflower bake is perfect for vegetarians. It uses cauliflower, cheese, and cream, all plant-based. Just ensure that the cheese options are vegetarian-friendly. Many cheeses are made without animal rennet, making them suitable for vegetarian diets. This dish is a tasty way to enjoy a healthy meal while meeting dietary needs. To sum up, this blog covered how to make a delicious cheesy cauliflower bake. We talked about required ingredients, step-by-step instructions, and tips for great results. You learned about variations, healthy swaps, and how to store leftovers. This dish is not just tasty; it is easy to make and perfect for many meals. Try it yourself for a comforting treat that everyone will enjoy. Remember, the best part is making it your own by adding what you love!](https://goldendishy.com/wp-content/uploads/2025/06/4f60bbbb-6786-4607-99e4-9a4e6c15f60e-768x768.webp)