31. Lemon Garlic Butter Shrimp Flavorful Dinner Recipe
. - Heat your skillet over medium heat. - Add the unsalted butter and let it melt. - Once melted, watch for it to bubble gently. - Next, add the minced garlic. - Sauté the garlic for about one minute. - Stir often until it smells great and turns lightly golden. - Now, add the peeled and deveined shrimp to the skillet. - Season the shrimp with salt and pepper. - If you like spice, sprinkle in some red pepper flakes. - Cook the shrimp for 2-3 minutes on one side. - Flip the shrimp to cook the other side evenly. - Add the lemon zest and juice as they cook. - Keep cooking until the shrimp are opaque. - Remove the skillet from the heat. - Stir in the chopped parsley for a fresh taste. - Serve the shrimp over warm pasta or fluffy rice. - Drizzle the leftover lemon-garlic butter sauce on top for extra flavor. - For a lovely presentation, you can garnish with lemon wedges. For more details, check the Full Recipe. - Achieving the perfect shrimp texture: To get tender shrimp, avoid overcooking. Cook them just until they turn pink. This usually takes about 2-3 minutes per side. - Best practices for sautéing garlic: Start with a hot skillet and melted butter. Add minced garlic and stir for about 1 minute. Keep an eye on it so it doesn’t burn; burnt garlic tastes bitter. - Presentation ideas for a beautiful dish: Serve the shrimp in shallow bowls to make it look elegant. Add a sprinkle of parsley on top for color. Include lemon wedges on the side for a fresh touch. - Pairing options with side dishes: Lemon garlic butter shrimp goes well with cooked pasta or fluffy rice. You can also serve it with a side salad for a light meal. - Additional herbs or spices to try: Consider adding fresh basil or thyme for extra flavor. These herbs pair well with lemon and shrimp. - Adjusting spice levels with red pepper flakes: If you like heat, add more red pepper flakes. Start with a teaspoon and adjust to your taste. This will make your dish more exciting! For more details, check the Full Recipe. {{image_4}} You can change the seafood in this recipe. Try scallops or even crab. These swaps add new tastes while keeping the dish simple. If you want a healthier fat, swap butter for olive oil. Olive oil works well and gives a light, fresh flavor. To mix things up, add other citrus flavors. Lime or orange juice can brighten the dish. You can also infuse the recipe with herbs. Try basil or thyme for a different twist. These herbs can make the dish feel more seasonal. If you need a gluten-free option, serve the shrimp over quinoa or zucchini noodles. Both are great gluten-free choices. For a low-calorie meal, cut back on the butter. You can use less or replace it with vegetable broth. This keeps the dish tasty but lighter. After enjoying your lemon garlic butter shrimp, store any leftovers in the fridge. Use an airtight container to keep them fresh. These shrimp will stay good for about 2-3 days. Always check for freshness before eating. To freeze lemon garlic butter shrimp, let them cool completely first. Place them in a freezer-safe bag, removing as much air as possible. They can last for about 2 months in the freezer. When you're ready to eat, thaw the shrimp in the fridge overnight. Reheat them gently in a skillet over low heat. This keeps them tender and tasty. Always ensure your shrimp is safe to eat after storage. Check for any off smells or changes in color. If the shrimp look slimy or smell bad, it’s best to discard them. Trust your senses to keep your meals safe and enjoyable. Cook shrimp for 4-6 minutes. They cook quickly. In a hot skillet, shrimp turn pink when done. Avoid overcooking; it makes them tough. Yes, you can use frozen shrimp. Thaw them first for best results. Place them in cold water for about 15 minutes. This way, they cook evenly and taste fresh. I love serving lemon garlic butter shrimp with: - Cooked pasta - Fluffy rice - Fresh salad - Garlic bread These sides balance the rich flavors well. Check for color and texture. Cooked shrimp turn pink and opaque. They should feel firm but not hard. When in doubt, cut one open. It should be white inside, not translucent. You’ve learned how to make lemon garlic butter shrimp. We covered essential ingredients, easy steps, tips for cooking, and variations to try. Remember to adjust flavors to your taste and pair with your favorite sides. Store leftovers safely for later enjoyment. Cooking shrimp can be simple and satisfying. Enjoy every bite, and don't hesitate to experiment. Whether for a cozy night in or impressing guests, this dish shines every time. Let your kitchen be a place of fun and flavor!](https://goldendishy.com/wp-content/uploads/2025/06/8ad1771e-7d26-4dd4-879b-9e464bbb0647.webp)
Looking for a quick and tasty dinner? My Lemon Garlic Butter Shrimp recipe is here to save the day! With just a few simple ingredients, you can whip up a mouthwatering dish that shines with fresh flavors. Perfectly sautéed shrimp combined with garlic and lemon make this a dinner winner. Ready to impress your family and friends? Let’s dive into the easy steps to create a flavorful meal they’ll love!
Ingredients
Main Ingredients
– 1 pound large shrimp, peeled and deveined
– 4 tablespoons unsalted butter
– 4 cloves garlic, finely minced
– Zest and juice of 1 fresh lemon
Seasonings
– 1 teaspoon red pepper flakes (optional)
– Salt and freshly ground black pepper
– 2 tablespoons fresh parsley, finely chopped
Serving Suggestions
– Cooked pasta or rice, for serving
– Additional garnish options (e.g. parsley, lemon wedges)
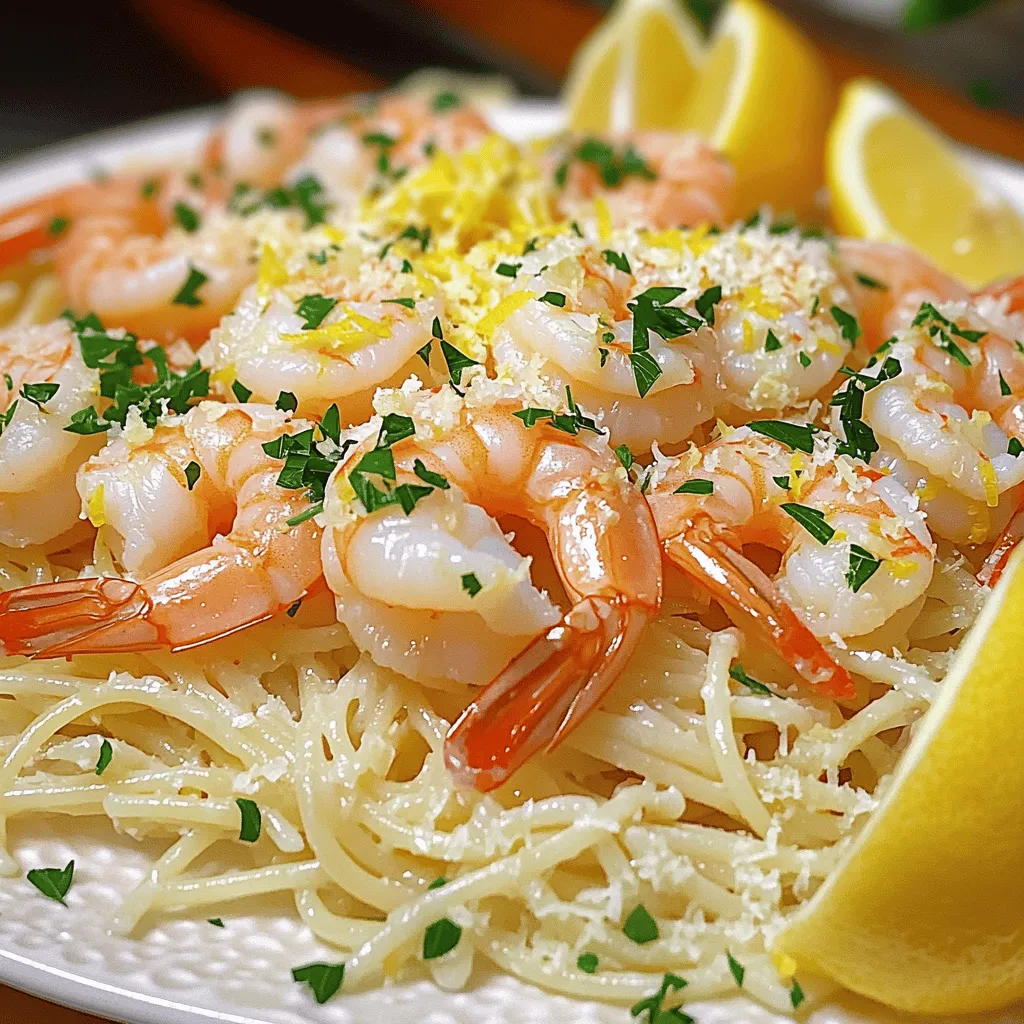
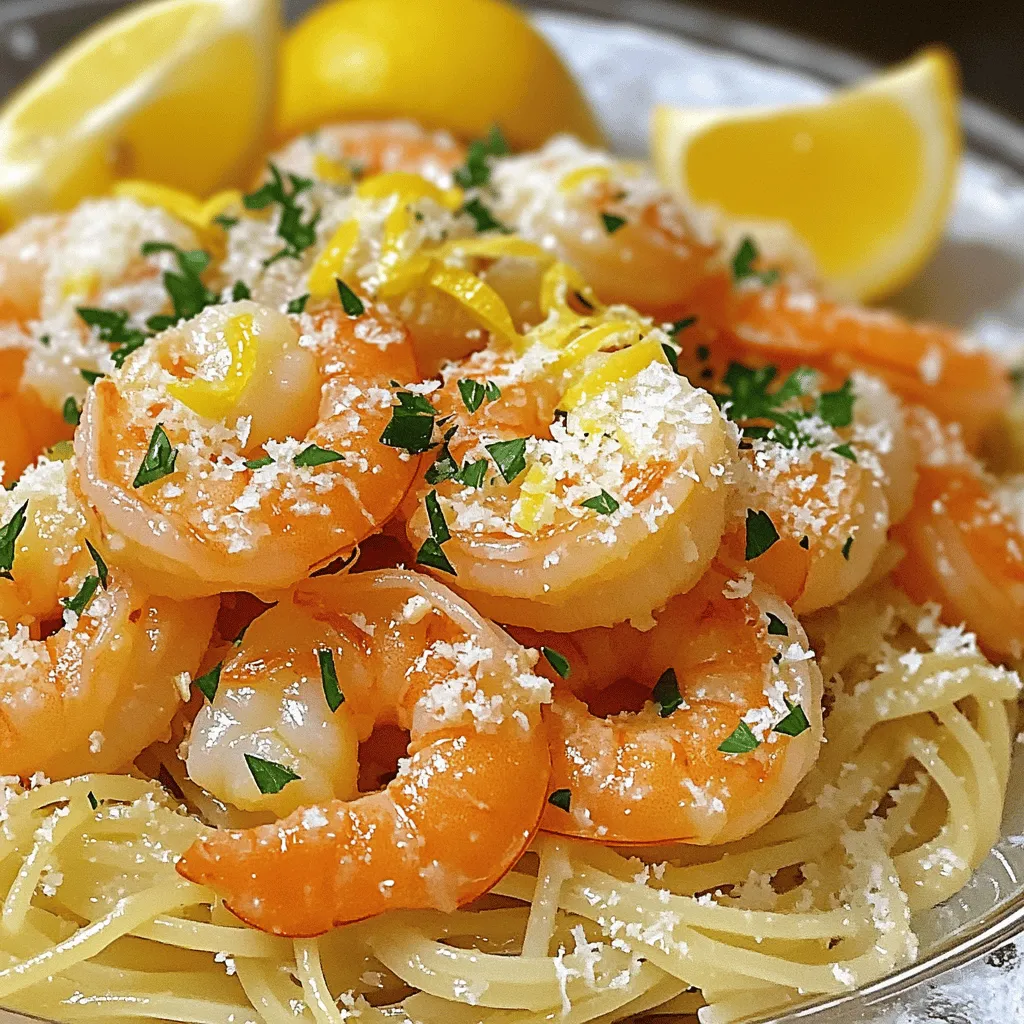
Lemon garlic butter shrimp is a simple dish with big flavor! Start with fresh shrimp. You want them large, peeled, and deveined for the best taste. The butter gives richness, while garlic adds a fragrant punch. Fresh lemon zest and juice brighten the dish. These ingredients work well together. You can also add red pepper flakes if you like heat.
Now, let’s talk about seasonings. Salt and black pepper enhance the flavors. Fresh parsley adds a pop of color and freshness. When you serve this dish, warm pasta or rice makes a great base. You can also garnish with lemon wedges and extra parsley. This creates a lovely presentation.
Step-by-Step Instructions
Preparing the Base
– Heat your skillet over medium heat.
– Add the unsalted butter and let it melt.
– Once melted, watch for it to bubble gently.
– Next, add the minced garlic.
– Sauté the garlic for about one minute.
– Stir often until it smells great and turns lightly golden.
Cooking the Shrimp
– Now, add the peeled and deveined shrimp to the skillet.
– Season the shrimp with salt and pepper.
– If you like spice, sprinkle in some red pepper flakes.
– Cook the shrimp for 2-3 minutes on one side.
– Flip the shrimp to cook the other side evenly.
– Add the lemon zest and juice as they cook.
– Keep cooking until the shrimp are opaque.
Finishing Touches
– Remove the skillet from the heat.
– Stir in the chopped parsley for a fresh taste.
– Serve the shrimp over warm pasta or fluffy rice.
– Drizzle the leftover lemon-garlic butter sauce on top for extra flavor.
– For a lovely presentation, you can garnish with lemon wedges.
Tips & Tricks
Cooking Tips
– Achieving the perfect shrimp texture: To get tender shrimp, avoid overcooking. Cook them just until they turn pink. This usually takes about 2-3 minutes per side.
– Best practices for sautéing garlic: Start with a hot skillet and melted butter. Add minced garlic and stir for about 1 minute. Keep an eye on it so it doesn’t burn; burnt garlic tastes bitter.
Serving Tips
– Presentation ideas for a beautiful dish: Serve the shrimp in shallow bowls to make it look elegant. Add a sprinkle of parsley on top for color. Include lemon wedges on the side for a fresh touch.
– Pairing options with side dishes: Lemon garlic butter shrimp goes well with cooked pasta or fluffy rice. You can also serve it with a side salad for a light meal.
Pro Tips for Flavor Enhancement
– Additional herbs or spices to try: Consider adding fresh basil or thyme for extra flavor. These herbs pair well with lemon and shrimp.
– Adjusting spice levels with red pepper flakes: If you like heat, add more red pepper flakes. Start with a teaspoon and adjust to your taste. This will make your dish more exciting!

Variations
Ingredient Swaps
You can change the seafood in this recipe. Try scallops or even crab. These swaps add new tastes while keeping the dish simple. If you want a healthier fat, swap butter for olive oil. Olive oil works well and gives a light, fresh flavor.
Flavor Variations
To mix things up, add other citrus flavors. Lime or orange juice can brighten the dish. You can also infuse the recipe with herbs. Try basil or thyme for a different twist. These herbs can make the dish feel more seasonal.
Dietary Modifications
If you need a gluten-free option, serve the shrimp over quinoa or zucchini noodles. Both are great gluten-free choices. For a low-calorie meal, cut back on the butter. You can use less or replace it with vegetable broth. This keeps the dish tasty but lighter.
Storage Info
Refrigeration
After enjoying your lemon garlic butter shrimp, store any leftovers in the fridge. Use an airtight container to keep them fresh. These shrimp will stay good for about 2-3 days. Always check for freshness before eating.
Freezing
To freeze lemon garlic butter shrimp, let them cool completely first. Place them in a freezer-safe bag, removing as much air as possible. They can last for about 2 months in the freezer.
When you’re ready to eat, thaw the shrimp in the fridge overnight. Reheat them gently in a skillet over low heat. This keeps them tender and tasty.
Best Practices for Safety
Always ensure your shrimp is safe to eat after storage. Check for any off smells or changes in color. If the shrimp look slimy or smell bad, it’s best to discard them. Trust your senses to keep your meals safe and enjoyable.
FAQs
How long do I cook shrimp?
Cook shrimp for 4-6 minutes. They cook quickly. In a hot skillet, shrimp turn pink when done. Avoid overcooking; it makes them tough.
Can I use frozen shrimp?
Yes, you can use frozen shrimp. Thaw them first for best results. Place them in cold water for about 15 minutes. This way, they cook evenly and taste fresh.
What can I serve with lemon garlic butter shrimp?
I love serving lemon garlic butter shrimp with:
– Cooked pasta
– Fluffy rice
– Fresh salad
– Garlic bread
These sides balance the rich flavors well.
How to tell if shrimp are cooked?
Check for color and texture. Cooked shrimp turn pink and opaque. They should feel firm but not hard. When in doubt, cut one open. It should be white inside, not translucent.
You’ve learned how to make lemon garlic butter shrimp. We covered essential ingredients, easy steps, tips for cooking, and variations to try. Remember to adjust flavors to your taste and pair with your favorite sides. Store leftovers safely for later enjoyment. Cooking shrimp can be simple and satisfying. Enjoy every bite, and don’t hesitate to experiment. Whether for a cozy night in or impressing guests, this dish shines every time. Let your kitchen be a place of fun and flavor!
. - Heat your skillet over medium heat. - Add the unsalted butter and let it melt. - Once melted, watch for it to bubble gently. - Next, add the minced garlic. - Sauté the garlic for about one minute. - Stir often until it smells great and turns lightly golden. - Now, add the peeled and deveined shrimp to the skillet. - Season the shrimp with salt and pepper. - If you like spice, sprinkle in some red pepper flakes. - Cook the shrimp for 2-3 minutes on one side. - Flip the shrimp to cook the other side evenly. - Add the lemon zest and juice as they cook. - Keep cooking until the shrimp are opaque. - Remove the skillet from the heat. - Stir in the chopped parsley for a fresh taste. - Serve the shrimp over warm pasta or fluffy rice. - Drizzle the leftover lemon-garlic butter sauce on top for extra flavor. - For a lovely presentation, you can garnish with lemon wedges. For more details, check the Full Recipe. - Achieving the perfect shrimp texture: To get tender shrimp, avoid overcooking. Cook them just until they turn pink. This usually takes about 2-3 minutes per side. - Best practices for sautéing garlic: Start with a hot skillet and melted butter. Add minced garlic and stir for about 1 minute. Keep an eye on it so it doesn’t burn; burnt garlic tastes bitter. - Presentation ideas for a beautiful dish: Serve the shrimp in shallow bowls to make it look elegant. Add a sprinkle of parsley on top for color. Include lemon wedges on the side for a fresh touch. - Pairing options with side dishes: Lemon garlic butter shrimp goes well with cooked pasta or fluffy rice. You can also serve it with a side salad for a light meal. - Additional herbs or spices to try: Consider adding fresh basil or thyme for extra flavor. These herbs pair well with lemon and shrimp. - Adjusting spice levels with red pepper flakes: If you like heat, add more red pepper flakes. Start with a teaspoon and adjust to your taste. This will make your dish more exciting! For more details, check the Full Recipe. {{image_4}} You can change the seafood in this recipe. Try scallops or even crab. These swaps add new tastes while keeping the dish simple. If you want a healthier fat, swap butter for olive oil. Olive oil works well and gives a light, fresh flavor. To mix things up, add other citrus flavors. Lime or orange juice can brighten the dish. You can also infuse the recipe with herbs. Try basil or thyme for a different twist. These herbs can make the dish feel more seasonal. If you need a gluten-free option, serve the shrimp over quinoa or zucchini noodles. Both are great gluten-free choices. For a low-calorie meal, cut back on the butter. You can use less or replace it with vegetable broth. This keeps the dish tasty but lighter. After enjoying your lemon garlic butter shrimp, store any leftovers in the fridge. Use an airtight container to keep them fresh. These shrimp will stay good for about 2-3 days. Always check for freshness before eating. To freeze lemon garlic butter shrimp, let them cool completely first. Place them in a freezer-safe bag, removing as much air as possible. They can last for about 2 months in the freezer. When you're ready to eat, thaw the shrimp in the fridge overnight. Reheat them gently in a skillet over low heat. This keeps them tender and tasty. Always ensure your shrimp is safe to eat after storage. Check for any off smells or changes in color. If the shrimp look slimy or smell bad, it’s best to discard them. Trust your senses to keep your meals safe and enjoyable. Cook shrimp for 4-6 minutes. They cook quickly. In a hot skillet, shrimp turn pink when done. Avoid overcooking; it makes them tough. Yes, you can use frozen shrimp. Thaw them first for best results. Place them in cold water for about 15 minutes. This way, they cook evenly and taste fresh. I love serving lemon garlic butter shrimp with: - Cooked pasta - Fluffy rice - Fresh salad - Garlic bread These sides balance the rich flavors well. Check for color and texture. Cooked shrimp turn pink and opaque. They should feel firm but not hard. When in doubt, cut one open. It should be white inside, not translucent. You’ve learned how to make lemon garlic butter shrimp. We covered essential ingredients, easy steps, tips for cooking, and variations to try. Remember to adjust flavors to your taste and pair with your favorite sides. Store leftovers safely for later enjoyment. Cooking shrimp can be simple and satisfying. Enjoy every bite, and don't hesitate to experiment. Whether for a cozy night in or impressing guests, this dish shines every time. Let your kitchen be a place of fun and flavor!](https://goldendishy.com/wp-content/uploads/2025/06/8ad1771e-7d26-4dd4-879b-9e464bbb0647-300x300.webp)


![When making vegetable and bean chili, gather these items first: - 1 tablespoon olive oil - 1 large onion, finely diced - 3 cloves garlic, minced - 1 bell pepper (red or yellow), chopped into bite-sized pieces - 1 medium carrot, diced into small cubes - 1 medium zucchini, diced - 1 cup corn kernels (fresh or frozen will work) - 1 can (15 oz) black beans, rinsed thoroughly and drained - 1 can (15 oz) kidney beans, rinsed thoroughly and drained - 1 can (15 oz) diced tomatoes with their juices - 2 cups vegetable broth (low sodium recommended) - 2 tablespoons chili powder - 1 teaspoon ground cumin - 1 teaspoon smoked paprika - Salt and pepper to taste - Fresh cilantro, chopped (for garnish) - Avocado slices (for serving, optional) These ingredients create a rich, hearty dish that warms you up. You can change this recipe to fit your taste. Here are some ideas: - Add more beans, like pinto or cannellini beans. - Swap in different vegetables, such as spinach or sweet potatoes. - Mix in some hot peppers for a spicy kick. - Use different herbs, like oregano or thyme, for extra flavor. - Top with cheese or sour cream if you prefer. These options let you make the chili your own! This vegetable and bean chili is not only tasty but also healthy. Here’s a quick breakdown of its nutrition: - Calories: Around 250 per serving - Protein: About 12 grams - Carbohydrates: Roughly 40 grams - Fiber: Nearly 12 grams - Fat: Around 5 grams This chili is high in fiber and protein, making it a satisfying meal. You can enjoy it guilt-free! For the full recipe, check out the [Full Recipe]. First, heat 1 tablespoon of olive oil in a large pot over medium heat. When the oil is hot, add 1 large onion, finely diced. Cook the onion for about 5 minutes. It should turn soft and clear. Next, add 3 minced garlic cloves. Stir the garlic in for 1 to 2 minutes. It should smell great and turn light gold. Now, add in a chopped bell pepper, a diced carrot, and a diced zucchini. Cook these veggies for 5 to 7 minutes. Stir them often as they start to soften and brighten. Then, mix in 1 cup of corn kernels. Let them cook for an extra 3 minutes. This adds sweet flavor and color. Next, add 1 can each of black beans and kidney beans, both rinsed and drained. Then, pour in 1 can of diced tomatoes with their juices and 2 cups of vegetable broth. Sprinkle in 2 tablespoons of chili powder, 1 teaspoon of ground cumin, and 1 teaspoon of smoked paprika. Stir everything together well. Increase the heat until it boils. Once boiling, lower the heat to let it simmer. Keep it uncovered for about 30 minutes. Stir occasionally to avoid sticking. Taste and add salt and pepper as you like. Once thickened, remove it from the heat. Let it sit for a few minutes. This helps the flavors mix well. Now, ladle the chili into bowls. You can top each bowl with freshly chopped cilantro. If you want, add avocado slices for a creamy finish. Check out the Full Recipe for more details! To boost the flavor of your vegetable and bean chili, try these tips: - Use Fresh Herbs: Fresh cilantro or parsley adds a bright taste. - Add Citrus: A squeeze of lime or lemon brightens the dish. - Incorporate Spices: Experiment with chipotle powder for heat or oregano for depth. You can also let the chili sit for a few hours or overnight. This resting time lets the flavors meld and deepen. If your chili is too thick, add more vegetable broth. Start with a half cup and stir well. If it’s too thin, simmer it longer. This helps the liquid reduce and thicken. You can also mash some beans to make the chili creamier. Serve your chili with various toppings. Here are some ideas: - Sliced avocado for creaminess - Shredded cheese for a cheesy touch - Crème fraîche or sour cream for richness - Crispy tortilla chips for crunch Pair your chili with warm bread or cornbread on the side. It’s a great way to soak up every delicious drop. For the full recipe, check out the robust vegetable & bean chili. Enjoy your hearty comfort food delight! {{image_4}} If you want a vegan chili, this recipe is already perfect! All the ingredients are plant-based. For gluten-free versions, check your vegetable broth and spices. Most brands are safe, but read labels to be sure. You can switch to gluten-free grains like quinoa or rice as a side. Feel free to change up the beans or veggies. If you don’t have black beans, use pinto or cannellini beans. You can also mix in lentils for added protein. For vegetables, try adding sweet potatoes, spinach, or even kale. This adds flavor and nutrition to your dish. To make your chili spicy, add more chili powder or diced jalapeños. You can also use hot sauce for an extra kick. If you prefer mild flavors, reduce the chili powder and smoked paprika. This way, everyone can enjoy their bowl of chili. For the full recipe, check out the detailed instructions and ingredient list! To keep your vegetable and bean chili fresh, let it cool first. Once cool, store it in an airtight container. Place the container in the fridge. Your chili will stay good for about 3 to 5 days. If you want to enjoy it later, freezing is a great option. You can freeze your chili for up to 3 months. First, let it cool completely. Then, pour it into a freezer-safe container. Leave some space at the top, as the chili will expand when frozen. Label the container with the date. This way, you will know when to use it. When you are ready to eat, thaw the chili in the fridge overnight. For quick reheating, use the microwave or the stove. If microwaving, heat in short bursts, stirring in between. On the stove, warm it over medium heat until it bubbles. Always check that it is hot all the way through before serving. Enjoy your hearty comfort food delight! For the full recipe, check out the detailed steps above. Yes, you can use canned beans. Canned beans save time and effort. Just rinse them well to remove excess sodium. For this chili, I recommend black beans and kidney beans. They add great texture and flavor. Vegetable bean chili lasts about 4 to 5 days in the fridge. Make sure to store it in an airtight container. The flavors actually improve over time, making it even tastier! You can serve this chili with many sides. Try crispy tortilla chips for crunch. Warm bread or cornbread pairs well too. Add a dollop of sour cream or Greek yogurt for creaminess. Don't forget fresh avocado slices for extra flavor! Check the Full Recipe for more serving ideas. This blog post covered all you need for a great vegetable bean chili. We explored the ingredients, showing how to customize it and understand its nutrition. The step-by-step instructions guide you through cooking, while tips enhance its flavor. Variations help you adapt to different diets. Finally, we discussed storage methods and answered common questions. Cooking a tasty chili doesn't have to be hard. You now have tools to make it your own and enjoy it for days. Happy cooking!](https://goldendishy.com/wp-content/uploads/2025/06/710b1993-2890-4a51-b686-850c3b1d6686-768x768.webp)